了解Spring Boot2自动配置原理
1、SpringBoot特点
1.1、依赖管理
1.父项目做依赖管理
依赖管理
<parent><groupId>org.springframework.boot</groupId><artifactId>spring-boot-starter-parent</artifactId><version>2.3.4.RELEASE</version>
</parent>他的父项目<parent><groupId>org.springframework.boot</groupId><artifactId>spring-boot-dependencies</artifactId><version>2.3.4.RELEASE</version></parent>里面几乎声明了所有开发中常用的依赖的版本号,所以有自动版本仲裁机制
2.开发导入starter场景启动器
1、见到很多 *spring-boot-starter- **: * 就某种场景
2、只要引入starter,这个场景的所有常规需要的依赖我们都自动引入
3、SpringBoot所有支持的场景
https://docs.spring.io/spring-boot/docs/current/reference/html/using-spring-boot.html#using-boot-starter
4、见到的 *-spring-boot-starter : 第三方为我们提供的简化开发的场景启动器。
5、所有场景启动器最底层的依赖
<dependency><groupId>org.springframework.boot</groupId><artifactId>spring-boot-starter</artifactId><version>2.3.4.RELEASE</version><scope>compile</scope>
</dependency>
3.无需关注版本号,自动版本仲裁
1、引入依赖默认都可以不写版本.Maven会根据就近原则,如果自己修改了版本号就使用修改后的,如果没有则使用父亲默认的.
2、引入非版本仲裁的jar,要写版本号。
4.可以修改默认版本号
1、查看spring-boot-dependencies里面规定当前依赖的版本 用的 key。
2、在当前pom.xml项目里面重写配置
<properties><mysql.version>5.1.43</mysql.version></properties>
1.2、自动配置
1.自动配好Tomcat
-
- 引入Tomcat依赖。
- 配置Tomcat
<dependency><groupId>org.springframework.boot</groupId><artifactId>spring-boot-starter-tomcat</artifactId><version>2.3.4.RELEASE</version><scope>compile</scope></dependency>
2.自动配好SpringMVC
- 引入SpringMVC全套组件
- 自动配好SpringMVC常用组件(功能)
3.自动配好Web常见功能
- SpringBoot帮我们配置好了所有web开发的常见场景,如字符编码,dispatcherServlet…
4.默认的包结构
-
主程序所在包及其下面的所有子包里面的组件都会被默认扫描进来,这样就无需之前的包扫描配置
-
想要改变扫描路径,可以 @SpringBootApplication(scanBasePackages=“com.atguigu”) 或者@ComponentScan 指定扫描路径(后期再讲如何做)
@SpringBootApplication
等同于
@SpringBootConfiguration
@EnableAutoConfiguration
@ComponentScan("com.rg.boot")
5.各种配置拥有默认值
-
默认配置最终都是映射到某个类的属性上,如:spring.servlet.multipart.max-file-size=10MB ,将对应MultipartProperties中的maxFileSize属性.
-
配置文件的值最终会绑定每个类上,这个类会在容器中创建对象
6.按需加载所有自动配置项
-
-springboot非常多的starter, 引入了哪些场景这个场景的自动配置才会开启 ,如在没有使用批处理时,批处理里面有的类是报错的,引入之后才不会报错.
-
SpringBoot所有的自动配置功能都在 spring-boot-autoconfigure 包里.
-
…
2、容器功能
2.1、组件添加
1、@Configuration
1.配置类里面使用@Bean标注在方法上给容器注册组件,默认也是单实例的
2.配置类本身也是组件
#############################实体类##############################
public class User {private String name;private Integer age;无参,有参,构造,toString...
}
public class Pet {private String name;无参,有参,构造,toString...
}#############################配置类##############################
/**** 2.配置类本身也是组件**/
@Configuration //告诉SpringBoot这是一个配置类 == 配置文件
public class MyConfig {@Bean//给容器中添加组件.以方法名作为组件的id.返回类型就是组件类型.返回的值,就是组件在容器中的实例.public User user01(){return new User("zhangsan", 18);}@Bean("tom")public Pet tomcatPet(){return new Pet("tomcat");}
}#############################测试类##############################public static void main(String[] args) {//1.返回我们的IOC容器ConfigurableApplicationContext run = SpringApplication.run(MainApplication.class, args);//2.查看容器里面的组件String[] names = run.getBeanDefinitionNames();for (String name : names) {System.out.println(name);}//3.从容器中获取组件Pet tom01 = run.getBean("tom", Pet.class);Pet tom02 = run.getBean("tom", Pet.class);System.out.println(tom01==tom02);//4.MyConfig本身也是一个组件MyConfig bean = run.getBean(MyConfig.class);System.out.println(bean);}
3. proxyBeanMethods :代理bean的方法
@Configuration(proxyBeanMethods=true) 时:调用MyConfig里面的类的注册方法,将在IOC容器中注册该类的代理对象.之后无论调用多少次注册方法,获取到的都是之前注册在容器中的单例对象.
MyConfig bean = run.getBean(MyConfig.class);
System.out.println(bean);//com.rg.boot.config.MyConfig$$EnhancerBySpringCGLIB$$bc5b911c@22d6cac2 获取到的MyConfig就是一个CGlib类型的代理对象.
//代理对象调方法,springboot总会检查这个组件是否在容器中,如果没有就创建;如果有则直接拿来用.保持组建的单例性.
User user = bean.user01();
User user1 = bean.user01();
System.out.println(user==user1);//运行结果为true;
@Configuration(proxyBeanMethods=false) ,获取到的是普通对象每次调用都要进行创建.上述运行结果为false.
4.Full模式(全配置)与Lite(轻量级)模式
Full(proxyBeanMethods = true)、【保证每个@Bean方法被调用多少次返回的组件都是单实例的】
Lite(proxyBeanMethods = false)【每个@Bean方法被调用多少次返回的组件都是新创建的】
可以利用Full模式解决组件依赖的问题.
举例:用户要依赖Pet的组件
//domain类
public class User {private String name;private Integer age;private Pet pet;...
}
//配置类
@Configuration(proxyBeanMethods = true) //告诉SpringBoot这是一个配置类 == 配置文件
public class MyConfig {@Bean//给容器中添加组件.以方法名作为组件的id.返回类型就是组件类型.返回的值,就是组件在容器中的实例.public User user01(){User user = new User("zhangsan", 18);//user组件依赖了pet组件user.setPet(tomcatPet());return user;}@Bean("tom")public Pet tomcatPet(){return new Pet("tomcat");}
}//测试方法public static void main(String[] args) {//1.返回我们的IOC容器ConfigurableApplicationContext run = SpringApplication.run(MainApplication.class, args);User user01 = run.getBean("user01", User.class);Pet tom = run.getBean("tom", Pet.class);System.out.println(user01.getPet()==tom);//运行结果为true.
}
总结:
配置 类组件之间无依赖关系用Lite模式加速容器启动过程,减少判断
配置类组件之间有依赖关系,方法会被调用得到之前单实例组件,用Full模式
2、@Bean、@Component、@Controller、@Service、@Repository
@Bean常用在方法上,其他四个常用在自定义类上.
注:注解注册组件调用的是无参构造方法,如果没有则将报错.
3、@ComponentScan、@Import
@ComponentScan:进行组件扫描.
@Import:进行组件导入.
 * @Import({User.class, DBHelper.class})*      给容器中自动创建出这两个类型的组件、默认组件的名字就是全类名*/@Import({User.class, DBHelper.class})
@Configuration(proxyBeanMethods = false) //告诉SpringBoot这是一个配置类 == 配置文件
public class MyConfig {
}
@Import 高级用法: https://www.bilibili.com/video/BV1gW411W7wy?p=8
4、@Conditional
条件装配:满足Conditional指定的条件,则进行组件注入

5.@ImportResource
@ImportResource(“classpath:xxx.xml”):导入并执行SpringBoot的配置文件
======================ApplicationContext.xml=========================
<?xml version="1.0" encoding="UTF-8"?>
<beans xmlns="http://www.springframework.org/schema/beans"xmlns:xsi="http://www.w3.org/2001/XMLSchema-instance"xsi:schemaLocation="http://www.springframework.org/schema/beans http://www.springframework.org/schema/beans/spring-beans.xsd"><bean id="pet" class="com.rg.boot.bean.Pet"><property name="name" value="tomcat"/></bean><bean id="user" class="com.rg.boot.bean.User"><property name="name" value="zhangsan"/><property name="age" value="18"/></bean>
</beans>
@ImportResource("classpath:ApplicationContext.xml")
public class MyConfig {}
2.2、配置绑定
传统方式:使用Java读取到properties文件中的内容,并且把它封装到JavaBean中,以供随时使用;
public class getProperties {public static void main(String[] args) throws FileNotFoundException, IOException {Properties pps = new Properties();pps.load(new FileInputStream("a.properties"));Enumeration enum1 = pps.propertyNames();//得到配置文件的名字while(enum1.hasMoreElements()) {String strKey = (String) enum1.nextElement();String strValue = pps.getProperty(strKey);System.out.println(strKey + "=" + strValue);//封装到JavaBean。}}}
1、@Component + @ConfigurationProperties
@ConfigurationProperties:SpringBoot配置文件中前缀为prefix的信息 和类中相关属性一一绑定.
/*** 只有在容器中的组件,才会拥有SpringBoot提供的强大功能*/
@Component
@ConfigurationProperties(prefix = "mycar")// SpringBoot配置文件中前缀为prefix的信息 和类中相关属性一一绑定.
public class Car {private String brand;private Integer price;public Car(String brand, Integer price) {this.brand = brand;this.price = price;}public Car() {}public String getBrand() {return brand;}public void setBrand(String brand) {this.brand = brand;}public Integer getPrice() {return price;}public void setPrice(Integer price) {this.price = price;}@Overridepublic String toString() {return "Car{" +"brand='" + brand + '\'' +", price=" + price +'}';}
}
2、@EnableConfigurationProperties + @ConfigurationProperties
@ConfigurationProperties(prefix = "mycar")// SpringBoot配置文件中前缀为prefix的信息 和类中相关属性一一绑定.
public class Car {private String brand;private Integer price;.....
}####################################MyConfig#####################
@EnableConfigurationProperties(Car.class)
/*** 1.开启Car配置绑定功能* 2.把这个car组件自动注册到容器中*/
public class MyConfig {......
}
3、自动配置原理入门
3.1、@SpringBootApplication
@SpringBootApplication:引导加载自动配置类
底层代码:
@SpringBootConfiguration
@EnableAutoConfiguration
@ComponentScan(excludeFilters = { @Filter(type = FilterType.CUSTOM, classes = TypeExcludeFilter.class),@Filter(type = FilterType.CUSTOM, classes = AutoConfigurationExcludeFilter.class) })
public @interface SpringBootApplication {}
1、@SpringBootConfiguration
底层原理是:@Configuration:代表当前是一个配置类
2、@ComponentScan
作用:进行包扫描
3、@EnableAutoConfiguration
@AutoConfigurationPackage
@Import(AutoConfigurationImportSelector.class)
public @interface EnableAutoConfiguration {}
作用:自动配置包,指定了默认的包规则
@Import(AutoConfigurationPackages.Registrar.class)  //给容器中导入一个组件
public @interface AutoConfigurationPackage {}//作用:
//利用Registrar给容器中导入一系列组件
//将指定的一个包下的所有组件导入进来=>MainApplication 所在包下。
1、利用getAutoConfigurationEntry(annotationMetadata);给容器中批量导入一些组件
2、调用List<String> configurations = getCandidateConfigurations(annotationMetadata, attributes)获取到所有需要导入到容器中的配置类(一共127个,如下图)
3、利用工厂加载 Map<String, List<String>> loadSpringFactories(@Nullable ClassLoader classLoader);得到所有的组件
4、从META-INF/spring.factories位置来加载一个文件。默认扫描我们当前系统里面所有META-INF/spring.factories位置的文件spring-boot-autoconfigure-2.3.4.RELEASE.jar包里面也有META-INF/spring.factories

文件里面写死了spring-boot一启动就要给容器中加载的所有配置类
以下是spring-boot-autoconfigure-2.3.4.RELEASE.jar/META-INF/spring.factories:
# Auto Configure
org.springframework.boot.autoconfigure.EnableAutoConfiguration=\
org.springframework.boot.autoconfigure.admin.SpringApplicationAdminJmxAutoConfiguration,\
org.springframework.boot.autoconfigure.aop.AopAutoConfiguration,\
org.springframework.boot.autoconfigure.amqp.RabbitAutoConfiguration,\
org.springframework.boot.autoconfigure.batch.BatchAutoConfiguration,\
org.springframework.boot.autoconfigure.cache.CacheAutoConfiguration,\
org.springframework.boot.autoconfigure.cassandra.CassandraAutoConfiguration,\
org.springframework.boot.autoconfigure.context.ConfigurationPropertiesAutoConfiguration,\
org.springframework.boot.autoconfigure.context.LifecycleAutoConfiguration,\
org.springframework.boot.autoconfigure.context.MessageSourceAutoConfiguration,\
org.springframework.boot.autoconfigure.context.PropertyPlaceholderAutoConfiguration,\
org.springframework.boot.autoconfigure.couchbase.CouchbaseAutoConfiguration,\
org.springframework.boot.autoconfigure.dao.PersistenceExceptionTranslationAutoConfiguration,\
org.springframework.boot.autoconfigure.data.cassandra.CassandraDataAutoConfiguration,\
org.springframework.boot.autoconfigure.data.cassandra.CassandraReactiveDataAutoConfiguration,\
org.springframework.boot.autoconfigure.data.cassandra.CassandraReactiveRepositoriesAutoConfiguration,\
org.springframework.boot.autoconfigure.data.cassandra.CassandraRepositoriesAutoConfiguration,\
org.springframework.boot.autoconfigure.data.couchbase.CouchbaseDataAutoConfiguration,\
org.springframework.boot.autoconfigure.data.couchbase.CouchbaseReactiveDataAutoConfiguration,\
org.springframework.boot.autoconfigure.data.couchbase.CouchbaseReactiveRepositoriesAutoConfiguration,\
org.springframework.boot.autoconfigure.data.couchbase.CouchbaseRepositoriesAutoConfiguration,\
org.springframework.boot.autoconfigure.data.elasticsearch.ElasticsearchDataAutoConfiguration,\
org.springframework.boot.autoconfigure.data.elasticsearch.ElasticsearchRepositoriesAutoConfiguration,\
org.springframework.boot.autoconfigure.data.elasticsearch.ReactiveElasticsearchRepositoriesAutoConfiguration,\
org.springframework.boot.autoconfigure.data.elasticsearch.ReactiveElasticsearchRestClientAutoConfiguration,\
org.springframework.boot.autoconfigure.data.jdbc.JdbcRepositoriesAutoConfiguration,\
org.springframework.boot.autoconfigure.data.jpa.JpaRepositoriesAutoConfiguration,\
org.springframework.boot.autoconfigure.data.ldap.LdapRepositoriesAutoConfiguration,\
org.springframework.boot.autoconfigure.data.mongo.MongoDataAutoConfiguration,\
org.springframework.boot.autoconfigure.data.mongo.MongoReactiveDataAutoConfiguration,\
org.springframework.boot.autoconfigure.data.mongo.MongoReactiveRepositoriesAutoConfiguration,\
org.springframework.boot.autoconfigure.data.mongo.MongoRepositoriesAutoConfiguration,\
org.springframework.boot.autoconfigure.data.neo4j.Neo4jDataAutoConfiguration,\
org.springframework.boot.autoconfigure.data.neo4j.Neo4jRepositoriesAutoConfiguration,\
org.springframework.boot.autoconfigure.data.solr.SolrRepositoriesAutoConfiguration,\
org.springframework.boot.autoconfigure.data.r2dbc.R2dbcDataAutoConfiguration,\
org.springframework.boot.autoconfigure.data.r2dbc.R2dbcRepositoriesAutoConfiguration,\
org.springframework.boot.autoconfigure.data.r2dbc.R2dbcTransactionManagerAutoConfiguration,\
org.springframework.boot.autoconfigure.data.redis.RedisAutoConfiguration,\
org.springframework.boot.autoconfigure.data.redis.RedisReactiveAutoConfiguration,\
org.springframework.boot.autoconfigure.data.redis.RedisRepositoriesAutoConfiguration,\
org.springframework.boot.autoconfigure.data.rest.RepositoryRestMvcAutoConfiguration,\
org.springframework.boot.autoconfigure.data.web.SpringDataWebAutoConfiguration,\
org.springframework.boot.autoconfigure.elasticsearch.ElasticsearchRestClientAutoConfiguration,\
org.springframework.boot.autoconfigure.flyway.FlywayAutoConfiguration,\
org.springframework.boot.autoconfigure.freemarker.FreeMarkerAutoConfiguration,\
org.springframework.boot.autoconfigure.groovy.template.GroovyTemplateAutoConfiguration,\
org.springframework.boot.autoconfigure.gson.GsonAutoConfiguration,\
org.springframework.boot.autoconfigure.h2.H2ConsoleAutoConfiguration,\
org.springframework.boot.autoconfigure.hateoas.HypermediaAutoConfiguration,\
org.springframework.boot.autoconfigure.hazelcast.HazelcastAutoConfiguration,\
org.springframework.boot.autoconfigure.hazelcast.HazelcastJpaDependencyAutoConfiguration,\
org.springframework.boot.autoconfigure.http.HttpMessageConvertersAutoConfiguration,\
org.springframework.boot.autoconfigure.http.codec.CodecsAutoConfiguration,\
org.springframework.boot.autoconfigure.influx.InfluxDbAutoConfiguration,\
org.springframework.boot.autoconfigure.info.ProjectInfoAutoConfiguration,\
org.springframework.boot.autoconfigure.integration.IntegrationAutoConfiguration,\
org.springframework.boot.autoconfigure.jackson.JacksonAutoConfiguration,\
org.springframework.boot.autoconfigure.jdbc.DataSourceAutoConfiguration,\
org.springframework.boot.autoconfigure.jdbc.JdbcTemplateAutoConfiguration,\
org.springframework.boot.autoconfigure.jdbc.JndiDataSourceAutoConfiguration,\
org.springframework.boot.autoconfigure.jdbc.XADataSourceAutoConfiguration,\
org.springframework.boot.autoconfigure.jdbc.DataSourceTransactionManagerAutoConfiguration,\
org.springframework.boot.autoconfigure.jms.JmsAutoConfiguration,\
org.springframework.boot.autoconfigure.jmx.JmxAutoConfiguration,\
org.springframework.boot.autoconfigure.jms.JndiConnectionFactoryAutoConfiguration,\
org.springframework.boot.autoconfigure.jms.activemq.ActiveMQAutoConfiguration,\
org.springframework.boot.autoconfigure.jms.artemis.ArtemisAutoConfiguration,\
org.springframework.boot.autoconfigure.jersey.JerseyAutoConfiguration,\
org.springframework.boot.autoconfigure.jooq.JooqAutoConfiguration,\
org.springframework.boot.autoconfigure.jsonb.JsonbAutoConfiguration,\
org.springframework.boot.autoconfigure.kafka.KafkaAutoConfiguration,\
org.springframework.boot.autoconfigure.availability.ApplicationAvailabilityAutoConfiguration,\
org.springframework.boot.autoconfigure.ldap.embedded.EmbeddedLdapAutoConfiguration,\
org.springframework.boot.autoconfigure.ldap.LdapAutoConfiguration,\
org.springframework.boot.autoconfigure.liquibase.LiquibaseAutoConfiguration,\
org.springframework.boot.autoconfigure.mail.MailSenderAutoConfiguration,\
org.springframework.boot.autoconfigure.mail.MailSenderValidatorAutoConfiguration,\
org.springframework.boot.autoconfigure.mongo.embedded.EmbeddedMongoAutoConfiguration,\
org.springframework.boot.autoconfigure.mongo.MongoAutoConfiguration,\
org.springframework.boot.autoconfigure.mongo.MongoReactiveAutoConfiguration,\
org.springframework.boot.autoconfigure.mustache.MustacheAutoConfiguration,\
org.springframework.boot.autoconfigure.orm.jpa.HibernateJpaAutoConfiguration,\
org.springframework.boot.autoconfigure.quartz.QuartzAutoConfiguration,\
org.springframework.boot.autoconfigure.r2dbc.R2dbcAutoConfiguration,\
org.springframework.boot.autoconfigure.rsocket.RSocketMessagingAutoConfiguration,\
org.springframework.boot.autoconfigure.rsocket.RSocketRequesterAutoConfiguration,\
org.springframework.boot.autoconfigure.rsocket.RSocketServerAutoConfiguration,\
org.springframework.boot.autoconfigure.rsocket.RSocketStrategiesAutoConfiguration,\
org.springframework.boot.autoconfigure.security.servlet.SecurityAutoConfiguration,\
org.springframework.boot.autoconfigure.security.servlet.UserDetailsServiceAutoConfiguration,\
org.springframework.boot.autoconfigure.security.servlet.SecurityFilterAutoConfiguration,\
org.springframework.boot.autoconfigure.security.reactive.ReactiveSecurityAutoConfiguration,\
org.springframework.boot.autoconfigure.security.reactive.ReactiveUserDetailsServiceAutoConfiguration,\
org.springframework.boot.autoconfigure.security.rsocket.RSocketSecurityAutoConfiguration,\
org.springframework.boot.autoconfigure.security.saml2.Saml2RelyingPartyAutoConfiguration,\
org.springframework.boot.autoconfigure.sendgrid.SendGridAutoConfiguration,\
org.springframework.boot.autoconfigure.session.SessionAutoConfiguration,\
org.springframework.boot.autoconfigure.security.oauth2.client.servlet.OAuth2ClientAutoConfiguration,\
org.springframework.boot.autoconfigure.security.oauth2.client.reactive.ReactiveOAuth2ClientAutoConfiguration,\
org.springframework.boot.autoconfigure.security.oauth2.resource.servlet.OAuth2ResourceServerAutoConfiguration,\
org.springframework.boot.autoconfigure.security.oauth2.resource.reactive.ReactiveOAuth2ResourceServerAutoConfiguration,\
org.springframework.boot.autoconfigure.solr.SolrAutoConfiguration,\
org.springframework.boot.autoconfigure.task.TaskExecutionAutoConfiguration,\
org.springframework.boot.autoconfigure.task.TaskSchedulingAutoConfiguration,\
org.springframework.boot.autoconfigure.thymeleaf.ThymeleafAutoConfiguration,\
org.springframework.boot.autoconfigure.transaction.TransactionAutoConfiguration,\
org.springframework.boot.autoconfigure.transaction.jta.JtaAutoConfiguration,\
org.springframework.boot.autoconfigure.validation.ValidationAutoConfiguration,\
org.springframework.boot.autoconfigure.web.client.RestTemplateAutoConfiguration,\
org.springframework.boot.autoconfigure.web.embedded.EmbeddedWebServerFactoryCustomizerAutoConfiguration,\
org.springframework.boot.autoconfigure.web.reactive.HttpHandlerAutoConfiguration,\
org.springframework.boot.autoconfigure.web.reactive.ReactiveWebServerFactoryAutoConfiguration,\
org.springframework.boot.autoconfigure.web.reactive.WebFluxAutoConfiguration,\
org.springframework.boot.autoconfigure.web.reactive.error.ErrorWebFluxAutoConfiguration,\
org.springframework.boot.autoconfigure.web.reactive.function.client.ClientHttpConnectorAutoConfiguration,\
org.springframework.boot.autoconfigure.web.reactive.function.client.WebClientAutoConfiguration,\
org.springframework.boot.autoconfigure.web.servlet.DispatcherServletAutoConfiguration,\
org.springframework.boot.autoconfigure.web.servlet.ServletWebServerFactoryAutoConfiguration,\
org.springframework.boot.autoconfigure.web.servlet.error.ErrorMvcAutoConfiguration,\
org.springframework.boot.autoconfigure.web.servlet.HttpEncodingAutoConfiguration,\
org.springframework.boot.autoconfigure.web.servlet.MultipartAutoConfiguration,\
org.springframework.boot.autoconfigure.web.servlet.WebMvcAutoConfiguration,\
org.springframework.boot.autoconfigure.websocket.reactive.WebSocketReactiveAutoConfiguration,\
org.springframework.boot.autoconfigure.websocket.servlet.WebSocketServletAutoConfiguration,\
org.springframework.boot.autoconfigure.websocket.servlet.WebSocketMessagingAutoConfiguration,\
org.springframework.boot.autoconfigure.webservices.WebServicesAutoConfiguration,\
org.springframework.boot.autoconfigure.webservices.client.WebServiceTemplateAutoConfiguration
3.2、按需开启自动配置项
虽然我们127个场景的所有自动配置启动的时候默认全部加载。xxxxAutoConfiguration
但按照条件装配规则(@Conditional),最终会按需配置。
如:没有使用AOP时,AopAutoConfiguration中的配置是报红的,没有使用批量处理时,批处理里面的配置不会进行加载.(底层实现大量使用@Conditional)
底层代码举例分析:
#######################################AopAutoConfiguration##############################
@Configuration(proxyBeanMethods = false)//开启对象的代理
@ConditionalOnProperty(prefix = "spring.aop", name = "auto", havingValue = "true", matchIfMissing = true)//判断是否存在以spring.aop为前缀,name为auto,值为true的配置,如果存在,则下面的生效;matchIfMissing=true:表示即使你没有配,也认为你配置了.  默认是开启的.
public class AopAutoConfiguration {@Configuration(proxyBeanMethods = false)@ConditionalOnClass(Advice.class)//判断是否存在Advice类,如果不存在则下面类中所有行为将不会执行.(由于我们没有导入Aop相关场景,所有无该类.)static class AspectJAutoProxyingConfiguration {...}@Configuration(proxyBeanMethods = false)@ConditionalOnMissingClass("org.aspectj.weaver.Advice")//如果没有则下面的生效@ConditionalOnProperty(prefix = "spring.aop", name = "proxy-target-class", havingValue = "true",matchIfMissing = true)//...static class ClassProxyingConfiguration {...}}############################ CacheAutoConfiguration(自动缓存) #######################
@Configuration(proxyBeanMethods = false)
@ConditionalOnClass(CacheManager.class)// 可以通过run.getBean()进行验证是否容器中有..验证后没有,则类中一系列操作配置都是无效的...多没有进行配置.
@ConditionalOnBean(CacheAspectSupport.class)
@ConditionalOnMissingBean(value = CacheManager.class, name = "cacheResolver")
@EnableConfigurationProperties(CacheProperties.class)
@AutoConfigureAfter({ CouchbaseDataAutoConfiguration.class, HazelcastAutoConfiguration.class,HibernateJpaAutoConfiguration.class, RedisAutoConfiguration.class })
@Import({ CacheConfigurationImportSelector.class, CacheManagerEntityManagerFactoryDependsOnPostProcessor.class })
public class CacheAutoConfiguration {// ...一系列配置...
}##################################DispatcherServletAutoConfiguration#####################
@AutoConfigureOrder(Ordered.HIGHEST_PRECEDENCE)//指定配置顺序
@Configuration(proxyBeanMethods = false)//开启方法的代理
@ConditionalOnWebApplication(type = Type.SERVLET)//判断是不是一个原生的Servlet类型的Web应用.
@ConditionalOnClass(DispatcherServlet.class)
@AutoConfigureAfter(ServletWebServerFactoryAutoConfiguration.class)//在ServletWebServerFactoryAutoConfiguration配置之后执行.
public class DispatcherServletAutoConfiguration {@Configuration(proxyBeanMethods = false)@Conditional(DefaultDispatcherServletCondition.class)@ConditionalOnClass(ServletRegistration.class)@EnableConfigurationProperties(WebMvcProperties.class)//1.开启WebMvcProperties上配置文件的配置绑定功能;  2.将该组件添加到容器中.//给容器中添加组件:dispatcherservletprotected static class DispatcherServletConfiguration {@Bean(name = DEFAULT_DISPATCHER_SERVLET_BEAN_NAME)public DispatcherServlet dispatcherServlet(WebMvcProperties webMvcProperties) {//创建一个DispatcherServlet,并设置相关属性.然后将该组件起名加到容器中; 之前是我们进行手动配置的,现在SpringBoot底层给我们进行了配置.DispatcherServlet dispatcherServlet = new DispatcherServlet();dispatcherServlet.setDispatchOptionsRequest(...);dispatcherServlet.setDispatchTraceRequest(...);dispatcherServlet.setThrowExceptionIfNoHandlerFound(...);dispatcherServlet.setPublishEvents(...);dispatcherServlet.setEnableLoggingRequestDetails(...);return dispatcherServlet;}//给容器中添加文件上传解析器multipartResolver@Bean@ConditionalOnBean(MultipartResolver.class)//判断容器中是否有这个类型的组件@ConditionalOnMissingBean(name = DispatcherServlet.MULTIPART_RESOLVER_BEAN_NAME)//容器中没有这个名字multipartResolver的组件。public MultipartResolver multipartResolver(MultipartResolver resolver) {//1.给@Bean标注的方法传入了对象参数,这个参数的值会从容器中找.然后以方法名为组件名称再次存入到容器中;		2.这样做可以防止有些用户配置的文件上传解析器不符合规范.return resolver;}}//......}###########################################HttpEncodingAutoConfiguration#################
@Configuration(proxyBeanMethods = false)//关闭方法的代理
@EnableConfigurationProperties(ServerProperties.class)//进行类和配置文件的绑定,并加载到容器
@ConditionalOnWebApplication(type = ConditionalOnWebApplication.Type.SERVLET)//判断是不是原生的Servlet类型 Web应用
@ConditionalOnClass(CharacterEncodingFilter.class)//判断是不是
@ConditionalOnProperty(prefix = "server.servlet.encoding", value = "enabled", matchIfMissing = true)//判断配置的server.servlet.encoding是否是enabled;即使你没有配置也认为配置了.
public class HttpEncodingAutoConfiguration {//HTTp编码自动配置.//...//配置编码过滤器@Bean@ConditionalOnMissingBean//如果容器中没有该组件,就进行配置;如果有则不再进行配置.public CharacterEncodingFilter characterEncodingFilter() {CharacterEncodingFilter filter = new OrderedCharacterEncodingFilter();filter.setEncoding(this.properties.getCharset().name());filter.setForceRequestEncoding(this.properties.shouldForce(Encoding.Type.REQUEST));filter.setForceResponseEncoding(this.properties.shouldForce(Encoding.Type.RESPONSE));return filter;}//...
}总结:SpringBoot默认会在底层配好所有的组件。但是如果用户自己配置了,则以用户的优先.
总结:
-
SpringBoot先加载所有的自动配置类 xxxxxAutoConfiguration
-
每个自动配置类按照条件(@Conditional )进行生效,默认都会绑定配置文件指定的值 。(xxxProperties类和配置文件进行了绑定,用于在组件注册前进行类对象的属性赋值.)
-
生效的配置类就会给容器中装配很多组件
-
只要容器中有这些组件,相当于这些功能就有了
如何定制化配置?
-
用户直接在配置类中使用@Bean替换底层的组件
-
用户去看这个组件的底层是获取的配置文件什么值(或者查看官方文档),然后去配置文件里修改。
历程:xxxxxAutoConfiguration —> 组件 —> xxxxProperties里面拿值 ----> application.properties
3.3、最佳实践
-
引入场景依赖
https://docs.spring.io/spring-boot/docs/current/reference/html/using-spring-boot.html#using-boot-starter
-
查看自动配置了哪些(选做)
-
自己分析,引入场景对应的自动配置一般都生效了
-
配置文件中debug=true开启自动配置报告。Negative(不生效)\Positive(生效)
-
-
是否需要修改
-
参照文档修改配置项或自己分析:xxxxProperties绑定了配置文件的哪些。
-
自定义加入或者替换组件: @Bean、@Component。。。
-
自定义器 XXXXXCustomizer;
-
…
-
4、开发小技巧
4.1、Lombok
简化JavaBean开发
        <dependency><groupId>org.projectlombok</groupId><artifactId>lombok</artifactId></dependency>idea中搜索安装lombok插件
===============================简化JavaBean开发===================================
@NoArgsConstructor//无参
@AllArgsConstructor//有参
@Data//getter/setter
@ToString//toString
@EqualsAndHashCode
public class User {private String name;private Integer age;private Pet pet;public User(String name, Integer age) {//自定义构造方法this.name = name;this.age = age;}
}================================简化日志开发===================================
@Slf4j
@RestController
public class HelloController {@RequestMapping("/hello")public String handle01(@RequestParam("name") String name){log.info("请求进来了....");return "Hello, Spring Boot 2!"+"你好:"+name;}
}
4.2、dev-tools
<dependency><groupId>org.springframework.boot</groupId><artifactId>spring-boot-devtools</artifactId><optional>true</optional></dependency>
项目或者页面修改以后:Ctrl+F9,用于快速重启项目.
4.3、Spring Initailizr(项目初始化向导)
1、选择我们需要的开发场景
File->new Project ->Spring Spring Initailizr->Next 填写项目的信息,完成点击NEXT

2.选择项目需要的配置信息
选择Spring Boot 版本信息,目前我们开发Web应用,Developer Tools勾选:Spring Boot DevTools,Lombok,Spring Configuration Processor; Web中勾选Spring Web;
SQL中勾选MyBatis Framework, Mysql Driver.…
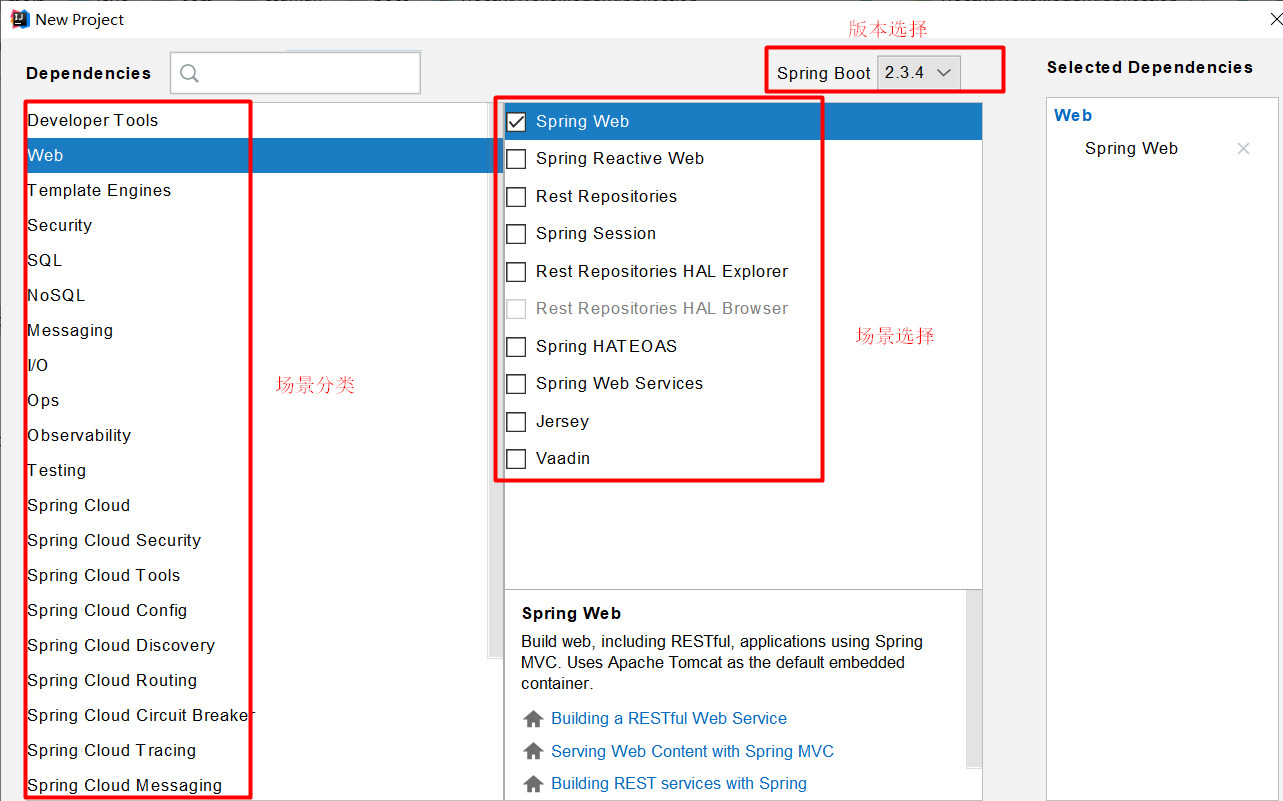
优点:
- 自动依赖引入

- 自动创建项目结构

- 自动编写好主配置类