文章目录
- day11_课后练习
- 代码阅读题
- 第1题
- 第2题
- 第3题
- 第4题
- 第5题
- 第6题
- 第7题
- 第8题
- 第9题
- 第10题
- 第11题
- 第12题
- 代码编程题
- 第13题
day11_课后练习
代码阅读题
第1题
知识点:实例初始化
案例:判断运行结果
package com.atguigu.test01;class HelloA{public HelloA(){System.out.println("HelloA");}{System.out.println("I'm A Class");}
}class HelloB extends HelloA{public HelloB(){System.out.println("HelloB");}{System.out.println("I'm B Class");}
}
public class Test01{public static void main(String[] args) {new HelloB();}
}
package com.atguigu.test01;/** 创建对象是通过执行实例初始化方法来完成的。* 如果new后面跟无参构造,就说明调用无参的实例初始化方法<init>(),* 如果new后面跟有参构造,就说明调用有参的实例初始化方法<init>(形参列表)。* 编译器编译后类中没有构造器,而是编译为一个个的实例初始化方法。* 实例初始化由:* (1)非静态成员变量的显式赋值代码* (2)非静态代码块代码* (3)构造器代码* 其中(1)(2)按编写顺序,(3)在最后* 在子类实例初始化首行会有super()或super(实参列表)表示调用父类的实例初始化方法,* 如果没写super()或super(实参列表),那么默认就是super(),因此:* (1)先执行父类实例初始化* <init>(){* System.out.println("I'm A Class");* System.out.println("HelloA");* }* (2)再执行子类实例初始化* <init>(){* System.out.println("I'm B Class");* System.out.println("HelloB");* }*/
class HelloA{public HelloA(){System.out.println("HelloA");}{System.out.println("I'm A Class");}
}class HelloB extends HelloA{public HelloB(){System.out.println("HelloB");}{System.out.println("I'm B Class");}
}
public class Test01{public static void main(String[] args) {new HelloB();}
}第2题
知识点:实例初始化
案例:判断运行结果
package com.atguigu.test02;public class Test02 {public static void main(String[] args) {new Child("mike");}
}class People {private String name;public People() {System.out.print("1");}public People(String name) {System.out.print("2");this.name = name;}
}class Child extends People {People father;public Child(String name) {super();System.out.print("3");father = new People(name + " F");}public Child() {System.out.print("4");}
}
package com.atguigu.test02;/** 实例初始化的过程:* (1)父类的实例初始化* <init>(){* System.out.print("1");* }* (2)子类的实例初始化 * <init>(String name){* System.out.print("3");* father = new People(name + " F");//创建了一个父类的对象* 调用父类的<init>(String name){* System.out.print("2");* }* }* */
public class Test02 {public static void main(String[] args) {new Child("mike");}
}class People {private String name;public People() {System.out.print("1");}public People(String name) {System.out.print("2");this.name = name;}
}class Child extends People {People father;public Child(String name) {System.out.print("3");father = new People(name + " F");}public Child() {System.out.print("4");}
}第3题
知识点:实例初始化
案例:分析运行结果
package com.atguigu.test03;public class Test03 {public static void main(String[] args) {Father f = new Father();Child c = new Child();}
}
class Father {public Father(){System.out.println("father create");}
}
class Child extends Father{public Child(){System.out.println("child create");}
}
package com.atguigu.test03;/** 1、Father f = new Father();* 执行父类的实例初始化方法* <init>(){* 		System.out.println("father create");* }* * 2、Child c = new Child();* (1)先执行父类的实例初始化方法* <init>(){* 		System.out.println("father create");* }* (2)再执行子类的实例初始化方法* <init>(){* 		System.out.println("child create");* }*/
public class Test03 {public static void main(String[] args) {Father f = new Father();Child c = new Child();}
}
class Father {public Father(){System.out.println("father create");}
}
class Child extends Father{public Child(){System.out.println("child create");}
}
第4题
知识点:继承、属性同名问题
package com.atguigu.test04;public class Test04 extends Father{private String name = "test";public static void main(String[] args) {Test04 test = new Test04();System.out.println(test.getName());}
}
class Father {private String name = "father";public String getName() {return name;}
}
package com.atguigu.test04;/** 当父类与子类有同名的属性时:* 通过子类对象调用getName()访问的是父类的name还是子类的name,* 那么要看子类是否重写,如果没有重写,就是父类的,重写了就是子类的。*/
public class Test04 extends Father{private String name = "test";public static void main(String[] args) {Test04 test = new Test04();System.out.println(test.getName());}
}
class Father {private String name = "father";public String getName() {return name;}
}
第5题
知识点:实例初始化、构造器
案例:分析运行结果
package com.atguigu.test05;public class Test05 {public static void main(String[] args) {new A(new B());}
}class A {public A() {System.out.println("A");}public A(B b) {this();System.out.println("AB");}
}class B {public B() {System.out.println("B");}
}
package com.atguigu.test05;/** 1、先算new B()* 执行B类的实例初始化方法:* <init>(){* System.out.println("B");* }* 2、再算new A(B对象)* 执行A类的实例初始化方法:* <init>(B b){* this();* 即调用本类的无参构造,或者说无参实参初始化方法* <init>(){* System.out.println("A");* }* System.out.println("AB");* }*/
public class Test05 {public static void main(String[] args) {new A(new B());}
}class A {public A() {System.out.println("A");}public A(B b) {this();System.out.println("AB");}
}class B {public B() {System.out.println("B");}
}第6题
知识点:实例初始化
案例:分析运行结果
package com.atguigu.test06;public class Test06 {public static void main(String[] args) {Sub s = new Sub();}
}
class Base{Base(){method(100);//  this.method(100);调用当前对象的method,现在new子类对象,当前对象是子类,子类重写了method,这里执行子类的method}{System.out.println("base");}public void method(int i){System.out.println("base : " + i);}
}
class Sub extends Base{Sub(){super.method(70);}{System.out.println("sub");}public void method(int j){System.out.println("sub : " + j);}
}
package com.atguigu.test06;/** 创建对象是通过执行实例初始化方法来完成的。* 如果new后面跟无参构造,就说明调用无参的实例初始化方法<init>(),* 如果new后面跟有参构造,就说明调用有参的实例初始化方法<init>(形参列表)。* 编译器编译后类中没有构造器,而是编译为一个个的实例初始化方法。* 实例初始化由:* (1)非静态成员变量的显式赋值代码* (2)非静态代码块代码* (3)构造器代码* 其中(1)(2)按编写顺序,(3)在最后* 在子类实例初始化首行会有super()或super(实参列表)表示调用父类的实例初始化方法,* 如果没写super()或super(实参列表),那么默认就是super(),因此:* 1、执行父类的实例初始化方法* <ini>(){* 		System.out.println("base");* 		method(100); //因为此时在创建子类的对象过程中,所以这个method(100)方法是* 						子类对象再调用,那么又因为子类重写了method(int)方法,* 						所以执行子类的method(int)* 					即System.out.println("sub : " + j);* }* * 2、执行子类的实例初始化方法* <init>(){* 		System.out.println("sub");* 		super.method(70);//因为这里用super.,那么一定是调用父类的method(int)* 					即System.out.println("base : " + i);* }*/
public class Test06 {public static void main(String[] args) {Sub s = new Sub();}
}
class Base{Base(){method(100);}{System.out.println("base");}public void method(int i){System.out.println("base : " + i);}
}
class Sub extends Base{Sub(){super.method(70);}{System.out.println("sub");}public void method(int j){System.out.println("sub : " + j);}
}
第7题
public class Test07 {public static void main(String[] args) {Son son = new Son();}
}
class Father{static{System.out.println("(1)父类的静态代码块");}{System.out.println("(2)父类的非静态代码块");}Father(){System.out.println("(3)父类的无参构造");}
}
class Son extends Father{static{System.out.println("(4)子类的静态代码块");}{System.out.println("(5)子类的非静态代码块");}Son(){System.out.println("(6)子类的无参构造");}
}
package com.atguigu.test07;/** (1)Father类的类初始化* ①类变量显式赋值:这里没有* ②静态代码块* 		System.out.println("(1)父类的静态代码块");* (2)Son类的类初始化* ①类变量显式赋值:这里没有* ②静态代码块* 		System.out.println("(4)子类的静态代码块");* * (3)执行Father类的是实参初始化方法<init>()* ①非静态成员变量的显式赋值:这里没有* ②非静态代码块:* 		System.out.println("(2)父类的非静态代码块");* ③父类的无参构造* 		System.out.println("(3)父类的无参构造");* * (4)执行Son类的实例初始化方法<init>()* ①非静态成员变量的显式赋值:这里没有* ②非静态代码块:* 		System.out.println("(5)子类的非静态代码块");* ③子类的无参构造* 		System.out.println("(6)子类的无参构造");*/
public class Test07 {public static void main(String[] args) {Son son = new Son();}
}
class Father{static{System.out.println("(1)父类的静态代码块");}{System.out.println("(2)父类的非静态代码块");}Father(){System.out.println("(3)父类的无参构造");}
}
class Son extends Father{static{System.out.println("(4)子类的静态代码块");}{System.out.println("(5)子类的非静态代码块");}Son(){System.out.println("(6)子类的无参构造");}
}
第8题
public class Test08 {public static void main(String[] args) {Zi zi = new Zi();}
}
class Fu{private static int i = getNum("(1)i");private int j = getNum("(2)j");static{print("(3)父类静态代码块");}{print("(4)父类非静态代码块,又称为构造代码块");}Fu(){print("(5)父类构造器");}public static void print(String str){System.out.println(str + "->" + i);}public static int getNum(String str){print(str);return ++i;}
}
class Zi extends Fu{private static int k = getNum("(6)k");private int h = getNum("(7)h");static{print("(8)子类静态代码块");}{print("(9)子类非静态代码块,又称为构造代码块");}Zi(){print("(10)子类构造器");}public static void print(String str){System.out.println(str + "->" + k);}public static int getNum(String str){print(str);return ++k;}
}
package com.atguigu.test08;/** (1)Fu类的类初始化* ①类变量显式赋值:* i = getNum("(1)i");* public static int getNum(String str){print(str);print方法代码如下:public static void print(String str){System.out.println(str + "->" + i); (1)i -> 0(默认值)}return ++i; i=1}* ②静态代码块* static{print("(3)父类静态代码块");print方法代码如下:public static void print(String str){System.out.println(str + "->" + i); (3)父类静态代码块 -> 1}}* (2)Zi类的类初始化* ①类变量显式赋值:* k = getNum("(6)k");* public static int getNum(String str){print(str);print方法代码如下:public static void print(String str){System.out.println(str + "->" + k); (6)k -> 0(默认值)}return ++k; k=1}* ②静态代码块* static{print("(8)子类静态代码块");print方法代码如下:public static void print(String str){System.out.println(str + "->" + k); (8)子类静态代码块 -> 1}} * * (3)执行Fu类的是实参初始化方法<init>()* ①非静态成员变量的显式赋值:* j = getNum("(2)j");* public static int getNum(String str){print(str);print方法代码如下:public static void print(String str){System.out.println(str + "->" + i); (2)j -> 1}return ++i; i=2}* ②非静态代码块:* {print("(4)父类非静态代码块,又称为构造代码块");print方法代码如下:public static void print(String str){System.out.println(str + "->" + i); (4)父类非静态代码块,又称为构造代码块 -> 2}} * ③父类的无参构造* Fu(){print("(5)父类构造器");print方法代码如下:public static void print(String str){System.out.println(str + "->" + i); (5)父类构造器 -> 2}} * * (4)执行Zi类的实例初始化方法<init>()* ①非静态成员变量的显式赋值:* h = getNum("(7)h");public static int getNum(String str){print(str);print方法代码如下:public static void print(String str){System.out.println(str + "->" + k); (7)h ->1}return ++k; k=2}* * ②非静态代码块:* {print("(9)子类非静态代码块,又称为构造代码块");print方法代码如下:public static void print(String str){System.out.println(str + "->" + k); (9)子类非静态代码块,又称为构造代码块 ->2}} * ③子类的无参构造* Zi(){print("(10)子类构造器");print方法代码如下:public static void print(String str){System.out.println(str + "->" + k); (10)子类构造器 ->2}} */
public class Test08 {public static void main(String[] args) {Zi zi = new Zi();}
}
class Fu{private static int i = getNum("(1)i");private int j = getNum("(2)j");static{print("(3)父类静态代码块");}{print("(4)父类非静态代码块,又称为构造代码块");}Fu(){print("(5)父类构造器");}public static void print(String str){System.out.println(str + "->" + i);}public static int getNum(String str){print(str);return ++i;}
}
class Zi extends Fu{private static int k = getNum("(6)k");private int h = getNum("(7)h");static{print("(8)子类静态代码块");}{print("(9)子类非静态代码块,又称为构造代码块");}Zi(){print("(10)子类构造器");}public static void print(String str){System.out.println(str + "->" + k);}public static int getNum(String str){print(str);return ++k;}
}第9题
public class T {public static int k = 0;public static T t1 = new T("t1");public static T t2 = new T("t2");public static int i = print("i");public static int n = 99;public int j = print("j");{print("构造块");}static{print("静态块");}public T(String str){System.out.println((++k) + ":" + str + "  i=" + i + "  n=" + n);++n;++i;}public static int print(String str){System.out.println((++k) + ":" + str + "  i=" + i + "  n=" + n);++n;return ++i;}public static void main(String[] args) {}
}
package com.atguigu.test09;/** 对于T来说,就完成类初始化* * 创建对象,调用类的实例初始化<init>()或<init>(String str)* * (1)静态变量的显式赋值* 		k = 0;t1 = new T("t1");<init>(String str)①j = print("j");print方法代码如下:public static int print(String str){System.out.println((++k) + ":" + str + "  i=" + i + "  n=" + n);  1:j i=0 n=0++n;									n=1  k=1return ++i;								i=1}②	{print("构造块");print方法代码如下:public static int print(String str){System.out.println((++k) + ":" + str + "  i=" + i + "  n=" + n);  2:构造块 i=1 n=1++n;									n=2  k=2return ++i;								i=2}}③public T(String str){System.out.println((++k) + ":" + str + "  i=" + i + "  n=" + n);	  3:t1  i=2  n=2	++n;											n=3  k=3++i;											i=3}* 		t2 = new T("t2");<init>(String str)①j = print("j");print方法代码如下:public static int print(String str){System.out.println((++k) + ":" + str + "  i=" + i + "  n=" + n);  4:j i=3 n=3++n;									n=4  k=4return ++i;								i=4}②	{print("构造块");print方法代码如下:public static int print(String str){System.out.println((++k) + ":" + str + "  i=" + i + "  n=" + n);  5:构造块 i=4 n=4++n;									n=5  k=5return ++i;								i=5}}③public T(String str){System.out.println((++k) + ":" + str + "  i=" + i + "  n=" + n);	  6:t2  i=5  n=5	++n;											n=6  k=6++i;											i=6}i = print("i");print方法代码如下:public static int print(String str){System.out.println((++k) + ":" + str + "  i=" + i + "  n=" + n);  7:i  i=6 n=6++n;									n=7  k=7return ++i;								i=7}n = 99;* (2)静态代码块* 	static{print("静态块");print方法代码如下:public static int print(String str){System.out.println((++k) + ":" + str + "  i=" + i + "  n=" + n);  8:静态块   i=7 n=99++n;									n=100  k=8return ++i;								i=8}}*/
public class T {public static int k = 0;public static T t1 = new T("t1");public static T t2 = new T("t2");public static int i = print("i");public static int n = 99;public int j = print("j");{print("构造块");}static{print("静态块");}public T(String str){System.out.println((++k) + ":" + str + "  i=" + i + "  n=" + n);++n;++i;}public static int print(String str){System.out.println((++k) + ":" + str + "  i=" + i + "  n=" + n);++n;return ++i;}public static void main(String[] args) {}
}
第10题
考核知识点:方法的参数传递、final关键字
package com.atguigu.test10;public class Test10 {public static void main(String[] args) {Other o = new Other();new Test10().addOne(o);System.out.println(o.i);}public void addOne(final Other o){o.i++;}
}
class Other{public int i;
}
/** 1、final* final修饰的是o,不是i,因此o变量的值不能修改,不是说i变量的值不能修改* 2、方法的参数传递机制:* 形参是基本数据类型,那么实参给形参的是数据值的副本,形参的修改不影响实参;* 形参是引用数据类型,那么实参给形参的是地址值的副本,形参对象修改属性相当于实参对象修改属性*/
public class Test10 {public static void main(String[] args) {Other o = new Other();new Test10().addOne(o);System.out.println(o.i);}public void addOne(final Other o){o.i++;}
}
class Other{public int i;
}
第11题
考核知识点:类初始化,局部变量与类变量,自增自减
package com.atguigu.test11;public class Test11 {static int x, y, z;static {int x = 5;x--;}static {x--;}public static void main(String[] args) {System.out.println("x=" + x);z--;method();System.out.println("result:" + (z + y + ++z));}public static void method() {y = z++ + ++z;}
}
/** (1)类的初始化* <clinit>(){* 		int x = 5;//局部变量x--;//局部变量		x=4* 		Test07.x--;//静态变量      x = -1* }* (2)执行main方法* System.out.println("x=" + x);//静态变量   -1* z--;//静态变量   z=-1* method();* 		y = z++ + ++z;//静态变量   * 			①先加载z的值“-1”②z自增,z=0③z自增 z =1④加载z的值“1” ⑤求和  “-1” + “1” = 0⑥把0赋值给y   y=0* System.out.println("result:" + (z + y + ++z));* 			①加载z的值“1”  ②加载y的值"0" ③z自增  z=2 ④加载z的值“2”  ⑤求和  “1” + “0” + “2”* */
public class Test11 {static int x, y, z;//类变量,静态变量,成员变量   默认值0static {int x = 5;//局部变量x--;//局部变量}static {x--;//静态变量}public static void main(String[] args) {System.out.println("x=" + x);//静态变量z--;//静态变量method();System.out.println("result:" + (z + y + ++z));//静态变量}public static void method() {y = z++ + ++z;//静态变量}
}
第12题
考核知识点:类初始化与实例初始化
package com.atguigu.test15;class HelloA{public HelloA(){System.out.println("HelloA");}{System.out.println("I'm A Class");}static{System.out.println("static A");}
}public class HelloB extends HelloA{public HelloB(){System.out.println("HelloB");}{System.out.println("I'm B Class");}static{System.out.println("static B");}public static void main(String[] args) {new HelloB();}}
/** 1、main是Java程序的入口,那么main所在的类需要先完成类初始化,才能执行main方法。* 即先完成HelloB的类初始化,才能执行main中的new Hello()* 2、但是在类初始化时,如果发现父类还没有初始化,会先初始化父类,即先完成HelloA的类初始化* 3、类初始化方法由:* (1)静态变量的显式赋值代码* (2)静态代码块代码* 4、 创建对象是通过执行实例初始化方法来完成的。* 如果new后面跟无参构造,就说明调用无参的实例初始化方法<init>(),* 如果new后面跟有参构造,就说明调用有参的实例初始化方法<init>(形参列表)。* 编译器编译后类中没有构造器,而是编译为一个个的实例初始化方法。* 实例初始化由:* (1)非静态成员变量的显式赋值代码* (2)非静态代码块代码* (3)构造器代码* 其中(1)(2)按编写顺序,(3)在最后* 在子类实例初始化首行会有super()或super(实参列表)表示调用父类的实例初始化方法,* 如果没写super()或super(实参列表),那么默认就是super(),因此:* * 因此:* 1、先执行HelloA的类初始化* <clinit>(){* System.out.println("static A");* }* 2、在完成Hello的类初始化* <clinit>(){* System.out.println("static B");* }* 3、再执行父类HelloA的实例初始化方法* <init>(){* System.out.println("I'm A Class");* System.out.println("HelloA");* }* 4、最后执行子类HelloB的是实例初始化方法* <init>(){* System.out.println("I'm B Class");* System.out.println("HelloB");* }*/
class HelloA{public HelloA(){System.out.println("HelloA");}{System.out.println("I'm A Class");}static{System.out.println("static A");}
}public class HelloB extends HelloA{public HelloB(){System.out.println("HelloB");}{System.out.println("I'm B Class");}static{System.out.println("static B");}public static void main(String[] args) {new HelloB();}}代码编程题
第13题
案例:
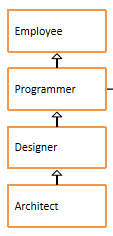
1、在com.atguigu.test16包中声明员工类、程序员类、设计师类、架构师类,
-
员工类属性:编号、姓名、年龄、薪资
-
程序员类属性:编程语言,默认都是"java"
-
设计师类属性:奖金
-
架构师类属性:持有股票数量
要求:属性私有化,无参有参构造,get/set,getInfo方法(考虑重写)
2、在com.atguigu.test16包中声明Test16类,并在main中创建每一个类的对象,并为属性赋值,并调用它们的getInfo()显示信息
package com.atguigu.test16;public class Employee {private int id;private String name;private int age;private double salary;public Employee() {super();}public Employee(int id, String name, int age, double salary) {super();this.id = id;this.name = name;this.age = age;this.salary = salary;}public int getId() {return id;}public void setId(int id) {this.id = id;}public String getName() {return name;}public void setName(String name) {this.name = name;}public int getAge() {return age;}public void setAge(int age) {this.age = age;}public double getSalary() {return salary;}public void setSalary(double salary) {this.salary = salary;}public String getInfo(){return id + "\t" + name + "\t" + age + "\t" + salary;}
}
package com.atguigu.test16;public class Programmer extends Employee{private String language = "java";public Programmer() {super();}public Programmer(int id, String name, int age, double salary) {super(id, name, age, salary);}public Programmer(int id, String name, int age, double salary, String language) {super(id, name, age, salary);this.language = language;}public String getLanguage() {return language;}public void setLanguage(String language) {this.language = language;}@Overridepublic String getInfo() {return super.getInfo() + "\t" + language;}}package com.atguigu.test16;public class Designer extends Programmer {private double bonus;public Designer() {super();}public Designer(int id, String name, int age, double salary, double bonus) {super(id, name, age, salary);this.bonus = bonus;}public Designer(int id, String name, int age, double salary, String language, double bonus) {super(id, name, age, salary, language);this.bonus = bonus;}public double getBonus() {return bonus;}public void setBonus(double bonus) {this.bonus = bonus;}@Overridepublic String getInfo() {return super.getInfo()+ "\t" + bonus;}}package com.atguigu.test16;public class Architect extends Designer {private int stock;public Architect() {super();}public Architect(int id, String name, int age, double salary, double bonus, int stock) {super(id, name, age, salary, bonus);this.stock = stock;}public Architect(int id, String name, int age, double salary, String language, double bonus, int stock) {super(id, name, age, salary, language, bonus);this.stock = stock;}public int getStock() {return stock;}public void setStock(int stock) {this.stock = stock;}@Overridepublic String getInfo() {return super.getInfo() + "\t" + stock;}}package com.atguigu.test16;public class Test16 {public static void main(String[] args) {Employee emp = new Employee(1, "张三", 23, 13000);Programmer pro = new Programmer(2, "李四", 23, 14000);Designer des = new Designer(3, "王五", 25, 15000, "scalar", 2000);Architect arc = new Architect(4, "赵六", 26, 16000, 3000, 100);System.out.println("编号\t姓名\t年龄\t薪资\t语言\t奖金\t股票");System.out.println(emp.getInfo());System.out.println(pro.getInfo());System.out.println(des.getInfo());System.out.println(arc.getInfo());}
}