作为一名菜鸟iOS开发程序员,第一次写文章,有点小激动!进入正题,最近项目中有个需求,类似美丽说蘑菇街首页效果,在网上找了一些资料后自己研究了下终于搞定了!
先看效果:

接下来详细的介绍下:
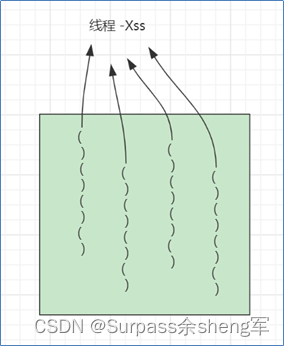
先说下布局层次结构:

图层结构大概就是这样的,这个简单,再说下思路:
1、要实现的效果是:当头部的蓝色View全部显示时,下面的TableView可以下拉,最底层的红色ScrollerView不能向下滑动,当向上滑动时,由于黄色菜单View未到达顶部,TableView此时不能滑动,底部的ScrollerView向上滑动,当黄色菜单View到达顶部时,底部的ScrollerView不能再继续向上滑动,此时TableView向上滑动
2、难点:如何让TableView和ScrollerView滑动和不滑动 怎么控制?很多人说用 ScrollerView.scrollEnabled = NO;
当你上下滑动时手指并没有抬起,经过试验这个方法无效。还有就是,当你滑动TableView时,下面的ScrollerView如何响应滑动手势?
直接上代码吧:
#import <UIKit/UIKit.h>@interface ZXWScrollerView : UIScrollView@end
#import "ZXWScrollerView.h"@implementation ZXWScrollerView- (BOOL)gestureRecognizer:(UIGestureRecognizer *)gestureRecognizer shouldRecognizeSimultaneouslyWithGestureRecognizer:(UIGestureRecognizer *)otherGestureRecognizer {return YES;
}@end自定义一个ScrollView类(最底层的ScrollerView继承该类),重写上面的方法 这个代码的意思是:当ScrollerView上的View有手势响应时,继续向下传递,这样当你滑动TableView时,下方的ScrollerView就会接收到该手势
继续看代码
首先创建下方的TableView的ViewControllerView
#import <UIKit/UIKit.h>@protocol oneDelegate <NSObject>-(void)oneDelegateDidScrollerToBottom:(UIScrollView*)scrView;@end@interface OneViewController : UIViewController
@property (nonatomic,weak) id <oneDelegate>delegate;
@property (nonatomic,strong)UITableView *tableView;
@property (nonatomic, assign) BOOL canScroll;
@end
#import "OneViewController.h"
static NSString *const kGoTopNotificationName = @"goTop";//进入置顶命令
static NSString *const kLeaveTopNotificationName = @"leaveTop";//离开置顶命令
@interface OneViewController ()<UITableViewDelegate,UITableViewDataSource>
{NSMutableArray *mutarr;
}@end@implementation OneViewController- (void)viewDidLoad {[super viewDidLoad];_tableView = [[UITableView alloc]initWithFrame:CGRectMake(0, 0, self.view.frame.size.width, self.view.frame.size.height-50-64)];[self.view addSubview:_tableView];_tableView.delegate = self;_tableView.dataSource = self;mutarr = [[NSMutableArray alloc]init];for (int i = 0 ; i<30; i++) {[mutarr addObject:[NSString stringWithFormat:@"哈哈哈哈哈哈%d",i]];}[[NSNotificationCenter defaultCenter] addObserver:self selector:@selector(acceptMsg:) name:kGoTopNotificationName object:nil];[[NSNotificationCenter defaultCenter] addObserver:self selector:@selector(acceptMsg:) name:kLeaveTopNotificationName object:nil];//其中一个TAB离开顶部的时候,如果其他几个偏移量不为0的时候,要把他们都置为0
}-(NSInteger)tableView:(UITableView *)tableView numberOfRowsInSection:(NSInteger)section
{return mutarr.count;
}-(UITableViewCell*)tableView:(UITableView *)tableView cellForRowAtIndexPath:(NSIndexPath *)indexPath
{UITableViewCell *cell = [tableView dequeueReusableCellWithIdentifier:@"cell"];if (cell==nil) {cell = [[UITableViewCell alloc]initWithStyle:UITableViewCellStyleDefault reuseIdentifier:@"cell"];}cell.textLabel.text = mutarr[indexPath.row];return cell;
}-(void)acceptMsg : (NSNotification *)notification{//NSLog(@"%@",notification);NSString *notificationName = notification.name;if ([notificationName isEqualToString:kGoTopNotificationName]) {NSDictionary *userInfo = notification.userInfo;NSString *canScroll = userInfo[@"canScroll"];if ([canScroll isEqualToString:@"1"]) {self.canScroll = YES;self.tableView.showsVerticalScrollIndicator = YES;}}else if([notificationName isEqualToString:kLeaveTopNotificationName]){self.tableView.contentOffset = CGPointZero;self.canScroll = NO;self.tableView.showsVerticalScrollIndicator = NO;}
}- (void)scrollViewDidScroll:(UIScrollView *)scrollView{if (!self.canScroll) {[scrollView setContentOffset:CGPointZero];}CGFloat offsetY = scrollView.contentOffset.y;if (offsetY<0) {[[NSNotificationCenter defaultCenter] postNotificationName:kLeaveTopNotificationName object:nil userInfo:nil];[self.delegate oneDelegateDidScrollerToBottom:scrollView];}
}- (void)didReceiveMemoryWarning {[super didReceiveMemoryWarning];// Dispose of any resources that can be recreated.
}/*
#pragma mark - Navigation// In a storyboard-based application, you will often want to do a little preparation before navigation
- (void)prepareForSegue:(UIStoryboardSegue *)segue sender:(id)sender {// Get the new view controller using [segue destinationViewController].// Pass the selected object to the new view controller.
}
*/@end
接着就是重点了 ViewController
#import <UIKit/UIKit.h>@interface ViewController : UIViewController@end
//
//  ViewController.m
//  111111
//
//  Created by ZXW on 2016/11/18.
//  Copyright © 2016年 ZXW. All rights reserved.
//#import "ViewController.h"
#import "ZXWScrollerView.h"
#import "OneViewController.h"
static NSString *const kGoTopNotificationName = @"goTop";//进入置顶命令
static NSString *const kLeaveTopNotificationName = @"leaveTop";//离开置顶命令
@interface ViewController ()<oneDelegate,UIScrollViewDelegate>
@property (nonatomic,strong) ZXWScrollerView *BtmScrollerView;
@property (nonatomic,strong) UIView          *headView;
@property (nonatomic,strong) UIScrollView    *MidScrollerView;
@property (nonatomic,strong) OneViewController *vc1;
@property (nonatomic,strong) OneViewController *vc2;
@property (nonatomic,strong) OneViewController *vc3;@property (nonatomic,assign)BOOL BtmCanScrollerLast;
@property (nonatomic,assign)BOOL BtmCanScrollercurrent;
@property (nonatomic, assign) BOOL canScroll;
@end@implementation ViewController- (void)viewDidLoad {[super viewDidLoad];
//    self.automaticallyAdjustsScrollViewInsets = YES;self.edgesForExtendedLayout = NO;_BtmScrollerView = [[ZXWScrollerView alloc]initWithFrame:self.view.frame];[self.view addSubview:_BtmScrollerView];_BtmScrollerView.backgroundColor = [UIColor redColor];_BtmScrollerView.delegate = self;_BtmScrollerView.showsVerticalScrollIndicator = NO;_BtmScrollerView.contentSize = CGSizeMake(self.view.frame.size.width, self.view.frame.size.height+150+64) ;_headView = [[UIView alloc]initWithFrame:CGRectMake(0, 0, self.view.frame.size.width, 150)];[_BtmScrollerView addSubview:_headView];UIView *view = [[UIView alloc]initWithFrame:CGRectMake(0, 100, self.view.frame.size.width, 50)];view.backgroundColor = [UIColor orangeColor];[_headView addSubview:view];_headView.backgroundColor = [UIColor blueColor];_MidScrollerView = [[UIScrollView alloc]initWithFrame:CGRectMake(0, 150, self.view.frame.size.width, self.view.frame.size.height)];_MidScrollerView.backgroundColor = [UIColor whiteColor];[_BtmScrollerView addSubview:_MidScrollerView];_MidScrollerView.pagingEnabled = YES;_MidScrollerView.contentSize = CGSizeMake(self.view.frame.size.width*3, self.view.frame.size.height);_vc1 = [[OneViewController alloc]init];_vc1.view.frame = CGRectMake(0, 0, self.view.frame.size.width, self.view.frame.size.height-50);[_MidScrollerView addSubview:_vc1.view];_vc1.delegate = self;_vc1.view.backgroundColor = [UIColor colorWithRed:(arc4random()%256)/255.0 green:(arc4random()%256)/255.0 blue:(arc4random()%256)/255.0 alpha:1];[self addChildViewController:_vc1];_vc2 = [[OneViewController alloc]init];_vc2.view.frame = CGRectMake(self.view.frame.size.width, 0, self.view.frame.size.width, self.view.frame.size.height-50);_vc2.delegate = self;[_MidScrollerView addSubview:_vc2.view];_vc2.view.backgroundColor = [UIColor colorWithRed:(arc4random()%256)/255.0 green:(arc4random()%256)/255.0 blue:(arc4random()%256)/255.0 alpha:1];[self addChildViewController:_vc2];_vc3 = [[OneViewController alloc]init];_vc3.view.frame = CGRectMake(2*self.view.frame.size.width, 0, self.view.frame.size.width, self.view.frame.size.height-50);_vc3.delegate = self;[_MidScrollerView addSubview:_vc3.view];_vc3.view.backgroundColor = [UIColor colorWithRed:(arc4random()%256)/255.0 green:(arc4random()%256)/255.0 blue:(arc4random()%256)/255.0 alpha:1];[self addChildViewController:_vc3];_canScroll = YES;
}-(void)scrollViewDidScroll:(UIScrollView *)scrollView
{//当前的偏移量CGFloat height = scrollView.contentOffset.y;
//    NSLog(@"%f", scrollView.contentOffset.y);if (height<100) {_BtmCanScrollercurrent = YES;}if (height>=100) {scrollView.contentOffset = CGPointMake(0, 100);_BtmCanScrollercurrent = NO;}if (_BtmCanScrollercurrent  != _BtmCanScrollerLast) {if (!_BtmCanScrollerLast && _BtmCanScrollercurrent) {NSLog(@"离开顶部");//要离开定不时只有当tableview偏移量小于或等于0时才可以滑动   否则设置为1if (!_canScroll) {scrollView.contentOffset = CGPointMake(0, 100);}}if (!_BtmCanScrollercurrent && _BtmCanScrollerLast) {NSLog(@"到达顶部");[[NSNotificationCenter defaultCenter] postNotificationName:kGoTopNotificationName object:nil userInfo:@{@"canScroll":@"1"}];_canScroll = NO;}}_BtmCanScrollerLast = _BtmCanScrollercurrent;
}-(void)oneDelegateDidScrollerToBottom:(UIScrollView *)scrView
{_canScroll = YES;
}- (void)didReceiveMemoryWarning {[super didReceiveMemoryWarning];// Dispose of any resources that can be recreated.
}@end
还是解释下吧 ScrollerView滑动时会调用-(void)scrollViewDidScroll:(UIScrollView *)scrollView这个方法 如果你不想ScrollerView滑动,那么就把偏移量设置为0,
[scrollView setContentOffset:CGPointZero];
至于什么时候滑动,什么时候不滑动,代码里面写的很清楚了,这里面的逻辑当然还可以优化的,有兴趣的朋友可以研究下,如果有不正确的地方请大家指正!
第一次写博客,纯手打!累~~~~,不喜勿喷!