目录
一,std容器
1,Vec(向量、栈)
2,VecDeque(队列、双端队列)
3,LinkedList(双向链表)
4,哈希表
5,集合
6,BinaryHeap(二叉堆、优先队列)
二,单向迭代器
1,Iterator特征、Iterator::next函数
2,IntoIterator特征、IntoIterator::into_iter函数
3,iter函数
4,iter_mut函数
5,Iterator::map函数
6,Iterator::collect函数、FromIterator特征
7,Iterator::cloned函数
8,小结
9,Iterator常用函数
(1)fold
10,Iterator常用函数2
11,Iterator常用函数3
三,双向迭代器
1,DoubleEndedIterator特征
2,Iterator::rev函数
一,std容器

1,Vec(向量、栈)
use std::vec::Vec;
(1)用作vector
let nums:Vec<i32>=vec![1,2,4,3];assert_eq!(nums.len(),4);assert_eq!(nums[3],3);assert_eq!(nums.is_empty(),false);遍历:
let mut nums:Vec<i32>=vec![1,2,4,3];for i in 0..nums.len() {nums[i]=0;}assert_eq!(nums, vec![0,0,0,0]);for x in nums.iter_mut(){*x=1;}assert_eq!(nums, vec![1,1,1,1]);for mut x in nums{x=1;}// assert_eq!(nums, vec![1,1,1,1]); //error,nums丧失了所有权vector翻转:
fn vector_reverse<T:Clone> (v:&Vec<T>)->Vec<T>{let mut ans = Vec::new();let mut i = v.len();loop {if i==0{break;}i-=1;ans.push(v[i].clone());}return ans;
}
(2)用作栈
let mut nums:Vec<i32>=Vec::new();nums.push(123);assert_eq!(nums.len(),1);assert_eq!(nums.last(),Some(&123));assert_eq!(nums.len(),1);assert_eq!(nums.pop(),Some(123));assert_eq!(nums.len(),0);(3)实现原理
pub(crate) struct RawVec<T, A: Allocator = Global> {ptr: Unique<T>,cap: usize,alloc: A,
}
pub struct Vec<T, #[unstable(feature = "allocator_api", issue = "32838")] A: Allocator = Global> {buf: RawVec<T, A>,len: usize,
}
buf中存放的是指针和最大可存储元素个数,len是实际元素个数。
例如push函数:
pub fn push(&mut self, value: T) {if self.len == self.buf.capacity() {self.buf.reserve_for_push(self.len);}unsafe {let end = self.as_mut_ptr().add(self.len);ptr::write(end, value);self.len += 1;}}每次push都检查len和cap,扩容方案是倍增,同C++。
reserve函数:
pub fn reserve(&mut self, additional: usize) {self.buf.reserve(self.len, additional);}let mut v = Vec::from([1]);v.reserve(10);assert_eq!(v.capacity(), 11);assert_eq!(v.len(), 1);
Rust::reverse(n)等价于C++STL::reserve(n+ v.capacity())
resize函数:
pub fn resize(&mut self, new_len: usize, value: T) {let len = self.len();if new_len > len {self.extend_with(new_len - len, value)} else {self.truncate(new_len);}}let mut vec = vec!["hello"];vec.resize(3, "world");assert_eq!(vec, ["hello", "world", "world"]);let mut vec = vec![1, 2, 3, 4];vec.resize(2, 0);assert_eq!(vec, [1, 2]);
resize函数和C++完全相同。
2,VecDeque(队列、双端队列)
use std::collections::VecDeque;
(1)用作队列
new创建空队列
len获取长度
with_capacity创建空队列 但 预占内存
push_back是尾部插入
pop_front是头部弹出,并获取弹出值
let deq:VecDeque<i32> = VecDeque::new();assert_eq!(deq.len(), 0);let mut deq:VecDeque<i32> = VecDeque::with_capacity(10);assert_eq!(deq.len(), 0);deq.push_back(1);deq.push_back(2);assert_eq!(deq.pop_front(),Some(1));assert_eq!(deq.len(), 1);(2)用作双端队列
from从列表创建队列
get获取任意位置的值
push_front头部插入
pop_back尾部弹出,并获取弹出值
2个队列还可以直接比较
let mut deq = VecDeque::from([-1, 0, 1]);assert_eq!(deq.get(2),Some(&1));deq.push_front(2);assert_eq!(deq.pop_back(),Some(1));let deq2 = VecDeque::from([2, -1, 0]);assert_eq!(deq,deq2);deq.pop_back();assert_ne!(deq,deq2);(3)实现原理
pub struct VecDeque<T,A: Allocator = Global,> {head: usize,len: usize,buf: RawVec<T, A>,
}
不像c++采用分段数组,rust的双端队列采用的是循环数组。
扩容方案:
fn grow(&mut self) {// Extend or possibly remove this assertion when valid use-cases for growing the// buffer without it being full emergedebug_assert!(self.is_full());let old_cap = self.capacity();self.buf.reserve_for_push(old_cap);unsafe {self.handle_capacity_increase(old_cap);}debug_assert!(!self.is_full());}和Vec一样,采用倍增的扩容方案。
这里的扩容稍微麻烦一点,先reserve_for_push倍增拷贝所有数据,然后handle_capacity_increase再拷贝部分数据(最多一半),调整head和tail
3,LinkedList(双向链表)
use std::collections::LinkedList;
(1)用法
支持在头部和尾部插入节点,在任意位置删除节点。
let mut list = LinkedList::new();list.push_back(2);list.push_back(3);list.push_front(1);// list is 1->2->3assert_eq!(list.remove(1), 2);assert_eq!(list.remove(0), 1);assert_eq!(list.remove(0), 3);与其说这是双向链表,不如说这个有点像数组。
(2)源码
pub struct LinkedList<T, A: Allocator = Global,> {head: Option<NonNull<Node<T>>>,tail: Option<NonNull<Node<T>>>,len: usize,alloc: A,marker: PhantomData<Box<Node<T>, A>>,
}struct Node<T> {next: Option<NonNull<Node<T>>>,prev: Option<NonNull<Node<T>>>,element: T,
}
4,哈希表
use std::collections::HashMap;
use std::collections::BTreeMap;
2个哈希表的常用方法相同:
let mut m = HashMap::new();if let Some(p) = m.get_mut(&1){*p += 1;}else{m.insert(1, 1);}let mut m = BTreeMap::new();if let Some(p) = m.get_mut(&1){*p += 1;}else{m.insert(1, 1);}例如,实现一个基于去重计数功能的类:
struct CalNum{m:HashMap<i32,i32>,
}
impl CalNum{fn add(& mut self,x:i32)->i32{if let Some(p)=self.m.get_mut(&x){*p+=1;}else{self.m.insert(x,1);}return self.m.len() as i32;}fn sub(& mut self,x:i32)->i32{if let Some(p)=self.m.get_mut(&x){*p-=1;if *p <= 0{self.m.remove(&x);}}return self.m.len() as i32;}fn get(& mut self)->i32{return self.m.len() as i32;}
}
5,集合
use std::collections::HashSet;
use std::collections::BTreeSet;
(1)常用方法
2个集合的常用方法完全相同。
HashSet:
let mut m = HashSet::new();m.insert(5);assert_eq!(m.len(), 1);if !m.contains(&6) {m.insert(6);}assert_eq!(m.len(), 2);m.insert(6);assert_eq!(m.len(), 2);m.remove(&5);m.remove(&6);assert_eq!(m.is_empty(), true);BTreeSet:
let mut m = BTreeSet::new();m.insert(5);assert_eq!(m.len(), 1);if !m.contains(&6) {m.insert(6);}assert_eq!(m.len(), 2);m.insert(6);assert_eq!(m.len(), 2);m.remove(&5);m.remove(&6);assert_eq!(m.is_empty(), true);(2)数据类型约束
impl<T, S> HashSet<T, S>
whereT: Eq + Hash,S: BuildHasher,
{
......
}
HashSet的泛型实现就约束了T具有Eq和Hash
impl<T, A: Allocator + Clone> BTreeSet<T, A> {
......pub fn contains<Q: ?Sized>(&self, value: &Q) -> boolwhereT: Borrow<Q> + Ord,Q: Ord,{self.map.contains_key(value)}
......pub fn insert(&mut self, value: T) -> boolwhereT: Ord,{self.map.insert(value, SetValZST::default()).is_none()}
......
}
BTreeSet的泛型实现约束较少,但是常见的接口需要Ord特征。
(3)浮点数示例
如果确保浮点数不会等于NAN,那么可以这么写:
#[derive(PartialEq,PartialOrd)]
struct FloatWithOrd{x:f32, // do not let x be NAN
}
impl Eq for FloatWithOrd{
}
impl Ord for FloatWithOrd {#[inline]fn cmp(&self,other:&FloatWithOrd)->Ordering{if(self.x < other.x){return Ordering::Less;}if(self.x > other.x){return Ordering::Greater;}return Ordering::Equal;}
}fn main() {let mut m = BTreeSet::new();m.insert(FloatWithOrd{x:5.0});assert_eq!(m.len(), 1);if !m.contains(&FloatWithOrd{x:6.0}) {m.insert(FloatWithOrd{x:6.0});}assert_eq!(m.len(), 2);m.insert(FloatWithOrd{x:6.0});assert_eq!(m.len(), 2);m.remove(&FloatWithOrd{x:5.0});m.remove(&FloatWithOrd{x:6.0});assert_eq!(m.is_empty(), true);println!("end");
}
浮点数类型的HashSet比较麻烦,需要Hash,暂时不研究这个。
6,BinaryHeap(二叉堆、优先队列)
use std::collections::BinaryHeap;
看实现源码是用二叉堆实现的。
默认堆顶是最大值:
let mut heap = BinaryHeap::new();heap.push(1);heap.push(3);heap.push(1);heap.push(2);assert_eq!(heap.peek(),Some(&3));heap.pop();assert_eq!(heap.peek(),Some(&2));heap.pop();assert_eq!(heap.peek(),Some(&1));heap.pop();assert_eq!(heap.peek(),Some(&1));heap.pop();assert_eq!(heap.peek(),None);要想使用堆顶是最小值的堆,有2种方法:自定义序关系、reserve
(1)自定义序关系
#[derive(Eq,PartialEq)]
struct Node{num:i32
}
impl Ord for Node {#[inline]fn cmp(&self,other:&Node)->Ordering{return other.num.cmp(&self.num);}
}
impl PartialOrd for Node {#[inline]fn partial_cmp(&self, other: &Node) ->  Option<Ordering> {return Some(self.cmp(other));}
}
fn main() {let mut heap = BinaryHeap::new();heap.push(Node{num:1});heap.push(Node{num:3});assert_eq!(heap.peek().unwrap().num, 1);println!("end");
}
注意,自己实现PartialOrd但是Ord用默认的话,在堆里面的逻辑也是对的,但是以后如果有别人把这个结构体用于堆之外的场景,可能就有BUG了。
(2)用reserve
use std::cmp::Reverse;
fn main() {let mut heap = BinaryHeap::new();heap.push(Reverse(1));heap.push(Reverse(3));assert_eq!(heap.peek().unwrap(), &Reverse(1));assert_eq!(Reverse(1)>Reverse(3), true);println!("end");
}
reserve就像是一个加负号的技巧:
fn main() {let mut heap = BinaryHeap::new();heap.push(-1);heap.push(-3);assert_eq!(heap.peek().unwrap(), &-1);assert_eq!(-1>-3, true);println!("end");
}
(3)堆排序
BinaryHeap自带堆排序into_sorted_vec
(4)源码解析
虽然BinaryHeap的定义本身没有要求ord特征,但是默认实现的泛型方法要求了Ord特征。
这里我摘录了核心的几个函数:pop、push、into_sorted_vec,以及其中调用的关键操作。
pub struct BinaryHeap<    T,A: Allocator = Global,> {data: Vec<T, A>,
}impl<T: Ord, A: Allocator> BinaryHeap<T, A> {。。。。。。pub fn pop(&mut self) -> Option<T> {self.data.pop().map(|mut item| {if !self.is_empty() {swap(&mut item, &mut self.data[0]);// SAFETY: !self.is_empty() means that self.len() > 0unsafe { self.sift_down_to_bottom(0) };}item})}pub fn push(&mut self, item: T) {let old_len = self.len();self.data.push(item);// SAFETY: Since we pushed a new item it means that//  old_len = self.len() - 1 < self.len()unsafe { self.sift_up(0, old_len) };}pub fn into_sorted_vec(mut self) -> Vec<T, A> {let mut end = self.len();while end > 1 {end -= 1;// SAFETY: `end` goes from `self.len() - 1` to 1 (both included),//  so it's always a valid index to access.//  It is safe to access index 0 (i.e. `ptr`), because//  1 <= end < self.len(), which means self.len() >= 2.unsafe {let ptr = self.data.as_mut_ptr();ptr::swap(ptr, ptr.add(end));}// SAFETY: `end` goes from `self.len() - 1` to 1 (both included) so://  0 < 1 <= end <= self.len() - 1 < self.len()//  Which means 0 < end and end < self.len().unsafe { self.sift_down_range(0, end) };}self.into_vec()}unsafe fn sift_up(&mut self, start: usize, pos: usize) -> usize {// Take out the value at `pos` and create a hole.// SAFETY: The caller guarantees that pos < self.len()let mut hole = unsafe { Hole::new(&mut self.data, pos) };while hole.pos() > start {let parent = (hole.pos() - 1) / 2;// SAFETY: hole.pos() > start >= 0, which means hole.pos() > 0//  and so hole.pos() - 1 can't underflow.//  This guarantees that parent < hole.pos() so//  it's a valid index and also != hole.pos().if hole.element() <= unsafe { hole.get(parent) } {break;}// SAFETY: Same as aboveunsafe { hole.move_to(parent) };}hole.pos()}unsafe fn sift_down_range(&mut self, pos: usize, end: usize) {// SAFETY: The caller guarantees that pos < end <= self.len().let mut hole = unsafe { Hole::new(&mut self.data, pos) };let mut child = 2 * hole.pos() + 1;// Loop invariant: child == 2 * hole.pos() + 1.while child <= end.saturating_sub(2) {// compare with the greater of the two children// SAFETY: child < end - 1 < self.len() and//  child + 1 < end <= self.len(), so they're valid indexes.//  child == 2 * hole.pos() + 1 != hole.pos() and//  child + 1 == 2 * hole.pos() + 2 != hole.pos().// FIXME: 2 * hole.pos() + 1 or 2 * hole.pos() + 2 could overflow//  if T is a ZSTchild += unsafe { hole.get(child) <= hole.get(child + 1) } as usize;// if we are already in order, stop.// SAFETY: child is now either the old child or the old child+1//  We already proven that both are < self.len() and != hole.pos()if hole.element() >= unsafe { hole.get(child) } {return;}// SAFETY: same as above.unsafe { hole.move_to(child) };child = 2 * hole.pos() + 1;}// SAFETY: && short circuit, which means that in the//  second condition it's already true that child == end - 1 < self.len().if child == end - 1 && hole.element() < unsafe { hole.get(child) } {// SAFETY: child is already proven to be a valid index and//  child == 2 * hole.pos() + 1 != hole.pos().unsafe { hole.move_to(child) };}}unsafe fn sift_down(&mut self, pos: usize) {let len = self.len();// SAFETY: pos < len is guaranteed by the caller and//  obviously len = self.len() <= self.len().unsafe { self.sift_down_range(pos, len) };}unsafe fn sift_down_to_bottom(&mut self, mut pos: usize) {let end = self.len();let start = pos;// SAFETY: The caller guarantees that pos < self.len().let mut hole = unsafe { Hole::new(&mut self.data, pos) };let mut child = 2 * hole.pos() + 1;// Loop invariant: child == 2 * hole.pos() + 1.while child <= end.saturating_sub(2) {// SAFETY: child < end - 1 < self.len() and//  child + 1 < end <= self.len(), so they're valid indexes.//  child == 2 * hole.pos() + 1 != hole.pos() and//  child + 1 == 2 * hole.pos() + 2 != hole.pos().// FIXME: 2 * hole.pos() + 1 or 2 * hole.pos() + 2 could overflow//  if T is a ZSTchild += unsafe { hole.get(child) <= hole.get(child + 1) } as usize;// SAFETY: Same as aboveunsafe { hole.move_to(child) };child = 2 * hole.pos() + 1;}if child == end - 1 {// SAFETY: child == end - 1 < self.len(), so it's a valid index//  and child == 2 * hole.pos() + 1 != hole.pos().unsafe { hole.move_to(child) };}pos = hole.pos();drop(hole);// SAFETY: pos is the position in the hole and was already proven//  to be a valid index.unsafe { self.sift_up(start, pos) };}。。。。。。
}
sift_down_range是往下调整到指定id,主要用于堆排序
sift_down是往下调整到底,直接调用sift_down_range
sift_down_to_bottom是先往下调整到底,之后再往上调整到顶。
(5)应用实例
rust源码的注释中,给出了Dijkstra's shortest path algorithm作为示例,如何使用优先队列。
//use std::cmp::Ordering;
//use std::collections::BinaryHeap;#[derive(Copy, Clone, Eq, PartialEq)]
struct State {cost: usize,position: usize,
}// The priority queue depends on `Ord`.
// Explicitly implement the trait so the queue becomes a min-heap
// instead of a max-heap.
impl Ord for State {fn cmp(&self, other: &Self) -> Ordering {// Notice that the we flip the ordering on costs.// In case of a tie we compare positions - this step is necessary// to make implementations of `PartialEq` and `Ord` consistent.other.cost.cmp(&self.cost).then_with(|| self.position.cmp(&other.position))}
}// `PartialOrd` needs to be implemented as well.
impl PartialOrd for State {fn partial_cmp(&self, other: &Self) -> Option<Ordering> {Some(self.cmp(other))}
}// Each node is represented as a `usize`, for a shorter implementation.
struct Edge {node: usize,cost: usize,
}// Dijkstra's shortest path algorithm.// Start at `start` and use `dist` to track the current shortest distance
// to each node. This implementation isn't memory-efficient as it may leave duplicate
// nodes in the queue. It also uses `usize::MAX` as a sentinel value,
// for a simpler implementation.
fn shortest_path(adj_list: &Vec<Vec<Edge>>, start: usize, goal: usize) -> Option<usize> {// dist[node] = current shortest distance from `start` to `node`let mut dist: Vec<_> = (0..adj_list.len()).map(|_| usize::MAX).collect();let mut heap = BinaryHeap::new();// We're at `start`, with a zero costdist[start] = 0;heap.push(State { cost: 0, position: start });// Examine the frontier with lower cost nodes first (min-heap)while let Some(State { cost, position }) = heap.pop() {// Alternatively we could have continued to find all shortest pathsif position == goal { return Some(cost); }// Important as we may have already found a better wayif cost > dist[position] { continue; }// For each node we can reach, see if we can find a way with// a lower cost going through this nodefor edge in &adj_list[position] {let next = State { cost: cost + edge.cost, position: edge.node };// If so, add it to the frontier and continueif next.cost < dist[next.position] {heap.push(next);// Relaxation, we have now found a better waydist[next.position] = next.cost;}}}// Goal not reachableNone
}fn main() {// This is the directed graph we're going to use.// The node numbers correspond to the different states,// and the edge weights symbolize the cost of moving// from one node to another.// Note that the edges are one-way.////                  7//          +-----------------+//          |                 |//          v   1        2    |  2//          0 -----> 1 -----> 3 ---> 4//          |        ^        ^      ^//          |        | 1      |      |//          |        |        | 3    | 1//          +------> 2 -------+      |//           10      |               |//                   +---------------+//// The graph is represented as an adjacency list where each index,// corresponding to a node value, has a list of outgoing edges.// Chosen for its efficiency.let graph = vec![// Node 0vec![Edge { node: 2, cost: 10 },Edge { node: 1, cost: 1 }],// Node 1vec![Edge { node: 3, cost: 2 }],// Node 2vec![Edge { node: 1, cost: 1 },Edge { node: 3, cost: 3 },Edge { node: 4, cost: 1 }],// Node 3vec![Edge { node: 0, cost: 7 },Edge { node: 4, cost: 2 }],// Node 4vec![]];assert_eq!(shortest_path(&graph, 0, 1), Some(1));assert_eq!(shortest_path(&graph, 0, 3), Some(3));assert_eq!(shortest_path(&graph, 3, 0), Some(7));assert_eq!(shortest_path(&graph, 0, 4), Some(5));assert_eq!(shortest_path(&graph, 4, 0), None);println!("endend");
}
二,单向迭代器
1,Iterator特征、Iterator::next函数
源码:
pub trait Iterator {type Item;fn next(&mut self) -> Option<Self::Item>;......省略了一堆函数,下文有一些常用函数
}
只有next函数是需要具体实现的,其他函数都直接用trait内的默认实现即可。
遍历方法:
let mut v = vec![1,0,3];let mut it = v.into_iter();assert_eq!(it.next(), Some(1));assert_eq!(it.next(), Some(0));assert_eq!(it.next(), Some(3));assert_eq!(it.next(), None);assert_eq!(it.next(), None);接下来,我们以Vec为例,看看3种迭代器的next函数都是怎么实现的。
2,IntoIterator特征、IntoIterator::into_iter函数
以这个代码为例:
fn main() {let nums:Vec<i32>=vec![1,2,4,3];let x=nums.into_iter().next();
}
首先我们发现里面先用到这个trait:
pub trait IntoIterator {type Item;type IntoIter: Iterator<Item = Self::Item>;fn into_iter(self) -> Self::IntoIter;
}
那么再看看Vec的IntoIterator是怎么实现的:
impl<T, A: Allocator> IntoIterator for Vec<T, A> {type Item = T;type IntoIter = IntoIter<T, A>;fn into_iter(self) -> Self::IntoIter {unsafe {let mut me = ManuallyDrop::new(self);let alloc = ManuallyDrop::new(ptr::read(me.allocator()));let begin = me.as_mut_ptr();let end = if T::IS_ZST {begin.wrapping_byte_add(me.len())} else {begin.add(me.len()) as *const T};let cap = me.buf.capacity();IntoIter {buf: NonNull::new_unchecked(begin),phantom: PhantomData,cap,alloc,ptr: begin,end,}}}
}
也就是说,Vec的into_iter方法会返回一个IntoIter类型的结构体,其中ptr和end都是裸指针。
IntoIter结构体是一个直接实现了Iterator特征的结构体:
impl<T, A: Allocator> Iterator for IntoIter<T, A> {type Item = T;fn next(&mut self) -> Option<T> {if self.ptr == self.end {None} else if T::IS_ZST {// `ptr` has to stay where it is to remain aligned, so we reduce the length by 1 by// reducing the `end`.self.end = self.end.wrapping_byte_sub(1);// Make up a value of this ZST.Some(unsafe { mem::zeroed() })} else {let old = self.ptr;self.ptr = unsafe { self.ptr.add(1) };Some(unsafe { ptr::read(old) })}}
}
迭代器都会默认实现IntoIterator:
impl<I: Iterator> IntoIterator for I {type Item = I::Item;type IntoIter = I;#[inline]fn into_iter(self) -> I {self}
}
即迭代器再调用into_iter函数会得到自身。
3,iter函数
再看看这个代码:
fn main() {let nums:Vec<i32>=vec![1,2,4,3];let mut x=nums.iter().next();
}
首先Vec做一个隐式转换,转换成切片slice:
impl<T, A: Allocator> ops::Deref for Vec<T, A> {type Target = [T];fn deref(&self) -> &[T] {unsafe { slice::from_raw_parts(self.as_ptr(), self.len) }}
}
然后切片的源码中有iter函数:
impl<T> [T] {pub fn iter(&self) -> Iter<'_, T> {Iter::new(self)}pub fn iter_mut(&mut self) -> IterMut<'_, T> {IterMut::new(self)}
}
iter函数返回一个Iter结构体
Iter结构体也实现了Iterator特征。
4,iter_mut函数
参考iter函数、Iter结构体。
5,Iterator::map函数
map函数把迭代器转化成Map结构体
fn map<B, F>(self, f: F) -> Map<Self, F>whereSelf: Sized,F: FnMut(Self::Item) -> B,{Map::new(self, f)}Map结构体也是迭代器,它也实现了Iterator特征。
Map结构体包含迭代器和算子2个成员:
pub struct Map<I, F> {// Used for `SplitWhitespace` and `SplitAsciiWhitespace` `as_str` methodspub(crate) iter: I,f: F,
}
6,Iterator::collect函数、FromIterator特征
Iterator::collect函数调用FromIterator::from_iter函数
fn collect<B: FromIterator<Self::Item>>(self) -> BwhereSelf: Sized,{FromIterator::from_iter(self)}对于3种迭代器,不知道用了什么机制,只有IntoIter迭代器可以调用collect得到容器本身,另外2种迭代器不能调用它。
let mut v = vec![1,2,3];//let v:Vec<i32> = v.iter().collect();//let v:Vec<i32> = v.iter_mut().collect();let v:Vec<i32> = v.into_iter().collect();对于Map结构体,不知道用了什么机制,会把里面的迭代器成员萃取出来,逐个调用Map结构体的算子成员进行运算,最后收集得到容器。
let mut v = vec![1,2,3];let v1:Vec<i32> = v.iter().map(|x| x+1).collect();let v2:Vec<i32> = v.iter_mut().map(|x| *x+1).collect();let v3:Vec<i32> = v.into_iter().map(|x| x+1).collect();7,Iterator::cloned函数
和map类型,调用cloned函数也会得到一个结构体
fn cloned<'a, T: 'a>(self) -> Cloned<Self>whereSelf: Sized + Iterator<Item = &'a T>,T: Clone,{Cloned::new(self)}Cloned结构体里面只有一个迭代器成员:
pub struct Cloned<I> {it: I,
}
应该是由于相同的萃取机制,经过cloned函数之后,迭代器就能collect了。
不知道用了什么机制,只有Iter迭代器才可以用cloned。
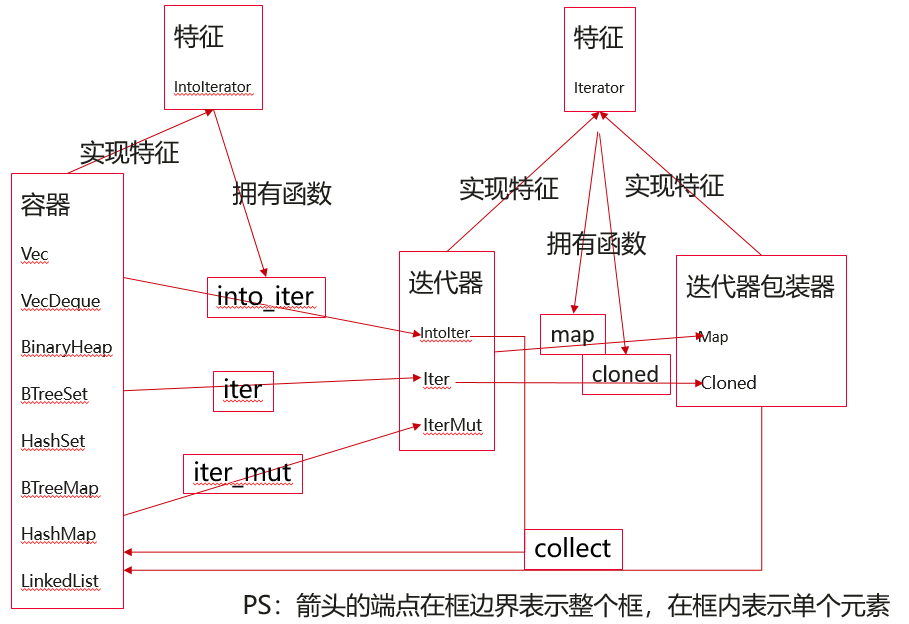
8,小结
9,Iterator常用函数
(1)fold
fn fold<B, F>(mut self, init: B, mut f: F) -> BwhereSelf: Sized,F: FnMut(B, Self::Item) -> B,{let mut accum = init;while let Some(x) = self.next() {accum = f(accum, x);}accum}用来做累积运算,语法是:
iter.fold(init, |acc, x| {// init是初始值// acc是累积值,x是当前元素// 返回更新后的acc
})
例如,统计所有数的平方和:
let mut v = vec![1,2,3];let x = v.iter().fold(0,|acc,x|{acc+x*x});assert_eq!(x,14);10,Iterator常用函数2
fn for_each<F>(self, f: F) where Self: Sized, F: FnMut(Self::Item),{#[inline]fn call<T>(mut f: impl FnMut(T)) -> impl FnMut((), T) {move |(), item| f(item)}self.fold((), call(f));}fn filter<P>(self, predicate: P) -> Filter<Self, P> where Self: Sized, P: FnMut(&Self::Item) -> bool,{Filter::new(self, predicate)}fn skip(self, n: usize) -> Skip<Self> where Self: Sized,{Skip::new(self, n)}fn take(self, n: usize) -> Take<Self> where Self: Sized,{Take::new(self, n)}
11,Iterator常用函数3
fn count(self) -> usizewhereSelf: Sized,{self.fold(0,#[rustc_inherit_overflow_checks]|count, _| count + 1,)}fn last(self) -> Option<Self::Item>whereSelf: Sized,{#[inline]fn some<T>(_: Option<T>, x: T) -> Option<T> {Some(x)}self.fold(None, some)}fn zip<U>(self, other: U) -> Zip<Self, U::IntoIter>whereSelf: Sized,U: IntoIterator,{Zip::new(self, other.into_iter())}fn unzip<A, B, FromA, FromB>(self) -> (FromA, FromB)whereFromA: Default + Extend<A>,FromB: Default + Extend<B>,Self: Sized + Iterator<Item = (A, B)>,{let mut unzipped: (FromA, FromB) = Default::default();unzipped.extend(self);unzipped}fn max(self) -> Option<Self::Item>whereSelf: Sized,Self::Item: Ord,{self.max_by(Ord::cmp)}fn min(self) -> Option<Self::Item>whereSelf: Sized,Self::Item: Ord,{self.min_by(Ord::cmp)}fn sum<S>(self) -> SwhereSelf: Sized,S: Sum<Self::Item>,{Sum::sum(self)}fn product<P>(self) -> PwhereSelf: Sized,P: Product<Self::Item>,{Product::product(self)}fn copied<'a, T: 'a>(self) -> Copied<Self>whereSelf: Sized + Iterator<Item = &'a T>,T: Copy,{Copied::new(self)}fn cloned<'a, T: 'a>(self) -> Cloned<Self>whereSelf: Sized + Iterator<Item = &'a T>,T: Clone,{Cloned::new(self)}fn cmp<I>(self, other: I) -> OrderingwhereI: IntoIterator<Item = Self::Item>,Self::Item: Ord,Self: Sized,{self.cmp_by(other, |x, y| x.cmp(&y))}fn partial_cmp<I>(self, other: I) -> Option<Ordering>whereI: IntoIterator,Self::Item: PartialOrd<I::Item>,Self: Sized,{self.partial_cmp_by(other, |x, y| x.partial_cmp(&y))}fn eq<I>(self, other: I) -> boolwhereI: IntoIterator,Self::Item: PartialEq<I::Item>,Self: Sized,{self.eq_by(other, |x, y| x == y)}fn ne<I>(self, other: I) -> boolwhereI: IntoIterator,Self::Item: PartialEq<I::Item>,Self: Sized,{!self.eq(other)}还有其他很多函数没有列出来。
三,双向迭代器
1,DoubleEndedIterator特征
pub trait DoubleEndedIterator: Iterator {fn next_back(&mut self) -> Option<Self::Item>;......省略了几个函数
}
双向迭代器DoubleEndedIterator特征 继承了 迭代器DoubleEndedIterator特征。
rust的容器都实现了DoubleEndedIterator特征
2,Iterator::rev函数
fn rev(self) -> Rev<Self> where Self: Sized + DoubleEndedIterator,{Rev::new(self)}既然这个函数需要DoubleEndedIterator特征,为什么不把这个函数挪到DoubleEndedIterator特征里面?
根据stack_overflow中网友的解答,应该是出于使用方便的角度,因为容器是常用的,rev也是常用的,但DoubleEndedIterator特征是不太需要关注的。也就是说,这里面只有包管理、可见性相关的考量,并没有强逻辑的考量。
rev使用示例:
let mut v = vec![1,2,3];let v:Vec<i32> = v.into_iter().rev().collect();assert_eq!(v, vec![3,2,1]);

![【BUUCTF】[RoarCTF 2019]Easy Java1](https://img-blog.csdnimg.cn/direct/02a6810f75824aab98c77daefd584fe5.png)