目录
一、简介
二、加密处理
三、发布配置
3.1、插入或更新配置信息
3.2、发布配置数据变动事件
3.2.1、目标节点是当前节点
3.2.2、目标节点非当前节点
四、总结
一、简介
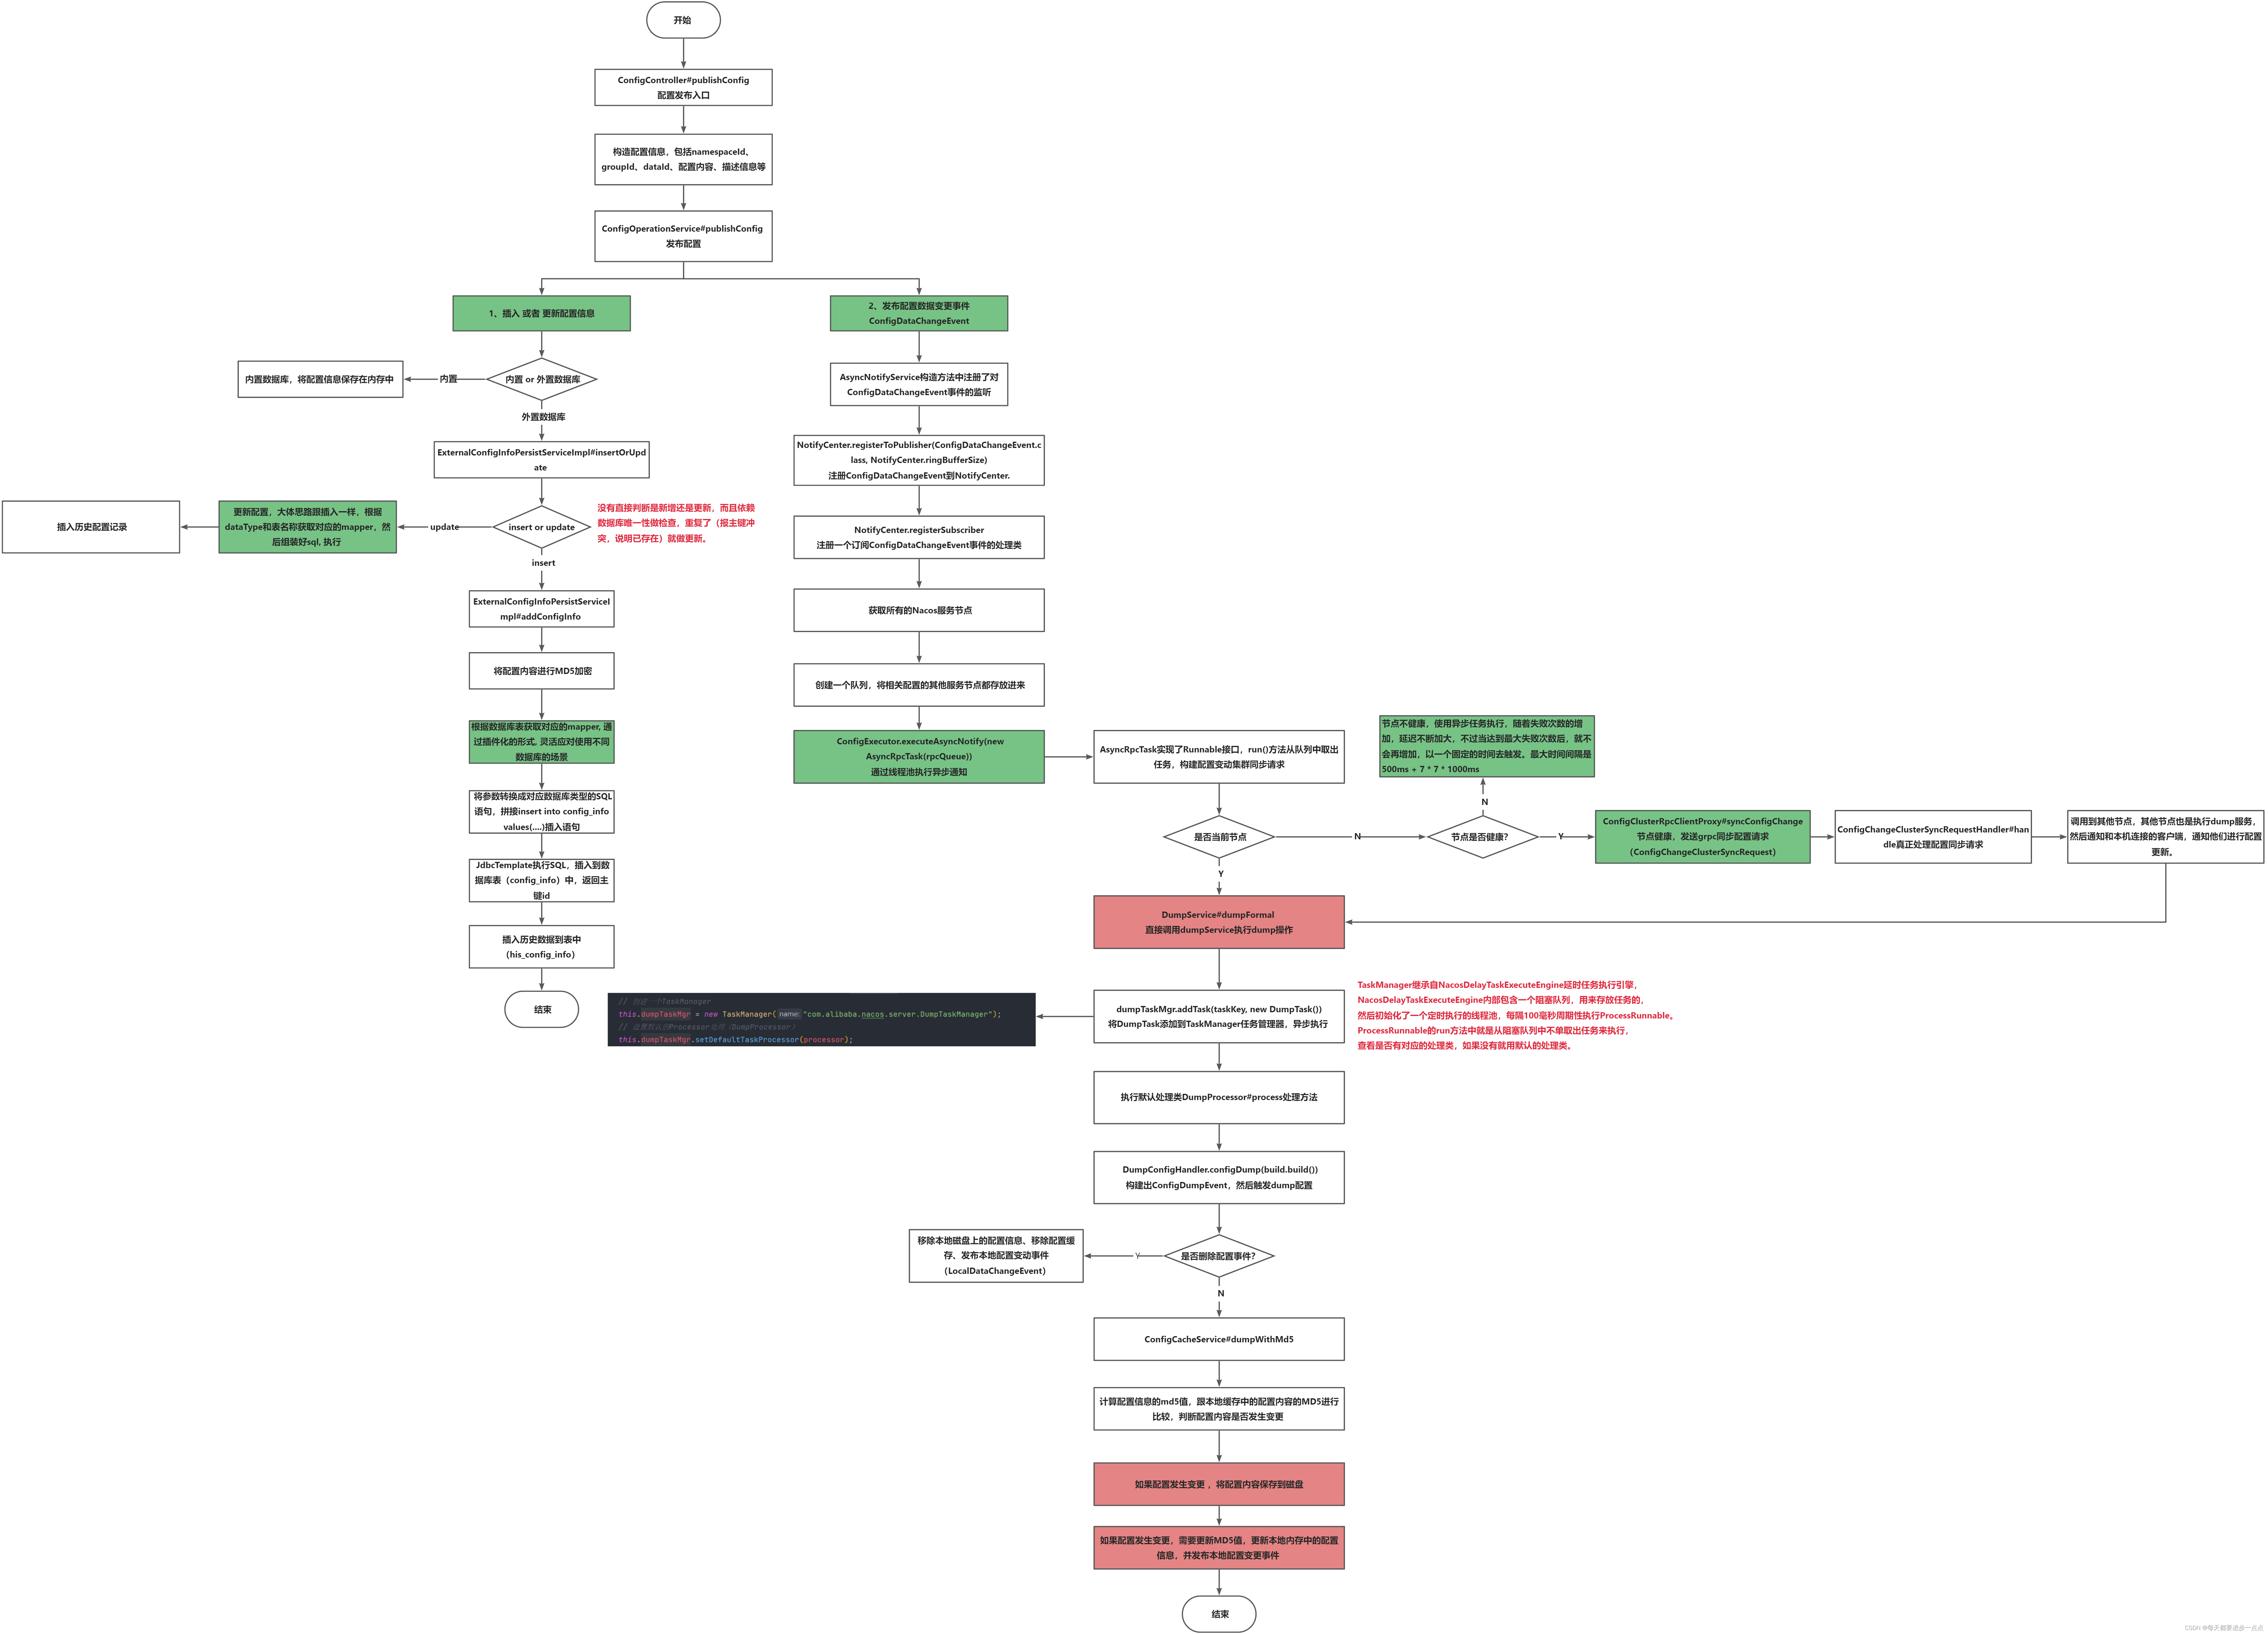
一般情况下,我们是通过Nacos提供的Web控制台登录,然后通过界面新增配置信息。后续客户端只要配置了对应的NameSpace,Group,DataId就可以在客户端获取到对应的配置信息。既然这样,Nacos服务端肯定会存储在Web控制台配置的配置信息。
Web控制台发布配置的入口肯定也是一个controller接口:com.alibaba.nacos.config.server.controller.ConfigController#publishConfig。
@PostMapping
@TpsControl(pointName = "ConfigPublish")
@Secured(action = ActionTypes.WRITE, signType = SignType.CONFIG)
public Boolean publishConfig(HttpServletRequest request, HttpServletResponse response,@RequestParam(value = "dataId") String dataId, @RequestParam(value = "group") String group,@RequestParam(value = "tenant", required = false, defaultValue = StringUtils.EMPTY) String tenant,@RequestParam(value = "content") String content, @RequestParam(value = "tag", required = false) String tag,@RequestParam(value = "appName", required = false) String appName,@RequestParam(value = "src_user", required = false) String srcUser,@RequestParam(value = "config_tags", required = false) String configTags,@RequestParam(value = "desc", required = false) String desc,@RequestParam(value = "use", required = false) String use,@RequestParam(value = "effect", required = false) String effect,@RequestParam(value = "type", required = false) String type,@RequestParam(value = "schema", required = false) String schema,@RequestParam(required = false) String encryptedDataKey) throws NacosException {String encryptedDataKeyFinal = null;// 内容加密if (StringUtils.isNotBlank(encryptedDataKey)) {encryptedDataKeyFinal = encryptedDataKey;} else {// 使用到插件化的思想进行加密Pair<String, String> pair = EncryptionHandler.encryptHandler(dataId, content);content = pair.getSecond();encryptedDataKeyFinal = pair.getFirst();}// 参数检查ParamUtils.checkTenant(tenant);ParamUtils.checkParam(dataId, group, "datumId", content);ParamUtils.checkParam(tag);// 构造配置信息,包括namespaceId、groupId、dataId、配置内容、描述信息等ConfigForm configForm = new ConfigForm();configForm.setDataId(dataId);configForm.setGroup(group);configForm.setNamespaceId(tenant);configForm.setContent(content);configForm.setTag(tag);configForm.setAppName(appName);configForm.setSrcUser(srcUser);configForm.setConfigTags(configTags);configForm.setDesc(desc);configForm.setUse(use);configForm.setEffect(effect);configForm.setType(type);configForm.setSchema(schema);if (StringUtils.isBlank(srcUser)) {configForm.setSrcUser(RequestUtil.getSrcUserName(request));}if (!ConfigType.isValidType(type)) {configForm.setType(ConfigType.getDefaultType().getType());}// 构造请求对象ConfigRequestInfo configRequestInfo = new ConfigRequestInfo();configRequestInfo.setSrcIp(RequestUtil.getRemoteIp(request));configRequestInfo.setRequestIpApp(RequestUtil.getAppName(request));configRequestInfo.setBetaIps(request.getHeader("betaIps"));// 发布配置return configOperationService.publishConfig(configForm, configRequestInfo, encryptedDataKeyFinal);
}
上述的代码主要完成了五件事情:
- 1、加密处理
- 2、参数检查
- 3、构造配置信息
- 4、构造请求对象
- 5、发布配置
下面我们分析一些重要代码。
二、加密处理
加密处理使用了插件化思想。我们分析下插件化的思想,看看是如何使用插件或者扩展来进行加解密的。
public static Pair<String, String> encryptHandler(String dataId, String content) {// 检查是否需要加密if (!checkCipher(dataId)) {return Pair.with("", content);}Optional<String> algorithmName = parseAlgorithmName(dataId);// 获取加密的处理类// EncryptionPluginManager.instance(): 返回单例实例Optional<EncryptionPluginService> optional = algorithmName.flatMap(EncryptionPluginManager.instance()::findEncryptionService);if (!optional.isPresent()) {LOGGER.warn("[EncryptionHandler] [encryptHandler] No encryption program with the corresponding name found");// 获取不到,还是走非加密型return Pair.with("", content);}EncryptionPluginService encryptionPluginService = optional.get();// 根据扩展的插件类,获取密钥String secretKey = encryptionPluginService.generateSecretKey();// 利用密钥加密String encryptContent = encryptionPluginService.encrypt(secretKey, content);return Pair.with(encryptionPluginService.encryptSecretKey(secretKey), encryptContent);
}
首先判断是否需要处理加密,如果需要的话,去插件里面获取对应的处理类,如果获取不到则打日志,然后使用非加密方式进行处理;获取到加密插件,利用插件获取秘钥,然后再加密。
我们来分析下如何获取加密处理类的:
Optional<EncryptionPluginService> optional = algorithmName
.flatMap(EncryptionPluginManager.instance()::findEncryptionService)
这个EncryptionPluginManager.instance()执行返回的是一个单例对象,看看它的构造方法:
private EncryptionPluginManager() {// 初始化: 根据自己写的扩展机制,获取EncryptionPluginService,然后再进行反射初始化。loadInitial();
}private void loadInitial() {// 通过NacosServiceLoader扩展机制,获取EncryptionPluginService加密处理类的集合Collection<EncryptionPluginService> encryptionPluginServices = NacosServiceLoader.load(EncryptionPluginService.class);for (EncryptionPluginService encryptionPluginService : encryptionPluginServices) {if (StringUtils.isBlank(encryptionPluginService.algorithmName())) {LOGGER.warn("[EncryptionPluginManager] Load EncryptionPluginService({}) algorithmName(null/empty) fail."+ " Please Add algorithmName to resolve.", encryptionPluginService.getClass());continue;}// 放入集合ENCRYPTION_SPI_MAP.put(encryptionPluginService.algorithmName(), encryptionPluginService);LOGGER.info("[EncryptionPluginManager] Load EncryptionPluginService({}) algorithmName({}) successfully.",encryptionPluginService.getClass(), encryptionPluginService.algorithmName());}
}
因为是单例,所以获取单例的时候通过loadInitial()进行初始化,初始化的时候会根据自己写的扩展机制,获取EncryptionPluginService加密处理类集合,然后再进行反射初始化,并缓存起来。
重要的还是这种插件化的思想,它仅仅依赖于原生JDK的SPI机制,可以按需扩展和定制:
- 1、提供给插件化的接口,由第三方去实现(自定义功能);
- 2、在初始化的时候,Nacos去加载处理类;
三、发布配置
发布配置调用的是ConfigOperationService#publishConfig方法:
public Boolean publishConfig(ConfigForm configForm, ConfigRequestInfo configRequestInfo, String encryptedDataKey)throws NacosException {// 将配置高级信息转成Map键值对Map<String, Object> configAdvanceInfo = getConfigAdvanceInfo(configForm);// 检查参数ParamUtils.checkParam(configAdvanceInfo);if (AggrWhitelist.isAggrDataId(configForm.getDataId())) {LOGGER.warn("[aggr-conflict] {} attempt to publish single data, {}, {}", configRequestInfo.getSrcIp(),configForm.getDataId(), configForm.getGroup());throw new NacosApiException(HttpStatus.FORBIDDEN.value(), ErrorCode.INVALID_DATA_ID,"dataId:" + configForm.getDataId() + " is aggr");}// 构建ConfigInfo配置信息,发布配置最基本的五个参数: nameSpaceId、groupId、dataId、应用名称、配置内容ConfigInfo configInfo = new ConfigInfo(configForm.getDataId(), configForm.getGroup(),configForm.getNamespaceId(), configForm.getAppName(), configForm.getContent());configInfo.setType(configForm.getType());configInfo.setEncryptedDataKey(encryptedDataKey);ConfigOperateResult configOperateResult = null;String persistEvent = ConfigTraceService.PERSISTENCE_EVENT;// 判断是否是beta测试版本if (StringUtils.isBlank(configRequestInfo.getBetaIps())) {// 正常发布,大部分情况下,我们都没有指定tagif (StringUtils.isBlank(configForm.getTag())) {// 1、插入 or 更新配置信息// 这里分为内置数据库(EmbeddedConfigInfoPersistServiceImpl)和外置数据库(ExternalConfigInfoPersistServiceImpl)操作,通常我们都是使用MySQL进行持久化存储configOperateResult = configInfoPersistService.insertOrUpdate(configRequestInfo.getSrcIp(),configForm.getSrcUser(), configInfo, configAdvanceInfo);// 2、发布配置数据变动事件ConfigChangePublisher.notifyConfigChange(new ConfigDataChangeEvent(false, configForm.getDataId(), configForm.getGroup(),configForm.getNamespaceId(), configOperateResult.getLastModified()));} else {// 指定tagpersistEvent = ConfigTraceService.PERSISTENCE_EVENT_TAG + "-" + configForm.getTag();configOperateResult = configInfoTagPersistService.insertOrUpdateTag(configInfo, configForm.getTag(),configRequestInfo.getSrcIp(), configForm.getSrcUser());ConfigChangePublisher.notifyConfigChange(new ConfigDataChangeEvent(false, configForm.getDataId(), configForm.getGroup(),configForm.getNamespaceId(), configForm.getTag(),configOperateResult.getLastModified()));}} else {persistEvent = ConfigTraceService.PERSISTENCE_EVENT_BETA;// beta publishconfigOperateResult = configInfoBetaPersistService.insertOrUpdateBeta(configInfo,configRequestInfo.getBetaIps(), configRequestInfo.getSrcIp(), configForm.getSrcUser());ConfigChangePublisher.notifyConfigChange(new ConfigDataChangeEvent(true, configForm.getDataId(), configForm.getGroup(),configForm.getNamespaceId(), configOperateResult.getLastModified()));}// 日志跟踪ConfigTraceService.logPersistenceEvent(configForm.getDataId(), configForm.getGroup(),configForm.getNamespaceId(), configRequestInfo.getRequestIpApp(), configOperateResult.getLastModified(),InetUtils.getSelfIP(), persistEvent, ConfigTraceService.PERSISTENCE_TYPE_PUB, configForm.getContent());return true;
}
首先组装好一些参数,我们需要重点关注的是构建ConfigInfo配置信息,发布配置最基本的五个参数: nameSpaceId、groupId、dataId、应用名称、配置内容。然后包含一些测试版本和tag的分支逻辑判断,我们关注最常用的正常发布流程。
通常情况下,我们发布配置,都不指定tag,其实就做了两件事:
- 1、插入或更新配置信息
- 2、发布配置数据变动事件
3.1、插入或更新配置信息
插入或更新配置信息,其实就是操作数据库,数据库操作分为了内置数据库和外置数据库,我们通常使用外置数据库MySQL来存储配置信息,也就是ExternalConfigInfoPersistServiceImpl,内置数据库对应的操作类是EmbeddedConfigInfoPersistServiceImpl。
我们这里主要分析外置数据库MySQL的方式:ExternalConfigInfoPersistServiceImpl#insertOrUpdate
public ConfigOperateResult insertOrUpdate(String srcIp, String srcUser, ConfigInfo configInfo,Map<String, Object> configAdvanceInfo) {// 没有直接判断是新增还是更新,而且依赖数据库唯一性做检查,重复了(报主键冲突,说明已存在)就做更新。try {// 添加配置信息return addConfigInfo(srcIp, srcUser, configInfo, configAdvanceInfo);} catch (DuplicateKeyException ive) { // Unique constraint conflict// 如果报唯一约束冲突,则更新配置内容return updateConfigInfo(configInfo, srcIp, srcUser, configAdvanceInfo);}
}
从源码可以看到,这里没有直接判断是新增还是更新配置,而且依赖数据库唯一性做检查,重复了(报主键冲突,说明已存在)就做更新。
我们先看下新增配置addConfigInfo:
public ConfigOperateResult addConfigInfo(final String srcIp, final String srcUser, final ConfigInfo configInfo,final Map<String, Object> configAdvanceInfo) {return tjt.execute(status -> {try {// jdbcTemplate操作,自动插入到数据库表(config_info)中,返回主键idlong configId = addConfigInfoAtomic(-1, srcIp, srcUser, configInfo, configAdvanceInfo);String configTags = configAdvanceInfo == null ? null : (String) configAdvanceInfo.get("config_tags");// 新增tag管理addConfigTagsRelation(configId, configTags, configInfo.getDataId(), configInfo.getGroup(),configInfo.getTenant());Timestamp now = new Timestamp(System.currentTimeMillis());// 插入历史数据到表中(his_config_info)historyConfigInfoPersistService.insertConfigHistoryAtomic(0, configInfo, srcIp, srcUser, now, "I");ConfigInfoStateWrapper configInfoCurrent = this.findConfigInfoState(configInfo.getDataId(),configInfo.getGroup(), configInfo.getTenant());if (configInfoCurrent == null) {return new ConfigOperateResult(false);}return new ConfigOperateResult(configInfoCurrent.getId(), configInfoCurrent.getLastModified());} catch (CannotGetJdbcConnectionException e) {LogUtil.FATAL_LOG.error("[db-error] " + e, e);throw e;}});
}
插入数据库的操作是在addConfigInfoAtomic()方法:
public long addConfigInfoAtomic(final long configId, final String srcIp, final String srcUser,final ConfigInfo configInfo, Map<String, Object> configAdvanceInfo) {// 取出配置信息final String appNameTmp =StringUtils.isBlank(configInfo.getAppName()) ? StringUtils.EMPTY : configInfo.getAppName();final String tenantTmp =StringUtils.isBlank(configInfo.getTenant()) ? StringUtils.EMPTY : configInfo.getTenant();final String desc = configAdvanceInfo == null ? null : (String) configAdvanceInfo.get("desc");final String use = configAdvanceInfo == null ? null : (String) configAdvanceInfo.get("use");final String effect = configAdvanceInfo == null ? null : (String) configAdvanceInfo.get("effect");final String type = configAdvanceInfo == null ? null : (String) configAdvanceInfo.get("type");final String schema = configAdvanceInfo == null ? null : (String) configAdvanceInfo.get("schema");final String encryptedDataKey =configInfo.getEncryptedDataKey() == null ? StringUtils.EMPTY : configInfo.getEncryptedDataKey();// 将配置内容进行MD5加密final String md5Tmp = MD5Utils.md5Hex(configInfo.getContent(), Constants.ENCODE);KeyHolder keyHolder = new GeneratedKeyHolder();// 根据数据库表获取对应的mapper, 通过插件化的形式, 灵活应对使用不同数据库的场景ConfigInfoMapper configInfoMapper = mapperManager.findMapper(dataSourceService.getDataSourceType(),TableConstant.CONFIG_INFO);// 将参数转换成对应数据库类型的sql语句,拼接insert into config_info values(....)插入语句final String sql = configInfoMapper.insert(Arrays.asList("data_id", "group_id", "tenant_id", "app_name", "content", "md5", "src_ip", "src_user","gmt_create", "gmt_modified", "c_desc", "c_use", "effect", "type", "c_schema","encrypted_data_key"));// 获取主键名称,默认值为idString[] returnGeneratedKeys = configInfoMapper.getPrimaryKeyGeneratedKeys();try {jt.update(new PreparedStatementCreator() {@Overridepublic PreparedStatement createPreparedStatement(Connection connection) throws SQLException {Timestamp now = new Timestamp(System.currentTimeMillis());// 通过预编译的PreparedStatement,设置每个字段的值PreparedStatement ps = connection.prepareStatement(sql, returnGeneratedKeys);ps.setString(1, configInfo.getDataId());ps.setString(2, configInfo.getGroup());ps.setString(3, tenantTmp);ps.setString(4, appNameTmp);ps.setString(5, configInfo.getContent());ps.setString(6, md5Tmp);ps.setString(7, srcIp);ps.setString(8, srcUser);ps.setTimestamp(9, now);ps.setTimestamp(10, now);ps.setString(11, desc);ps.setString(12, use);ps.setString(13, effect);ps.setString(14, type);ps.setString(15, schema);ps.setString(16, encryptedDataKey);return ps;}}, keyHolder);Number nu = keyHolder.getKey();if (nu == null) {throw new IllegalArgumentException("insert config_info fail");}return nu.longValue();} catch (CannotGetJdbcConnectionException e) {LogUtil.FATAL_LOG.error("[db-error] " + e, e);throw e;}
}
首先取出配置信息,对配置的内容进行MD5加密,然后根据数据库表获取对应的mapper,这里还是通过插件化的形式,灵活应对使用不同数据库的场景。
获取到mapper之后,将参数转换成对应数据库类型的sql语句,拼接insert into config_info values(....)插入语句,最后通过JdbcTemplate执行sql,完成配置的插入。
我们再来分析下如何利用插件化思想完成对mapper的获取的:
ConfigInfoMapper configInfoMapper = mapperManager.findMapper(dataSourceService.getDataSourceType(),TableConstant.CONFIG_INFO);public <R extends Mapper> R findMapper(String dataSource, String tableName) {LOGGER.info("[MapperManager] findMapper dataSource: {}, tableName: {}", dataSource, tableName);if (StringUtils.isBlank(dataSource) || StringUtils.isBlank(tableName)) {throw new NacosRuntimeException(FIND_DATASOURCE_ERROR_CODE, "dataSource or tableName is null");}// 从SPI缓存中获取,这个是在MapperManager构造方法中初始化的Map<String, Mapper> tableMapper = MAPPER_SPI_MAP.get(dataSource);if (Objects.isNull(tableMapper)) {throw new NacosRuntimeException(FIND_DATASOURCE_ERROR_CODE,"[MapperManager] Failed to find the datasource,dataSource:" + dataSource);}// 根据表名称获取mapperMapper mapper = tableMapper.get(tableName);if (Objects.isNull(mapper)) {throw new NacosRuntimeException(FIND_TABLE_ERROR_CODE,"[MapperManager] Failed to find the table ,tableName:" + tableName);}if (dataSourceLogEnable) {return (R) MapperProxy.createSingleProxy(mapper);}return (R) mapper;
}
首先从MAPPER_SPI_MAP缓存中获取,这个是在MapperManager构造方法中初始化的。然后根据表名称获取到对应的mapper。
这个MAPPER_SPI_MAP初始化也和之前EncryptionPluginService的一样,在单例的构造方法中加载:
private MapperManager() {loadInitial();
}public void loadInitial() {Collection<Mapper> mappers = NacosServiceLoader.load(Mapper.class);for (Mapper mapper : mappers) {Map<String, Mapper> mapperMap = MAPPER_SPI_MAP.computeIfAbsent(mapper.getDataSource(), (r) -> new HashMap<>(16));mapperMap.put(mapper.getTableName(), mapper);LOGGER.info("[MapperManager] Load Mapper({}) datasource({}) tableName({}) successfully.",mapper.getClass(), mapper.getDataSource(), mapper.getTableName());}
}
我们也可以看到Nacos源码加载的Mapper插件:

获取到插件配置的具体mapper实现类后,在调用mapper.Mapper#insert()方法时,就可以根据插件的扩展,通过不同的实现类去处理了,就能解决不同数据库类型中sql存在差异的问题。
更新配置的大体流程跟新增一样,首先查出旧的配置信息,然后做一些判断,最后根据dataType和表名称获取对应的mapper,然后组装好sql,通过JdbcTemplate执行。
3.2、发布配置数据变动事件
ConfigChangePublisher.notifyConfigChange(new ConfigDataChangeEvent(false, configForm.getDataId(), configForm.getGroup(),configForm.getNamespaceId(), configOperateResult.getLastModified()));public static void notifyConfigChange(ConfigDataChangeEvent event) {// 如果是内部存储并且Nacos非单机模式启动,就不处理了if (DatasourceConfiguration.isEmbeddedStorage() && !EnvUtil.getStandaloneMode()) {return;}NotifyCenter.publishEvent(event);
}
可以看到,还是利用了Nacos的事件统一发布中心NotifyCenter类,我们直接查找ConfigDataChangeEvent的onEvent方法来查看处理逻辑。
public AsyncNotifyService(ServerMemberManager memberManager) {this.memberManager = memberManager;// 注册ConfigDataChangeEvent到NotifyCenter.NotifyCenter.registerToPublisher(ConfigDataChangeEvent.class, NotifyCenter.ringBufferSize);// 注册一个订阅ConfigDataChangeEvent事件的处理类NotifyCenter.registerSubscriber(new Subscriber() {@Overridepublic void onEvent(Event event) {// Generate ConfigDataChangeEvent concurrentlyif (event instanceof ConfigDataChangeEvent) {ConfigDataChangeEvent evt = (ConfigDataChangeEvent) event;long dumpTs = evt.lastModifiedTs;String dataId = evt.dataId;String group = evt.group;String tenant = evt.tenant;String tag = evt.tag;MetricsMonitor.incrementConfigChangeCount(tenant, group, dataId);// 获取所有的Nacos服务节点(包括当前客户端)Collection<Member> ipList = memberManager.allMembers();// 创建一个队列,将相关配置的其他服务节点都存放进来Queue<NotifySingleRpcTask> rpcQueue = new LinkedList<>();for (Member member : ipList) {// grpc report data change onlyrpcQueue.add(new NotifySingleRpcTask(dataId, group, tenant, tag, dumpTs, evt.isBeta, evt.isBatch,member));}if (!rpcQueue.isEmpty()) {// 通过线程池执行异步通知// AsyncRpcTask实现了runnable接口,关注其run方法ConfigExecutor.executeAsyncNotify(new AsyncRpcTask(rpcQueue));}}}@Overridepublic Class<? extends Event> subscribeType() {return ConfigDataChangeEvent.class;}});
}
在AsyncNotifyService构造方法中,将ConfigDataChangeEvent事件注册到NotifyCenter通知中心,然后还注册一个订阅ConfigDataChangeEvent事件的处理类。
AsyncNotifyService使用spring进行托管,在IOC容器启动的时候,就会创建这个bean对象,就会执行AsyncNotifyService构造方法。我们重点关注onEvent()具体的事件处理逻辑:
- 1、获取所有的Nacos服务节点(包括当前客户端)
- 2、创建一个队列,将相关配置的其他服务节点都存放进来
- 3、通过线程池执行异步通知
// 获取所有的Nacos服务节点(包括当前客户端)
Collection<Member> ipList = memberManager.allMembers();// 创建一个队列,将相关配置的其他服务节点都存放进来
Queue<NotifySingleRpcTask> rpcQueue = new LinkedList<>();for (Member member : ipList) {// grpc report data change onlyrpcQueue.add(new NotifySingleRpcTask(dataId, group, tenant, tag, dumpTs, evt.isBeta, evt.isBatch,member));
}
if (!rpcQueue.isEmpty()) {// 通过线程池执行异步通知// AsyncRpcTask实现了runnable接口,关注其run方法ConfigExecutor.executeAsyncNotify(new AsyncRpcTask(rpcQueue));
}
获取到服务列表后,通过线程池调用异步任务AsyncRpcTask,AsyncRpcTask实现了Runnable接口,看看run()的逻辑:
class AsyncRpcTask implements Runnable {private Queue<NotifySingleRpcTask> queue;public AsyncRpcTask(Queue<NotifySingleRpcTask> queue) {// 构造方法放入rpcTask的队列this.queue = queue;}@Overridepublic void run() {while (!queue.isEmpty()) {// 从队列中取出任务NotifySingleRpcTask task = queue.poll();// 构造配置变动集群同步请求ConfigChangeClusterSyncRequest syncRequest = new ConfigChangeClusterSyncRequest();syncRequest.setDataId(task.getDataId());syncRequest.setGroup(task.getGroup());syncRequest.setBeta(task.isBeta);syncRequest.setLastModified(task.getLastModified());syncRequest.setTag(task.tag);syncRequest.setBatch(task.isBatch);syncRequest.setTenant(task.getTenant());// 通知的目标节点Member member = task.member;// 如果是当前节点,直接调用dumpService执行dump操作if (memberManager.getSelf().equals(member)) {if (syncRequest.isBeta()) {dumpService.dumpBeta(syncRequest.getDataId(), syncRequest.getGroup(), syncRequest.getTenant(),syncRequest.getLastModified(), NetUtils.localIP());} else if (syncRequest.isBatch()) {dumpService.dumpBatch(syncRequest.getDataId(), syncRequest.getGroup(), syncRequest.getTenant(),syncRequest.getLastModified(), NetUtils.localIP());} else if (StringUtils.isNotBlank(syncRequest.getTag())) {dumpService.dumpTag(syncRequest.getDataId(), syncRequest.getGroup(), syncRequest.getTenant(),syncRequest.getTag(), syncRequest.getLastModified(), NetUtils.localIP());} else {dumpService.dumpFormal(syncRequest.getDataId(), syncRequest.getGroup(), syncRequest.getTenant(),syncRequest.getLastModified(), NetUtils.localIP());}continue;}String event = getNotifyEvent(task);if (memberManager.hasMember(member.getAddress())) {// 启动健康检查,有IP未被监控,直接放入通知队列,否则通知boolean unHealthNeedDelay = isUnHealthy(member.getAddress());if (unHealthNeedDelay) {// 目标 IP 运行状况不健康,然后将其放入通知列表中ConfigTraceService.logNotifyEvent(task.getDataId(), task.getGroup(), task.getTenant(), null,task.getLastModified(), InetUtils.getSelfIP(), event,ConfigTraceService.NOTIFY_TYPE_UNHEALTH, 0, member.getAddress());// 异步任务执行// 可延迟的处理,因为是不健康的节点,不知道什么时候能恢复asyncTaskExecute(task);} else {// 发送grpc请求try {configClusterRpcClientProxy.syncConfigChange(member, syncRequest,new AsyncRpcNotifyCallBack(task));} catch (Exception e) {MetricsMonitor.getConfigNotifyException().increment();asyncTaskExecute(task);}}} else {//No nothing if  member has offline.}}}
}
只要队列不为空,就会从队列中取出NotifySingleRpcTask任务来执行,然后构造配置变动集群同步的请求对象,包括namespaceId、dataId、groupId、标签等,然后通知目标节点。
3.2.1、目标节点是当前节点
如果目标节点是当前节点,则会直接调用dumpService执行dump操作,其实就是更新本地内存和磁盘中的配置信息为最新的配置信息。
public void dumpFormal(String dataId, String group, String tenant, long lastModified, String handleIp) {String groupKey = GroupKey2.getKey(dataId, group, tenant);String taskKey = dataId + group + tenant;// 将DumpTask添加到TaskManager任务管理器,它将异步执行dumpTaskMgr.addTask(taskKey, new DumpTask(groupKey, false, false, false, null, lastModified, handleIp));DUMP_LOG.info("[dump] add formal task. groupKey={}", groupKey);
}
上面是将task放入到了TaskManager中,那在哪里执行的呢?我们看下DumpService的构造方法:
public DumpService(ConfigInfoPersistService configInfoPersistService,NamespacePersistService namespacePersistService,HistoryConfigInfoPersistService historyConfigInfoPersistService,ConfigInfoAggrPersistService configInfoAggrPersistService,ConfigInfoBetaPersistService configInfoBetaPersistService,ConfigInfoTagPersistService configInfoTagPersistService, ServerMemberManager memberManager) {this.configInfoPersistService = configInfoPersistService;this.namespacePersistService = namespacePersistService;this.historyConfigInfoPersistService = historyConfigInfoPersistService;this.configInfoAggrPersistService = configInfoAggrPersistService;this.configInfoBetaPersistService = configInfoBetaPersistService;this.configInfoTagPersistService = configInfoTagPersistService;this.memberManager = memberManager;this.processor = new DumpProcessor(this);this.dumpAllProcessor = new DumpAllProcessor(this);this.dumpAllBetaProcessor = new DumpAllBetaProcessor(this);this.dumpAllTagProcessor = new DumpAllTagProcessor(this);// 创建一个TaskManagerthis.dumpTaskMgr = new TaskManager("com.alibaba.nacos.server.DumpTaskManager");// 设置默认的Processor处理(DumpProcessor)this.dumpTaskMgr.setDefaultTaskProcessor(processor);this.dumpAllTaskMgr = new TaskManager("com.alibaba.nacos.server.DumpAllTaskManager");this.dumpAllTaskMgr.setDefaultTaskProcessor(dumpAllProcessor);this.dumpAllTaskMgr.addProcessor(DumpAllTask.TASK_ID, dumpAllProcessor);this.dumpAllTaskMgr.addProcessor(DumpAllBetaTask.TASK_ID, dumpAllBetaProcessor);this.dumpAllTaskMgr.addProcessor(DumpAllTagTask.TASK_ID, dumpAllTagProcessor);DynamicDataSource.getInstance().getDataSource();
}
可以看到,创建了一个任务管理器TaskManager,并设置了默认的处理类DumpProcessor。
我们再看下TaskManager的构造方法:
public TaskManager(String name) {super(name, LOGGER, 100L);this.name = name;
}
TaskManager继承自NacosDelayTaskExecuteEngine延时任务执行引擎,所以实际上执行的是:
/*** 定时任务线程池,在构造方法中初始化*/
private final ScheduledExecutorService processingExecutor;/*** 任务队列* key:对应的服务*/
protected final ConcurrentHashMap<Object, AbstractDelayTask> tasks;public NacosDelayTaskExecuteEngine(String name, int initCapacity, Logger logger, long processInterval) {super(logger);// 初始化任务队列tasks = new ConcurrentHashMap<>(initCapacity);// 创建定时任务的线程池processingExecutor = ExecutorFactory.newSingleScheduledExecutorService(new NameThreadFactory(name));// 在指定的初始延迟时间(100毫秒)后开始执行任务,并按固定的时间间隔周期性(100毫秒)地执行任务。// 默认延时100毫秒执行ProcessRunnable,然后每隔100毫秒周期性执行ProcessRunnableprocessingExecutor.scheduleWithFixedDelay(new ProcessRunnable(), processInterval, processInterval, TimeUnit.MILLISECONDS);
}
熟悉nacos服务注册流程的小伙伴对这一块应该不陌生,服务注册也是大量使用到任务引擎。从上面的代码中,我们可以看到,NacosDelayTaskExecuteEngine内部包含一个阻塞队列,用来存放任务的,然后初始化了一个定时执行的线程池,每隔100毫秒周期性执行ProcessRunnable。ProcessRunnable的run方法中就是从阻塞队列中不单取出任务来执行,查看是否有对应的处理类,如果没有就用默认的处理类。
在本例中,实际上就是用的默认的处理类DumpProcessor。 我们查看DumpProcessor#process具体的处理方法:
public boolean process(NacosTask task) {DumpTask dumpTask = (DumpTask) task;String[] pair = GroupKey2.parseKey(dumpTask.getGroupKey());String dataId = pair[0];String group = pair[1];String tenant = pair[2];long lastModified = dumpTask.getLastModified();String handleIp = dumpTask.getHandleIp();boolean isBeta = dumpTask.isBeta();String tag = dumpTask.getTag();// 构建ConfigDumpEventBuildConfigDumpEvent.ConfigDumpEventBuilder build = ConfigDumpEvent.builder().namespaceId(tenant).dataId(dataId).group(group).isBeta(isBeta).tag(tag).lastModifiedTs(lastModified).handleIp(handleIp);if (isBeta) {// 如果发布测试版,则转储配置,更新测试版缓存ConfigInfo4Beta cf = configInfoBetaPersistService.findConfigInfo4Beta(dataId, group, tenant);build.remove(Objects.isNull(cf));build.betaIps(Objects.isNull(cf) ? null : cf.getBetaIps());build.content(Objects.isNull(cf) ? null : cf.getContent());build.encryptedDataKey(Objects.isNull(cf) ? null : cf.getEncryptedDataKey());return DumpConfigHandler.configDump(build.build());}if (StringUtils.isBlank(tag)) {// tag为空的情况,正常情况下都是走的这个分支// 查看配置信息ConfigInfo cf = configInfoPersistService.findConfigInfo(dataId, group, tenant);build.remove(Objects.isNull(cf));build.content(Objects.isNull(cf) ? null : cf.getContent());build.type(Objects.isNull(cf) ? null : cf.getType());build.encryptedDataKey(Objects.isNull(cf) ? null : cf.getEncryptedDataKey());} else {ConfigInfo4Tag cf = configInfoTagPersistService.findConfigInfo4Tag(dataId, group, tenant, tag);build.remove(Objects.isNull(cf));build.content(Objects.isNull(cf) ? null : cf.getContent());}// 构建出ConfigDumpEvent,然后触发dump配置return DumpConfigHandler.configDump(build.build());
}
上面的逻辑主要是构建出ConfigDumpEvent,然后触发dump配置,通过DumpConfigHandler处理。
public static boolean configDump(ConfigDumpEvent event) {final String dataId = event.getDataId();final String group = event.getGroup();final String namespaceId = event.getNamespaceId();final String content = event.getContent();final String type = event.getType();final long lastModified = event.getLastModifiedTs();//beta测试版if (event.isBeta()) {boolean result = false;if (event.isRemove()) {result = ConfigCacheService.removeBeta(dataId, group, namespaceId);if (result) {ConfigTraceService.logDumpBetaEvent(dataId, group, namespaceId, null, lastModified,event.getHandleIp(), ConfigTraceService.DUMP_TYPE_REMOVE_OK,System.currentTimeMillis() - lastModified, 0);}return result;} else {result = ConfigCacheService.dumpBeta(dataId, group, namespaceId, content, lastModified,event.getBetaIps(), event.getEncryptedDataKey());if (result) {ConfigTraceService.logDumpBetaEvent(dataId, group, namespaceId, null, lastModified,event.getHandleIp(), ConfigTraceService.DUMP_TYPE_OK,System.currentTimeMillis() - lastModified, content.length());}}return result;}//tag不为空的处理if (StringUtils.isNotBlank(event.getTag())) {//boolean result;if (!event.isRemove()) {// 非删除配置事件result = ConfigCacheService.dumpTag(dataId, group, namespaceId, event.getTag(), content, lastModified,event.getEncryptedDataKey());if (result) {ConfigTraceService.logDumpTagEvent(dataId, group, namespaceId, event.getTag(), null, lastModified,event.getHandleIp(), ConfigTraceService.DUMP_TYPE_OK,System.currentTimeMillis() - lastModified, content.length());}} else {// 删除配置事件,移除配置缓存result = ConfigCacheService.removeTag(dataId, group, namespaceId, event.getTag());if (result) {ConfigTraceService.logDumpTagEvent(dataId, group, namespaceId, event.getTag(), null, lastModified,event.getHandleIp(), ConfigTraceService.DUMP_TYPE_REMOVE_OK,System.currentTimeMillis() - lastModified, 0);}}return result;}// 内置的一些特殊配置if (dataId.equals(AggrWhitelist.AGGRIDS_METADATA)) {AggrWhitelist.load(content);}if (dataId.equals(ClientIpWhiteList.CLIENT_IP_WHITELIST_METADATA)) {ClientIpWhiteList.load(content);}if (dataId.equals(SwitchService.SWITCH_META_DATAID)) {SwitchService.load(content);}boolean result;if (!event.isRemove()) {// 非删除事件:配置缓存服务dump配置信息result = ConfigCacheService.dump(dataId, group, namespaceId, content, lastModified, event.getType(),event.getEncryptedDataKey());if (result) {// 记录日志ConfigTraceService.logDumpEvent(dataId, group, namespaceId, null, lastModified, event.getHandleIp(),ConfigTraceService.DUMP_TYPE_OK, System.currentTimeMillis() - lastModified, content.length());}} else {// 删除配置事件,移除配置缓存result = ConfigCacheService.remove(dataId, group, namespaceId);if (result) {// 记录日志ConfigTraceService.logDumpEvent(dataId, group, namespaceId, null, lastModified, event.getHandleIp(),ConfigTraceService.DUMP_TYPE_REMOVE_OK, System.currentTimeMillis() - lastModified, 0);}}return result;}因为ConfigDumpEvent分为了两类事件,一类是新增或更新的事件,另一类是删除的事件,对于这两种事件是不同的两种处理方式。
首先看下删除的逻辑:
public static boolean remove(String dataId, String group, String tenant) {final String groupKey = GroupKey2.getKey(dataId, group, tenant);// 获取写锁final int lockResult = tryWriteLock(groupKey);// 如果数据不存在了if (0 == lockResult) {DUMP_LOG.info("[remove-ok] {} not exist.", groupKey);return true;}// 获取写锁失败了if (lockResult < 0) {DUMP_LOG.warn("[remove-error] write lock failed. {}", groupKey);return false;}try {// 移除配置if (!PropertyUtil.isDirectRead()) {DUMP_LOG.info("[dump] remove  local disk cache,groupKey={} ", groupKey);ConfigDiskServiceFactory.getInstance().removeConfigInfo(dataId, group, tenant);}// 移除配置缓存CACHE.remove(groupKey);DUMP_LOG.info("[dump] remove  local jvm cache,groupKey={} ", groupKey);// 发布本地配置变动通知NotifyCenter.publishEvent(new LocalDataChangeEvent(groupKey));return true;} finally {// 释放写锁releaseWriteLock(groupKey);}
}
主要做了三件事情:
- 1、获取写锁
- 2、移除配置信息、移除配置缓存
- 3、发布本地配置变动通知
再看下新增,修改的逻辑:
public static boolean dump(String dataId, String group, String tenant, String content, long lastModifiedTs,String type, String encryptedDataKey) {return dumpWithMd5(dataId, group, tenant, content, null, lastModifiedTs, type, encryptedDataKey);
}public static boolean dumpWithMd5(String dataId, String group, String tenant, String content, String md5,long lastModifiedTs, String type, String encryptedDataKey) {String groupKey = GroupKey2.getKey(dataId, group, tenant);CacheItem ci = makeSure(groupKey, encryptedDataKey);ci.setType(type);// 获取写锁final int lockResult = tryWriteLock(groupKey);assert (lockResult != 0);// 获取锁失败if (lockResult < 0) {DUMP_LOG.warn("[dump-error] write lock failed. {}", groupKey);return false;}try {// 校验最后更新时间,如果这个事件滞后了则不处理了boolean lastModifiedOutDated = lastModifiedTs < ConfigCacheService.getLastModifiedTs(groupKey);// 小于缓存中的最后更新时间,说明滞后了,不处理if (lastModifiedOutDated) {DUMP_LOG.warn("[dump-ignore] timestamp is outdated,groupKey={}", groupKey);return true;}boolean newLastModified = lastModifiedTs > ConfigCacheService.getLastModifiedTs(groupKey);// 计算配置信息的md5值if (md5 == null) {md5 = MD5Utils.md5Hex(content, ENCODE);}//check md5 & update local disk cache.String localContentMd5 = ConfigCacheService.getContentMd5(groupKey);boolean md5Changed = !md5.equals(localContentMd5);// 如果配置内容发生变更,需要保存到磁盘if (md5Changed) {if (!PropertyUtil.isDirectRead()) {DUMP_LOG.info("[dump] md5 changed, save to disk cache ,groupKey={}, newMd5={},oldMd5={}", groupKey,md5, localContentMd5);ConfigDiskServiceFactory.getInstance().saveToDisk(dataId, group, tenant, content);} else {//ignore to save disk cache in direct model}} else {DUMP_LOG.warn("[dump-ignore] ignore to save to disk cache. md5 consistent,groupKey={}, md5={}",groupKey, md5);}//check  md5 and timestamp & update local jvm cache.if (md5Changed) {DUMP_LOG.info("[dump] md5 changed, update md5 and timestamp in jvm cache ,groupKey={}, newMd5={},oldMd5={},lastModifiedTs={}",groupKey, md5, localContentMd5, lastModifiedTs);// 如果配置内容发生变更,需要更新MD5值,更新本地内存中的配置信息,并发布本地配置变更事件updateMd5(groupKey, md5, lastModifiedTs, encryptedDataKey);} else if (newLastModified) {DUMP_LOG.info("[dump] md5 consistent ,timestamp changed, update timestamp only in jvm cache ,groupKey={},lastModifiedTs={}",groupKey, lastModifiedTs);// 设置缓存中配置最后变更时间updateTimeStamp(groupKey, lastModifiedTs, encryptedDataKey);} else {DUMP_LOG.warn("[dump-ignore] ignore to save to jvm cache. md5 consistent and no new timestamp changed.groupKey={}",groupKey);}return true;} catch (IOException ioe) {DUMP_LOG.error("[dump-exception] save disk error. " + groupKey + ", " + ioe);if (ioe.getMessage() != null) {String errMsg = ioe.getMessage();if (NO_SPACE_CN.equals(errMsg) || NO_SPACE_EN.equals(errMsg) || errMsg.contains(DISK_QUATA_CN)|| errMsg.contains(DISK_QUATA_EN)) {// Protect from disk full.FATAL_LOG.error("Local Disk Full,Exit", ioe);System.exit(0);}}return false;} finally {// 释放写锁releaseWriteLock(groupKey);}}public static void updateMd5(String groupKey, String md5Utf8, long lastModifiedTs, String encryptedDataKey) {CacheItem cache = makeSure(groupKey, encryptedDataKey);if (cache.getConfigCache().getMd5Utf8() == null || !cache.getConfigCache().getMd5Utf8().equals(md5Utf8)) {cache.getConfigCache().setMd5Utf8(md5Utf8);cache.getConfigCache().setLastModifiedTs(lastModifiedTs);cache.getConfigCache().setEncryptedDataKey(encryptedDataKey);NotifyCenter.publishEvent(new LocalDataChangeEvent(groupKey));}
}
这里与删除逻辑不同的是,需要比较md5值,不一致可能会有个磁盘存储的处理。
3.2.2、目标节点非当前节点
如果目标节点是其它节点,还会区分是否健康实例,进行不同的处理。如果节点不健康,则会延迟处理同步的逻辑;如果节点健康,则会发送grpc请求,目标服务进行配置的同步。
在服务节点间的配置同步有两个主要的逻辑:
- 1、节点不健康的情况,采用异步定时任务去执行,但是这个定时并不是严格意义的定时,因为他会有个延迟的过程,会随着失败次数的增加,延迟不断加大,不过当达到最大失败次数后,就不会再增加,以一个固定的时间去触发。最大时间间隔是500ms + 7 * 7 * 1000ms。
private void asyncTaskExecute(NotifySingleRpcTask task) {// 随着失败次数的增加,延迟不断加大,不过当达到最大失败次数后,就不会再增加,以一个固定的时间去触发。最大时间间隔是500ms + 7 * 7 * 1000msint delay = getDelayTime(task);Queue<NotifySingleRpcTask> queue = new LinkedList<>();queue.add(task);AsyncRpcTask asyncTask = new AsyncRpcTask(queue);ConfigExecutor.scheduleAsyncNotify(asyncTask, delay, TimeUnit.MILLISECONDS);
}private static int getDelayTime(NotifyTask task) {int failCount = task.getFailCount();// 最大时间间隔是500ms + 7 * 7 * 1000msint delay = MIN_RETRY_INTERVAL + failCount * failCount * INCREASE_STEPS;if (failCount <= MAX_COUNT) {task.setFailCount(failCount + 1);}return delay;
}- 2、节点不健康的情况,发送grpc同步请求
configClusterRpcClientProxy.syncConfigChange(member, syncRequest,new AsyncRpcNotifyCallBack(task));public void syncConfigChange(Member member, ConfigChangeClusterSyncRequest request, RequestCallBack callBack)throws NacosException {// 异步处理// grpc真正的处理类是在:com.alibaba.nacos.config.server.remote.ConfigChangeClusterSyncRequestHandler.handleclusterRpcClientProxy.asyncRequest(member, request, callBack);
}
具体处理ConfigChangeClusterSyncRequest请求是在ConfigChangeClusterSyncRequestHandler#handle方法:
public ConfigChangeClusterSyncResponse handle(ConfigChangeClusterSyncRequest configChangeSyncRequest,RequestMeta meta) throws NacosException {// 调用到其他节点,其他节点也是执行dump服务,然后通知和本机连接的客户端,通知他们进行配置更新。if (configChangeSyncRequest.isBeta()) {dumpService.dumpBeta(configChangeSyncRequest.getDataId(), configChangeSyncRequest.getGroup(),configChangeSyncRequest.getTenant(), configChangeSyncRequest.getLastModified(), meta.getClientIp());} else if (configChangeSyncRequest.isBatch()) {dumpService.dumpBatch(configChangeSyncRequest.getDataId(), configChangeSyncRequest.getGroup(),configChangeSyncRequest.getTenant(), configChangeSyncRequest.getLastModified(), meta.getClientIp());} else if (StringUtils.isNotBlank(configChangeSyncRequest.getTag())) {dumpService.dumpTag(configChangeSyncRequest.getDataId(), configChangeSyncRequest.getGroup(),configChangeSyncRequest.getTenant(), configChangeSyncRequest.getTag(),configChangeSyncRequest.getLastModified(), meta.getClientIp());} else {// 本机的dump服务dumpService.dumpFormal(configChangeSyncRequest.getDataId(), configChangeSyncRequest.getGroup(),configChangeSyncRequest.getTenant(), configChangeSyncRequest.getLastModified(), meta.getClientIp());}return new ConfigChangeClusterSyncResponse();
}
可以看到,调用到其他节点,其他节点也是执行dump服务,然后通知和本机连接的客户端,通知他们进行配置更新。
四、总结
