目录
1 -> 链表
1.1 -> 链表的概念及结构
1.2 -> 链表的分类
2 -> 无头+单向+非循环链表(单链表)
2.1 -> 接口声明
2.2 -> 接口实现
2.2.1 -> 动态申请一个结点
2.2.2 -> 单链表的打印
2.2.3 -> 单链表的尾插
2.2.4 -> 单链表的头插
2.2.5 -> 单链表的尾删
2.2.6 -> 单链表的头删
2.2.7 -> 单链表的查找
2.2.8 -> 单链表在pos位置之前插入x
2.2.9 -> 单链表在pos位置之后插入x
2.2.10 -> 单链表删除pos位置的值
2.2.11 -> 单链表删除pos位置之后的值
2.3 -> 完整代码
2.3.1 -> SList.h
2.3.2 -> SList.c
2.3.3 -> Test.c

1 -> 链表
1.1 -> 链表的概念及结构
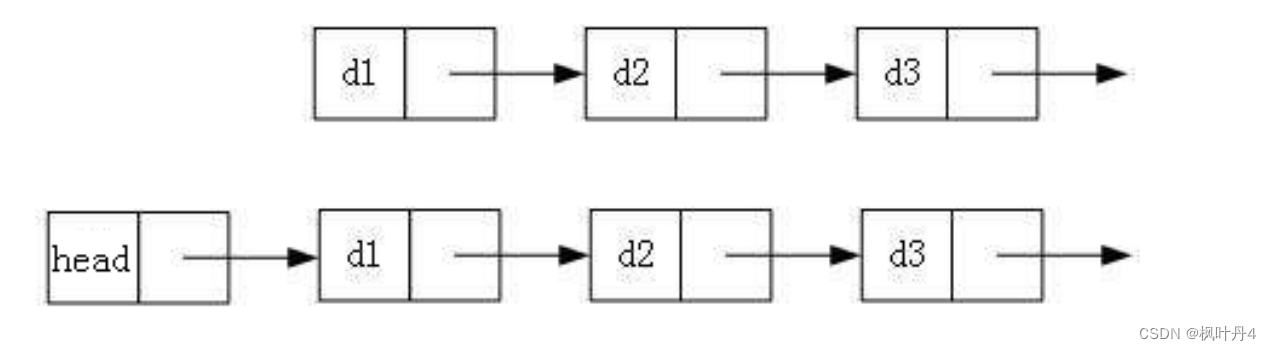
概念:链表是一种物理存储结构上非连续、非顺序的存储结构,数据元素的逻辑顺序是通过链表中的指针链接次序实现的。
现实中 数据结构中

注意:
- 上图可看出,链式结构在逻辑上是连续的,但是在物理上不一定连续;
- 现实中的结点一般都是从堆上申请出来的;
- 从堆上申请的空间,是按照一定策略分配的,两次申请的空间可能连续,也可能不连续。
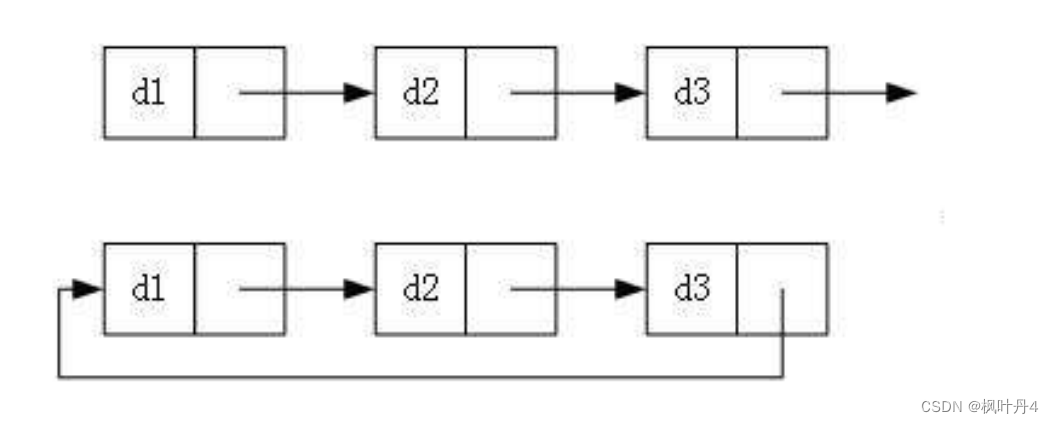
假设在32位系统上,结点中值域为int类型,则一个节点的大小为8个字节,则也可能有以下链表:

1.2 -> 链表的分类
实际中链表的结构非常多样,以下情况组合起来就有八种链表结构:
1. 单向或双向

2. 带头或不带头
3. 循环或非循环
虽然有很多链表结构,但最常用的还是这两种:
1. 无头单向非循环链表

2. 带头双向循环链表

1. 无头单向非循环链表:结构简单,一般不会单独用来存储数据。实际中更多是作为其他数据结构的子结构,如哈希桶、图的邻接表等。
2. 带头双向循环链表:结构最复杂,一般用在单独存储数据。实际中使用的链表数据结构,都是带头双向循环链表。另外这个结构虽然复杂,但是使用代码实现以后会发现结构会带来很多优势,实现反而简单了。
2 -> 无头+单向+非循环链表(单链表)
2.1 -> 接口声明
#pragma once#define _CRT_SECURE_NO_WARNINGS 1
#include <stdio.h>
#include <stdlib.h>
#include <assert.h>// 无头+单向+非循环链表增删查改实现
typedef int SLTDateType;typedef struct SLTNode
{SLTDateType data;struct SLTNode* next;
}SLTNode;// 动态申请一个结点
SLTNode* BuySLTNode(SLTDateType x);// 单链表打印
void SLTPrint(SLTNode* phead);// 单链表尾插
void SLTPushBack(SLTNode** pphead, SLTDateType x);// 单链表的头插
void SLTPushFront(SLTNode** pphead, SLTDateType x);// 单链表的尾删
void SLTPopBack(SLTNode** pphead);// 单链表头删
void SLTPopFront(SLTNode** pphead);// 单链表查找
SLTNode* SLTFind(SLTNode* phead, SLTDateType x);// 单链表在pos位置之前插入x
void SLTInsert(SLTNode** pphead, SLTNode* pos, SLTDateType x);// 单链表在pos位置之后插入x
void SLTInsertAfter(SLTNode* pos, SLTDateType x);// 单链表删除pos位置的值
void SLTErase(SLTNode** pphead, SLTNode* pos);// 单链表删除pos位置之后的值
void SLTEraseAfter(SLTNode* pos);
2.2 -> 接口实现
2.2.1 -> 动态申请一个结点
// 动态申请一个结点
SLTNode* BuySLTNode(SLTDateType x)
{SLTNode* newnode = (SLTNode*)malloc(sizeof(SLTNode));if (newnode == NULL){perror("malloc fail");return NULL;}newnode->data = x;newnode->next = NULL;return newnode;
}
2.2.2 -> 单链表的打印
// 单链表的打印
void SLTPrint(SLTNode* phead)
{SLTNode* cur = phead;while (cur != NULL){printf("%d->", cur->data);cur = cur->next;}printf("NULL\n");
}
2.2.3 -> 单链表的尾插
// 单链表的尾插
void SLTPushBack(SLTNode** pphead, SLTDateType x)
{assert(pphead);SLTNode* newnode = BuySLTNode(x);if (*pphead == NULL){*pphead = newnode;}else{SLTNode* cur = *pphead;while (cur->next != NULL){cur = cur->next;}cur->next = newnode;}
}
// 尾插测试
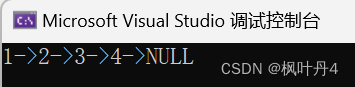
void SLTTest1()
{SLTNode* plist = NULL;SLTPushBack(&plist, 1);SLTPushBack(&plist, 2);SLTPushBack(&plist, 3);SLTPushBack(&plist, 4);SLTPrint(plist);
}
2.2.4 -> 单链表的头插
// 单链表的头插
void SLTPushFront(SLTNode** pphead, SLTDateType x)
{assert(pphead);SLTNode* newnode = BuySLTNode(x);newnode->next = *pphead;*pphead = newnode;
}
// 头插测试
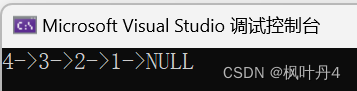
void SLTTest2()
{SLTNode* plist = NULL;SLTPushFront(&plist, 1);SLTPushFront(&plist, 2);SLTPushFront(&plist, 3);SLTPushFront(&plist, 4);SLTPrint(plist);
}
2.2.5 -> 单链表的尾删
// 单链表的尾删
void SLTPopBack(SLTNode** pphead)
{assert(pphead);assert(*pphead); // 暴力检查温柔的检查//if (*pphead == NULL)//{//	return;//}// 只有一个节点if ((*pphead)->next == NULL){free(*pphead);*pphead = NULL;}// 有多个节点else{SLTNode* prev = *pphead;SLTNode* tail = *pphead;while (tail->next != NULL){prev = tail;tail = tail->next;}free(tail);tail = NULL;prev->next = NULL;}
}
// 尾删测试
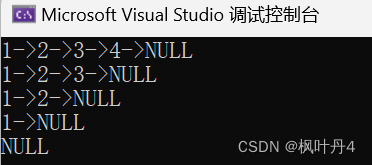
void SLTTest3()
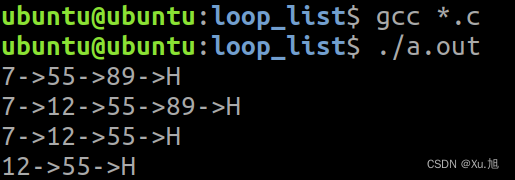
{SLTNode* plist = NULL;SLTPushBack(&plist, 1);SLTPushBack(&plist, 2);SLTPushBack(&plist, 3);SLTPushBack(&plist, 4);SLTPrint(plist);SLTPopBack(&plist);SLTPrint(plist);SLTPopBack(&plist);SLTPrint(plist);SLTPopBack(&plist);SLTPrint(plist);SLTPopBack(&plist);SLTPrint(plist);
}
2.2.6 -> 单链表的头删
// 单链表的头删
void SLTPopFront(SLTNode** pphead)
{assert(*pphead);SLTNode* tail = *pphead;*pphead = (*pphead)->next;free(tail);tail = NULL;
}
// 头删测试
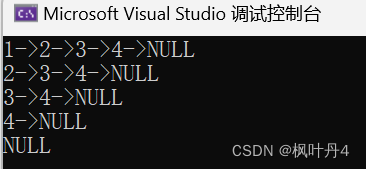
void SLTTest4()
{SLTNode* plist = NULL;SLTPushBack(&plist, 1);SLTPushBack(&plist, 2);SLTPushBack(&plist, 3);SLTPushBack(&plist, 4);SLTPrint(plist);SLTPopFront(&plist);SLTPrint(plist);SLTPopFront(&plist);SLTPrint(plist);SLTPopFront(&plist);SLTPrint(plist);SLTPopFront(&plist);SLTPrint(plist);
}
2.2.7 -> 单链表的查找
// 单链表的查找
SLTNode* SLTFind(SLTNode* phead, SLTDateType x)
{SLTNode* ptr = phead;while (ptr->next != NULL){if (ptr->data == x){return ptr;}else{ptr = ptr->next;}}return NULL;
}
// 查找测试
void SLTTest5()
{SLTNode* plist = NULL;SLTPushBack(&plist, 1);SLTPushBack(&plist, 2);SLTPushBack(&plist, 3);SLTPushBack(&plist, 4);SLTPrint(plist);SLTNode* ans = SLTFind(plist, 1);if (ans)ans->data = 10;SLTPrint(plist);
}
2.2.8 -> 单链表在pos位置之前插入x
// 单链表在pos位置之前插入x
void SLTInsert(SLTNode** pphead, SLTNode* pos, SLTDateType x)
{assert(pphead);assert(pos);if (pos == *pphead){SLTPushFront(pphead, x);}else{SLTNode* newnode = BuySLTNode(x);SLTNode* prev = *pphead;while (prev->next != pos){prev = prev->next;}prev->next = newnode;newnode->next = pos;}
}
// 在pos位置之前插入x测试
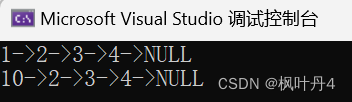
void SLTTest6()
{SLTNode* plist = NULL;SLTPushBack(&plist, 1);SLTPushBack(&plist, 2);SLTPushBack(&plist, 3);SLTPushBack(&plist, 4);SLTPrint(plist);SLTNode* pos = SLTFind(plist, 2);if (pos)SLTInsert(&plist, pos, 99);SLTPrint(plist);
}
2.2.9 -> 单链表在pos位置之后插入x
// 单链表在pos位置之后插入x
void SLTInsertAfter(SLTNode* pos, SLTDateType x)
{assert(pos);SLTNode* newnode = BuySLTNode(x);SLTNode* tmp = pos->next;pos->next = newnode;newnode->next = tmp;
}
// 在pos位置之后插入x测试
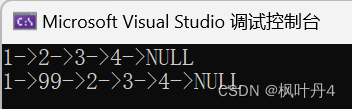
void SLTTest7()
{SLTNode* plist = NULL;SLTPushBack(&plist, 1);SLTPushBack(&plist, 2);SLTPushBack(&plist, 3);SLTPushBack(&plist, 4);SLTPrint(plist);SLTNode* pos = SLTFind(plist, 2);if (pos)SLTInsertAfter(pos, 99);SLTPrint(plist);
}
2.2.10 -> 单链表删除pos位置的值
// 单链表删除pos位置的值
void SLTErase(SLTNode** pphead, SLTNode* pos)
{assert(pphead);assert(*pphead);assert(pos);if (pos == *pphead){SLTPopFront(pphead);}else{SLTNode* prev = *pphead;if (prev->next != pos){prev = prev->next;}prev->next = pos->next;free(pos);pos = NULL;}
}
// 删除pos位置的值测试
void SLTTest8()
{SLTNode* plist = NULL;SLTPushBack(&plist, 1);SLTPushBack(&plist, 2);SLTPushBack(&plist, 3);SLTPushBack(&plist, 4);SLTPrint(plist);SLTNode* pos = SLTFind(plist, 2);if (pos)SLTErase(&plist, pos);SLTPrint(plist);
}
2.2.11 -> 单链表删除pos位置之后的值
// 单链表删除pos位置之后的值
void SLTEraseAfter(SLTNode* pos)
{assert(pos);assert(pos->next);SLTNode* tmp = pos->next->next;free(pos->next);pos->next = tmp;
}
// 删除pos位置之后的值测试
void SLTTest9()
{SLTNode* plist = NULL;SLTPushBack(&plist, 1);SLTPushBack(&plist, 2);SLTPushBack(&plist, 3);SLTPushBack(&plist, 4);SLTPrint(plist);SLTNode* pos = SLTFind(plist, 2);if (pos)SLTEraseAfter(pos);SLTPrint(plist);
}
2.3 -> 完整代码
2.3.1 -> SList.h
#pragma once#define _CRT_SECURE_NO_WARNINGS 1
#include <stdio.h>
#include <stdlib.h>
#include <assert.h>// 无头+单向+非循环链表增删查改实现
typedef int SLTDateType;typedef struct SLTNode
{SLTDateType data;struct SLTNode* next;
}SLTNode;// 动态申请一个结点
SLTNode* BuySLTNode(SLTDateType x);// 单链表打印
void SLTPrint(SLTNode* phead);// 单链表尾插
void SLTPushBack(SLTNode** pphead, SLTDateType x);// 单链表的头插
void SLTPushFront(SLTNode** pphead, SLTDateType x);// 单链表的尾删
void SLTPopBack(SLTNode** pphead);// 单链表头删
void SLTPopFront(SLTNode** pphead);// 单链表查找
SLTNode* SLTFind(SLTNode* phead, SLTDateType x);// 单链表在pos位置之前插入x
void SLTInsert(SLTNode** pphead, SLTNode* pos, SLTDateType x);// 单链表在pos位置之后插入x
void SLTInsertAfter(SLTNode* pos, SLTDateType x);// 单链表删除pos位置的值
void SLTErase(SLTNode** pphead, SLTNode* pos);// 单链表删除pos位置之后的值
void SLTEraseAfter(SLTNode* pos);
2.3.2 -> SList.c
#include "SList.h"// 动态申请一个结点
SLTNode* BuySLTNode(SLTDateType x)
{SLTNode* newnode = (SLTNode*)malloc(sizeof(SLTNode));if (newnode == NULL){perror("malloc fail");return NULL;}newnode->data = x;newnode->next = NULL;return newnode;
}// 单链表的打印
void SLTPrint(SLTNode* phead)
{SLTNode* cur = phead;while (cur != NULL){printf("%d->", cur->data);cur = cur->next;}printf("NULL\n");
}// 单链表的尾插
void SLTPushBack(SLTNode** pphead, SLTDateType x)
{assert(pphead);SLTNode* newnode = BuySLTNode(x);if (*pphead == NULL){*pphead = newnode;}else{SLTNode* cur = *pphead;while (cur->next != NULL){cur = cur->next;}cur->next = newnode;}
}// 单链表的头插
void SLTPushFront(SLTNode** pphead, SLTDateType x)
{assert(pphead);SLTNode* newnode = BuySLTNode(x);newnode->next = *pphead;*pphead = newnode;
}// 单链表的尾删
void SLTPopBack(SLTNode** pphead)
{assert(pphead);assert(*pphead); // 暴力检查温柔的检查//if (*pphead == NULL)//{//	return;//}// 只有一个节点if ((*pphead)->next == NULL){free(*pphead);*pphead = NULL;}// 有多个节点else{SLTNode* prev = *pphead;SLTNode* tail = *pphead;while (tail->next != NULL){prev = tail;tail = tail->next;}free(tail);tail = NULL;prev->next = NULL;}
}// 单链表的头删
void SLTPopFront(SLTNode** pphead)
{assert(*pphead);SLTNode* tail = *pphead;*pphead = (*pphead)->next;free(tail);tail = NULL;
}// 单链表的查找
SLTNode* SLTFind(SLTNode* phead, SLTDateType x)
{SLTNode* ptr = phead;while (ptr->next != NULL){if (ptr->data == x){return ptr;}else{ptr = ptr->next;}}return NULL;
}// 单链表在pos位置之前插入x
void SLTInsert(SLTNode** pphead, SLTNode* pos, SLTDateType x)
{assert(pphead);assert(pos);if (pos == *pphead){SLTPushFront(pphead, x);}else{SLTNode* newnode = BuySLTNode(x);SLTNode* prev = *pphead;while (prev->next != pos){prev = prev->next;}prev->next = newnode;newnode->next = pos;}
}// 单链表在pos位置之后插入x
void SLTInsertAfter(SLTNode* pos, SLTDateType x)
{assert(pos);SLTNode* newnode = BuySLTNode(x);SLTNode* tmp = pos->next;pos->next = newnode;newnode->next = tmp;
}// 单链表删除pos位置的值
void SLTErase(SLTNode** pphead, SLTNode* pos)
{assert(pphead);assert(*pphead);assert(pos);if (pos == *pphead){SLTPopFront(pphead);}else{SLTNode* prev = *pphead;if (prev->next != pos){prev = prev->next;}prev->next = pos->next;free(pos);pos = NULL;}
}// 单链表删除pos位置之后的值
void SLTEraseAfter(SLTNode* pos)
{assert(pos);assert(pos->next);SLTNode* tmp = pos->next->next;free(pos->next);pos->next = tmp;
}
2.3.3 -> Test.c
#include "SList.h"// 尾插测试
void SLTTest1()
{SLTNode* plist = NULL;SLTPushBack(&plist, 1);SLTPushBack(&plist, 2);SLTPushBack(&plist, 3);SLTPushBack(&plist, 4);SLTPrint(plist);
}// 头插测试
void SLTTest2()
{SLTNode* plist = NULL;SLTPushFront(&plist, 1);SLTPushFront(&plist, 2);SLTPushFront(&plist, 3);SLTPushFront(&plist, 4);SLTPrint(plist);
}// 尾删测试
void SLTTest3()
{SLTNode* plist = NULL;SLTPushBack(&plist, 1);SLTPushBack(&plist, 2);SLTPushBack(&plist, 3);SLTPushBack(&plist, 4);SLTPrint(plist);SLTPopBack(&plist);SLTPrint(plist);SLTPopBack(&plist);SLTPrint(plist);SLTPopBack(&plist);SLTPrint(plist);SLTPopBack(&plist);SLTPrint(plist);
}// 头删测试
void SLTTest4()
{SLTNode* plist = NULL;SLTPushBack(&plist, 1);SLTPushBack(&plist, 2);SLTPushBack(&plist, 3);SLTPushBack(&plist, 4);SLTPrint(plist);SLTPopFront(&plist);SLTPrint(plist);SLTPopFront(&plist);SLTPrint(plist);SLTPopFront(&plist);SLTPrint(plist);SLTPopFront(&plist);SLTPrint(plist);
}// 查找测试
void SLTTest5()
{SLTNode* plist = NULL;SLTPushBack(&plist, 1);SLTPushBack(&plist, 2);SLTPushBack(&plist, 3);SLTPushBack(&plist, 4);SLTPrint(plist);SLTNode* ans = SLTFind(plist, 1);if (ans)ans->data = 10;SLTPrint(plist);
}// 在pos位置之前插入x测试
void SLTTest6()
{SLTNode* plist = NULL;SLTPushBack(&plist, 1);SLTPushBack(&plist, 2);SLTPushBack(&plist, 3);SLTPushBack(&plist, 4);SLTPrint(plist);SLTNode* pos = SLTFind(plist, 2);if (pos)SLTInsert(&plist, pos, 99);SLTPrint(plist);
}// 在pos位置之后插入x测试
void SLTTest7()
{SLTNode* plist = NULL;SLTPushBack(&plist, 1);SLTPushBack(&plist, 2);SLTPushBack(&plist, 3);SLTPushBack(&plist, 4);SLTPrint(plist);SLTNode* pos = SLTFind(plist, 2);if (pos)SLTInsertAfter(pos, 99);SLTPrint(plist);
}// 删除pos位置的值测试
void SLTTest8()
{SLTNode* plist = NULL;SLTPushBack(&plist, 1);SLTPushBack(&plist, 2);SLTPushBack(&plist, 3);SLTPushBack(&plist, 4);SLTPrint(plist);SLTNode* pos = SLTFind(plist, 2);if (pos)SLTErase(&plist, pos);SLTPrint(plist);
}// 删除pos位置之后的值测试
void SLTTest9()
{SLTNode* plist = NULL;SLTPushBack(&plist, 1);SLTPushBack(&plist, 2);SLTPushBack(&plist, 3);SLTPushBack(&plist, 4);SLTPrint(plist);SLTNode* pos = SLTFind(plist, 2);if (pos)SLTEraseAfter(pos);SLTPrint(plist);
}int main()
{return 0;
}
感谢大佬们的支持!!!
互三啦!!!