文章目录
- 几何体的顶点position、法向量normal及uv坐标
- UV映射
- UV坐标系
- UV坐标与顶点坐标
- 设置UV坐标
- 案例1:使用PlaneGeometry创建平面缓存几何体
- 案例2:使用BufferGeometry创建平面缓存几何体
- 法向量 - 顶点法向量光照计算
- 案例1:不设置顶点法向量平面几何体与自带顶点法向量的平面几何体对比
- 案例2:设置法向量
- 方式1 computeVertexNormals方法
- 方式2:自定义normal属性值
- 引入顶点法向量辅助器VertexNormalsHelper
- 几何体的移动、旋转和缩放
- 移动几何体的顶点 bufferGeometry.translate
- 几何体平移与物体平移
- 几何体旋转与模型旋转(缩放同理)
几何体的顶点position、法向量normal及uv坐标
UV映射
UV映射是一种将二维纹理映射到三维模型表面的技术。
在这个过程中,3D模型上的每个顶点都会被赋予一个二维坐标(U, V)。
这些坐标用于将纹理图像上的像素与模型表面上的点进行对应。
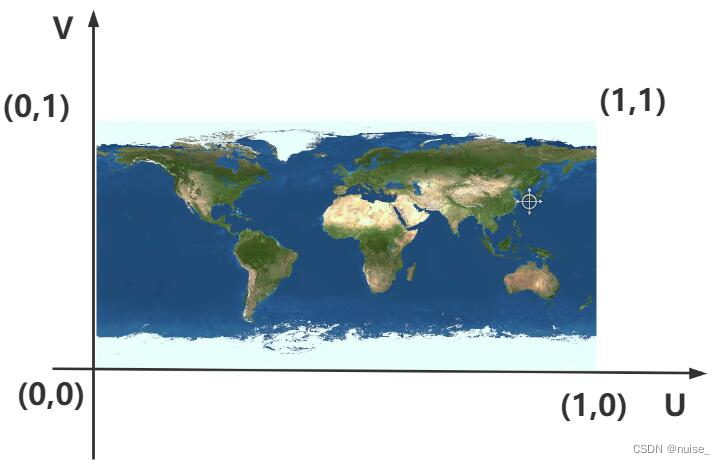
UV坐标系
U和V分别表示纹理坐标的水平和垂直方向,使用UV来表达纹理的坐标系。
UV坐标的取值范围是0~1,纹理贴图左下角对应的UV坐标是(0,0),右上角对应的坐标(1,1)。
UV坐标与顶点坐标
| 类型 | 含义 | 属性 |
|---|---|---|
| UV坐标 | 该顶点在纹理上的二维坐标(U, V) | geometry.attributes.uv |
| 顶点坐标 | 3D/2D模型中每个顶点的空间坐标(x, y, z) | geometry.attributes.position |
- 位置关系是一一对应的,每一个顶点位置对应一个纹理贴图的位置
- 顶点位置用于确定模型在场景中的形状,而UV坐标用于确定纹理在模型上的分布。
设置UV坐标
案例1:使用PlaneGeometry创建平面缓存几何体
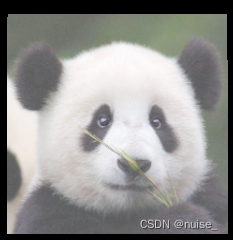
// 图片路径public/assets/panda.png
let uvTexture = new THREE.TextureLoader().load("/assets/panda.png");// 创建平面几何体
const planeGeometry = new THREE.PlaneGeometry(100, 100);
console.log("planeGeometry.attributes.position",planeGeometry.attributes.position.array);
console.log("planeGeometry.attributes.uv",planeGeometry.attributes.uv.array);
console.log("planeGeometry.index",planeGeometry.index.array);// 创建材质
const planeMaterial = new THREE.MeshBasicMaterial({map: uvTexture,
});
// 创建平面
const planeMesh = new THREE.Mesh(planeGeometry, planeMaterial);
// 添加到场景
scene.add(planeMesh);
planeMesh.position.x = -3;
贴图正确显示,查看position与uv发现设置贴图时已自动计算出uv坐标
案例2:使用BufferGeometry创建平面缓存几何体
1.使用BufferGeometry创建平面缓存几何体,通过map设置贴图。
let uvTexture = new THREE.TextureLoader().load("/assets/panda.png");
// 创建平面几何体
const geometry = new THREE.BufferGeometry();
// 使用索引绘制
const vertices = new Float32Array([-50, 50, 0, 50, 50, 0, -50, -50, 0,50, -50,0
]);
// 创建顶点属性
geometry.setAttribute("position", new THREE.BufferAttribute(vertices, 3));
// 创建索引
const indices = new Uint16Array([0, 2, 1, 2, 3, 1]);
// 创建索引属性
geometry.setIndex(new THREE.BufferAttribute(indices, 1));
// 创建材质
const material = new THREE.MeshBasicMaterial({map: uvTexture,
});
const plane = new THREE.Mesh(geometry, material);
scene.add(plane);
plane.position.x = 3;
console.log("geometry.attributes.position",geometry.attributes.position.array);
console.log("geometry.attributes.uv",geometry.attributes.uv);
console.log("geometry.index",geometry.index.array);
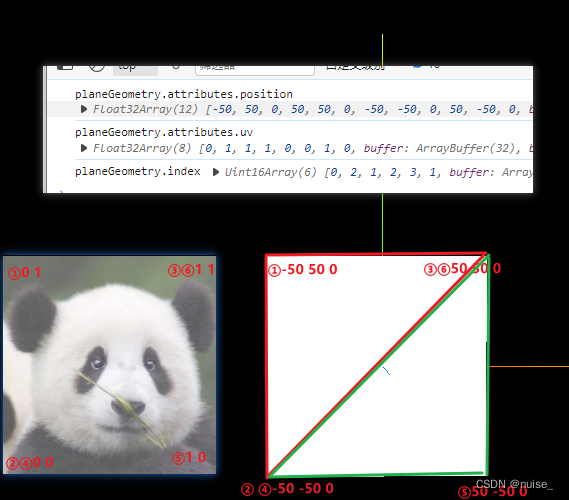
贴图并没有生效,通过打印发现BufferGeometry没有uv坐标,需要自定义uv坐标

2.根据纹理坐标将纹理贴图的对应位置裁剪映射到几何体的表面上
let uvTexture = new THREE.TextureLoader().load("/assets/panda.png");
const geometry = new THREE.BufferGeometry();
const vertices = new Float32Array([-50, 50, 0, 50, 50, 0, -50, -50, 0,50, -50,0
]);
geometry.setAttribute("position", new THREE.BufferAttribute(vertices, 3));
const indices= new Uint16Array([0, 2, 1, 2, 3, 1]);
geometry.setIndex(new THREE.BufferAttribute(indices, 1));
const material = new THREE.MeshBasicMaterial({map: uvTexture,
});
const plane = new THREE.Mesh(geometry, material);
scene.add(plane);
plane.position.x = 3;
const uv = new Float32Array([0,1,1,1,0,0,1,0
]);
geometry.attributes.uv = new THREE.BufferAttribute(uv, 2);
法向量 - 顶点法向量光照计算
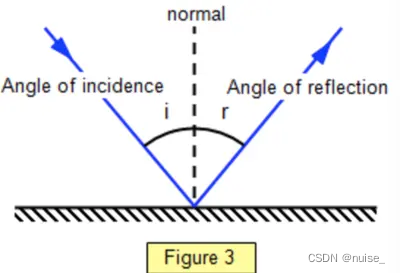
太阳光照在一个物体表面,物体表面与光线夹角位置不同的区域明暗程度不同。
法向量 用于根据光线与物体表面入射角,计算得到反射角(光从哪个角度反射出去)。光照和法向量的夹角决定了平面反射出的光照强度。
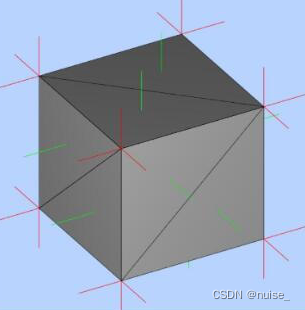
在Threejs中表示物体的网格模型Mesh的曲面是由一个一个三角形构成,所以为了表示物体表面各个位置的法线方向,可以给几何体的每个顶点定义一个方向向量,通过属性geometry.attributes.normal设置。
一个三角面只会有一个法向量。一个顶点会属于不同的三角面,因此一个顶点会有多个法向量。红色短线表示顶点法向量,绿色短线表示面法向量
案例1:不设置顶点法向量平面几何体与自带顶点法向量的平面几何体对比
1.准备两个平面几何,使用同一个材质。一个使用已经设置了法向量的PlaneGeometry创建,另一个使用默认没设置法向量的BufferGeometry创建
// 没设置法向量的BufferGeometry
const bufferGeometry = new THREE.BufferGeometry();
const vertices = new Float32Array([-50, 50, 0, 50, 50, 0, -50, -50, 0,50, -50,0
]);
bufferGeometry.setAttribute("position", new THREE.BufferAttribute(vertices, 3));
const indices = new Uint16Array([0, 2, 1, 2, 3, 1]);
bufferGeometry.setIndex(new THREE.BufferAttribute(indices, 1));
const material = new THREE.MeshBasicMaterial({map: uvTexture,
});
const bufferPlane = new THREE.Mesh(bufferGeometry, material);
scene.add(bufferPlane);
bufferPlane.position.x = -100;
const uv = new Float32Array([0,1,1,1,0,0,1,0
]);
bufferGeometry.attributes.uv = new THREE.BufferAttribute(uv, 2);
// 自带法向量的PlaneGeometry
const planeGeometry = new THREE.PlaneGeometry(100, 100);
const planeMesh = new THREE.Mesh(planeGeometry, material);
scene.add(planeMesh);
planeMesh.position.x = 100;
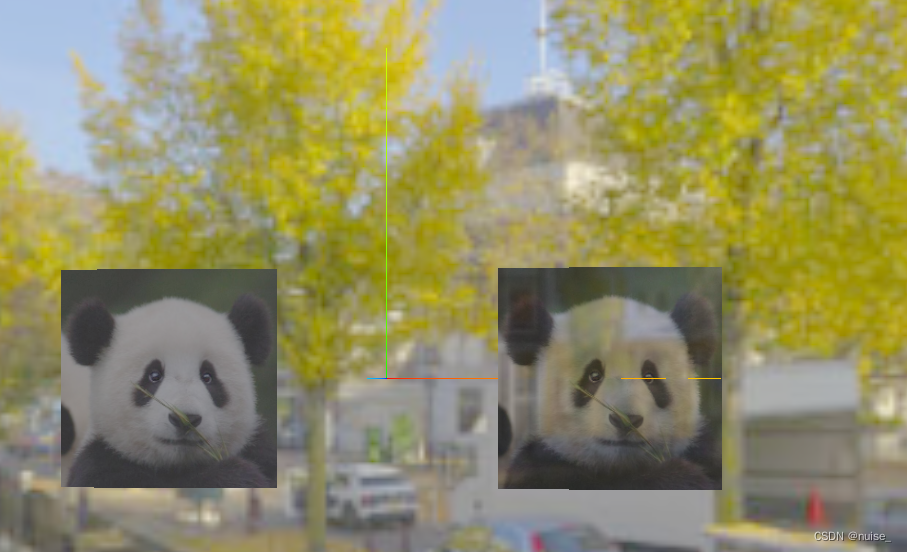
2.给模型设置环境贴图后,可以将光反射的环境部分映射到模型上(类似镜子将人反射在镜子上面),法向量用于计算,光从哪里反射出去。
// 设置环境贴图
const loader = new THREE.TextureLoader();
loader.load("/assets/test.jpg",(envMap)=>{envMap.mapping = THREE.EquirectangularReflectionMapping;// 设置反射的方式material.envMap = envMap; // 设置环境贴图scene.background = envMap; // 将这幅图设置为环境(可选)
})
可以发现,没有法向量的平面几何体没有对光进行反射
案例2:设置法向量
方式1 computeVertexNormals方法
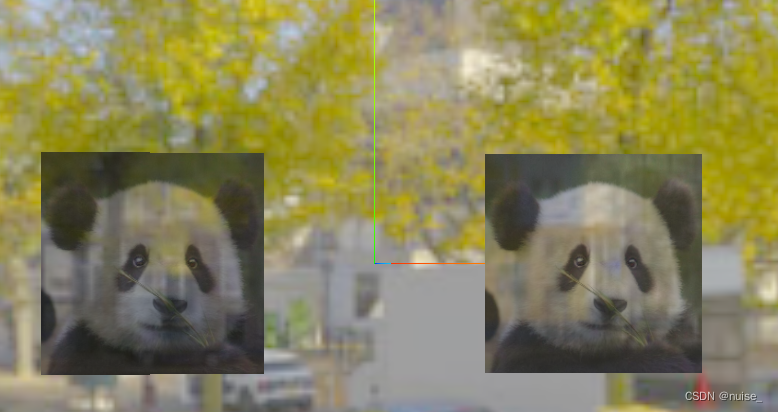
bufferGeometry.computeVertexNormals () 提供了计算顶点法向量的方法,所以只需要让BufferAttribute创建的平面几何体计算顶点法向量即可
const bufferGeometry = new THREE.BufferGeometry();
const vertices = new Float32Array([-50, 50, 0, 50, 50, 0, -50, -50, 0,50, -50,0
]);
bufferGeometry.setAttribute("position", new THREE.BufferAttribute(vertices, 3));
const indices = new Uint16Array([0, 2, 1, 2, 3, 1]);
bufferGeometry.setIndex(new THREE.BufferAttribute(indices, 1));
const material = new THREE.MeshBasicMaterial({map: uvTexture,
});
const bufferPlane = new THREE.Mesh(bufferGeometry, material);
scene.add(bufferPlane);
bufferPlane.position.x = -100;
const uv = new Float32Array([0,1,1,1,0,0,1,0
]);
bufferGeometry.attributes.uv = new THREE.BufferAttribute(uv, 2);
bufferGeometry.computeVertexNormals(); // 增加
方式2:自定义normal属性值
本来矩形由2个三角形组成,也就是6个顶点。但有些顶点重复,为了复用我们也设置了顶点索引。所以这里的法向量也按照顶点索引来设置。
// 顶点索引 [0, 2, 1, 2, 3, 1]const normals = new Float32Array([0, 0, 1,0, 0, 1,        0, 0, 1,0, 0, 1
])
bufferGeometry.setAttribute("normal", new THREE.BufferAttribute(normals, 3));
引入顶点法向量辅助器VertexNormalsHelper
语法:new VertexNormalsHelper( object : Object3D, size : Number, color : Hex, linewidth : Number )
object:要渲染顶点法线辅助的对象
size (可选的)箭头的长度,默认为 1
color 16进制颜色值. 默认为 0xff0000
linewidth (可选的) 箭头线段的宽度,默认为 1
继承链:Object3D → Line → VertexNormalsHelper
为了更方便调试,可以引入顶点法向量辅助器
import { VertexNormalsHelper } from 'three/addons/helpers/VertexNormalsHelper.js';// 这里的参数是模型,不是几何体
const vertexNormalsHelper= new VertexNormalsHelper(bufferPlane, 8.2, 0xff0000);
scene.add(vertexNormalsHelper);
几何体的移动、旋转和缩放
BufferGeometry重写了Object3D的同名方法,几何变换的本质是改变几何体的顶点数据
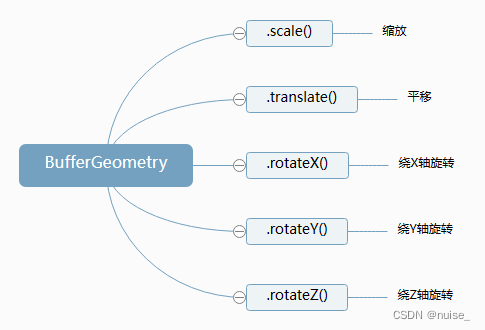
| 方法 | 描述 |
|---|---|
| bufferGeometry.scale ( x : Float, y : Float, z : Float ) | 从几何体原始位置开始缩放几何体 |
| bufferGeometry.translate ( x : Float, y : Float, z : Float ) | 从几何体原始位置开始移动几何体,本质改变的是顶点坐标 |
| bufferGeometry.rotateX/rotateY/rotateZ( radians : Float ) | 沿着对象坐标系(局部空间)的主轴旋转几何体,参数是弧度 |
移动几何体的顶点 bufferGeometry.translate
这里需要区分移动几何体的顶点和移动物体,一般情况下选择移动物体,当顶点本身就偏离需要将几何体中心移动到原点时选择移动几何体(消除中心点偏移)。
几何体的变换由于直接将最终计算结果设置为顶点坐标,所以很难追逐到是否发生了变换。
| - | 使用 | 描述 |
|---|---|---|
| 移动几何体的顶点 | bufferGeometry.translate ( x : Float, y : Float, z : Float ) | 改变几何体的 ,geometry.attributes.position属性 |
| 移动物体 | object3D.position : Vector3 | 移动对象的局部位置 |
- 任何一个模型的本地坐标(局部坐标)就是模型的
.position属性。- 一个模型的世界坐标,模型自身
.position和所有父对象.position累加的坐标。
案例
const bufferGeometry = new THREE.BufferGeometry();
const vertices = new Float32Array([-50, 50, 0, 50, 50, 0, -50, -50, 0,50, -50,0
]);
bufferGeometry.setAttribute("position", new THREE.BufferAttribute(vertices, 3));
const indices = new Uint16Array([0, 2, 1, 2, 3, 1]);
bufferGeometry.setIndex(new THREE.BufferAttribute(indices, 1));
const material = new THREE.MeshBasicMaterial();
const bufferPlane = new THREE.Mesh(bufferGeometry, material);
// 移动顶点
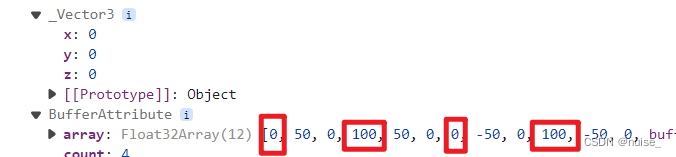
bufferGeometry.translate(50,0,0)
scene.add(bufferPlane);
// 物体的局部坐标仍然在(0,0,0) 几何体的顶点坐标x轴都加了50
console.log(bufferPlane.position,bufferGeometry.attributes.position)
几何体平移与物体平移
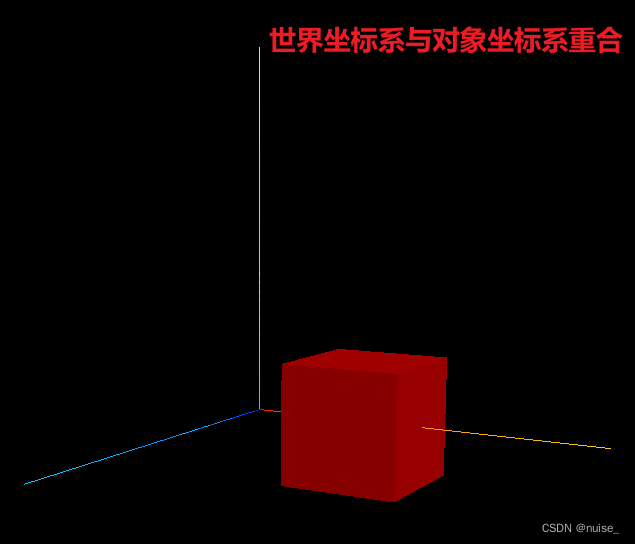
几何体平移geometry.translate(50,0,0) 移动几何体
1.世界坐标没变化,还是(0,0,0)
2.本质是改变了顶点坐标
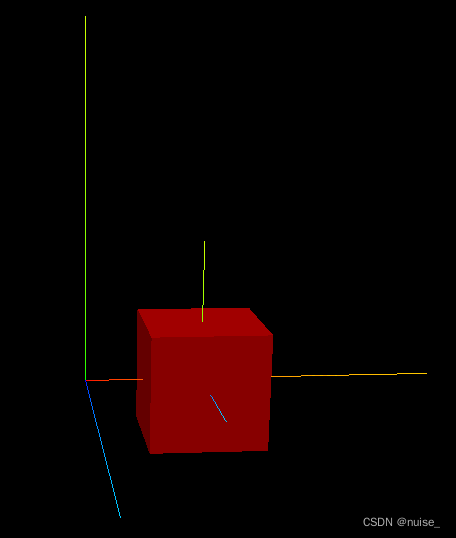
模型平移mesh.ttanslateX(50) 沿X轴移动50个单位
1.世界坐标变为(50,0,0)
2.对象坐标系(局部空间/几何对象坐标系)跟随,整体移动
几何体旋转与模型旋转(缩放同理)
| - | 方法 | 本质修改 |
|---|---|---|
| 几何体旋转 | bufferGeometry.rotateX( rad : Float) | 顶点坐标 |
| 物体旋转 | object3D…rotateX/.rotateY /.rotateZ ( rad : Float) | rotation |
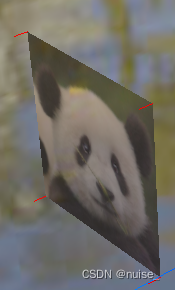
几何体旋转
const bufferGeometry = new THREE.BufferGeometry();
const vertices = new Float32Array([-50, 50, 0, 50, 50, 0, -50, -50, 0,50, -50,0
]);
bufferGeometry.setAttribute("position", new THREE.BufferAttribute(vertices, 3));
const indices = new Uint16Array([0, 2, 1, 2, 3, 1]);
bufferGeometry.setIndex(new THREE.BufferAttribute(indices, 1));
const material = new THREE.MeshBasicMaterial();
const bufferPlane = new THREE.Mesh(bufferGeometry, material);
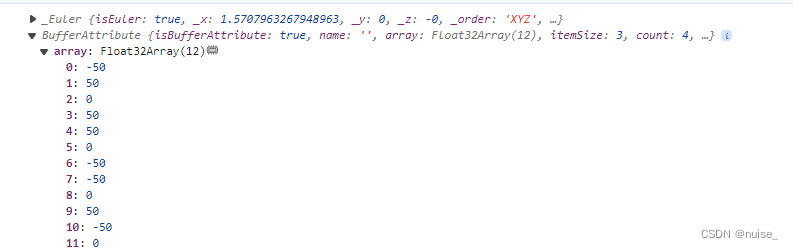
// 几何体旋转
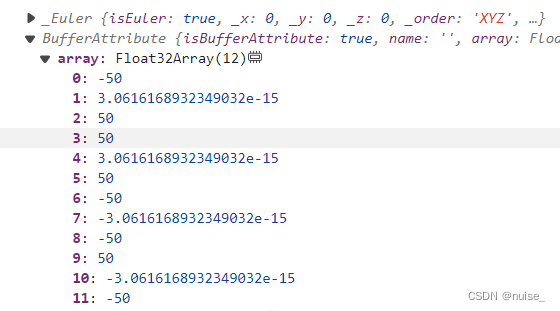
bufferGeometry.rotateX(Math.PI / 2);
scene.add(bufferPlane);
console.log(bufferPlane.rotation,bufferGeometry.attributes.position)
物体旋转
const bufferGeometry = new THREE.BufferGeometry();
const vertices = new Float32Array([-50, 50, 0, 50, 50, 0, -50, -50, 0,50, -50,0
]);
bufferGeometry.setAttribute("position", new THREE.BufferAttribute(vertices, 3));
const indices = new Uint16Array([0, 2, 1, 2, 3, 1]);
bufferGeometry.setIndex(new THREE.BufferAttribute(indices, 1));
const material = new THREE.MeshBasicMaterial();
const bufferPlane = new THREE.Mesh(bufferGeometry, material);
// 物体旋转
bufferPlane.rotateX(Math.PI / 2)
scene.add(bufferPlane);
console.log(bufferPlane.rotation,bufferGeometry.attributes.position)