Hi ~o(* ̄▽ ̄*)ブ大家好呀! 我是【小阿飞_】,我又来给大家分享知识啦😜
今天分享的是spring入门需要理解的一些概念和一些基础的使用操作,有哪里讲解的不好还请大佬们评论区多多指点😜
本期精彩:
spring简介
如何理解控制反转(依赖注入)
AOP的关键概念
spring相关操作
spring.xml 配置文件
通过Spring的ApplicationContext获取Bean
init-method:指定bean的初始化方法
复杂属性的配置
多配置文件
获取配置的Bean
学习spring肯定先是要知道什么是spring ( ̄▽ ̄)"
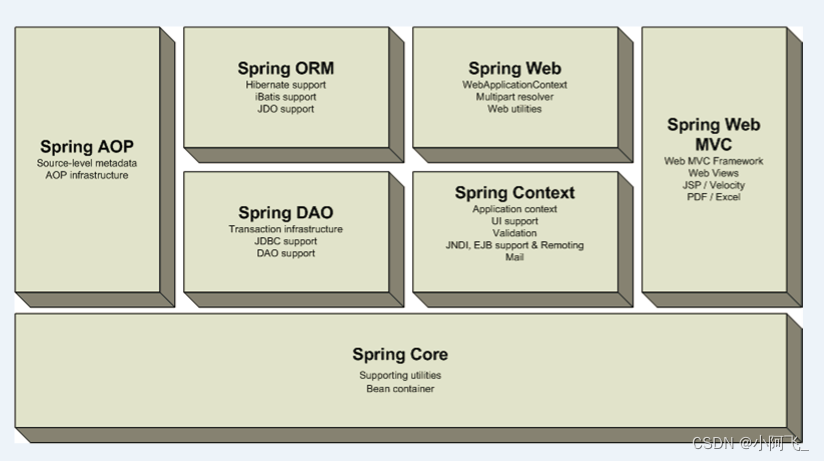
spring简介
是一个开源框架,它由Rod Johnson创建。它是为了解决企业应用开发的复杂性而创建的。Spring使用基本的JavaBean来完成以前只可能由EJB完成的事情。然而,Spring的用途不仅限于服务器端的开发。从简单性、可测试性和松耦合的角度而言,任何Java应用都可以从Spring中受益
Spring项目出发点:
- 目的:提供一种贯穿始终的解决方面,将各种专用框架整合成一个连贯的整体框架,简化企业级应用的开发(有点像计算机的主板,粘合剂)
- 鼓励最佳实践: 例如spring将“针对接口编程”的成本降到了最小
- 非侵入性: 应用对象尽量避免依赖框架,LOC和AOP是避免依赖的关键技术
- 统一配置: 好的框架应该让应用配置灵活且统一
- 易于测试: 使单元测试尽可能简单
- 可扩展:扩展功能等较灵活
简而言之,Spring是一个轻量级的控制反转/依赖注入(LOC)和面向切面(AOP)的容器框架
ROM指的是在数据库与应用之间的缓存中间件
如何理解控制反转(依赖注入)
控制反转(LOC=Inversion of Control)
由容器控制程序之间的(依赖)关系,非传统实现中由程序代码直接操控的形式。这也就是所谓“控制反转”的概念所在:(依赖)控制权由应用代码中转到了外部容器,控制权的转移,是所谓反转。
LOC还有一个另外的名字:“依赖注入 (DI=Dependency Injection)” ,即由容器动态的将某种依赖关系注入到组件之中
AOP的关键概念
Spring框架的关键组件之一是面向切面编程(AOP)
面向方面的编程需要将程序逻辑分解成不同的部分,跨越应用程序的多个点的功能被称为交叉切割问题,这些交叉关切在概念上与应用程序的业务逻辑分开。有如:日志记录,审计,声明式事务,安全性和缓存等方面的各种常见的的例子,简单来说就是Spring中的AOP可以实现统一控制以及对重复使用的而非业务逻辑的代码进行封装
- 连接点(Joinpoint):程序执行过程中明确的点,如方法的调用,或者异常的抛出.
- 目标(Target):被通知(被代理)的对象
- 通知(Advice):在某个特定的连接点上执行的动作,同时Advice也是程序代码的具体实现,例如一个实现日志记录的代码(通知有些书上也称为处理)
- 代理(Proxy):将通知应用到目标对象后创建的对象(代理=目标+通知),请注意:只有代理对象才有AOP功能,而AOP的代码是写在通知的方法里面的
- 切入点(Pointcut):多个连接点的集合,定义了通知应该应用到那些连接点。(也将Pointcut理解成一个条件 ,此条件决定了容器在什么情况下将通知和目标组合成代理返回给外部程序)
- 适配器(Advisor):适配器=通知(Advice)+切入点(Pointcut)
spring相关操作
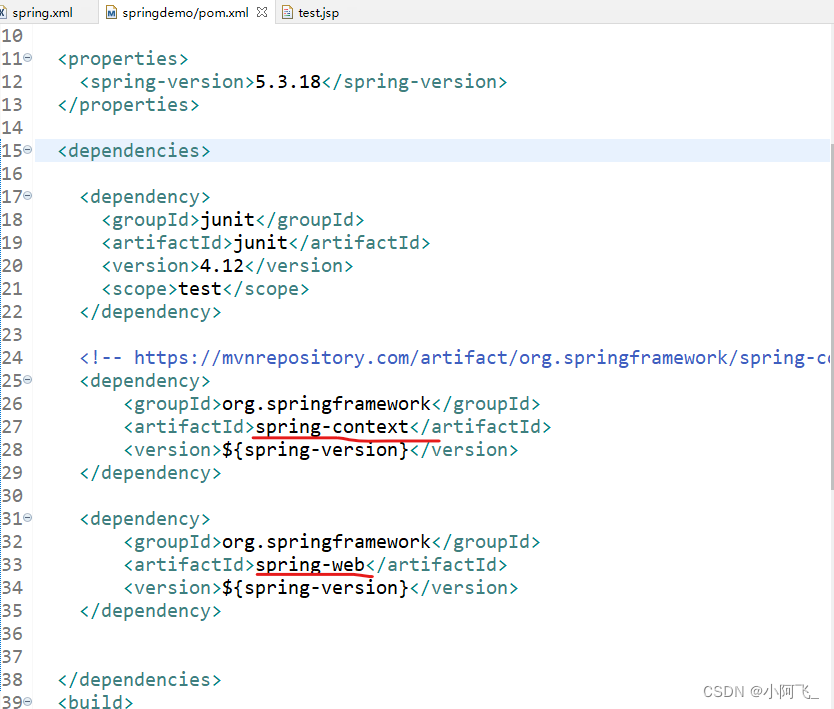
创建maven项目后,在maven仓库的官网上找到本期我们所需要用到的spring依赖包代码并拷入pom.xml文件,会自动为我们下载好所需要的jar包(依赖传递)
maven仓库官网链接:https://mvnrepository.com/artifact/org.springframework/spring-context/5.3.18
再创建spring的配置文件,名字自定义,我取的是spring.xml,配置文件代码如下👇
<?xml version="1.0" encoding="UTF-8"?>
<beans xmlns="http://www.springframework.org/schema/beans"xmlns:xsi="http://www.w3.org/2001/XMLSchema-instance" xmlns:aop="http://www.springframework.org/schema/aop"xmlns:context="http://www.springframework.org/schema/context" xmlns:tx="http://www.springframework.org/schema/tx"xsi:schemaLocation="http://www.springframework.org/schema/beans http://www.springframework.org/schema/beans/spring-beans.xsdhttp://www.springframework.org/schema/aop http://www.springframework.org/schema/aop/spring-aop-4.3.xsdhttp://www.springframework.org/schema/context http://www.springframework.org/schema/context/spring-context-4.3.xsdhttp://www.springframework.org/schema/tx http://www.springframework.org/schema/tx/spring-tx-4.3.xsd">
</beans>
然后就可以进行相关操作了:先创建一个实体类
public class Student {	private String name;public String getName() {return name;}public void setName(String name) {this.name = name;}@Overridepublic String toString() {return "Demo [name=" + name + "]";}
}
spring.xml 配置文件
配置文件说明:
- id:在容器中查找Bean的id(唯一、且不能以/开头)
- class:bean的完整类名
- name:在容器中查找Bean的名字(唯一、允许以/开头、允许多个值,多个值之间用逗号或空格隔开)
- scope:(singleton|prototype)默认是singleton
singleton: 单例模式, 在每个Spring IoC容器中一个bean定义对应一个对象实例
prototype: 原型模式/多例模式, 一个bean定义对应多个对象实例- parent:指定一个父bean(必须要有继承关系才行)
- abstract: 将一个bean定义成抽象bean(抽象bean是不能实例化的),抽象类一定要定义成抽象bean,非抽象类也可以定义成抽象bean
注: 在这里配置的name属性为简单的String属性,可以直接使用value进行配置。另外可以直接使用value设置的如下:
8基础数据+String+3个sql
java.util.Date
java.sql.Date
java.sql.Time
java.sql.Timestamp
通过Spring的ApplicationContext获取Bean
首先将刚刚创建好的实体类在配置在spring.xml文件中
<bean id="demo" class="org.lisen.springdemo.model.Demo"><property name="name"><value>张三</value></property>
</bean>
然后就可以通过Spring的ApplicationContext来获取这个实体类了,也可以称之为Bean
这里可以理解为从IOC容器中取到配置文件spring.xml中已经实例好了的对象
public class SpringDemo {public static void main(String[] args) {ApplicationContext cxt = new ClassPathXmlApplicationContext("spring.xml");Student demo = (Student)cxt.getBean("demo");System.out.println(demo);}
}
那么,如果这个实体类存在父类且父类是一个抽象类时,该如何在配置文件spring.xml中配置呢?
先创建一个父类person为抽象类,且学生类继承它(代码略)
然后可以在配置文件中这样操作(注:当一个类是抽象类时,必须配置abstract="true",但是,配置了abstract="true"的类可以是抽象类也可以是普通类)👇
<bean id="student" class="org.lisen.springdemo.model.Student" parent="person"><property name="name"><value>张三</value></property></bean><bean id="person" class="org.lisen.springdemo.model.Person" abstract="true"><property name="phone"><value>139751878778</value></property></bean>然后就可以通过上面同样的方式来获取相关信息了👇
public class SpringDemo {public static void main(String[] args) {ApplicationContext cxt = new ClassPathXmlApplicationContext("spring.xml");Student student = (Student)cxt.getBean("student");System.out.println(student.getName());System.out.println(student.getPhone());}
}
是不是感觉使用起来也不是很难?
除了上面那种方式来获取学生类之外,我们还可以:使用有参数构造方法创建学生Bean
只需要将配置文件spring.xml中的操作改成这个就可以了
<bean id="student" class="org.lisen.springdemo.model.Student" parent="person"><constructor-arg name="name"><value>王小</value></constructor-arg><!-- 第二种方式(没有上面那样写可读性高)<constructor-arg index="0"><value>王小</value></constructor-arg>-->
</bean>
通过构造函数获取学生类Bean👇
public class SpringDemo {	public static void main(String[] args) {ApplicationContext cxt = new ClassPathXmlApplicationContext("spring.xml");//构造函数注入Student s= (Student)cxt.getBean("student");System.out.println(s.getkName());}
}
init-method:指定bean的初始化方法
1、修改上面的Student类,加入一个init方法,注意该方法不能有参数
public class Student extends Person { private String name;public String getName() {return name;}public void setName(String name) {this.name = name;}@Overridepublic String toString() {return "Demo [name=" + name + "]";}//init方法,不能有参数public void init() {System.out.println("Student init ....");}}2、修改Student类对应的配置文件( 运行原来的测试用例,会发生后台打印“Student init ....“,表示init-method正常调用)
<bean id="student" class="org.lisen.springdemo.model.Student" parent="person" init-method="init"><property name="name"><value>张三</value></property>
</bean>
复杂属性的配置
JavaBean属性注入
在学生类中加入类属性:private Address address;
public class Address {private String city;private String street;public String getCity() {return city;}public void setCity(String city) {this.city = city;}public String getStreet() {return street;}public void setStreet(String street) {this.street = street;}
}
配置文件的改动👇
<bean id="student" class="org.lisen.springdemo.model.Student" parent="person" init-method="init"><property name="name"><value>张三</value></property><property name="addr" ref="addr"/></bean> <bean id="addr" class="org.lisen.springdemo.model.Addr"><property name="city"><value>长沙</value></property></bean>在学生类中加入类属性list、数组:private int[] arr; private List list;
配置文件👇
<property name="list"><list><value>123</value><value>456</value><value>789</value><value>asd</value></list>
</property>
在学生类中加入类属性map:private Map map;后对应的配置文件👇
<property name="map"><map><entry key="aa" value="123"/><entry key="bb" value="456"/><entry key="cc" value="789"/></map>
</property>
在学生类中加入类属性:后缀为的文件:private Properties prop;后对应的配置文件👇
<property name="prop"><props><prop key="dd">qwer</prop><prop key="ee">tyu</prop><prop key="ff">iop</prop></props>
</property>
多配置文件
系统一般会被分成多个模块,可以为每个模块配置一个配置文件,便于管理,在版本控制软件中也可以减少冲突
spring-a.xml 假设为a模块的配置文件
<?xml version="1.0" encoding="UTF-8"?>
<beans xmlns="http://www.springframework.org/schema/beans"xmlns:xsi="http://www.w3.org/2001/XMLSchema-instance" xmlns:aop="http://www.springframework.org/schema/aop"xmlns:context="http://www.springframework.org/schema/context" xmlns:tx="http://www.springframework.org/schema/tx"xsi:schemaLocation="http://www.springframework.org/schema/beans http://www.springframework.org/schema/beans/spring-beans.xsdhttp://www.springframework.org/schema/aop http://www.springframework.org/schema/aop/spring-aop-4.3.xsdhttp://www.springframework.org/schema/context http://www.springframework.org/schema/context/spring-context-4.3.xsdhttp://www.springframework.org/schema/tx http://www.springframework.org/schema/tx/spring-tx-4.3.xsd">	<bean id="student" class="org.lisen.springdemo.model.Student" parent="person" init-method="init"><property name="name"><value>张三</value></property><property name="addr" ref="addr"/></bean>	<bean id="addr" class="org.lisen.springdemo.model.Addr"><property name="city"><value>长沙</value></property></bean>	<bean id="person" class="org.lisen.springdemo.model.Person" abstract="true"><property name="phone"><value>139751878778</value></property></bean>	<bean id="worker" class="org.lisen.springdemo.model.Worker" parent="person"><constructor-arg name="workName"><value>王小</value></constructor-arg></bean>
</beans>
spring.xml 为总的spring配置文件, 在总配置文件中导入其他模块即可👇
(如果不想写总配置文件的话还有一种方式就是:ApplicationContext cxt = new ClassPathXmlApplicationContext("spring-*.xml");)
<?xml version="1.0" encoding="UTF-8"?>
<beans xmlns="http://www.springframework.org/schema/beans"xmlns:xsi="http://www.w3.org/2001/XMLSchema-instance" xmlns:aop="http://www.springframework.org/schema/aop"xmlns:context="http://www.springframework.org/schema/context" xmlns:tx="http://www.springframework.org/schema/tx"xsi:schemaLocation="http://www.springframework.org/schema/beans http://www.springframework.org/schema/beans/spring-beans.xsdhttp://www.springframework.org/schema/aop http://www.springframework.org/schema/aop/spring-aop-4.3.xsdhttp://www.springframework.org/schema/context http://www.springframework.org/schema/context/spring-context-4.3.xsdhttp://www.springframework.org/schema/tx http://www.springframework.org/schema/tx/spring-tx-4.3.xsd"><import resource="spring-a.xml"/></beans>
获取配置的Bean
这里我们还可以写一个对象帮助类用来简化以后获取对象的代码操作👇
/*** 用于简化Bean的获取.* ApplicationContextAware接口:* 实现了这个接口的bean,当spring容器初始化的时候,会自动的将ApplicationContext注入进来*/
public final class SpringBeanUtil implements ApplicationContextAware {private SpringBeanUtil() {}private static ApplicationContext cxt;@Overridepublic void setApplicationContext(ApplicationContext appContext) throws BeansException {cxt = appContext;}/*** 根据Bean的id来获取Bean对象* @param id 配置文件中的bean的id属性* @return Object*/@SuppressWarnings("unchecked")public static <T> T getBean(String id) {return (T)cxt.getBean(id);}}
配置文件
<bean class="org.lisen.springdemo.util.SpringBeanUtil"/>好咯,spring入门的一些相关知识就分享到这里了,下期将更加深入地和继续大家分享spring的其他知识,欢迎大佬评论区多多指点(●'◡'●)