目录
- 一、Spring概述
- 二、Spring的体系结构
- 三、Spring的核心容器
- 四、实现步骤
一、Spring概述
spring是当前主流的JavaWeb框架,它是为了解决应用开发复杂性问题而产生的。对于一个Java应用程序员来说,掌握spring框架的使用,是我们基本的一项技能。spring是分层的JavaSE/EE full-stack 轻量级开源框架,以IoC(Inverse of Control 控制反转)和AOP(Aspect Oriented Programming 面向切面编程)为内核,使用基本的JavaBean来完成以前只可能由EJB完成的工作,取代了EJB的臃肿、低效的开发模式。
二、Spring的体系结构

三、Spring的核心容器
Spring容器会负责控制程序之间的关系,而不是由程序代码直接控制。Spring为我们提供了两种核心容器,分别为BeanFactory和ApplicationContext。
ApplicationContext是BeanFactory的子接口,是另一种常用的Spring核心容器。不仅包含了BeanFactory的所有功能,还添加了对国际化、资源访问、事件传播等方面的支持。因此ApplicationContext在实际开发中较为常用。
通过ClassPathXmlApplicationContext创建:
ApplicationContext applicationContext = new ClassPathXmlApplicationContext(String configLocation);
ClassPathXmlApplicationContext会从类路径classPath中寻找指定的XML配置文件,找到并装载完成ApplicationContext的实例化工作。
创建Spring容器后,就可以获取Spring容器中的Bean。Spring获取Bean的实例通常采用以下两种方法:
(1)根据容器中Bean的id或name来获取指定的Bean,获取之后需要进行强制类型转换。
Object getBean(String name);
(2)根据类的类型来获取Bean的实例。由于此方法为泛型方法,因此在获取Bean之后不需要进行强制类型转换。
<T> T getBean(Class<T> requiredType);
四、实现步骤
(1)在IDEA中创建名称为spring的Maven项目。
(2)在pom.xml文件中加载需使用到的Spring四个基础包以及Spring依赖包。
<dependencies> <!--Spring的基础包Spring-core--><dependency><groupId>org.springframework</groupId><artifactId>spring-core</artifactId><version>5.2.8.RELEASE</version></dependency><!--Spring的基础包Spring-beans--><dependency><groupId>org.springframework</groupId><artifactId>spring-beans</artifactId><version>5.2.8.RELEASE</version></dependency> <!--Spring的基础包Spring-context--><dependency><groupId>org.springframework</groupId><artifactId>spring-context</artifactId><version>5.2.8.RELEASE</version></dependency><!--Spring的基础包Spring-expression--><dependency><groupId>org.springframework</groupId><artifactId>spring-expression</artifactId><version>5.2.8.RELEASE</version></dependency><!--Spring的依赖包commons-logging--><dependency><groupId>commons-logging</groupId><artifactId>commons-logging</artifactId><version>1.2</version></dependency><!--Junit单元测试--><dependency><groupId>junit</groupId><artifactId>junit</artifactId><version>4.12</version><scope>test</scope></dependency></dependencies>
(3)在src/main/java目录下创建com.zh包,在该包中创建名为HelloSpring的类,在HelloSpring类中定义userName属性和show()方法。
private String userName;public void setUserName(String userName) {this.userName = userName;}public void show(){System.out.println(userName+":欢迎来到Spring");}
(4)在src/main/resources目录下,新建applicationContext.xml文件作为HelloSpring类的配置文件,并在该配置文件中创建id为helloSpring的Bean。
<?xml version="1.0" encoding="utf-8" ?>
<beans xmlns="http://www.springframework.org/schema/beans"xmlns:xsi="http://www.w3.org/2001/XMLSchema-instance"xsi:schemaLocation="http://www.springframework.org/schema/beanshttp://www.springframework.org/schema/beans/spring-beans.xsd"><bean id="helloSpring" class="com.zh.HelloSpring"><property name="userName" value="张三"></property></bean></beans>
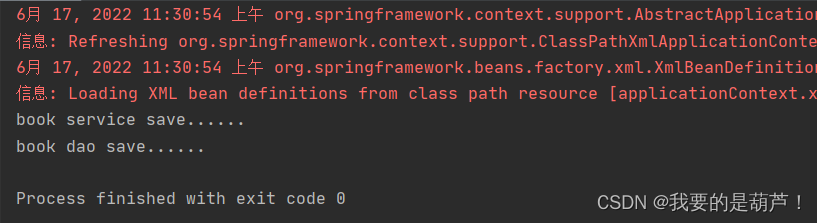
(5)在test/java目录下,创建测试类TestHelloSpring,在main()方法中初始化Spring容器并加载applicationContext.xml配置文件,通过Spring容器获取HelloSpring类的helloSpring实例,调用HelloSpring类中的show()方法在控制台输出信息。
public static void main(String[] args) {ApplicationContext applicationContext = new ClassPathXmlApplicationContext("applicationContext.xml");HelloSpring helloSpring = (HelloSpring) applicationContext.getBean("helloSpring");helloSpring.show();}
(6)运行结果