一、实验环境
1.安装7.6虚拟机
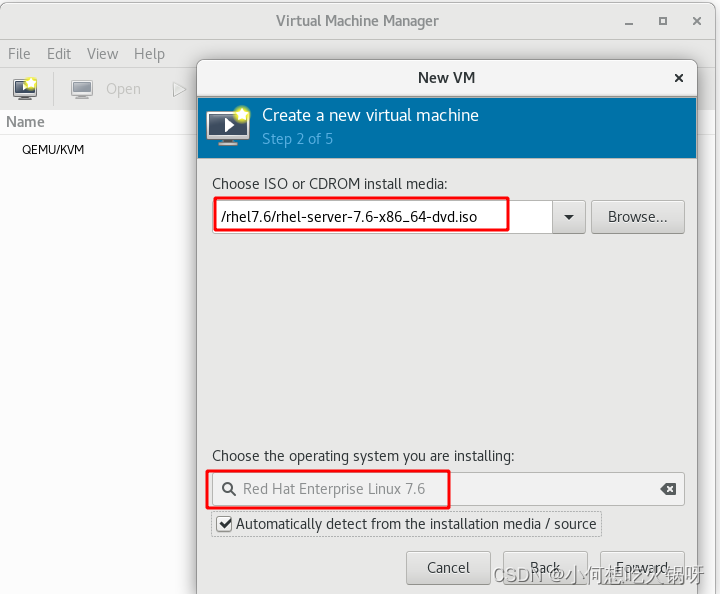
最小化安装,不安装图形!
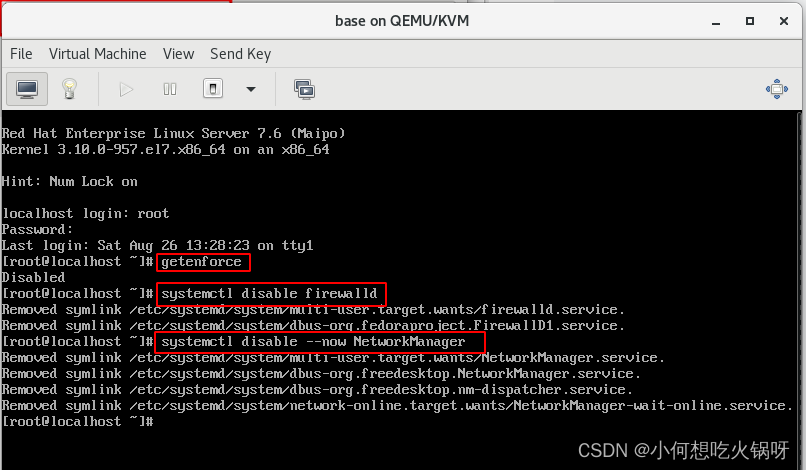
2.封装虚拟机
- 关闭selinux
- 关闭防火墙
- 关闭networkmanager
- 配置网络,保证可以ssh
- 修改主机名+添加双向解析
- 配置7.6网络仓库--安装常用的工具

配置完成后,在真机ssh虚拟机
如果失败,检查桥接!
设置为以下模式即可!
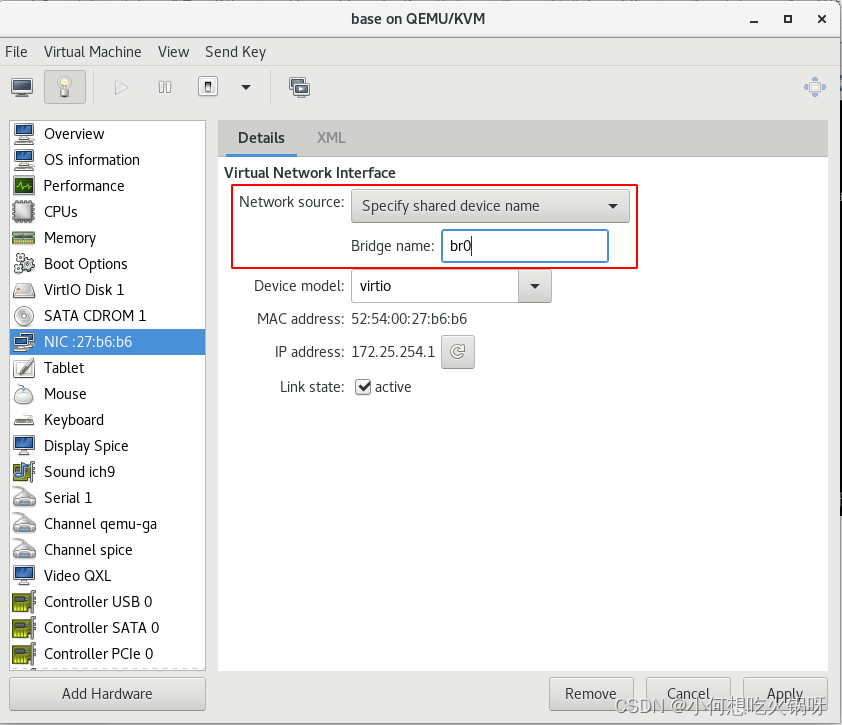
在真机上测试桥接模式

再次ssh,发现可以连接但是很慢------因为没有解析

因此要在虚拟机上添加解析
修改主机名+添加双向解析
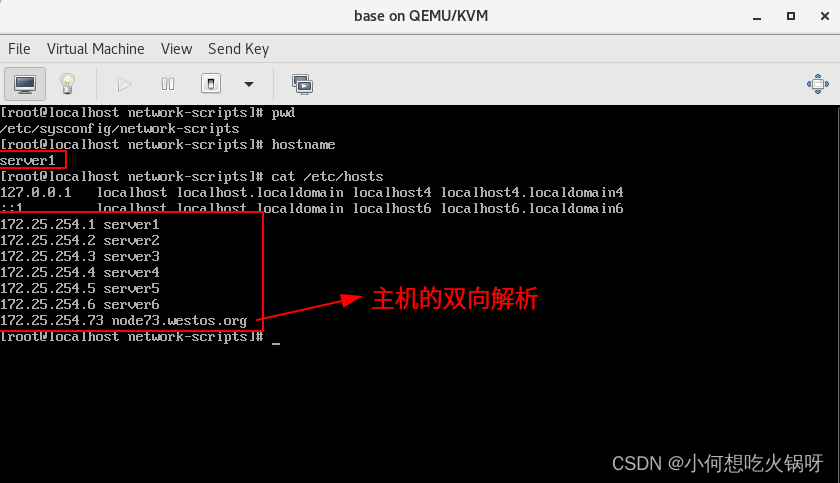
再次ssh虚拟机,很快!!

然后配置网络仓库,首先在真机挂载7.6镜像+设置自动挂载
[root@node73 /]# mkdir /var/www/html/rhel7.6
[root@node73 /]# mount /rhel7.6/rhel-server-7.6-x86_64-dvd.iso /var/www/html/rhel7.6/
mount: /var/www/html/rhel7.6: WARNING: device write-protected, mounted read-only.
[root@node73 /]# df
Filesystem     1K-blocks     Used Available Use% Mounted on
devtmpfs         3860280        0   3860280   0% /dev
tmpfs            3911640   102300   3809340   3% /dev/shm
tmpfs            3911640    26804   3884836   1% /run
tmpfs            3911640        0   3911640   0% /sys/fs/cgroup
/dev/sda8       93186608 81814148  11372460  88% /
/dev/sda6        1038336   230112    808224  23% /boot
/dev/sda1         262144    32912    229232  13% /boot/efi
/dev/loop0       8238560  8238560         0 100% /var/www/html/westos
tmpfs             782328       12    782316   1% /run/user/42
tmpfs             782328       64    782264   1% /run/user/0
/dev/loop1       4391278  4391278         0 100% /var/www/html/rhel7.6
[root@node73 /]# vim /etc/rc.d/rc.local
[root@node73 /]# chmod +x /etc/rc.d/rc.local
配置本地仓库
[root@node73 yum.repos.d]# vim westos.repo
[root@node73 yum.repos.d]# yum repolist
repo id                                 repo name
dvd                                     rhel7.6
[root@node73 yum.repos.d]# cat westos.repo
[dvd]
name=rhel7.6
baseurl=file:///var/www/html/rhel7.6
gpgcheck=0
gpgkey=/etc/pki/rpm-gpg/RPM-GPG-KEY-redhat-release
enabled=1[root@node73 yum.repos.d]#
在虚拟机搭建网络仓库!
[root@server1 yum.repos.d]# vi dvd.repo
[root@server1 yum.repos.d]# yum repolist
Loaded plugins: product-id, search-disabled-repos, subscription-manager
This system is not registered with an entitlement server. You can use subscription-manager to register.
dvd                                                      | 4.3 kB     00:00
(1/2): dvd/group_gz                                        | 146 kB   00:00
(2/2): dvd/primary_db                                      | 4.2 MB   00:00
repo id                              repo name                            status
dvd                                  rhel7.6                              5,152
repolist: 5,152
[root@server1 yum.repos.d]# cat dvd.repo
[dvd]
name=rhel7.6
baseurl=http://172.25.254.73/rhel7.6
gpgcheck=0
[root@server1 yum.repos.d]#
网络仓库配置成功后,下载常用的工具
[root@server1 yum.repos.d]# yum install -y vim lftp net-tools wget lsof
Loaded plugins: product-id, search-disabled-repos, subscription-manager
This system is not registered with an entitlement server. You can use subscription-manager to register.
Package 2:vim-enhanced-7.4.160-5.el7.x86_64 already insta
至此,虚拟机封装成功!关机!
3.清理虚拟机
在真机上进行操作,清理虚拟机,保证虚拟机环境的干净!
[root@node73 images]# virt-sysprep -d base
[   0.0] Examining the guest ...
[   4.2] Performing "abrt-data" ...
[   4.2] Performing "backup-files" ...
[   4.5] Performing "bash-history" ...
[   4.6] Performing "blkid-tab" ...
[   4.6] Performing "crash-data" ...
[   4.6] Performing "cron-spool" ...
[   4.6] Performing "dhcp-client-state" ...
[   4.6] Performing "dhcp-server-state" ...
[   4.6] Performing "dovecot-data" ...
[   4.6] Performing "logfiles" ...
[   4.7] Performing "machine-id" ...
[   4.7] Performing "mail-spool" ...
[   4.7] Performing "net-hostname" ...
[   4.7] Performing "net-hwaddr" ...
[   4.8] Performing "pacct-log" ...
[   4.8] Performing "package-manager-cache" ...
[   4.8] Performing "pam-data" ...
[   4.8] Performing "passwd-backups" ...
[   4.8] Performing "puppet-data-log" ...
[   4.8] Performing "rh-subscription-manager" ...
[   4.8] Performing "rhn-systemid" ...
[   4.9] Performing "rpm-db" ...
[   4.9] Performing "samba-db-log" ...
[   4.9] Performing "script" ...
[   4.9] Performing "smolt-uuid" ...
[   4.9] Performing "ssh-hostkeys" ...
[   4.9] Performing "ssh-userdir" ...
[   4.9] Performing "sssd-db-log" ...
[   4.9] Performing "tmp-files" ...
[   4.9] Performing "udev-persistent-net" ...
[   4.9] Performing "utmp" ...
[   4.9] Performing "yum-uuid" ...
[   4.9] Performing "customize" ...
[   5.0] Setting a random seed
[   5.0] Setting the machine ID in /etc/machine-id
[   5.0] Performing "lvm-uuids" ...
[root@node73 images]# which virt-sysprep
/usr/bin/virt-sysprep
[root@node73 images]# rpm -qf /usr/bin/virt-sysprep
libguestfs-tools-c-1.38.4-15.module+el8.2.0+5297+222a20af.x86_64
如果找不到命令,可以利用rpm -qf查找需要的安装包,进行命令安装!
4.压缩虚拟机
压缩虚拟机,节省空间!
注意:空间不够会失败!!
[root@node73 images]# du -h base.qcow2
21G	base.qcow2
[root@node73 images]# virt-sparsify --compress base.qcow2 base-new.qcow2
virt-sparsify: warning: There may not be enough free space on /tmp.
You may need to set TMPDIR to point to a directory with more free space.Max needed: 20.0G.  Free: 10.5G.  May need another 9.5G.Note this is an overestimate.  If the guest disk is full of data
then not as much free space would be required.You can ignore this warning or change it to a hard failure using the
--check-tmpdir=(ignore|continue|warn|fail) option.  See virt-sparsify(1).Press RETURN to continue or ^C to quit.
^C[root@node73 images]# ls
base.qcow2  westosa.qcow2
[root@node73 images]# rm -fr westosa.qcow2
[root@node73 images]# virt-sparsify --compress base.qcow2 base-new.qcow2
[   0.0] Create overlay file in /tmp to protect source disk
[   0.0] Examine source disk
[   1.4] Fill free space in /dev/rhel/root with zero100% ⟦▒▒▒▒▒▒▒▒▒▒▒▒▒▒▒▒▒▒▒▒▒▒▒▒▒▒▒▒▒▒▒▒▒▒▒▒▒▒▒▒▒▒▒▒▒▒▒▒▒▒▒▒▒▒▒▒▒▒▒▒▒▒▒▒▒⟧ 00:00
[  97.4] Clearing Linux swap on /dev/rhel/swap100% ⟦▒▒▒▒▒▒▒▒▒▒▒▒▒▒▒▒▒▒▒▒▒▒▒▒▒▒▒▒▒▒▒▒▒▒▒▒▒▒▒▒▒▒▒▒▒▒▒▒▒▒▒▒▒▒▒▒▒▒▒▒▒▒▒▒▒⟧ 00:00
[ 100.9] Fill free space in /dev/sda1 with zero
[ 102.1] Copy to destination and make sparse
[ 184.3] Sparsify operation completed with no errors.
virt-sparsify: Before deleting the old disk, carefully check that the
target disk boots and works correctly.
[root@node73 images]# ls
base-new.qcow2  base.qcow2
压缩成功后,删除base.qcow2,保留小的就可以!
[root@node73 images]# du -h base-new.qcow2
582M	base-new.qcow2
[root@node73 images]# du -h base.qcow2
21G	base.qcow2
[root@node73 images]#
[root@node73 images]# rm -f base.qcow2
[root@node73 images]# ls
base-new.qcow2
[root@node73 images]#
5.创建4个子盘---快照
[root@node73 images]# pwd
/var/lib/libvirt/images
[root@node73 images]# qemu-img create -f qcow2 -b base-new.qcow2 vm1
Formatting 'vm1', fmt=qcow2 size=21474836480 backing_file=base-new.qcow2 cluster_size=65536 lazy_refcounts=off refcount_bits=16
[root@node73 images]# qemu-img create -f qcow2 -b base-new.qcow2 vm2
Formatting 'vm2', fmt=qcow2 size=21474836480 backing_file=base-new.qcow2 cluster_size=65536 lazy_refcounts=off refcount_bits=16
[root@node73 images]# qemu-img create -f qcow2 -b base-new.qcow2 vm3
Formatting 'vm3', fmt=qcow2 size=21474836480 backing_file=base-new.qcow2 cluster_size=65536 lazy_refcounts=off refcount_bits=16
[root@node73 images]# qemu-img create -f qcow2 -b base-new.qcow2 vm4
Formatting 'vm4', fmt=qcow2 size=21474836480 backing_file=base-new.qcow2 cluster_size=65536 lazy_refcounts=off refcount_bits=16
[root@node73 images]# ls
base-new.qcow2  vm1  vm2  vm3  vm4
硬盘信息创建完成后,创建虚拟机!
vm1 vm2 vm3 vm4都一样
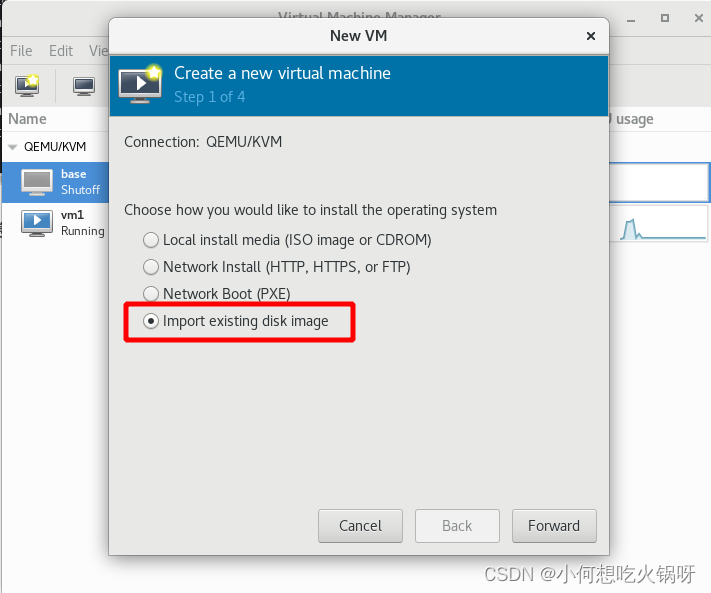

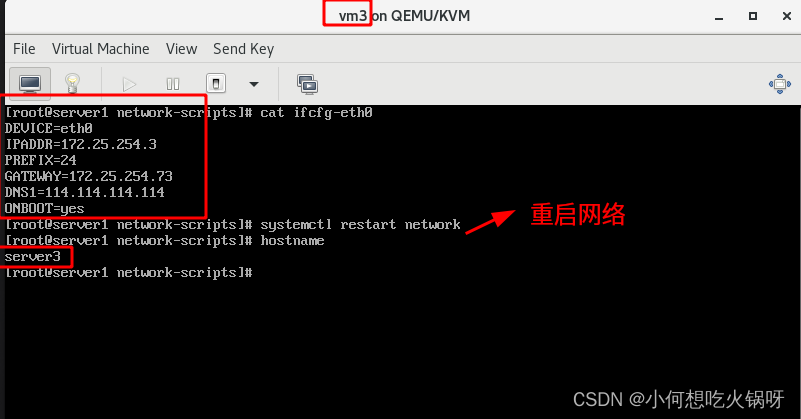
 6.子盘网络配置
修改子盘对应ip+主机名
vm1---->172.25.254.1----->server1
vm2----->172.25.254.2--->server2 
更改完后systemctl restart network (7.6版本)
二、docker介绍
ocker 是一个开源的应用容器引擎,让开发者可以打包他们的应用以及依赖包到一个可移植的容器中,然后发布到任何流行的Linux或Windows操作系统的机器上,也可以实现虚拟化,容器是完全使用沙箱机制,相互之间不会有任何接口。
一个完整的Docker有以下几个部分组成:
DockerClient客户端
Docker Daemon守护进程
Docker Image镜像
DockerContainer容器
在镜像里封装各种服务,构建镜像后运行镜像产生容器!
三、docker的安装
在虚拟机server1操作
1.下载镜像源
在百度上搜索阿里巴巴镜像源---->docker.ce----->wget下载
注意:这里下载的是centos 7版本的
后续安装有依赖性需要下载centos 7的源
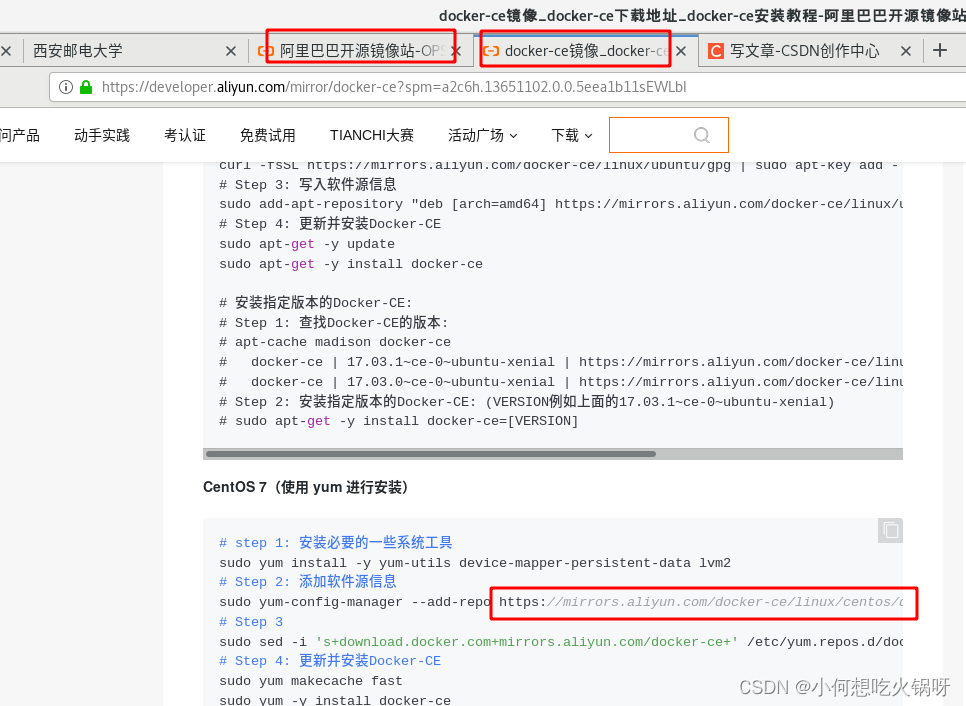
[root@server1 yum.repos.d]# wget https://mirrors.aliyun.com/docker-ce/linux/centos/docker-ce.repo
--2023-08-26 16:12:14--  https://mirrors.aliyun.com/docker-ce/linux/centos/docker-ce.repo
Resolving mirrors.aliyun.com (mirrors.aliyun.com)... 111.170.130.227, 118.182.226.233, 124.236.30.238, ...
Connecting to mirrors.aliyun.com (mirrors.aliyun.com)|111.170.130.227|:443... connected.
HTTP request sent, awaiting response... 200 OK
Length: 2081 (2.0K) [application/octet-stream]
Saving to: ‘docker-ce.repo’100%[======================================>] 2,081       --.-K/s   in 0s      2023-08-26 16:12:15 (4.71 MB/s) - ‘docker-ce.repo’ saved [2081/2081][root@server1 yum.repos.d]#
Display all 1273 possibilities? (y or n)^C
[root@server1 yum.repos.d]# ls
docker-ce.repo  dvd.repo  redhat.repo
2.编辑docker-ce.repo
只留下有用的!
[root@server1 yum.repos.d]# vim docker-ce.repo
[root@server1 yum.repos.d]# cat docker-ce.repo
[docker-ce-stable]
name=Docker CE Stable - $basearch
baseurl=https://mirrors.aliyun.com/docker-ce/linux/centos/$releasever/$basearch/stable
enabled=1
gpgcheck=0
gpgkey=https://mirrors.aliyun.com/docker-ce/linux/centos/gpg
3.安装docker
[root@server1 yum.repos.d]# yum install -y docker-ce
Loaded plugins: product-id, search-disabled-repos, subscription-manager
This system is not registered with an entitlement server. You can use subscription-manager to register.
Resolving Dependencies
安装失败,因为有依赖性,需要下载centos 7源
同样,在阿里巴巴寻找centos源,并下载
[root@server1 yum.repos.d]# wget https://mirrors.aliyun.com/repo/Centos-7.repo
--2023-08-26 16:28:30--  https://mirrors.aliyun.com/repo/Centos-7.repo
Resolving mirrors.aliyun.com (mirrors.aliyun.com)... 111.170.130.233, 118.182.226.237, 61.159.80.232, ...
Connecting to mirrors.aliyun.com (mirrors.aliyun.com)|111.170.130.233|:443... connected.
HTTP request sent, awaiting response... 200 OK
Length: 2523 (2.5K) [application/octet-stream]
Saving to: ‘Centos-7.repo’100%[======================================>] 2,523       --.-K/s   in 0.002s  2023-08-26 16:28:31 (1.60 MB/s) - ‘Centos-7.repo’ saved [2523/2523]
下载完成后,修改配置文件!

检查源是否可用!
[root@server1 yum.repos.d]# yum repolist
Loaded plugins: product-id, search-disabled-repos, subscription-manager
This system is not registered with an entitlement server. You can use subscription-manager to register.
repo id                         repo name                                 status
docker-ce-stable/7Server/x86_64 Docker CE Stable - x86_64                   259
dvd                             rhel7.6                                   5,152
extras/x86_64                   CentOS-7Server - Extras - mirrors.aliyun.   518
再次安装docker-ce
  policycoreutils-python.x86_64 0:2.5-29.el7                           python-IPy.noarch 0:0.75-6.el7                                       setools-libs.x86_64 0:3.3.8-4.el7                                    slirp4netns.x86_64 0:0.4.3-4.el7_8                                   Complete!
[root@server1 yum.repos.d]#
安装成功!!
4. 开启docker
- 开启docker+开机自启!
- 桥接模式解决
[root@server1 yum.repos.d]# systemctl start docker
[root@server1 yum.repos.d]# systemctl enable docker
Created symlink from /etc/systemd/system/multi-user.target.wants/docker.service to /usr/lib/systemd/system/docker.service.
docker info查看信息,出现错误,与桥接模式有关!
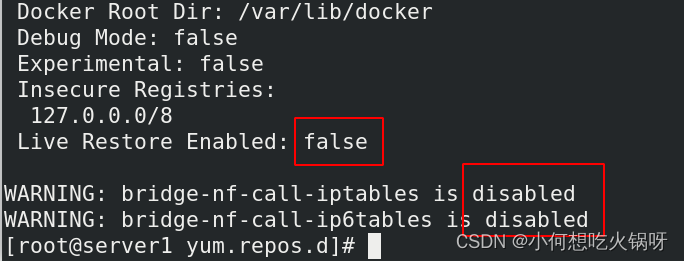
解决方法如下:
首先过滤警告
编辑文件--设置为1
使编辑文件立即生效!
WARNING: bridge-nf-call-iptables is disabled
WARNING: bridge-nf-call-ip6tables is disabled
[root@server1 yum.repos.d]# sysctl -a|grep bridge-nf-call-iptables
net.bridge.bridge-nf-call-iptables = 0
sysctl: reading key "net.ipv6.conf.all.stable_secret"
sysctl: reading key "net.ipv6.conf.default.stable_secret"
sysctl: reading key "net.ipv6.conf.docker0.stable_secret"
sysctl: reading key "net.ipv6.conf.eth0.stable_secret"
sysctl: reading key "net.ipv6.conf.lo.stable_secret"
[root@server1 yum.repos.d]# vim /etc/sysctl.d/docker.conf
[root@server1 yum.repos.d]# cat /etc/sysctl.d/docker.conf
net.bridge.bridge-nf-call-iptablves = 1
net.bridge.bridge-nf-call-ip6tablves = 1[root@server1 yum.repos.d]# sysctl --system
* Applying /usr/lib/sysctl.d/00-system.conf ...
net.bridge.bridge-nf-call-ip6tables = 0
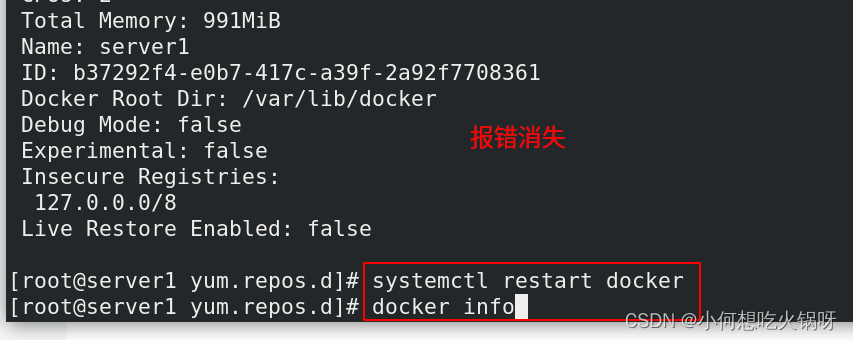
解决完成---重启docker-----再次docker info 警告消失!
四、docker简单操作---game2048
- 搜索用户
- 拉取镜像
- 查看本地镜像
- 后台运行game2048
- 查看运行的镜像
1.搜索用户
[root@server1 ~]# docker search yakexi007
NAME                                        DESCRIPTION   STARS     OFFICIAL   AUTOMATED
yakexi007/game2048                                        0
yakexi007/mario                                           0
yakexi007/myapp                                           0
yakexi007/busyboxplus                                     0
yakexi007/nginx                                           0
yakexi007/debian-base                                     0
yakexi007/base-debian10                                   0
yakexi007/webserver                                       0
yakexi007/base-debian11                                   0
yakexi007/ingress-nginx-controller                        0
yakexi007/kube-webhook-certgen                            0
yakexi007/nfs-subdir-external-provisioner                 0
yakexi007/trivy-k8s-webhook                               0
2.拉取game2048镜像
[root@server1 ~]# docker pull yakexi007/game2048
Using default tag: latest
latest: Pulling from yakexi007/game2048
Digest: sha256:8a34fb9cb168c420604b6e5d32ca6d412cb0d533a826b313b190535c03fe9390
Status: Image is up to date for yakexi007/game2048:latest
docker.io/yakexi007/game2048:latest
3.查看本地镜像
[root@server1 ~]# docker images
REPOSITORY           TAG       IMAGE ID       CREATED       SIZE
yakexi007/game2048   latest    19299002fdbe   6 years ago   55.5MB
4.后台运行该小游戏
-d:后台运行 -p端口号:80:80 第一个80是主机端口号 第二个是容器的端口号
[root@server1 ~]# docker run -d --name demo -p 80:80 yakexi007/game2048
docker: Error response from daemon: Conflict. The container name "/demo" is already in use by container "fef753f1e86e9e6f4b6ac7d18e6d5f989b2757672d0ad1f9443d320230071592". You have to remove (or rename) that container to be able to reuse that name.
See 'docker run --help'.
5.查看正在运行的镜像
[root@server1 ~]# docker ps
CONTAINER ID   IMAGE                COMMAND                  CREATED         STATUS         PORTS                                        NAMES
fef753f1e86e   yakexi007/game2048   "/bin/sh -c 'sed -i …"   3 minutes ago   Up 3 minutes   0.0.0.0:80->80/tcp, :::80->80/tcp, 443/tcp   demo
6.测试
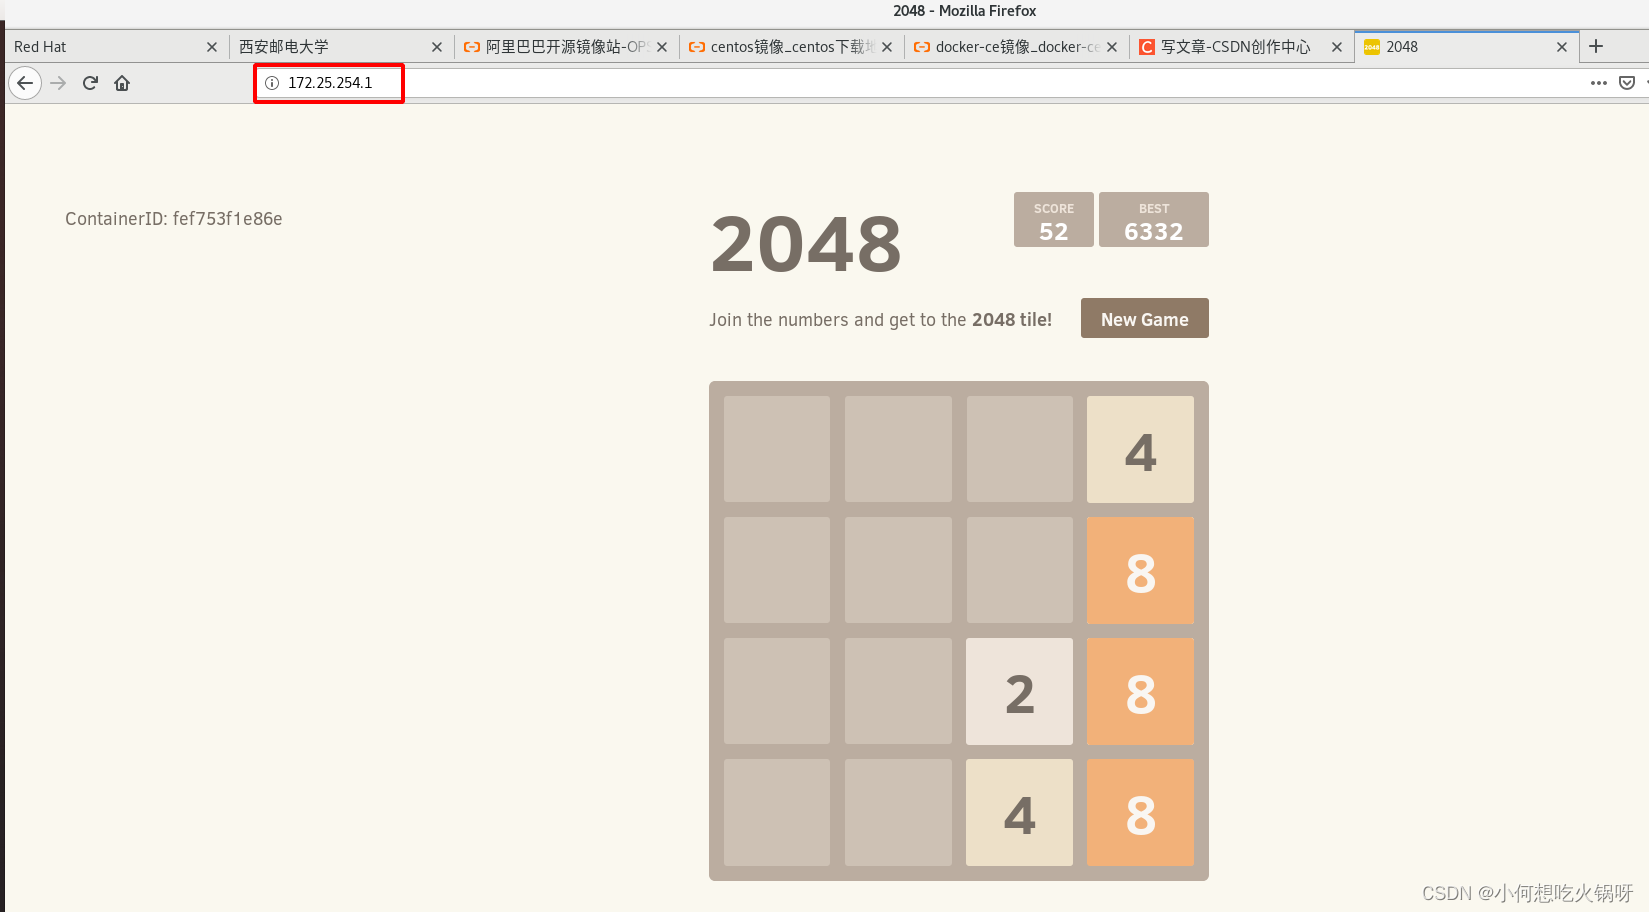
在浏览器直接搜索虚拟机的ip :172.25.254.1
小游戏直接运行!
五、docker镜像
1.镜像构建三部曲
- 运行容器
- 修改容器
- 将容器保存为新的镜像 -----commit
缺点:效率低,容易出错!!!不好审计!!
---------------------------------------------实验--------------------------------------------------------
搜索busybox镜像
直接以名字开头的就是官方镜像,其他的就是私人镜像
[root@server1 ~]# docker search busybox
NAME                                DESCRIPTION                                     STARS     OFFICIAL   AUTOMATED
busybox                             Busybox base image.                             3073      [OK]
rancher/busybox                                                                     0
openebs/busybox-client                                                              0
antrea/busybox                                                                      0
拉取busybox镜像
[root@server1 ~]# docker pull busybox
Using default tag: latest
latest: Pulling from library/busybox
3f4d90098f5b: Pull complete
Digest: sha256:3fbc632167424a6d997e74f52b878d7cc478225cffac6bc977eedfe51c7f4e79
Status: Downloaded newer image for busybox:latest
docker.io/library/busybox:latest
查看本地镜像
[root@server1 ~]# docker images
REPOSITORY           TAG       IMAGE ID       CREATED       SIZE
busybox              latest    a416a98b71e2   5 weeks ago   4.26MB
yakexi007/game2048   latest    19299002fdbe   6 years ago   55.5MB
查看正在运行的容器,删除game2048,因为没用~
[root@server1 ~]# docker ps
CONTAINER ID   IMAGE                COMMAND                  CREATED       STATUS       PORTS                                        NAMES
fef753f1e86e   yakexi007/game2048   "/bin/sh -c 'sed -i …"   3 hours ago   Up 3 hours   0.0.0.0:80->80/tcp, :::80->80/tcp, 443/tcp   demo
[root@server1 ~]# docker rm -f demo
demo
运行busybox容器,-it 表示交互式运行!
在容器内创建爱3个文件!
[root@server1 ~]# docker run -it --name demo busybox
/ # ls
bin    dev    etc    home   lib    lib64  proc   root   sys    tmp    usr    var
/ # touch file1 file2 file3
/ # ls -l
total 16
drwxr-xr-x    2 root     root         12288 Jul 17 18:30 bin
drwxr-xr-x    5 root     root           360 Aug 26 12:43 dev
drwxr-xr-x    1 root     root            66 Aug 26 12:43 etc
-rw-r--r--    1 root     root             0 Aug 26 12:44 file1
-rw-r--r--    1 root     root             0 Aug 26 12:44 file2
-rw-r--r--    1 root     root             0 Aug 26 12:44 file3
drwxr-xr-x    2 nobody   nobody           6 Jul 17 18:30 home
drwxr-xr-x    2 root     root           213 Jul 17 18:30 lib
lrwxrwxrwx    1 root     root             3 Jul 17 18:30 lib64 -> lib
dr-xr-xr-x  124 root     root             0 Aug 26 12:43 proc
drwx------    1 root     root            26 Aug 26 12:43 root
dr-xr-xr-x   13 root     root             0 Aug 26 12:43 sys
drwxrwxrwt    2 root     root             6 Jul 17 18:30 tmp
drwxr-xr-x    4 root     root            29 Jul 17 18:30 usr
drwxr-xr-x    4 root     root            30 Jul 17 18:30 var
/ #
“ ctrl + D "退出容器,同时容器也结束运行
[root@server1 ~]# docker ps
CONTAINER ID   IMAGE     COMMAND   CREATED   STATUS    PORTS     NAMES
[root@server1 ~]# docker ps -a
CONTAINER ID   IMAGE     COMMAND   CREATED          STATUS                     PORTS     NAMES
64129b6bba22   busybox   "sh"      41 seconds ago   Exited (0) 5 seconds ago             demo
此时ps 发现没有运行的容器,ps -a可以看见运行结束的容器
那可不可以 退出容器 但是容器还可以运行呢?------“ ctrl + p + q” 同时按!
运行容器-----attach进入容器----> ctrl + p + q结束
<pre>[root@server1 ~]# docker start demo
demo
[root@server1 ~]# docker ps
CONTAINER ID IMAGE COMMAND CREATED STATUS PORTS NAMES
64129b6bba22 busybox "sh" About a minute ago Up 2 seconds demo
[root@server1 ~]# docker attach demo
/ #
/ #
/ # ls
<font color="#729FCF"><b>bin</b></font> <font color="#729FCF"><b>etc</b></font> file2 <font color="#729FCF"><b>home</b></font> <font color="#34E2E2"><b>lib64</b></font> <font color="#729FCF"><b>root</b></font> <font color="#729FCF"><b>tmp</b></font> <font color="#729FCF"><b>var</b></font>
<font color="#729FCF"><b>dev</b></font> file1 file3 <font color="#729FCF"><b>lib</b></font> <font color="#729FCF"><b>proc</b></font> <font color="#729FCF"><b>sys</b></font> <font color="#729FCF"><b>usr</b></font>
/ # read escape sequence
[root@server1 ~]# docker ps
CONTAINER ID IMAGE COMMAND CREATED STATUS PORTS NAMES
64129b6bba22 busybox "sh" About a minute ago Up 49 seconds demo
</pre>再次查看,容器仍然在运行!!
关闭容器--->删除容器demo(容器已经关闭在删除不用-f)
[root@server1 ~]# docker stop demo
demo
[root@server1 ~]# docker ps -a
CONTAINER ID   IMAGE     COMMAND   CREATED         STATUS                       PORTS     NAMES
64129b6bba22   busybox   "sh"      2 minutes ago   Exited (137) 6 seconds ago             demo
[root@server1 ~]# docker rm demo
demo
[root@server1 ~]# docker ps
CONTAINER ID   IMAGE     COMMAND   CREATED   STATUS    PORTS     NAMES
[root@server1 ~]# docker ps -a
CONTAINER ID   IMAGE     COMMAND   CREATED   STATUS    PORTS     NAMES
接下来为构建容器三部曲:
首先运行容器+修改容器
[root@server1 ~]# docker run -it --name demo busybox
/ # ls
bin    dev    etc    home   lib    lib64  proc   root   sys    tmp    usr    var
/ # touch file1 file2 file3
/ # ls
bin    etc    file2  home   lib64  root   tmp    var
dev    file1  file3  lib    proc   sys    usr
/ #
然后将容器保存为新的镜像
docker commit 容器 新镜像
[root@server1 ~]# docker commit demo demo:v1
sha256:20023e6023d090b4e60f25bed57736bf126f200cf05bc2213c6c6ab35d844633
查看busybox与新镜像的不同-----多了3个文件
[root@server1 ~]# docker history demo:v1
IMAGE          CREATED          CREATED BY                                      SIZE      COMMENT
20023e6023d0   11 seconds ago   sh                                              30B
a416a98b71e2   5 weeks ago      /bin/sh -c #(nop)  CMD ["sh"]                   0B
<missing>      5 weeks ago      /bin/sh -c #(nop) ADD file:7e9002edaafd4e457…   4.26MB
[root@server1 ~]# docker history busybox:latest
IMAGE          CREATED       CREATED BY                                      SIZE      COMMENT
a416a98b71e2   5 weeks ago   /bin/sh -c #(nop)  CMD ["sh"]                   0B
<missing>      5 weeks ago   /bin/sh -c #(nop) ADD file:7e9002edaafd4e457…   4.26MB
删除旧容器demo
[root@server1 ~]# docker rm demo
demo
运行新镜像的新容器----3个文件已经存在!
[root@server1 ~]# docker run -it --name demo demo:v1
/ # ls
bin    etc    file2  home   lib64  root   tmp    var
dev    file1  file3  lib    proc   sys    usr
/ #
删除新容器+新镜像
[root@server1 ~]# docker rm -f demo
demo
[root@server1 ~]# docker rmi demo:v1
Untagged: demo:v1
Deleted: sha256:20023e6023d090b4e60f25bed57736bf126f200cf05bc2213c6c6ab35d844633
Deleted: sha256:9a87c38acddc016e67374e685905a77c857ff15b2518ff551416b03b67c1158a
2.Dockerfile构建镜像
Dockerfil本质也是通过commit创建新镜像,但是方便审计,不易出错!还有缓存特性!
- 创建新目录docker----目录名随意
- 在docker目录下新建Dockerfile文件------必须叫这个名字
- 编辑Dockerfile文件
- build构建镜像----自动读取当前目录的Dockerfile文件
通过层级结构构建镜像!
首先创建新目录---目录名随意-
创建新目录的原因是-构建新镜像时会把当前目录所有东西发送到docker引擎!
[root@server1 docker]# pwd
/root/docker
[root@server1 docker]# ls
创建Dockerfile文件--必须叫这个名字!
文件里面编辑要构建的新镜像的操作!
eg:拉取busybox镜像----->建立文件file------->在默认发布目录写westos
[root@server1 docker]# vim Dockerfile
[root@server1 docker]# cat Dockerfile
FROM busybox
RUN touch file
RUN echo westos > index.html
docker build --help发现 ,默认识别当前目录下的Dockerfile文件!
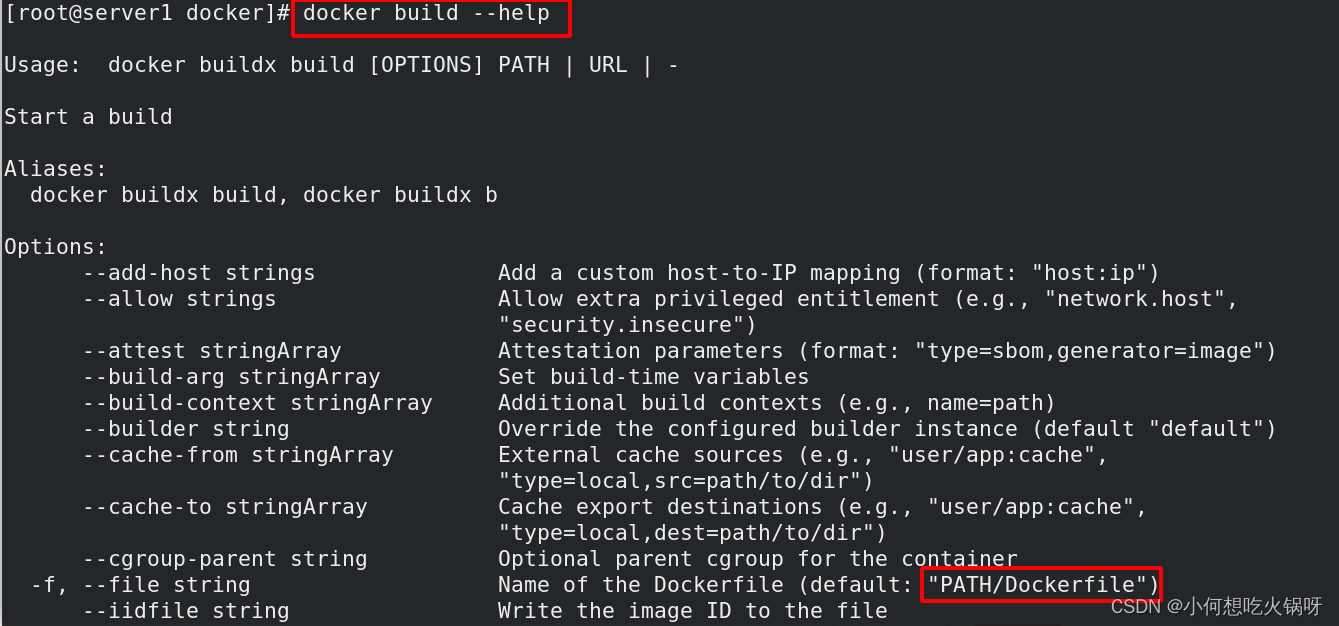
build构建新镜像demo:v1 标签是v1

查看新镜像信息:特点写的很清楚

以新镜像运行容器 --rm表示运行完就删除容器,看看内容就行!
[root@server1 docker]# docker run --rm -it demo:v1
/ # ls
bin         etc         home        lib         proc        sys         usr
dev         file        index.html  lib64       root        tmp         var
/ # cat index.html
westos
/ #
[root@server1 docker]# docker ps -a
CONTAINER ID   IMAGE     COMMAND   CREATED   STATUS    PORTS     NAMES
如果构建镜像忘记了一个操作,再次编辑Dockerfile文件
添加RUN touch file1
[root@server1 docker]# cat Dockerfile
FROM busybox
RUN touch file
RUN echo westos > index.html
RUN touch file1
构建新镜像demo:v2,之前构建过的直接使用缓存!!很快!!

查看镜像demo:v2的详细信息,写的很清楚!!

3.Dockerfile详解
(1) Dockerfile常用命令
FROM :指定base镜像,如果本地不存在就从远程仓库下载
MAINTAINER:设置镜像的作者,比如用户,邮箱等
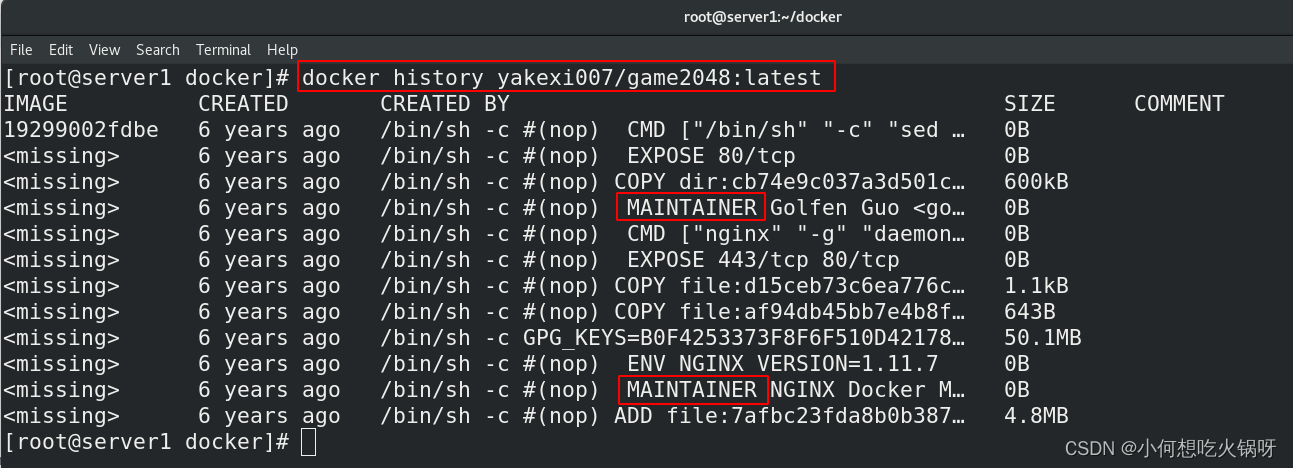
COPY:把文件复制到镜像
ps:要拷贝的内容 通常 和 Dockerfile放置在一个目录下
只能是相对路径!
实验:
首先删除之前构建的镜像demo:v1 demo:v2
[root@server1 docker]# docker images
REPOSITORY           TAG       IMAGE ID       CREATED        SIZE
demo                 v2        e12192a98b71   13 hours ago   4.26MB
demo                 v1        f5d71c7a0bf1   13 hours ago   4.26MB
busybox              latest    a416a98b71e2   5 weeks ago    4.26MB
yakexi007/game2048   latest    19299002fdbe   6 years ago    55.5MB
[root@server1 docker]# docker rmi demo:v1
Untagged: demo:v1
Deleted: sha256:f5d71c7a0bf1ea53b02991f0282eac5d94204f98e491b4c6f13e08d54ef20d38
[root@server1 docker]# docker rmi demo:v2
Untagged: demo:v2
Deleted: sha256:e12192a98b7142af9a56c4f75ffafd0605bc3b5fb2232141a25a10ec6e604331
[root@server1 docker]# docker images
REPOSITORY           TAG       IMAGE ID       CREATED       SIZE
busybox              latest    a416a98b71e2   5 weeks ago   4.26MB
yakexi007/game2048   latest    19299002fdbe   6 years ago   55.5MB
编辑Dockerfile文件,设定拷贝内容

build构建镜像
 查看镜像详细信息!

运行镜像产生容器,进入镜像的根目录查看复制内容是否存在!

复制内容存在!!复制成功!!
ADD:用法与COPY类似,src可以是归档压缩文件,会被自动解压到dest
src也可以是URL,自动下载到镜像dest.
实验:
从宿主机发送一个压缩文件到虚拟机docker目录下
[root@node73 Downloads]# scp nginx-1.21.5.tar.gz @172.25.254.1:/root/docker
root@172.25.254.1's password:
nginx-1.21.5.tar.gz                           100% 1047KB 228.8MB/s   00:00
[root@server1 ~]# cd docker/
[root@server1 docker]# ls
Dockerfile index.html nginx-1.21.5.tar.gz
编辑文件,添加压缩文件!
[root@server1 docker]# cat Dockerfile
FROM busybox
COPY index.html /
ADD nginx-1.21.5.tar.gz /
构建镜像

进入镜像查看,压缩文档自动解压为目录!!
ENV:设置环境变量,后续可以调用!

EXPOSE:对外暴露的端口,如果运行应用服务,可以把服务器端口暴露出去
如果在镜像封装web服务器,需要设置暴露的端口
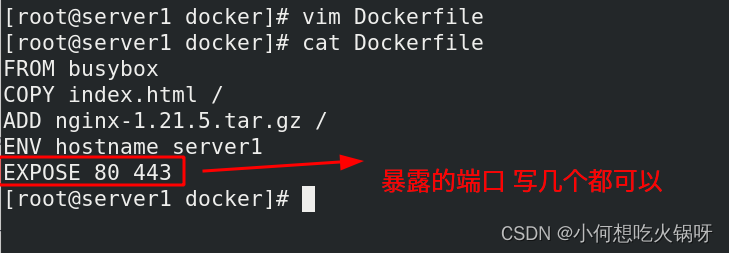
查看game2048镜像暴露的端口
-------------------------------------------------马里奥游戏------------------------------------------------------------------
首先拉取马里奥镜像到本地

查看马里奥镜像详细信息,暴露的端口号!

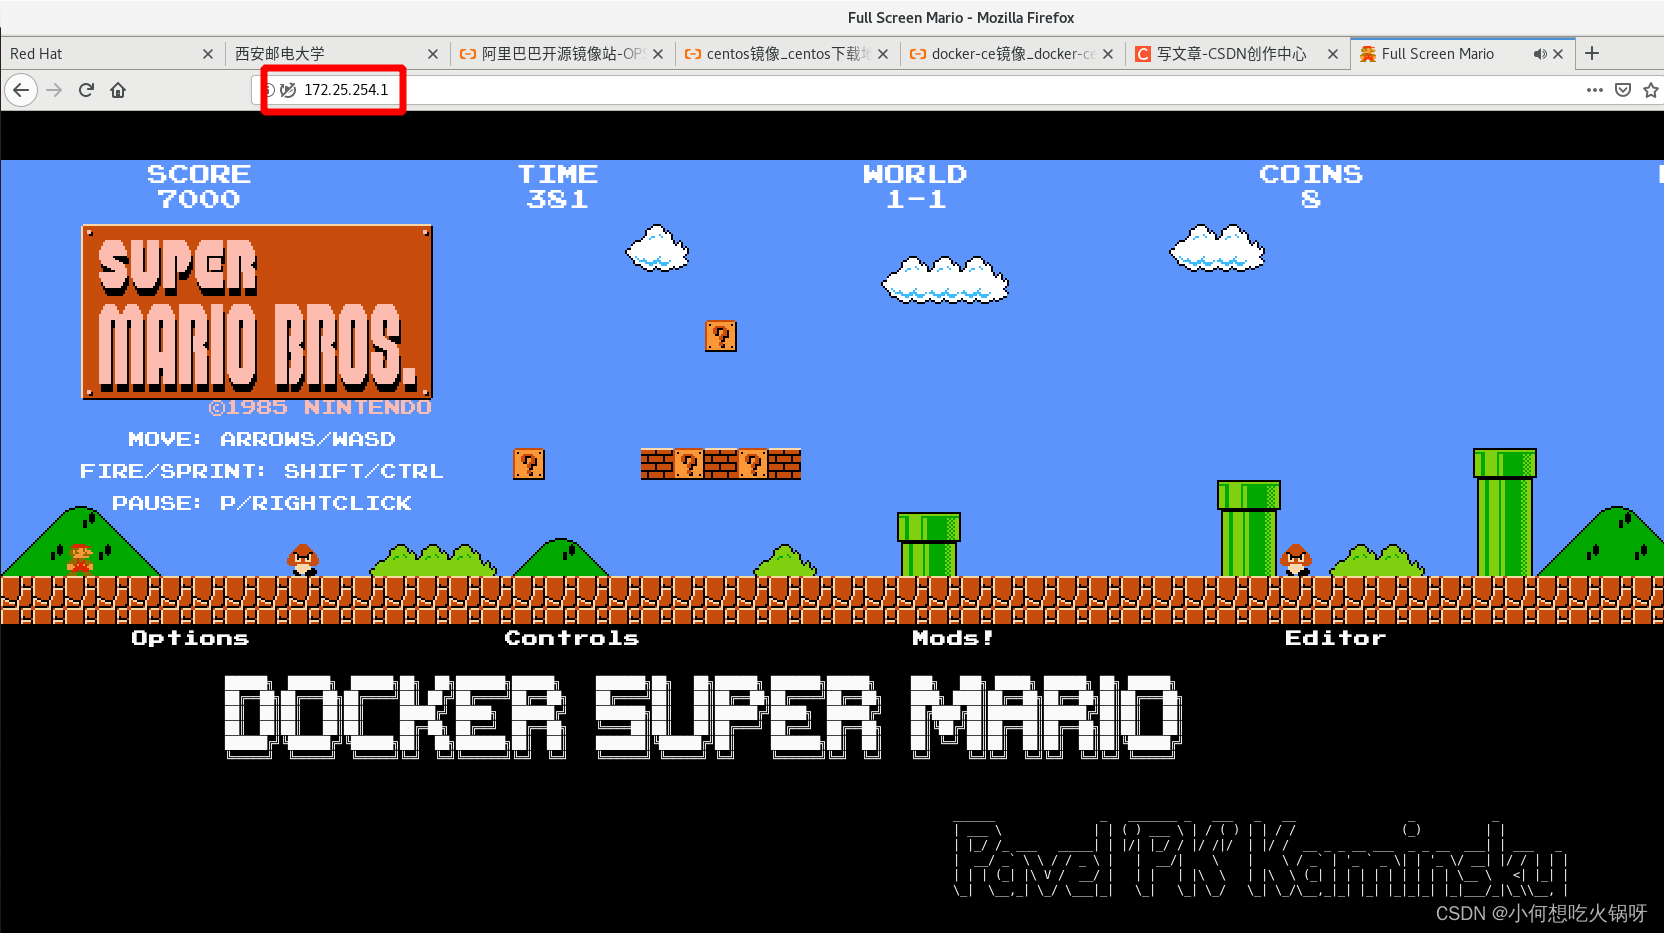
后台运行马里奥游戏,指定暴露的端口号

在宿主机浏览器输入虚拟机的ip:172.25.254.1,就可以开始玩游戏拉!
VOLOME:申明数据卷,通常指定的是数据挂载点 ; 使容器和数据分离,在容器可以直接使用宿主机的数据,容器与宿主机互相同步!
实验:
首先编辑Dockerfile文件,挂载数据卷挂载到镜像的/data目录!
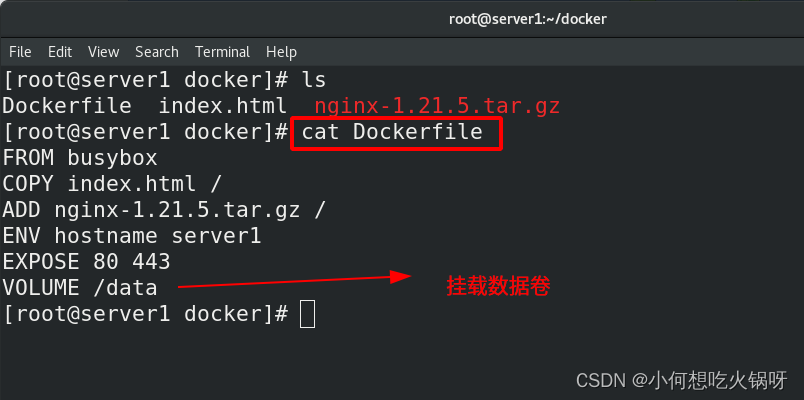
构建镜像

查看数据卷,此时还没有数据!
[root@server1 docker]# docker volume ls
DRIVER    VOLUME NAME
运行镜像产生容器,镜像内有/data目录,进入目录新建file1

此时查看数据卷,产生了数据!
#docker inspect demo:查看容器的详细信息
[root@server1 docker]# docker inspect demo
发现挂载卷的路径信息

进入宿主机路径发现file1以存在,说明容器与主机同步,数据与容器实现分离~
删除file1 在宿主机建立file2,此时容器内也已同步!

进入容器查看file2果然以存在!file1已经被删除!

如何删除数据卷呢?
当删除容器时,数据卷还在
直接docker volume rm +数据卷名字 就可以删除卷
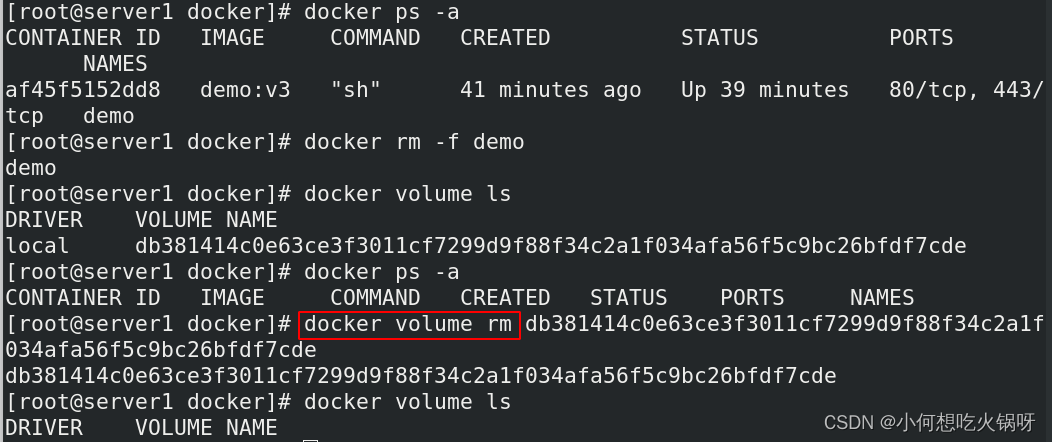
WORKDIR:在容器内切换目录,如果目录不存在会自动创建
RUN:在容器内运行命令并创建新的镜像层,常用于安装软件包
CMD:容器启动后执行的命令
支持的格式:
Exec 格式:CMD ["executable","param1","param2"]
CMD ["param1","param2"] 为 ENTRYPOINT 提供额外的参数,此时 ENTRYPOINT 必须使用 Exec 格式。
Shell 格式:CMD command param1 param2
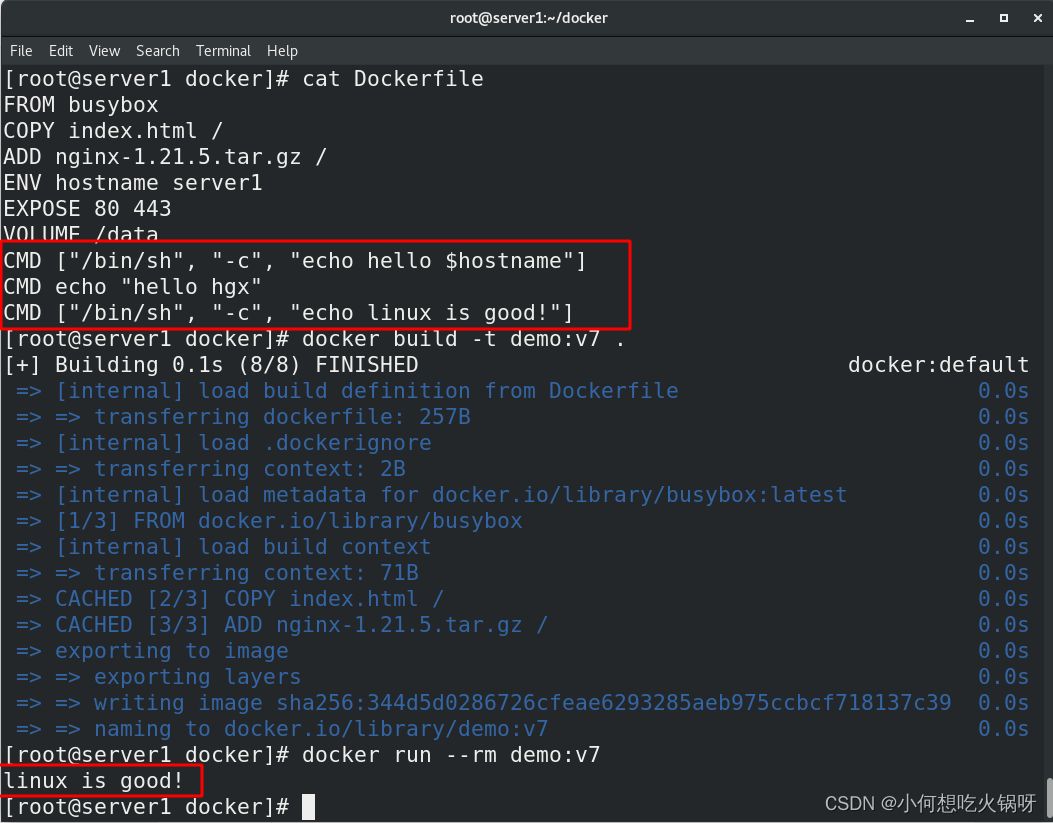
每个Dockerfile只能生效一条CMD指令。如果指定了多条CMD指令,只有最后一条生效。
如果用户启动容器时候指定了运行的命令,则会覆盖掉CMD指定的命令。
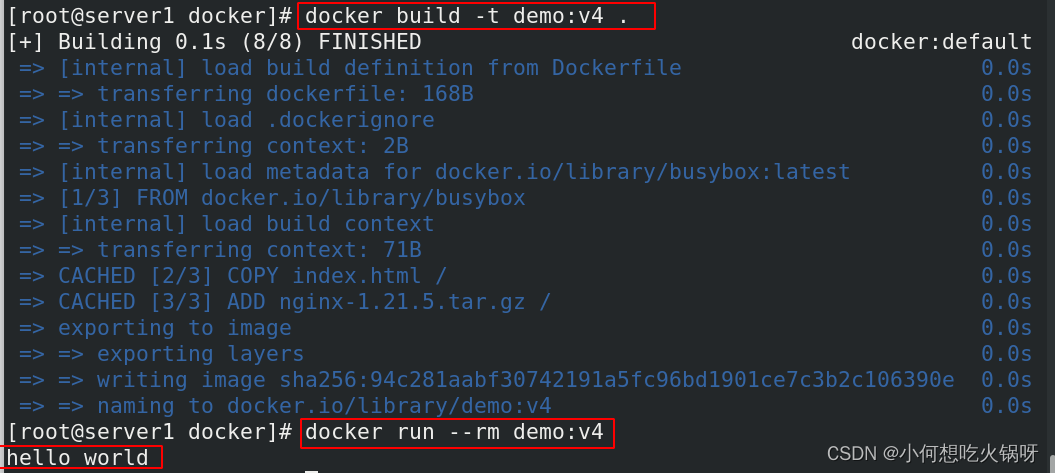
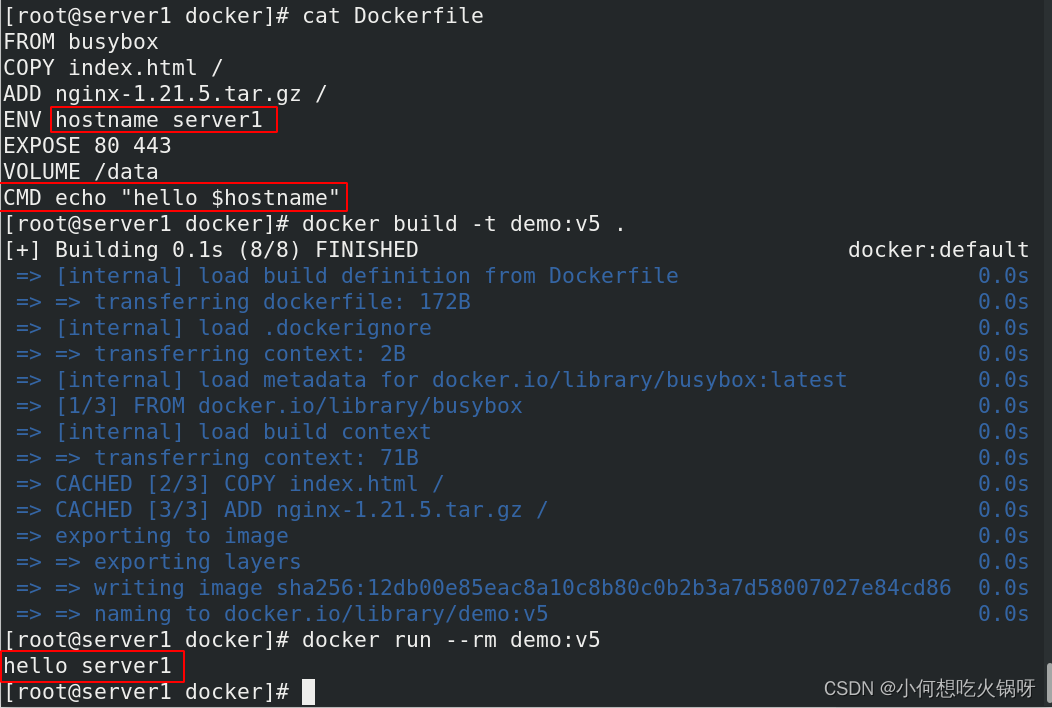
编辑文件,添加CMD指令
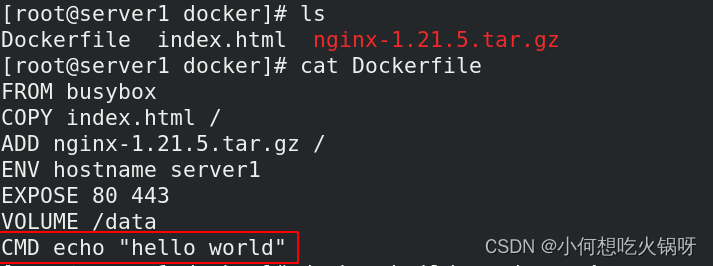
构建镜像,并运行,不需要交互,直接显示CMD输出!
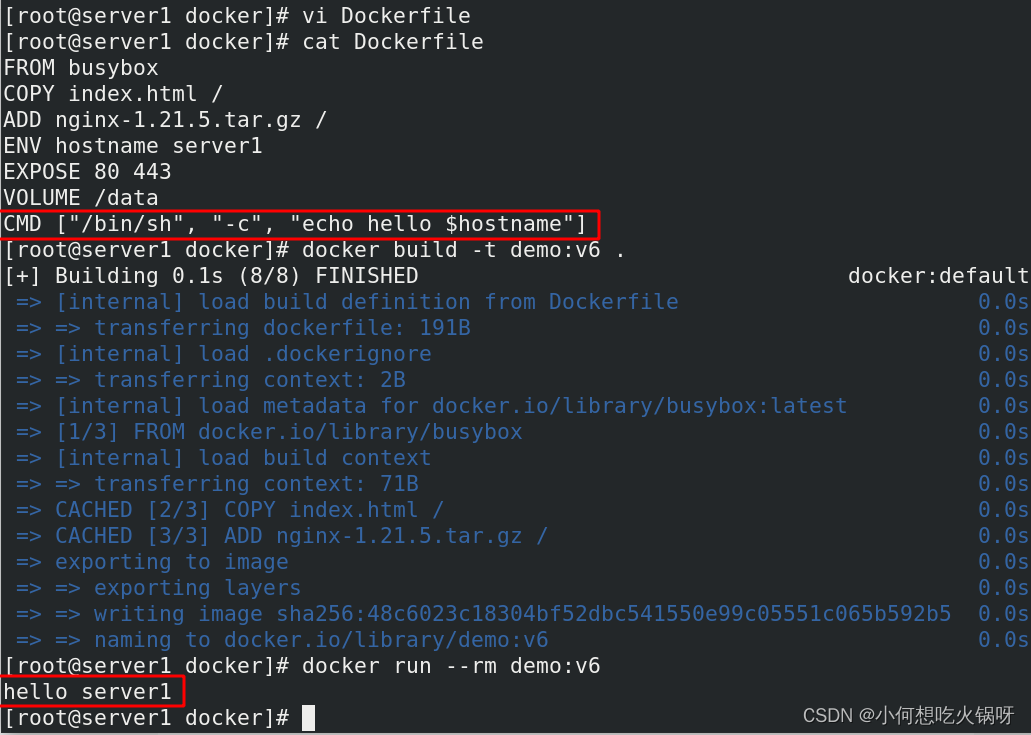
交互格式可以解析变量,exec格式不可以解析!
exec格式如下,调用/bin/sh -c 执行命令默认不掉用shell,不按照格式会不解析变量!报错!
当有多条CMD指令,只有最后一条生效
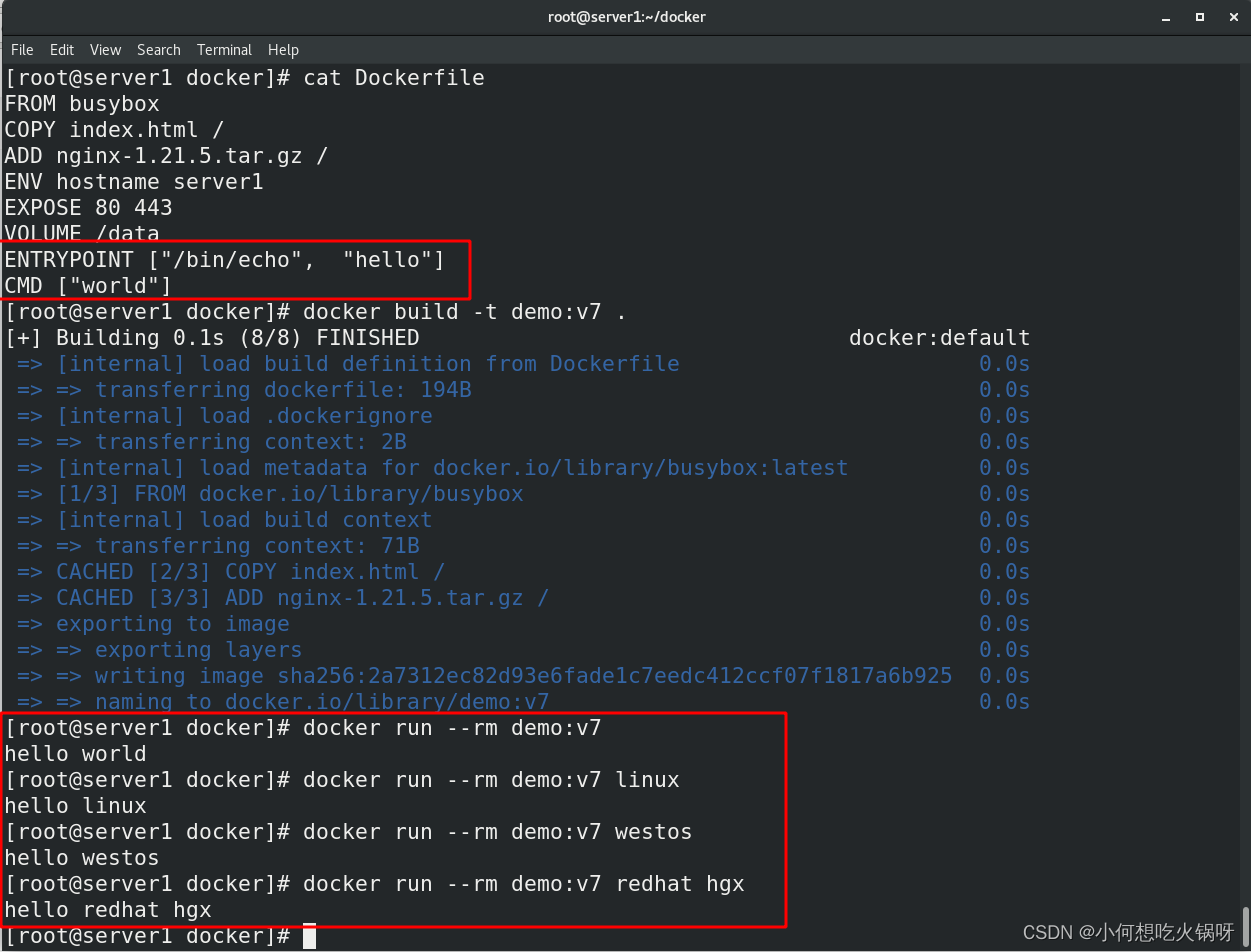
ENTRYPOINT:与CMD命令类似
支持的格式:
Exec 格式:ENTRYPOINT ["executable", "param1", "param2"] 这是 ENTRYPOINT 的推荐格式
Shell 格式:ENTRYPOINT command param1 param2
每个Dockerfile中只能生效一个ENTRYPOINT指令,当有多个ENTRYPOINT指令时,只有最后一个起效。
如果用户启动容器时候指定了运行的命令,不会被覆盖!
启动容器后加了指定命令,CMD指令会被覆盖,ENTRYPOINT不会被覆盖!
----------------------------基于以上指令----------------------------完整做次实验--------------------
(2) centos封装nginx镜像
在centos系统添加nginx服务封装好镜像!
首先拉取centos基础镜像
[root@server1 docker]# docker pull centos:7
7: Pulling from library/centos
2d473b07cdd5: Pull complete
Digest: sha256:be65f488b7764ad3638f236b7b515b3678369a5124c47b8d32916d6487418ea4
Status: Downloaded newer image for centos:7
docker.io/library/centos:7
然后编辑Dockerfile文件,封装服务
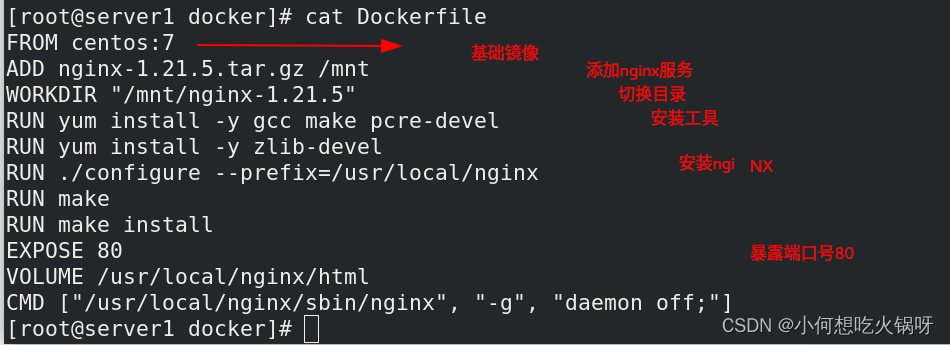
构建镜像!!
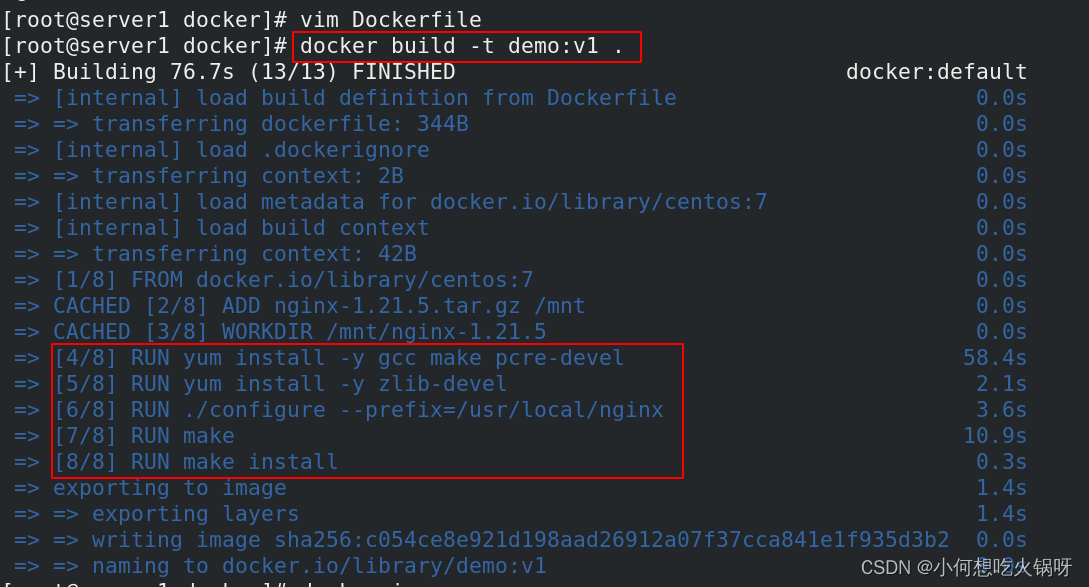
镜像封装成功,后台运行!! 注意:一定要加端口号才能看到效果!

在宿主机浏览器测试,显示nginx界面!

镜像太大了!!需要优化
4.镜像的优化
- 选择最精简的基础镜像
- 减少镜像的层数
- 清理镜像构建的中间产物
- 注意优化网络请求
- 尽量去用构建缓存
- 使用多阶段构建镜像
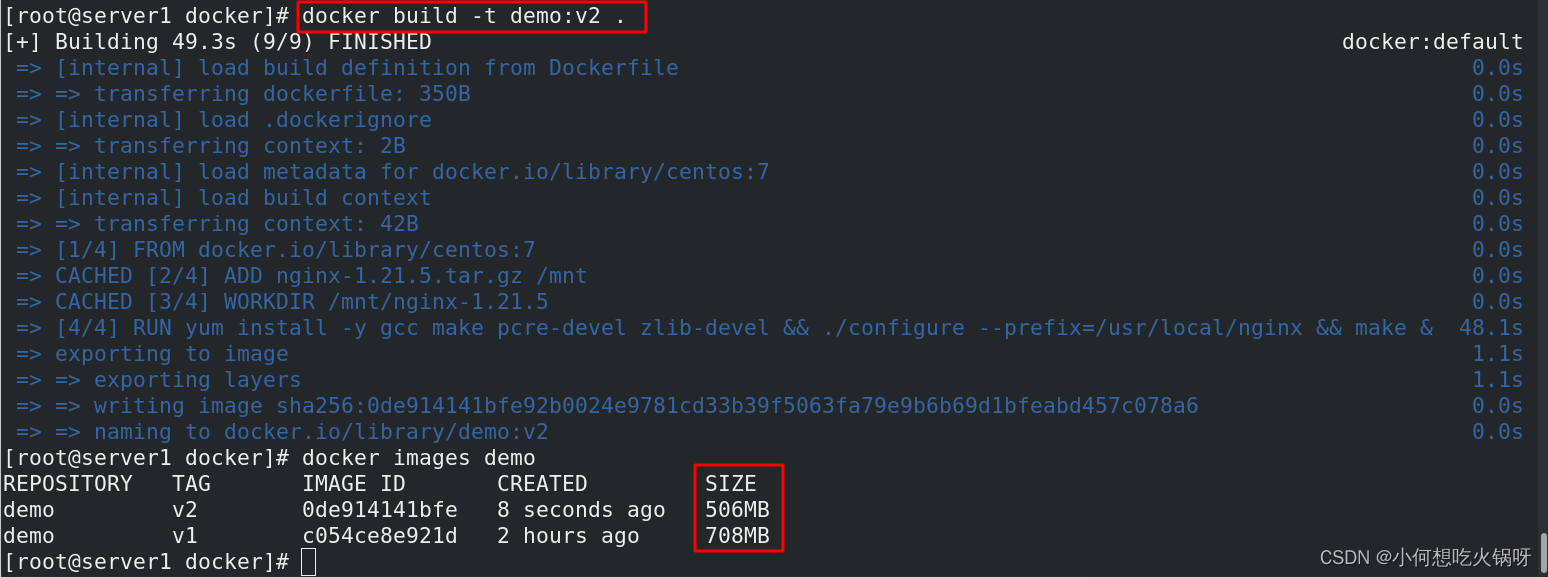
(1) 减少镜像层数

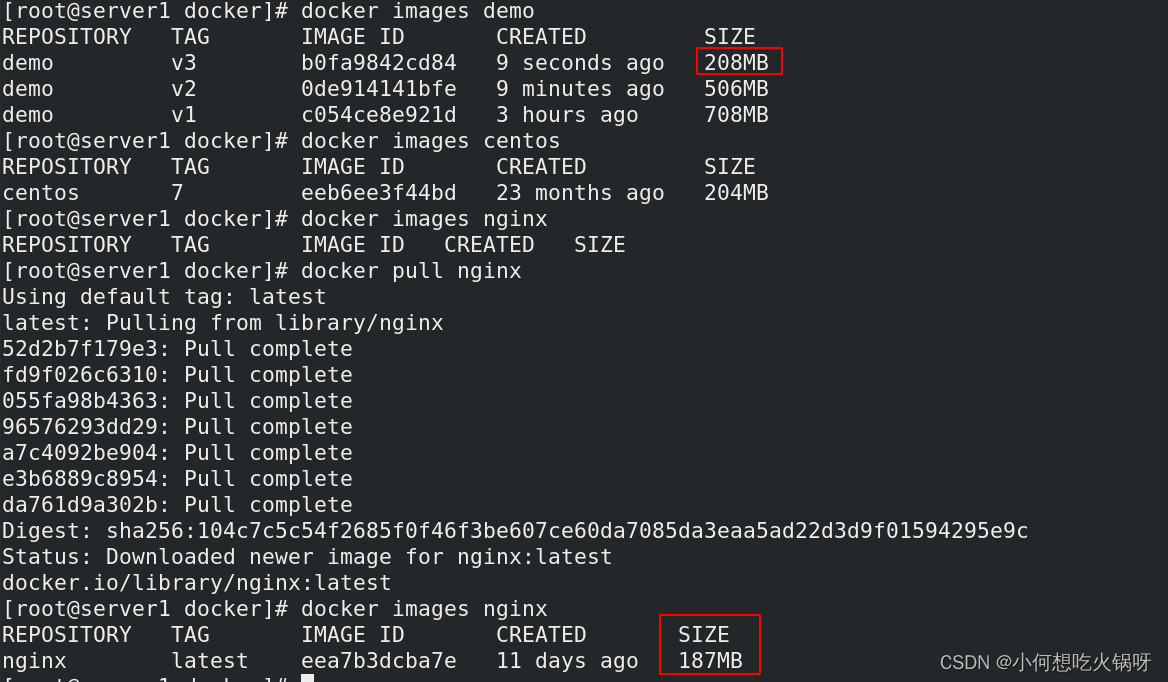
构建镜像,与原来的对比,小了200M
(2) 多阶段构建镜像
构建阶段的中间产物都不需要!!·

构建镜像,与demo:v1相比小多了,与centos镜像相比只多了4M
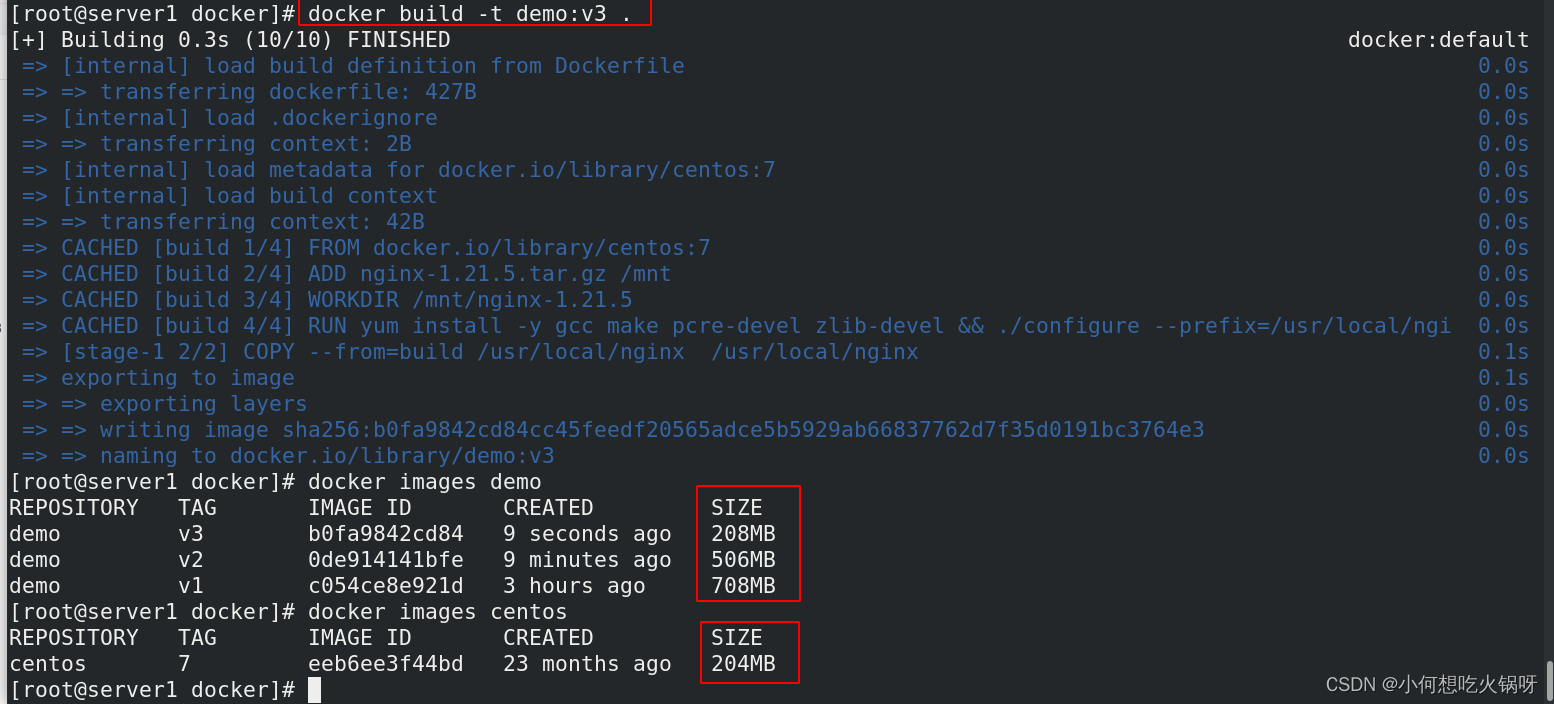
但是与基础镜像nginx相比还是很大!因此可以替换基础镜像
