一、拖拽效果图展示
首先,上个gif图看看效果

吐血测试了一天,目前还未发现bug。ps(拖拽效果仅在前端实现,未和后端交互)
文章代码参考小程序实现列表拖拽排序 ,参考文章还是存在一些bug和不足,比如,样式代码没给对,还有实现的拖拽是拖拽起始位置数据的替换,不是我想要的拖拽效果。
二、解决思路
首先,拖拽重要的计算清楚位置关系,从什么地方开始拖,拖到什么地方结束,以及如何判断有效的拖拽排序。
在拖拽开始时、拖拽过程中、拖拽结束时获取拖拽数据项的索引和实时的位置相关数据。给拖拽节点绑定catchtouchstart、catchtouchmove、catchtouchend事件,利用data-xxx属性传递索引)
<!-- 拖拽节点 --><view data-index='{{index}}' catchtouchstart='dragStart' catchtouchmove='dragMove'catchtouchend='dragEnd'><image class="img" src="/image/icon-sort.png"></image></view>结合下图进行分析,如图,需要拖拽的数据列表都放在class=habitlist的节点中,为方便计算位置,固定每个数据项的height=60px;假设数据列表habitList=[{ name: "跳舞",icon: "./image/icon/icon-dance.png"},{name:"看书",...},...],当前拖拽项(name为跳舞的项)的克隆为kelong={name: "跳舞",icon: "./image/icon/icon-dance.png"}
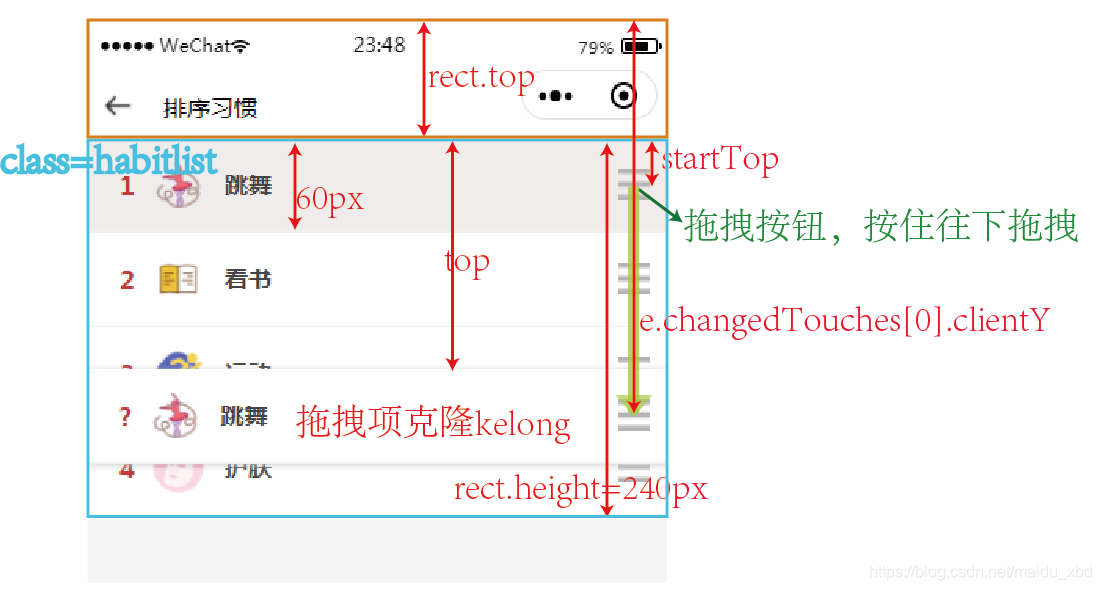
1、【catchtouchstart】-拖拽开始时,获取当前拖拽项的索引,克隆当前项的内容给对象kelong。通过节点查询器,选择class=habitlist的节点,获取节点位置信息的查询请求,rect.top为该节点距离顶部的距离;rec.height为该节点区域的高度;e.changedTouches[0].clientY代表当前点击位置距离可视区域顶部的垂直距离,由于每个数据项的height=60px;预估:top=.changedTouches[0].clientY - rect.top - 30为当前克隆项显示的top,注意:克隆项显示的位置要相对class=habitlist的节点定位(子绝父相)。该值也为拖拽开始时的kelong项的位置startTop,(startTop值主要用于拖拽结束时判断是向下还是向上拖拽了)
// 拖拽开始dragStart(e) {// console.log("拖拽开始", e);var i = e.currentTarget.dataset.index // 当前拖拽项的索引index// 把当前拖拽项的内容复制给kelongvar kelong = this.data.habitList[i]var query = wx.createSelectorQuery() // 创建节点查询器 quer//选择class=habitlist的节点,获取节点位置信息的查询请求query.select('.habitlist').boundingClientRect((rect) => {var top = e.changedTouches[0].clientY - rect.top - 30var startTop = top;this.setData({kelong: kelong,selectedIndex:i,showkelong: true,top:top,startTop:startTop})}).exec();},2、【catchtouchmove】-拖拽移动时,要对拖拽的范围做控制,文中做了顶部边界控制:控制克隆项不会拖拽出class=habitlist节点的顶部边界。当top<0时,将top置为0,底部可不做限制。
// 拖拽移动dragMove(e) {// console.log("拖拽移动", e);var query = wx.createSelectorQuery();var top =this.data.topquery.select('.habitlist').boundingClientRect((rect) => {top = e.changedTouches[0].clientY - rect.top - 30if (top < 0) {// 顶部边界控制:控制克隆项不会拖拽出class=habitlist节点的顶部边界top = 0}this.setData({top:top})}).exec();},3、【catchtouchend】-拖拽结束时,
(1)进行边界控制:不仅要进行顶部边界限制,还要做底部边界控制,即如果拖拽超出底部边界,则该拖拽数据项为最后一个位置的数据了。
(2)向上或向下拖拽的数据备份及处理:向上拖拽时,需要备份插入位置target开始的下方数据(除了拖拽数据项);向下拖拽时,需要备份插入位置target开始的上方数据;然后按拖拽后的正确索引位置遍历赋值。
// 拖拽结束dragEnd(e) {// console.log("拖拽结束", e);var i = e.currentTarget.dataset.indexvar query = wx.createSelectorQuery();var kelong = this.data.kelongvar habitList = this.data.habitListquery.select('.habitlist').boundingClientRect((rect) => {var top = e.changedTouches[0].clientY - rect.top - 30if (top > rect.height) {// 底部边界控制:控制克隆项拖拽结束时不会出class=habitlist节点的底部边界top = rect.height - 60} else if (top < 0) {// 顶部边界控制:控制克隆项拖拽结束时不会出class=habitlist节点的顶部边界top = 0}this.setData({top: top,})var target = parseInt(top / 60)var list = [] //用于备份数据if (this.data.startTop > top) {// 往上方位置拖拽for (var k = 0; k <= i - target; k++) {// 备份插入位置target开始的下方数据,除了拖拽数据项if (habitList[target + k].name != kelong.name) {list.push(habitList[target + k])}}if (list.lenghth != 0) {habitList[target] = kelongfor (var m = target + 1, n = 0; n < list.length; m++, n++) {habitList[m] = list[n]}}} else {// 往下边位置拖拽for (var k = 1; k <= target - i; k++) {// 备份插入位置target开始的上方数据,除了拖拽数据项if (habitList[i + k].name != kelong.name) {list.push(habitList[i + k])}}if (list.length != 0) {habitList[target] = kelongfor (var m = i, n = 0; n < list.length; m++, n++) {habitList[m] = list[n]}}}this.setData({habitList: habitList,selectedIndex:-1,showkelong: false})}).exec();},三、完整代码
【sortHabit.wxml】
<view  class="page-wrapper"><top-title toptitle="排序习惯" backImgFlag="true"></top-title><view class="habitlist"><!-- 克隆当前拖拽的项 --><view class='habit kelong' hidden='{{!showkelong}}' style='top:{{top}}px'><view class='index'>?</view><view class="icon"><image class="iconImg" src="{{kelong.icon}}"></image></view><view class="info"><view class="title">{{kelong.name}}</view></view><image class="img"src="cloud://xbd-cloud-xxx/icon/icon-sort.png"></image></view><block wx:for="{{habitList}}" wx:key="name"><view class="habit {{selectedIndex==index?'gray':''}}" ><view class='index'>{{index+1}}</view><view class="icon"><image class="iconImg" src="{{item.icon}}"></image></view><view class="info"><view class="title">{{item.name}}</view></view><!-- 拖拽节点 --><view data-index='{{index}}' catchtouchstart='dragStart' catchtouchmove='dragMove'catchtouchend='dragEnd'><image class="img"src="cloud://xbd-cloud-xxx/icon/icon-sort.png"></image></view></view></block></view>
</view>
【sortHabit.js】
Page({/*** 页面的初始数据*/data: {habitList: [],// 当前拖拽项的克隆kelong: {name: '',icon: ''},startTop: 0, //拖拽开始时克隆项距离class=habitlist节点顶部边界的值top: 0,selectedIndex: -1, //被选择拖拽的项的indexbackupList: [], //用于备份数据showkelong: false, //是否显示克隆项},/*** 生命周期函数--监听页面加载*/onLoad: function (options) {var list = [{name: "跳舞",icon: "cloud://xbd-cloud-xxx/icon/icon-dance.png"}, {name: "看书",icon: "cloud://xbd-cloud-xxx/icon/icon-reading.png"}, {name: "运动",icon: "cloud://xbd-cloud-xxx/icon/icon-sports.png"}, {name: "护肤",icon: "cloud://xbd-cloud-xxx/icon/icon-facialmask.png"}]this.setData({habitList: list})},// 拖拽开始dragStart(e) {// console.log("拖拽开始", e);var i = e.currentTarget.dataset.index // 当前拖拽项的索引index// 把当前拖拽项的内容复制给kelongvar kelong = this.data.habitList[i]console.log("拖拽开始i=",i,"kelong=",kelong);var query = wx.createSelectorQuery(); // 创建节点查询器 quer//选择class=habitlist的节点,获取节点位置信息的查询请求query.select('.habitlist').boundingClientRect((rect) => {var top = e.changedTouches[0].clientY - rect.top - 30var startTop = top;this.setData({kelong: kelong,selectedIndex:i,showkelong: true,top:top,startTop:startTop})}).exec();},// 拖拽移动dragMove(e) {// console.log("拖拽移动", e);var query = wx.createSelectorQuery();var top =this.data.topquery.select('.habitlist').boundingClientRect((rect) => {top = e.changedTouches[0].clientY - rect.top - 30if (top < 0) {// 顶部边界控制:控制克隆项不会拖拽出class=habitlist节点的顶部边界top = 0}this.setData({top:top})}).exec();},// 拖拽结束dragEnd(e) {// console.log("拖拽结束", e);var i = e.currentTarget.dataset.indexvar query = wx.createSelectorQuery();var kelong = this.data.kelongvar habitList = this.data.habitListquery.select('.habitlist').boundingClientRect((rect) => {var top = e.changedTouches[0].clientY - rect.top - 30if (top > rect.height) {// 底部边界控制:控制克隆项拖拽结束时不会出class=habitlist节点的底部边界top = rect.height - 60} else if (top < 0) {// 顶部边界控制:控制克隆项拖拽结束时不会出class=habitlist节点的顶部边界top = 0}this.setData({top: top,})var target = parseInt(top / 60)var list = [] //用于备份数据if (this.data.startTop > top) {// 往上方位置拖拽for (var k = 0; k <= i - target; k++) {// 备份插入位置target开始的下方数据,除了拖拽数据项if (habitList[target + k].name != kelong.name) {list.push(habitList[target + k])}}console.log("往上拖拽 list=======", list);if (list.lenghth != 0) {habitList[target] = kelongfor (var m = target + 1, n = 0; n < list.length; m++, n++) {habitList[m] = list[n]}}} else {// 往下边位置拖拽for (var k = 1; k <= target - i; k++) {// 备份插入位置target开始的上方数据,除了拖拽数据项if (habitList[i + k].name != kelong.name) {list.push(habitList[i + k])}}console.log("往下拖拽 list=======", list);if (list.length != 0) {habitList[target] = kelongfor (var m = i, n = 0; n < list.length; m++, n++) {habitList[m] = list[n]}}}console.log(habitList);this.setData({habitList: habitList,selectedIndex:-1,showkelong: false})}).exec();},})【sortHabit.wxss】
.habit {margin: 0rpx auto;width: 100%;height: 60px;border-radius: 10rpx;background-color: #fff;display: flex;padding: 15rpx;box-sizing: border-box;position: relative;border-bottom: 1px solid #f1f1f1;
}
.habit .index {margin: 25rpx 20rpx 0px 30rpx;font-weight: bold;color: #c93a3a;
}
.habit .icon {margin-right: 25rpx;
}
.habit .icon .iconImg {margin-top: 10rpx;width: 70rpx;height: 70rpx;
}
.habit .info {display: flex;flex-direction: column;width: 60vw;
}
.habit .info .title {margin: 25rpx 0rpx;font-size: 30rpx;
}
.habit .img {position: absolute;right: 30rpx;margin-top: 25rpx;width: 40rpx;height: 40rpx;
}
.habitlist {position: relative;
}
.kelong {z-index: 999;position: absolute;box-shadow: 1px 1px 5px #ccc;
}
.gray {background-color: #efecec;
}
ps:也不知道自己讲清楚没,记录点滴心路历程~下篇讲讲日历打卡


