Hexo添加豆瓣个人页面
- 安装
hexo-douban插件
npm install hexo-douban --save-dev
- 在博客站点的配置文件
_config.yml中添加以下内容(注意:不是主题的配置文件)
# hexo-douban
douban:user: xxxx  # 你的豆瓣IDbuiltin: truebook:title: '那些年,我翻阅过的书'quote: '思想和身体,总有一个在路上'movie:title: '那些年,我追过的电影'quote: '过去、现在、和未来'game:title: '那些年,我玩过的游戏'quote: '还记得你曾经的游戏角色吗'timeout: 10000
user: 你的豆瓣ID.打开豆瓣,登入账户,然后在右上角点击 “个人主页” ,这时候地址栏的URL大概是这样:”https://www.douban.com/people/xxxxxx/" ,其中的”xxxxxx”就是你的个人ID了。
builtin: 是否将生成页面的功能嵌入hexo s和hexo g中,默认是false,另一可选项为true(1.x.x版本新增配置项)。
如果配置了builtin参数为true,那么除了可以使用hexo douban命令之外,hexo g或hexo s也内嵌了生成页面的功能。
title: 该页面的标题.
quote: 写在页面开头的一段话,支持html语法.
timeout: 爬取数据的超时时间,默认是 10000ms ,如果在使用时发现报了超时的错(ETIMEOUT)可以把这个数据设置的大一点。
注意:如果只想显示某一个页面(比如movie),那就把其他的配置项注释掉即可。
- 访问
如果上面的配置都没有问题,就可以使用以下地址访问
http://localhost:4000/books
http://localhost:4000/movies
http://localhost:4000/games
注意:此时books、movies、games不需要使用hexo new page xxx来创建,只需要配置hexo-douban后会自动创建。
- Butterfly 主题中使用 hexo-douban 插件
添加到菜单中
如果上面的页面显示都无问题的话,就可以在主题的配置文件_config.butterfly.yml中为这些页面添加菜单链接了
menu:娱乐||fas fa-list:- 电影 || /movies/ || fas fa-film- 游戏 || /games/ || fas fa-gamepad- 书籍 || /books/ || fas fa-book
并且修改主题配置文件_config.butterfly.yml
# If you are using hexo-douban, you can configure it (如果你有使用 hexo-douban,可配置這個)
douban:meta: truemovies_img: https://gitee.com/dulily/cdn/raw/master/img/me.jpgbooks_img: https://gitee.com/dulily/cdn/raw/master/img/221410-15917120505729.jpggames_img: https://gitee.com/dulily/cdn/raw/master/img/fbb1db7f27e748086d30301c6540918f.jpg
movies_img: 设置 hexo-douban 中 movies 页面的 top_img
books_img: 设置 hexo-douban 中 books 页面的 top_img
games_img: 设置 hexo-douban 中 games 页面的 top_img
为 Hexo 添加哔哩哔哩追番页面
安装
$ npm install hexo-bilibili-bangumi --save
配置
将下面的配置写入站点的配置文件 _config.yml 里(不是主题的配置文件).
bangumi: # 追番设置enable: truesource: bilipath:vmid:title: '追番列表'quote: '生命不息,追番不止!'show: 1lazyload: trueloading:metaColor:color:webp:progress:proxy:host: '代理host'port: '代理端口'extra_options:key: value
- enable: 是否启用
- source: 数据源,仅支持追番,追剧仅支持哔哩哔哩源。
bili: 哔哩哔哩源,bgm: Bangumi源 - proxy: 代理设置,仅在使用支持
bgm源追番时生效。默认false - path: 页面路径,默认
bangumis/index.html,cinemas/index.html - vmid: 哔哩哔哩的
vmid(uid)如何获取?或Bangumi的用户id如何获取? - title: 该页面的标题
- quote: 写在页面开头的一段话,支持 html 语法,可留空。
- show: 初始显示页面:
0: 想看,1: 在看,2: 看过,默认为1 - lazyload: 是否启用图片懒加载,如果与主题的懒加载冲突请关闭,默认
true - loading: 图片加载完成前的 loading 图片,需启用图片懒加载
- metaColor: meta 部分(简介上方)字体颜色
- color: 简介字体颜色
- webp: 番剧封面使用
webp格式(此格式在safari浏览器下不显示,但是图片大小可以缩小 100 倍左右,仅支持哔哩哔哩源), 默认true - progress: 获取番剧数据时是否显示进度条,默认
true - extra_options: 此配置会扩展到Hexo
page变量中
使用
- 在
hexo generate或hexo deploy之前使用hexo bangumi -u命令更新追番数据,使用hexo cinema -u命令更新追剧数据! - 删除数据命令:
hexo bangumi -d/hexo cinema -d
获取 Bilibili uid
登录哔哩哔哩后前往https://space.bilibili.com/页面,网址最后的一串数字就是 uid
***需要将追番列表设置为公开!
示例
[外链图片转存中…(img-13qYWZYo-1644565890474)]
手动添加番剧数据
因为某些番剧在哔哩哔哩上没有,但是又想在hexo中展示,怎么办呢?现在支持手动添加番剧数据了!
在 sources/_data/ 目录下新建文件,命名为 extra_bangumis.json(追番数据)或extra_cinemas.json(追剧数据) ,并添加以如下内容:
{"watchedExtra": [{"title": "缘之空","type": "番剧","area": "日本","cover": "https://cdn.jsdelivr.net/gh/mmdjiji/bangumis@main/Yosuga-no-Sora/cover.jpg","totalCount": "全12话","id": 0,"follow": "不可用","view": "不可用","danmaku": "不可用","coin": "不可用","score": "不可用","des": "远离都市的田园小镇,奥木染。春日野悠带着妹妹穹,来到了这座城镇。坐落在这里的是,儿时暑假经常造访的充满回忆的已故祖父的家。双亲因意外事故而丧生,变得无依无靠..."}]
}
title 是番剧的标题,cover 是封面图链接, des 是简介,上述字段均根据需要修改。
另外除了 watchedExtra 数组,还可以在后面添加新的数组,可用数组名如下:
| 可用数组名 | 含义 |
|---|---|
| wantWatchExtra | 想看 |
| watchingExtra | 在看 |
| watchedExtra | 看过 |
需要注意,在两个数组之间需要用 , 分隔。
Math数学
修改 主題配置文件:
mathjax:enable: true# true 表示每一頁都加載mathjax.js# false 需要時加載,須在使用的Markdown Front-matter 加上 mathjax: trueper_page: false
如果
per_page设为true,则每一页都会加载Mathjax服务。设为false,则需要在文章Front-matter添加mathjax:true,对应的文章才会加载Mathjax服务。
访客地图
1. 注册账号
官网 clustrmaps.com 也是第三方的,有Google Docs账号可以直接登录,Sign up即可,科学上网这里不教。
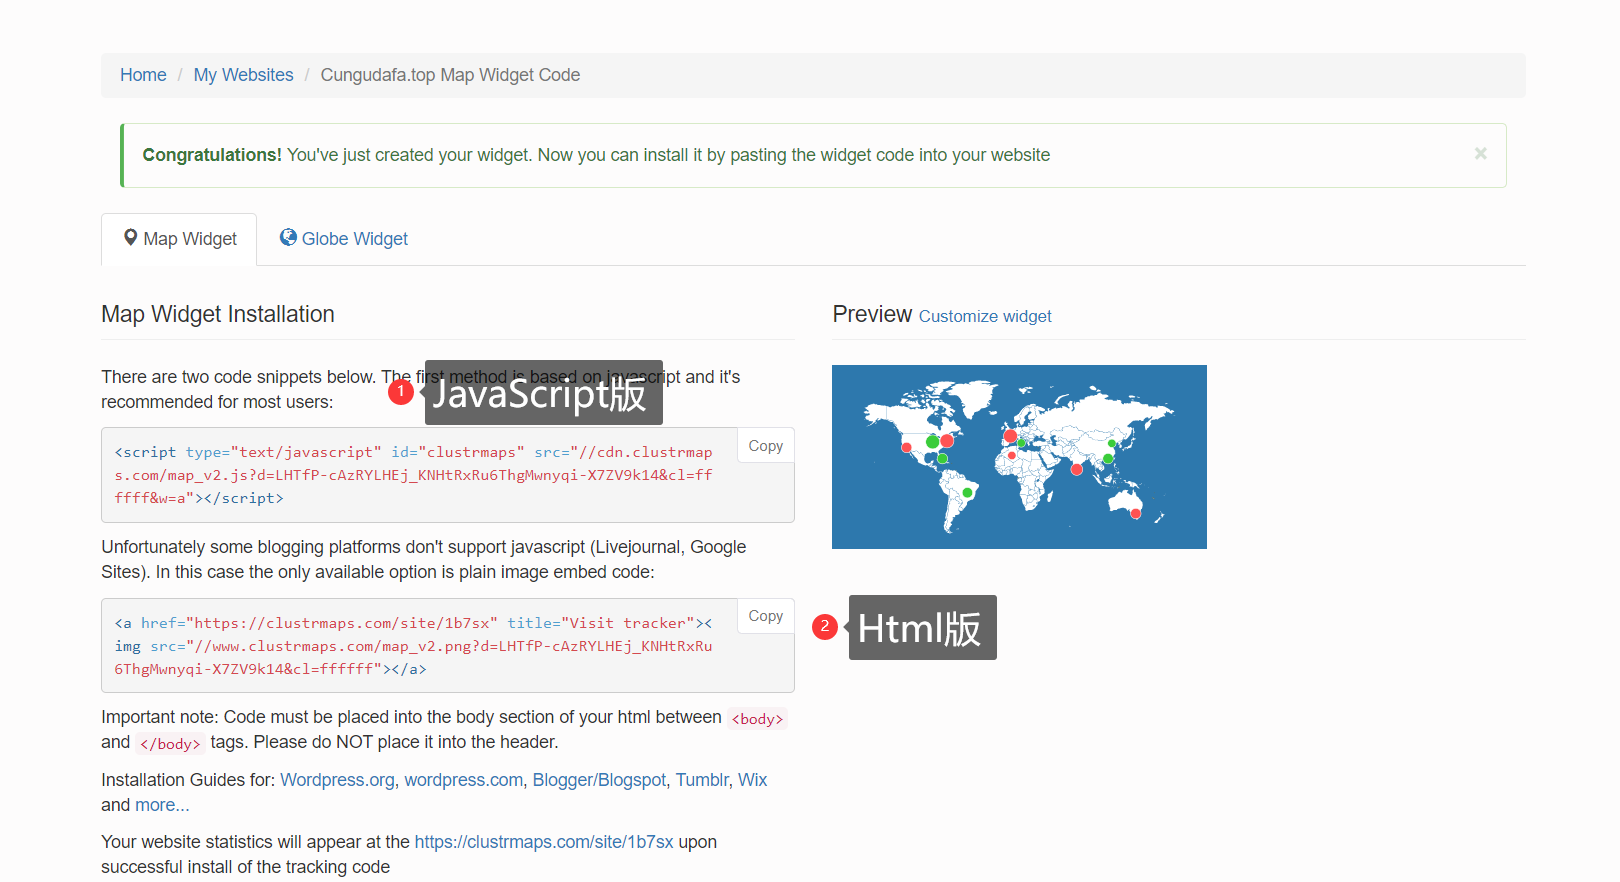
注册之后,在官网找到 Website Widget,如图。

我喜欢Map形式,如果喜欢Globe widget自便。

点击select就可以看到信息了,我这里用的html版,复制到你的博客就好了。
2.hexo主题引入
我在butterfly(pug)的侧边栏引入的,next可以同理规划;sakura(ejs)更简单,直接贴js或html代码
- 在主题配置声明一个侧边栏给地图显示
文件:source\_data\butterfly.yml
card_maps: true

添加一个界面元素
文件如图所示:
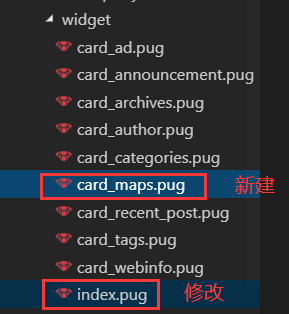
先在加载框添加一条card_maps的声明,(主题控制是否显示这个界面元素)
修改添加:themes\Butterfly\layout\includes\widget\index.pug
if theme.aside.card_maps!=partial('includes/widget/card_maps', {}, {cache:theme.fragment_cache})

然后,新建 一个页面元素:themes\Butterfly\layout\includes\widget\card_maps.pug
复制下面的pug格式样式,将url_for改为你之前申请的
.card-widget.card-map.card-content.item-headlinei.fa.fa-map-marker(aria-hidden="true")span= _p('访客')a(href=url_for('https://clustrmaps.com/site/1b7sx'))img(src=url_for('//www.clustrmaps.com/map_v2.png?d=LHTfP-cAzRYLHEj_KNHtRxRu6ThgMwnyqi-X7ZV9k14&cl=ffffff'))
文章页背景透明
- 在
\themes\butterfly\source\css路径下创建一个xxx.css文件,在文件中添加如下代码:
/* 首页文章栏背景透明 */
#recent-posts>.recent-post-item,.layout_page>div:first-child:not(.recent-posts),.layout_post>#page,.layout_post>#post,.read-mode .layout_post>#post {background: var(--light_bg_color)
}/* 侧边栏透明 */
#aside-content .card-widget {background: var(--light_bg_color)
}
- 然后将该文件引入到
_config.butterfly.yml文件中inject的head处:
- <link rel="stylesheet" href="/css/xxx.css">
添加个性化看板娘
由stevenjoezhang魔改项目
最简单引用方式在Butterfly/_config.yml中inject添加
inject:head:- <link rel="stylesheet" href="https://cdn.jsdelivr.net/npm/font-awesome/css/font-awesome.min.css">bottom:- <script src="https://cdn.jsdelivr.net/gh/stevenjoezhang/live2d-widget@latest/autoload.js"></script>
浏览器标题恶搞
在theme/Butterfly/source/js文件夹下添加crash_cheat.js文件
填入以下内容记得要修改你喜欢的标题
var OriginTitle = document.title;var titleTime;document.addEventListener('visibilitychange', function () {if (document.hidden) {$('[rel="icon"]').attr('href', "/joke.ico");document.title = '看不见我🙈~看不见我🙈~';clearTimeout(titleTime);}else {$('[rel="icon"]').attr('href', "/favicon.ico");document.title = ' ( ๑•̀ㅂ•́) ✧被发现了~';titleTime = setTimeout(function () {document.title = OriginTitle;}, 2000);}});
在Butterfly/layout/includes/layout.pug中添加以下代码来引入
script(type='text/javascript', src='/js/crash_cheat.js')

