前言
具体内容就是:
输入一个图像,经过神经网络后,识别为一个数字。从而实现图像的分类。

资源:
https://download.csdn.net/download/fengzhongye51460/89578965
思路:
确定输入的图像:会单通道灰度的28*28的图像,

把图像平铺后,输送到784个神经元的输入层

输入层输送到隐藏层,提取特征

隐藏层输送到输出层,显示概率


初始化模型
import torch  # Import PyTorch
from torch import nn  # Import the neural network module from PyTorch# Define the neural network class, inheriting from nn.Module
class Network(nn.Module):def __init__(self):super().__init__()  # Call the initializer of the parent class nn.Moduleself.layer1 = nn.Linear(784, 256)  # Define the first linear layer (input size 784, output size 256)self.layer2 = nn.Linear(256, 10)  # Define the second linear layer (input size 256, output size 10)def forward(self, x):x = x.view(-1, 28*28)  # Flatten the input tensor to a 1D tensor of size 28*28x = self.layer1(x)  # Pass the input through the first linear layerx = torch.relu(x)  # Apply the ReLU activation functionreturn self.layer2(x)  # Pass the result through the second linear layer and return it

__init__中
在输入层和隐藏层之间,创建一个线性层1 ,784个神经元转为256个
在隐藏层和输出层之间,创建一个线性层2,把256个神经元转为10个
forward中
先把输入图像x展平,然后输送到layer1中,用relu激活,再输送至layer2
训练模型
import torch
from torch import nn
from torch import optim
from model import Network
from torchvision import transforms
from torchvision import datasets
from torch.utils.data import DataLoaderif __name__ == '__main__':# Define the image transformations: convert to grayscale and then to tensortransform = transforms.Compose([transforms.Grayscale(num_output_channels=1),transforms.ToTensor()])# Load the training dataset from the specified directory and apply transformationstrain_dataset = datasets.ImageFolder(root='./mnist_train', transform=transform)# Load the test dataset from the specified directory and apply transformationstest_dataset = datasets.ImageFolder(root='./mnist_test', transform=transform)# Print the length of the training datasetprint("train_dataset length: ", len(train_dataset))# Print the length of the test datasetprint("test_dataset length: ", len(test_dataset))# Create a DataLoader for the training dataset with batch size of 64 and shuffling enabledtrain_loader = DataLoader(train_dataset, batch_size=64, shuffle=True)# Print the number of batches in the training DataLoaderprint("train_loader length: ", len(train_loader))# Iterate over the first few batches of the training DataLoaderfor batch_idx, (data, label) in enumerate(train_loader):# Uncomment the following lines to break after 3 batches# if batch_idx == 3:#     break# Print the batch indexprint("batch_idx: ", batch_idx)# Print the shape of the data tensorprint("data.shape: ", data.shape)# Print the shape of the label tensorprint("label.shape: ", label.shape)# Print the labelsprint(label)# Initialize the neural network modelmodel = Network()# Initialize the Adam optimizer with the model's parametersoptimizer = optim.Adam(model.parameters())# Define the loss function as cross-entropy losscriterion = nn.CrossEntropyLoss()# Train the model for 10 epochsfor epoch in range(10):# Iterate over the batches in the training DataLoaderfor batch_idx, (data, label) in enumerate(train_loader):# Forward pass: compute the model outputoutput = model(data)# Compute the lossloss = criterion(output, label)# Backward pass: compute the gradientsloss.backward()# Update the model parametersoptimizer.step()# Zero the gradients for the next iterationoptimizer.zero_grad()# Print the loss every 100 batchesif batch_idx % 100 == 0:print(f"Epoch {epoch + 1}/10 "f"| Batch {batch_idx}/{len(train_loader)} "f"| Loss: {loss.item():.4f}")# Save the trained model's state dictionary to a filetorch.save(model.state_dict(), 'mnist.pth')
1.数据的读取
先把图像灰度化,然后转换为张量
transform = transforms.Compose([transforms.Grayscale(num_output_channels=1),transforms.ToTensor()])导入训练数据和测试数据,
# Load the training dataset from the specified directory and apply transformationstrain_dataset = datasets.ImageFolder(root='./mnist_train', transform=transform)# Load the test dataset from the specified directory and apply transformationstest_dataset = datasets.ImageFolder(root='./mnist_test', transform=transform)# Print the length of the training datasetprint("train_dataset length: ", len(train_dataset))# Print the length of the test datasetprint("test_dataset length: ", len(test_dataset))# Create a DataLoader for the training dataset with batch size of 64 and shuffling enabledtrain_loader = DataLoader(train_dataset, batch_size=64, shuffle=True)# Print the number of batches in the training DataLoaderprint("train_loader length: ", len(train_loader))会把文件夹名称作为数据的标签

,例如 名称为0的文件夹,下面所有的文件都是数字0的图片

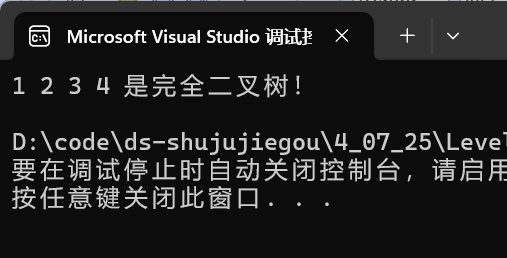
打印信息

可以看到导入了6w张训练图片,1w张测试图片,和60000/64=938 组数据
2.数据的训练
创建模型,设置优化器和损失函数
# Initialize the neural network modelmodel = Network()# Initialize the Adam optimizer with the model's parametersoptimizer = optim.Adam(model.parameters())# Define the loss function as cross-entropy losscriterion = nn.CrossEntropyLoss()
训练数据
训练10轮 ,
每次的步骤
1.计算神经网络的前向传播结果
2.计算output和标签label之间的损失loss
3.使用backward计算梯度
4.使用optimizer更新参数
5.将梯度清零
# Train the model for 10 epochsfor epoch in range(10):# Iterate over the batches in the training DataLoaderfor batch_idx, (data, label) in enumerate(train_loader):# Forward pass: compute the model outputoutput = model(data)# Compute the lossloss = criterion(output, label)# Backward pass: compute the gradientsloss.backward()# Update the model parametersoptimizer.step()# Zero the gradients for the next iterationoptimizer.zero_grad()# Print the loss every 100 batchesif batch_idx % 100 == 0:print(f"Epoch {epoch + 1}/10 "f"| Batch {batch_idx}/{len(train_loader)} "f"| Loss: {loss.item():.4f}")
3.保存模型
# Save the trained model's state dictionary to a filetorch.save(model.state_dict(), 'mnist.pth')测试模型
代码
from model import Network  # Import the custom neural network model class
from torchvision import transforms  # Import torchvision transformations
from torchvision import datasets  # Import torchvision datasets
import torch  # Import PyTorchif __name__ == '__main__':# Define the image transformations: convert to grayscale and then to tensortransform = transforms.Compose([transforms.Grayscale(num_output_channels=1),transforms.ToTensor()])# Load the test dataset from the specified directory and apply transformationstest_dataset = datasets.ImageFolder(root='./mnist_test', transform=transform)# Print the length of the test datasetprint("test_dataset length: ", len(test_dataset))# Initialize the neural network modelmodel = Network()# Load the model's state dictionary from the saved filemodel.load_state_dict(torch.load('mnist.pth'))right = 0  # Initialize a counter for correctly classified images# Iterate over the test datasetfor i, (x, y) in enumerate(test_dataset):output = model(x.unsqueeze(0))  # Forward pass: add batch dimension and compute the model outputpredict = output.argmax(1).item()  # Get the index of the highest score as the predicted labelif predict == y:right += 1  # Increment the counter if the prediction is correctelse:img_path = test_dataset.samples[i][0]  # Get the path of the misclassified image# Print details of the misclassified caseprint(f"wrong case: predict = {predict} actual = {y} img_path = {img_path}")sample_num = len(test_dataset)  # Get the total number of samples in the test datasetacc = right * 1.0 / sample_num  # Calculate the accuracy as the ratio of correct predictions# Print the test accuracyprint("test accuracy = %d / %d = %.31f" % (right, sample_num, acc))
1.读取测试数据集
# Define the image transformations: convert to grayscale and then to tensortransform = transforms.Compose([transforms.Grayscale(num_output_channels=1),transforms.ToTensor()])# Load the test dataset from the specified directory and apply transformationstest_dataset = datasets.ImageFolder(root='./mnist_test', transform=transform)# Print the length of the test datasetprint("test_dataset length: ", len(test_dataset))查看打印信息,导入了1w张测试图片
![]()
2.导入模型
# Initialize the neural network modelmodel = Network()# Load the model's state dictionary from the saved filemodel.load_state_dict(torch.load('mnist.pth'))
3.测试
将测试图片导入模型
output = model(x.unsqueeze(0)) # Forward pass: add batch dimension and compute the model output选择概率最大的测试标签
predict = output.argmax(1).item() # Get the index of the highest score as the predicted label查看结果

可以看到,1w图片中9807张图片识别正确。


![[STM32]HAL库实现自己的BootLoader-BootLoader与OTA-STM32CUBEMX](https://i-blog.csdnimg.cn/direct/2a7166fd9a9e4f7d9496c6f879a670ee.png)