1.系统备份
1.1 将瑞芯微平台嵌入式系统的root ssh 权限开通
step1:
sudo vi /etc/ssh/sshd_configstep2: 找到PermitRootLogin,把开关打开:
PermitRootLogin yes
step3:重启ssh服务
sudo systemctl restart sshd
1.2.使用瑞芯微的打包脚本把嵌入式系统系统打包
这个打包脚本,建议修改一下,把文件系统放在当前目录:
#! /bin/bash# acquire root privilege
if [ ! "$UID" -eq 0 ]; thenecho "This script require root privilege."exit 0
fifunction check_ip()
{   local IP=$1   VALID_CHECK=$(echo $IP|awk -F. '$1<=255&&$2<=255&&$3<=255&&$4<=255{print "yes"}')   if echo $IP|grep -E "^[0-9]{1,3}\.[0-9]{1,3}\.[0-9]{1,3}\.[0-9]{1,3}$" >/dev/null; then   if [ $VALID_CHECK == "yes" ]; then   echo "IP $IP  available!"   return 0   else   echo "IP $IP not available!"   return 1   fi   else   echo "IP format error!"   return 1   fi
}
while true ;do   read -p "Enter your username and ip:" userName IP   check_ip $IP   [ $? -eq 0 ] && break
done
# Install the rsync
if ! type rsync >/dev/null 2>&1; thenecho 'rsync did not install,Now we will intall rsync!'apt updateapt install rsync
fi
# Test ip
if  ping -c 2 ${IP} >/dev/null ; thenecho 'The IP is conneted!'
else echo 'The IP can not conneted! 'exit 0
fi
# New path
rm -rf ./rootfs
if [ ! -d "./rootfs" ]; thenmkdir ./rootfs
fi
# Download rootfs
rsync -avx $userName@$IP:/ ./rootfs
#rm -rf ./rootfs/var/log/*# Creat new img by dd
dd if=/dev/zero of=rootfs.img  bs=1M count=15000
mkfs.ext4 -F -L linuxroot rootfs.img
if [ ! -d "/ubuntu-mount" ]; thenmkdir /ubuntu-mount
fi
mount rootfs.img /ubuntu-mount
cp -rfp ./rootfs/* /ubuntu-mount
umount /ubuntu-mount
e2fsck -p -f rootfs.img
resize2fs -M rootfs.img
exit 0
1.3 系统备份的结果
最终会生成一个叫rootfs.img包,这个包往往尺寸很大,推荐用.7z压缩一下。另外,./rootfs中你能看到根文件系统,建议对./rootfs/var/log中的目录进行整理,删减不必要的日志
7z a xxxx-release-v1.0.20240510.7z rootfs.img
这个rootfs.img的包就是我们需要处理的文件系统。
2.升级包.img生成
2.1 首选准备原厂boot uboot这里镜像文件
它们需要和上一步生成的linux文件系统合并,然后打包成最终的.img映像。
使用原厂系统工具:RKDevTool_Release_v2.92解包适应你的平台的原厂.img升级包,比如对我而言是:
lubancat-rk3588-debian11-gnome-20240424_update.img
注意最新版的v3.15功能不全,无法使用。
注意v2.92有个坑:
2.1.1 修改v2.92烧写工具的bug
我们之后主要的工作目录:./rockdev下的两个可执行文件不是最新版:

最新版在.bin目录里:
![]()
记得把它先拷过去。
2.1.2 解包
原厂文件的解包过程,打开主界面即可:
解包的位置在这里:
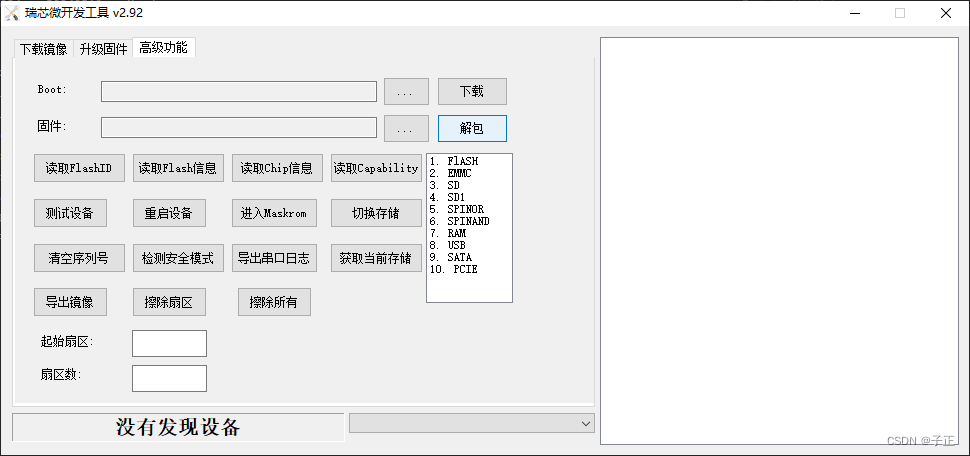
选择固件包(*.img),然后点击解包即可。
解包后的各个组成部分放置在:
.\Output目录下:
2.2 筛选需要的.imge和其他配置文件到工作目录中
注意依照2.1.1修正v2.92 ./rockdev目录的.exe文件版本问题
step1:在.rockdev目录创建Image目录,把Output目录中的文件全部拷贝过去
step2.把Image目录中的package-file,拷贝一份到./rockdev目录
step3.建议修改update-script文件,增补rootfs的部分
(它可能并不需要,如果你测试不需要这一步,请留言。)
# 升级kernel
write_image PACKAGE:kernel KERNEL:
check_image PACKAGE:kernel KERNEL:# 升级boot
write_image PACKAGE:boot BOOT:
check_image PACKAGE:boot BOOT:# 升级rootrfs
write_image PACKAGE:rootfs ROOTFS:
check_image PACKAGE:rootfs ROOTFS:
上文中加粗的部分是新增的代码。
2.3 替换掉./rockdev/Image中的rootfs.img
2.4 打包,生成最终可用的.img
rk3588-mkupdate.bat
3.最终的成品及使用
最终在./rockdev目录下会生成一个
update.img
可以重命名并压缩,这就是最终的升级包
3.1 升级:
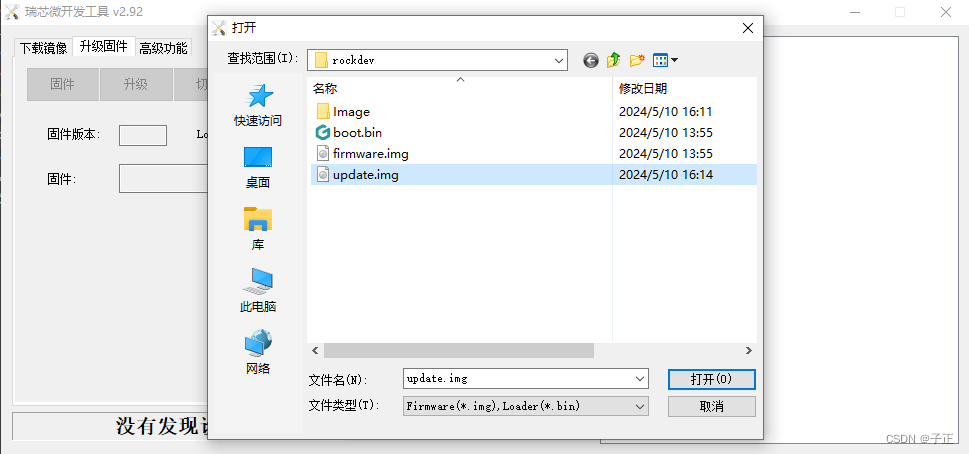
最终升级时, 注意要进入Loader模式:
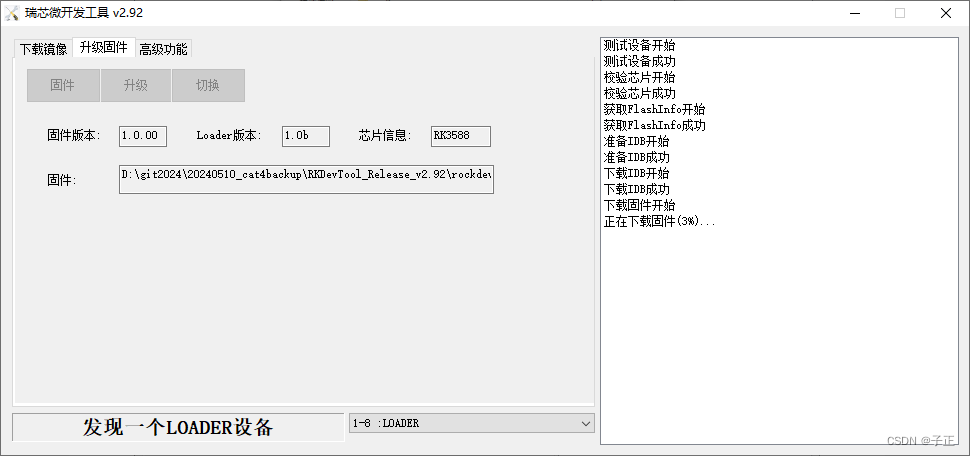
备注:
这个备份和还原过程在鲁班猫CAT4平台上测试过,对应的芯片组是RK3588.
last modified: May10,2024
created at :May10,2024

