本章是STL容器 list 的模拟实现。
之前已经使用 C语言 对带头双向循环链表 进行实现,详见数据结构: 线性表(带头双向循环链表实现), 相较于之前的实现,C++ 下多了对迭代器以及模板等相关语法特性。下面将着重讲解这些新知识。
文章目录
- 一. list 的基本框架
- 1. 结点的结构
- 2. 链表初始化
- 3. push_back 尾插
- 二. list 迭代器的实现
- 1. 迭代器的结构
- 2. ++,--,*,==,!=
- 3. ->
- 4. 利用模板实现const迭代器
- 三. 完整代码
- list.h
- test.cpp
一. list 的基本框架
1. 结点的结构
n个结点链接成一个链表,首先要构造结点的结构,C语言中结点是这样定义的:
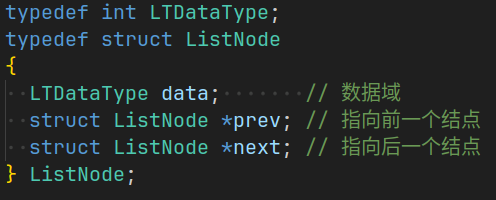
虽然可以用 typedef 使得该结点可以存放不同的数据类型,但是如果在一个程序中有两个不同数据类型的链表,就需要再重新创建新的结点结构体,与此同时,链表的相关操作也需要进行重新创建。这样,一个程序中就有两个近乎相同的一长串代码,C++ 的模板此时就给了完美的解决方案:
// ListNode
template <typename T>
struct ListNode
{ListNode<T> *_next; // 指向后继结点的指针ListNode<T> *_prev; // 指向前驱结点的指针T _data;            // 存放结点的数据
};
通过类模板即可以在创建链表的时候指定结点的类型,以此推导出 T 的类型。
由于 C++ 中的关键字 struct 升级成了一个类, 这样就可以通过创建结点类的默认构造函数来实现结点的默认初始化。
STL 中 list 是一个带头双向循环链表,那么结点初始化的时候,可以使其的前驱和后继都指向空指针, 同时数据域的初始化调用结点类型的默认构造函数。
// ListNode
template <typename T>
struct ListNode
{ListNode<T> *_next; // 指向后继结点的指针ListNode<T> *_prev; // 指向前驱结点的指针T _data;            // 存放结点的数据ListNode(const T &val = T()) // 全缺省构造: _next(nullptr), _prev(nullptr), _data(val){}
};
2. 链表初始化
设计完结点的结构,接下来就是 List 类的构建, 为了方便使用,使用 typedef 对 ListNode<T> 进行重命名。
List 只有一个成员,就是指向头结点即哨兵位的指针。
构造函数也可以写出来了,创建一个新结点,该结点的前驱和后继指向自己,同时 _head 的值为该结点的地址。为了方便拷贝构造以及其他构造函数复用,这里将这个操作封装成一个私有函数。
namespace wr
{template <typename T>class list{typedef ListNode<T> Node;public:list(){empty_init():}private:void empty_init(){_head = new Node;_head->_prev = _head;_head->_next = _head;}Node* _head;};
}
3. push_back 尾插
此时完成尾插操作的实现,就可以把一个链表的最初框架完成了,尾插的实现就不过多赘述了。
push_back(const T &val = T())
{Node* newNode = new Node(val);Node* tail = _head->_prev;// tail newNode _headtail->_next = newNode;newNode->_prev = tail;newNode->_next = _head;_head->_prev = newNode;
}
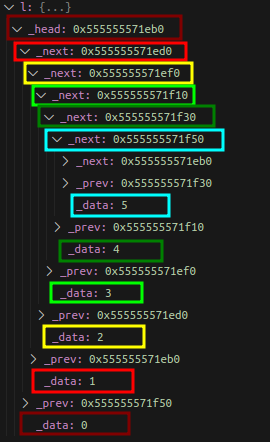
这时候通过调试,就可以确认链表创建并尾插成功:
二. list 迭代器的实现
list 的重点就是迭代器的实现。
之前的 vector 和 string 由于是顺序存储结构,所有迭代器是原生指针,通过 ++ 等操作可以直接访问到对应元素。
但是,list 是链式存储结构,在底层各结点的位置不是连续的,单纯使用原生指针的加减是访问不到结点数据的。
那么,怎么样才可以通过 iterator++ 等操作来实现访问结点的效果呢?
得益于C++自定义类型可以进行运算符重载,但Node* 是内置类型,不可以进行运算符重载, 可以将Node*进行封装,再重载 ++ 等操作
1. 迭代器的结构
template<class T>
struct __list_iterator{typedef ListNode<T> Node; // 重命名Node* _node;  // 迭代器指向的结点指针// construct__list_iterator(Node* node = nullptr): _node(node){}
};
2. ++,–,*,==,!=
接着是实现 ++,--,* 操作符的重载
++ 使迭代器指向当前结点的后驱
-- 使迭代器指向当前结点的前驱
* 得到结点的数据
typedef __list_iterator<T> self;  // 重命名
self &operator++()
{_node = _node->_next;return *this;
}self operator++(int)
{self tmp(*this);_node = _node->_next;return tmp;
}self &operator--()
{_node = _node->_prev;return *this;
}self operator--(int)
{self tmp(*this);_node = _node->_prev;return tmp;
}T& operator*()
{return _node->_data;
}bool operator!=(const self &s)
{return _node != s._node;
}bool operator==(const self &s)
{return _node == s._node;
}
在 list 类中添加 end, begin
typedef __list_iterator<T> iterator;
iterator begin()
{return _head->_next;
}
iterator end()
{return _head;
}
const_iterator begin() const
{return _head->_next;
}
const_iterator end() const
{return _head;
}
随后进行测试,迭代器构建成功:
3. ->
若结点的数据域的类型是自定义类型,例如下面的自定义类型 AA
struct AA{int _a1;int _a2;
};
当然可以先对迭代器进行解引用, 再访问成员:(*it)._a1
或者直接使用箭头进行访问: it->_a1
这里直接给出 operator->()的实现
T* operator->()
{return &_node->data;
}
这样的实现方式会令人感到奇怪,为什么是直接返回结点的数据域地址呢?
这里类似于运算符重载中的后置++——将int放入参数括号内,也是一种特殊处理。
当出现迭代器后面跟了一个->时,C++语法规定省略了一个->, 实际上为 it.operator->()->_a1,这样就可以理解为什么返回的是结点的数据域地址了。
为了实现逻辑自恰,对此进行特殊处理。
4. 利用模板实现const迭代器
const迭代器和普通迭代器的区别是能否对迭代器指向的数据进行修改,不是直接简单粗暴的 cosnt iterator ,迭代器本身是需要改变的。
那么两者有区别的就是 operator*() 和 operator->() 的返回类型。
普通迭代器是:T& operator*(),T* operator->()
const迭代器:const T& operator*(),const T* operator->()
既然两者十分相似,就没有必要在重新创建一个 __const_list_iterator 这样的类,导致代码冗余,重复。
模板这个时候又发挥了作用,可以直接在迭代器的类模板再添加两个类型,在重命名迭代器的时候只要放入对应的类型,让编译器进行类型推演即可
template<class T, class Ref, class Ptr>
class __list_iterator{//...
};template<class T>
class list{
public:// 重命名typedef __list_iterator<T, T&, T*> iterator;  typedef __list_iterator<T, const T&, const T*> const_iterator;//...
};
三. 完整代码
list 的其他接口实现就不过多赘述,这里直接贴上模拟实现 list 的完整代码
list.h
#ifndef __LIST_H__
#define __LIST_H__
#include <assert.h>namespace wr
{// ListNodetemplate <typename T>struct ListNode{ListNode<T> *_next; // 指向后继结点的指针ListNode<T> *_prev; // 指向前驱结点的指针T _data;            // 存放结点的数据ListNode(const T &val = T()) // 全缺省构造: _next(nullptr), _prev(nullptr), _data(val){}};// __list_iteratortemplate <typename T, typename Ref, typename Ptr>struct __list_iterator{typedef ListNode<T> Node;typedef __list_iterator<T, Ref, Ptr> self; // 重命名为selfNode *_node; // 迭代器指向的结点指针__list_iterator(Node *node = nullptr): _node(node){}__list_iterator(const self &s): _node(s._node){}self &operator++(){_node = _node->_next;return *this;}self operator++(int){self tmp(*this);_node = _node->_next;return tmp;}self &operator--(){_node = _node->_prev;return *this;}self operator--(int){self tmp(*this);_node = _node->_prev;return tmp;}Ref operator*(){return _node->_data;}Ptr operator->(){return &(operator*());}bool operator!=(const self &s){return _node != s._node;}bool operator==(const self &s){return _node == s._node;}};// listtemplate <typename T>class list{typedef ListNode<T> Node;public:typedef __list_iterator<T, T &, T *> iterator;typedef __list_iterator<T, const T &, const T *> const_iterator;list(){empty_init();}list(int n, const T &val = T()){empty_init();for (int i = 0; i < n; ++i){push_back(val);}}template<typename InputIterator>list(InputIterator first, InputIterator last){empty_init();while (first != last){push_back(*first);++first;}}list(const list<T> & l){empty_init();for (const auto &e : l){push_back(e);}}list<T>& operator=(const list<T> l){swap(l);return *this;}~list(){clear();delete _head;_head = nullptr;}// List Iteratoriterator begin(){return _head->_next;}iterator end(){return _head;}const_iterator begin() const{return _head->_next;}const_iterator end() const{return _head;}// List Capacitysize_t size() const{size_t size = 0;const_iterator it = begin();while (it != end()){++size;++it;}return size;}bool empty() const{return !size();}// List AccessT &front(){return *(begin());}const T &front() const{return *(begin());}T &back(){return *(--end());}const T &back() const{return *(--end());}// List Modifyvoid push_back(const T &val = T()){// Node *newNode = new Node(val);// Node *tail = _head->_prev;// tail->_next = newNode;// newNode->_prev = tail;// newNode->_next = _head;// _head->_prev = newNode;insert(end(), val);}void pop_back(){erase(--end());}void push_front(const T &val = T()){insert(begin(), val);}void pop_front(){erase(begin());}iterator insert(iterator pos, const T &val){ // 在pos位置前插入值为val的节点Node *cur = pos._node;Node *prev = cur->_prev;Node *newNode = new Node(val);prev->_next = newNode;newNode->_prev = prev;newNode->_next = cur;cur->_prev = newNode;return newNode;}iterator erase(iterator pos){ // 删除pos位置的节点,返回该节点的下一个位置assert(pos != end());Node *cur = pos._node;Node *prev = cur->_prev;Node *next = cur->_next;prev->_next = next;next->_prev = prev;delete cur;return next;}void clear(){iterator it = begin();while (it != end()){it = erase(it);}}void swap(list<T> &l){std::swap(_head, l._head);}private:void empty_init(){_head = new Node;_head->_next = _head;_head->_prev = _head;}Node *_head;};
}#endif // __LIST_H__
test.cpp
#include <iostream>
#include <utility>
#include <string>
#include "list.h"using namespace std;
using namespace wr;#define SHOW(x) \for (auto e : x) \cout << e << " "; \cout << endl; \
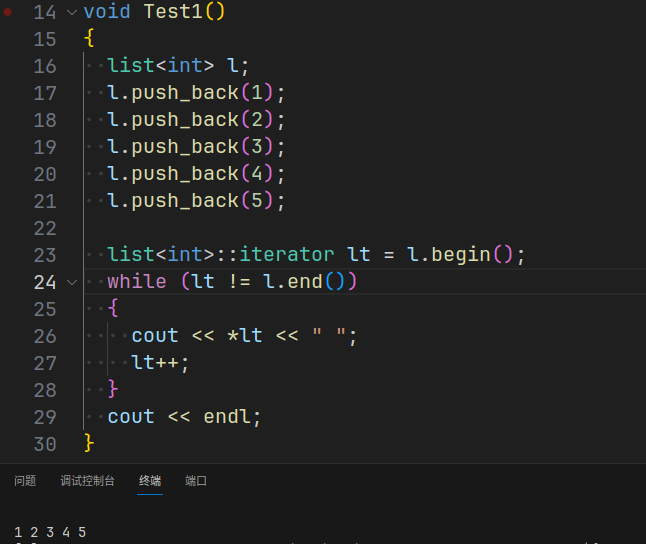
void Test1()
{list<int> l;l.push_back(1);l.push_back(2);l.push_back(3);l.push_back(4);l.push_back(5);list<int>::iterator lt = l.begin();while (lt != l.end()){cout << *lt << " ";lt++;}cout << endl;
}void Test2()
{list<int> l;l.push_back(1);l.push_back(2);l.push_back(3);l.push_back(4);l.push_back(5);l.push_back(6);SHOW(l);l.push_front(0);SHOW(l);l.pop_back();SHOW(l);l.pop_front();SHOW(l);l.clear();SHOW(l);
}void Test3()
{list<string> l1;l1.push_back("1111");l1.push_back("2222");l1.push_back("3333");l1.push_back("4444");l1.push_back("5555");l1.push_back("6666");SHOW(l1);list<string> l2;l2.push_back("aaaa");l2.push_back("bbbb");l2.push_back("cccc");l2.push_back("dddd");l2.push_back("eeee");SHOW(l2);l1.swap(l2);SHOW(l1);l1.front() = "1111";l1.back() = "9999";cout << l1.front() << endl;cout << l1.back() << endl;SHOW(l1);
}void Test4()
{list<int> l;cout << l.empty() << endl;cout << l.size() << endl;l.push_back(1);l.push_back(1);l.push_back(1);l.push_back(1);l.push_back(1);l.push_back(1);l.push_back(1);cout << l.empty() << endl;cout << l.size() << endl;
}void Test5()
{char a[] = "abcdeftg";list<char> l1(a, a + sizeof(a) / sizeof(char));SHOW(l1);cout << l1.size() << endl;list<char> l2(l1);SHOW(l2);list<char> l3;l3.push_back('1');l2.swap(l3);SHOW(l2);SHOW(l3);
}int main()
{Test1();//Test2();//Test3();//Test4();//Test5();return 0;
}
本章完。
![[Mac软件]Adobe Substance 3D Stager 2.1.4 3D场景搭建工具](https://img-blog.csdnimg.cn/img_convert/43e1e340d57b052e19205822f8611f47.png)