1、集群架构
| 操作系统 | IP地址 | |
| 1* | Ubuntu22.04 | 192.168.1.74 |
| 2 | Ubuntu22.04 | 192.168.1.60 |
| 3 | Ubuntu22.04 | 192.168.1.67 |
| 4 | Ubuntu20.03 | 192.168.1.136 |
上述四台电脑,我在1中下载了管理服务、元数据服务、存储服务、客户端服务,在2、3中下载了存储服务、客户端服务,在4中下载了元数据服务、客户端服务。
2、BeeGFS下载
我选择的版本是:BeeGFS V7.4.2
注意,目前BeeGFS支持的Linux内核版本最高为6.2,如果内核版本高于6.2在安装完beegfs-client后启动会出现错误,所以如果版本高于6.2,请查看内核更换一章。使用下面命令查看Linux内核
uname -r
添加密钥:
wget -q -O - https://www.beegfs.io/release/beegfs_7.4.2/gpg/GPG-KEY-beegfs | apt-key add -
此处用的版本是7.4.2,如果版本变化自行查看官网
wget https://www.beegfs.io/release/beegfs_7.4.2/dists/beegfs-jammy.list -O /etc/apt/sources.list.d/beegfs.list
apt-get install apt-transport-https
apt-get update
以上步骤在所有节点中均操作一遍
2.1、管理服务
根据BeeGFS官网,管理服务一般不需要单独占用一台机器,在主要节点上下载即可。
这里我们在192.168.1.74这台计算机上安装了管理服务。
apt-get install beegfs-mgmtd
节点设置:
/opt/beegfs/sbin/beegfs-setup-mgmtd -p /data/beegfs/beegfs_mgmtd
防火墙端口:
管理服务需开启 8008端口
ufw allow 8008
2.2、元数据服务
我在192.168.1.74、192.168.1.136两台计算机上安装了元数据服务:
apt-get install beegfs-meta libbeegfs-ib
节点设置:
/opt/beegfs/sbin/beegfs-setup-meta -p /data/beegfs/beegfs_meta -s 2 -m 192.168.1.74
-s 元数据服务ID
-m 管理服务节点ip
元数据服务需开启8005端口
ufw allow 8005
2.3、存储服务
我在192.168.1.73、192.168.1.60、192.168.1.67三台计算机上安装了存储服务
apt-get install beegfs-storage libbeegfs-ib
节点设置
/opt/beegfs/sbin/beegfs-setup-storage -p /mnt/myraid1/beegfs_storage -s 3 -i 301 -m 192.168.1.74
-s 存储服务ID
-i 存储目标ID
-m 管理服务节点IP
存储服务需开启8003端口
ufw allow 8003
2.4、客户端
所有计算机上均安装了客户端
apt-get install beegfs-client beegfs-helperd beegfs-utils
节点设置
/opt/beegfs/sbin/beegfs-setup-client -m 192.168.1.74
客户端挂载目录在/etc/beegfs/beegfs_mounts.conf中定义
第一个条目定义安装目录。第二个条目引用此安装点的相应配置文件。
默认挂载目录锁/mnt/beegfs
如需修改则自行更改,我这里使用默认目录
客户端开启8004端口
ufw allow 8004
注意:
如果电脑的secure boot开启的话,beegfs-client启动会报错。
需要进入BIOS关闭
3、安全设置
官方建议使用 connAuthFile 配置连接身份验证
如果不需要身份验证,则在所有节点上将connDisableAuthentication设置为true
服务配置文件在:/etc/beegfs/目录下
管理服务配置文件: beegfs-mgmtd.conf
元数据服务配置文件: beegfs-meta.conf
存储服务配置文件: beegfs-storge.conf
客户端服务配置文件: beegfs-client.conf
beegfs-helperd.conf
正常情况下需要设置身份认证,做法如下:
1、创建密码文件(在管理服务节点操作就行):
dd if=/dev/random of=/etc/beegfs/connauthfile bs=128 count=1
2、确保该文件只能由root用户读取:
chown root:root /etc/beegfs/connauthfile
chmod 400 /etc/beegfs/connauthfile
3、将文件复制到所有主机(mgmtd,meta,storage,client,mon)
可以使用scp命令复制:
scp /etc/beegfs/connauthfile 用户@<目标主机ip>:/etc/beegfs/connauthfile
4、编辑集群中所有配置文件,包括 helperd/mon:
connDisableAuthentication=false
connAuthFile=/etc/beegfs/connauthfile
4、一些命令
1、管理服务启动:
systemctl start beegfs-mgmtd
2、元数据服务启动:
systemctl start beegfs-meta
3、存储服务启动:
systemctl start beegfs-meta
4、客户端服务启动:
systemctl start beegfs-helperd
systemctl start beegfs-client
5、查看元数据服务
beegfs-ctl --listnodes --nodetype=meta --nicdetails
6、查看存储服务
beegfs-ctl --listnodes --nodetype=storage --nicdetails
7、查看客户端
beegfs-ctl --listnodes --nodetype=client --nicdetails
8、显示客户端实际使用的连接
beegfs-net
9、显示服务的可能连接
beegfs-check-servers
10、显示存储和元数据目标的可用空间和索引节点
beegfs-df
5、更换Linux系统内核
如果内核版本大于6.2,管理服务将会不可用,此时需将内核将为6.2及以下:
查看内核版本命令
uname -r
1、查看自己grub版本,记住是2.0以上还是以下
grub-install --version
2、查看可用内核版本
apt-cache search linux-image
3、下载内核(可选)
如果查看电脑已有内核中没有需要的,则需要下载,我这里下载的是 6.2.0-39-generic
sudo apt-get install linux-headers-6.2.0-39-generic
sudo apt-get install linux-image-6.2.0-39-generic
sudo apt-get install linux-modules-6.2.0-39-generic
sudo apt-get install linux-modules-extra-6.2.0-39-generic
4、查看内核安装情况
dpkg --list | grep linux-image
dpkg --list | grep linux-headers
5、再次查找需要更换的内核
grep 'menuentry' /boot/grub/grub.cfg
我的是6.2.0-39-generic,一般查找到Ubuntu, with Linux 6.2.0-39-generic
6、修改grub
vim /etc/default/grub
将GRUB_DEFAULT=0修改成GRUB_DEFAULT=“Ubuntu, with Linux 6.2.0-39-generic”
7、更新grub
update-grub
8、如果看到下面警告:
Please don't use old title `Ubuntu, with Linux 6.2.0-39-generic' for GRUB_DEFAULT, use `Advanced options for Ubuntu>Ubuntu, with Linux 6.2.0-39-generic' (for versions before 2.00) or `gnulinux-advanced-5169ddc2-d57c-4044-a238-a33f4f953600>gnulinux-6.2.0-39-generic-advanced-5169ddc2-d57c-4044-a238-a33f4f953600' (for 2.00 or later)
则根据grub版本,如果大于2.0则修改/etc/default/grub中的
GRUB_DEFAULT=“gnulinux-advanced-5169ddc2-d57c-4044-a238-a33f4f953600>gnulinux-6.2.0-39-generic-advanced-5169ddc2-d57c-4044-a238-a33f4f953600”
如果小于2.0则修改为
GRUB_DEFAULT=“Advanced options for Ubuntu>Ubuntu, with Linux 6.2.0-39-generic”
再次输入update-grub后重启
9、输入 uname -r查看是否修改成功
10、卸载之前版本
查看已安装版本
dpkg --get-selections | grep linux-image
删除:
apt-get remove linux-image-5.10.0-1023-oem
dpkg -P linux-image-5.10.0-1023-oem
11、恢复grub
将grub的GRUB_DEFAULT改为0
然后update-grub
12、关闭内核自动更新
sudo apt-mark hold linux-image-generic linux-headers-generi
6、可能出现的问题
一般来说可能beegfs-client启动时会出现问题:
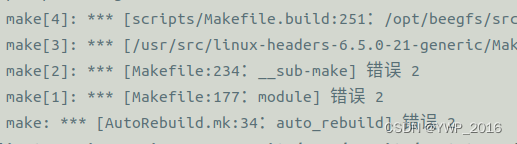
这个错误一般是内核版本不匹配

这个问题一般是端口没打开,具体查看日志文件,/var/log/beegfs_client.log

这个问题可能锁计算机secure boot开启会出现,简单方法是进入BIOS界面关闭Secure Boot,但是可能会有安全隐患。
以上是我在安装BeeGFS时遇到的一些问题,可能不是最好的解答,希望能给你起到借鉴的作用。
7、参考
Quick Start Guide — BeeGFS Documentation 7.4.2 ![]() https://doc.beegfs.io/latest/quick_start_guide/quick_start_guide.html
https://doc.beegfs.io/latest/quick_start_guide/quick_start_guide.html
ubuntu20.04内核降级_ubuntu20更新内核-腾讯云开发者社区-腾讯云如题,在不小心安装新内核之后,发现没办法降级(网上的各种方法 最后结合信息摸索出了解决方案:![]() https://cloud.tencent.com/developer/article/2121264
https://cloud.tencent.com/developer/article/2121264
Ubuntu内核的查看、更新、卸载、取消及启用自动更新_ubuntu使用dpkg查看安装的内核-CSDN博客文章浏览阅读2.4k次,点赞5次,收藏20次。Ubuntu内核的查看、更新、卸载、取消及启用自动更新。_ubuntu使用dpkg查看安装的内核https://blog.csdn.net/Explorer_XZH/article/details/129395789本文合作作者:
感情丶剪不断-CSDN博客感情丶剪不断关注react.js,前端框架,面试,css,node.js,es6,vue.js,https,javascript领域.https://blog.csdn.net/qq_46688918?type=blog