LLM权重量化
- 浮点表示的背景知识
- Naïve 8位量化
- 使用LLM.int8() 进行8位量化
- 结论
- References
大型语言模型(llm)以其广泛的计算需求而闻名。通常,模型的大小是通过将**参数的数量(大小)乘以这些值的精度(数据类型)**来计算的。为了节省内存,可以通过称为量化的过程使用精度较低的数据类型来存储权重。
我们在文献中区分了两个主要的权重量化技术家族:
- 训练后量化(PTQ)是一种简单的技术,其中已经训练的模型的权重被转换为较低的精度,而不需要任何再训练。尽管PTQ易于实现,但它与潜在的性能下降有关。
- 量化感知训练(QAT)在预训练或微调阶段引入了权重转换过程,从而提高了模型的性能。然而,QAT的计算成本很高,并且需要具有代表性的训练数据。
在本文中,我们将重点放在PTQ上以降低参数的精度。为了获得良好的直觉,我们将使用GPT-2模型将naïve和更复杂的技术应用于一个玩具示例。
浮点表示的背景知识
数据类型的选择决定了所需计算资源的数量,从而影响模型的速度和效率。在深度学习应用中,平衡精度和计算性能变得至关重要,因为更高的精度通常意味着更高的计算需求。
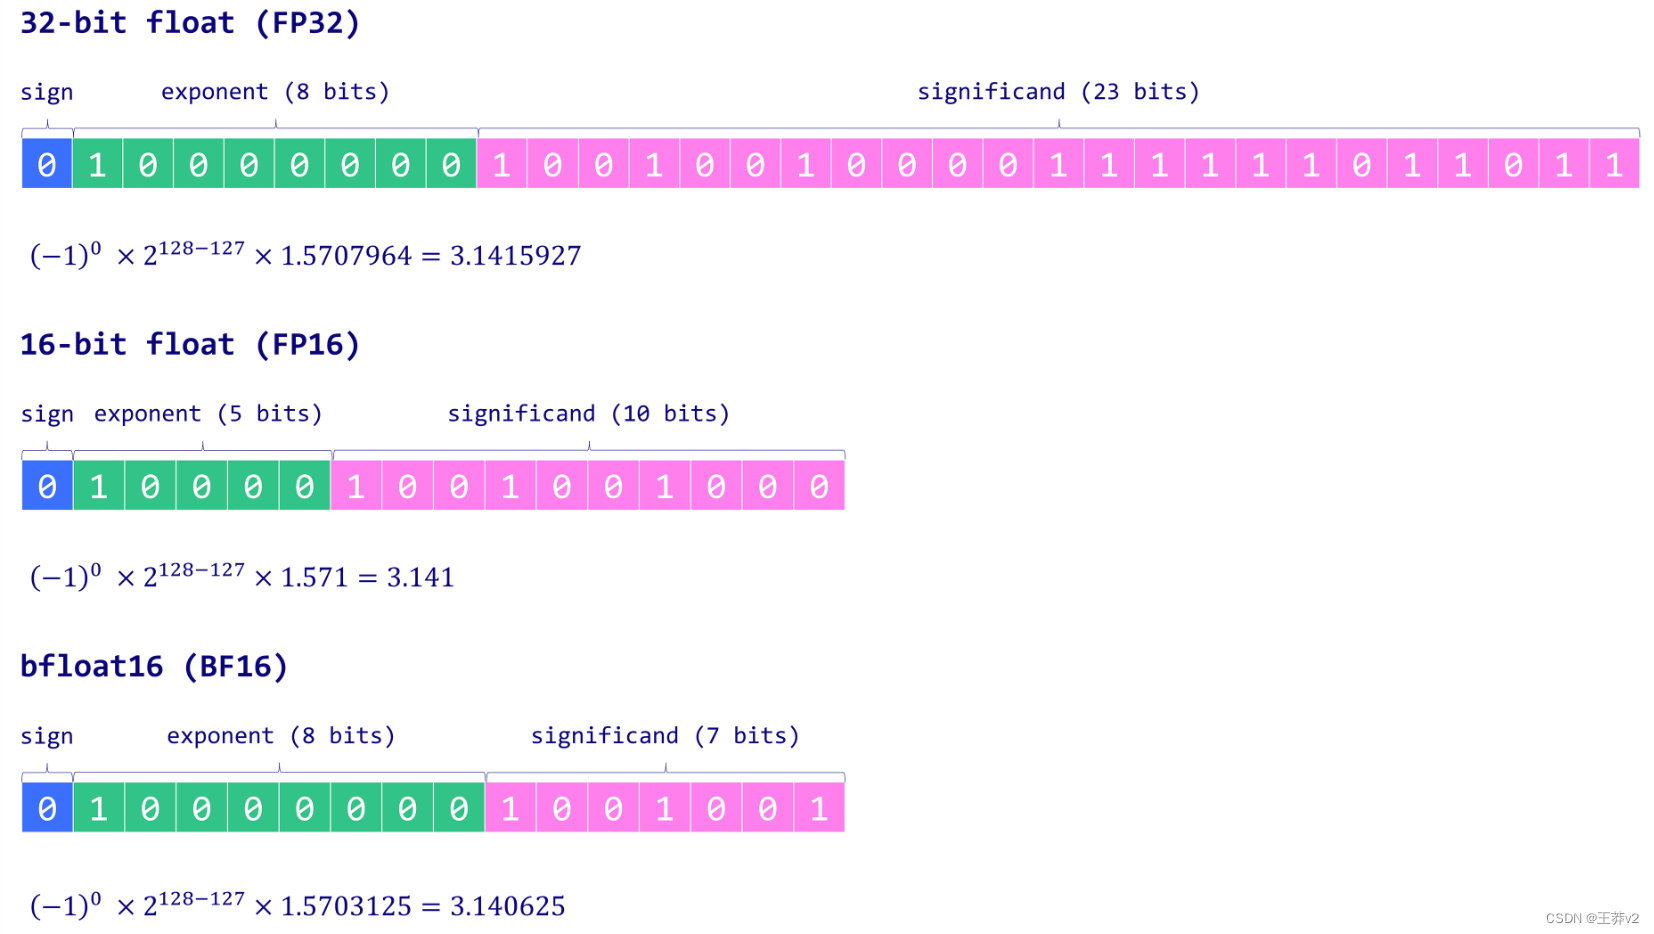
在各种数据类型中,浮点数主要用于深度学习,因为它们能够高精度地表示各种值。通常,浮点数使用n位来存储数值。这些n位被进一步划分为三个不同的组件:
- Sign:符号位表示数字的正或负性质。它使用一个位,其中0表示正数,1表示负数。
- Exponent:指数是位数的一段,表示基数(通常在二进制表示中为2)的功率。指数也可以是正值或负值,允许数字代表非常大或非常小的值。
- Significand/Mantissa:剩余的位用于存储significand,也称为mantissa。这代表数字的有效数字。数字的精度在很大程度上取决于符号的长度。
这种设计允许浮点数以不同精度水平覆盖广泛的值。用于此表示的公式是:

为了更好地理解这一点,让我们深入研究一下深度学习中最常用的一些数据类型:float32 (FP32)、float16 (FP16)和bfloat16 (BF16):
- FP32使用32位来表示一个数字:符号为1位,指数为8位,剩余的23位为符号。虽然它提供了高度的精度,但FP32的缺点是其高计算和内存占用空间。
- FP16使用16位来存储一个数字:一个用于符号,五个用于指数,十用于意义。虽然这使其内存效率更高,并加速了计算,但范围和精度的降低可能会带来数值不稳定性,可能会影响模型的准确性。
- BF16也是16位格式,但符号为1位,指数为8位,符号为7位。与FP16相比,BF16扩大了可代表范围,从而降低了溢流和溢流风险。尽管由于显著位较少而降低了精度,但BF16通常不会对模型性能产生显著影响,并且是深度学习任务的有用折衷方案。
在ML行话中,FP32通常被称为“全精度”(4字节),而BF16和FP16是“半精度”(2字节)。但我们能做得更好,使用单个字节来存储权重吗?答案是INT8数据类型,它由一个8位表示组成,能够存储28 = 256个不同的值。在下一节中,我们将了解如何将FP32权重转换为INT8格式。
Naïve 8位量化
在本节中,我们将实现两种量化技术:具有绝对最大(absmax)量化的对称技术和具有零点量化的非对称技术。在这两种情况下,目标是将FP32张量X(原始权重)映射到INT8张量 X g u a n t X_{guant} Xguant(量化权重)。
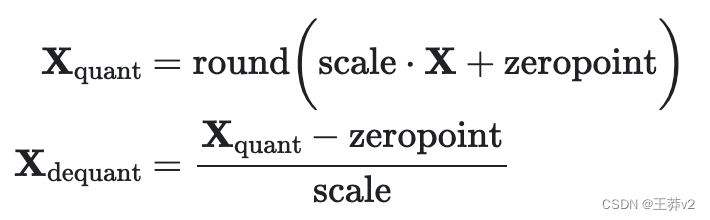
通过abmax量化,将原始数字除以张量的绝对最大值,再乘以缩放因子(127),将输入映射到[- 127,127]的范围内。为了检索原始的FP16值,INT8数字除以量化因子,承认由于四舍五入导致的精度损失。

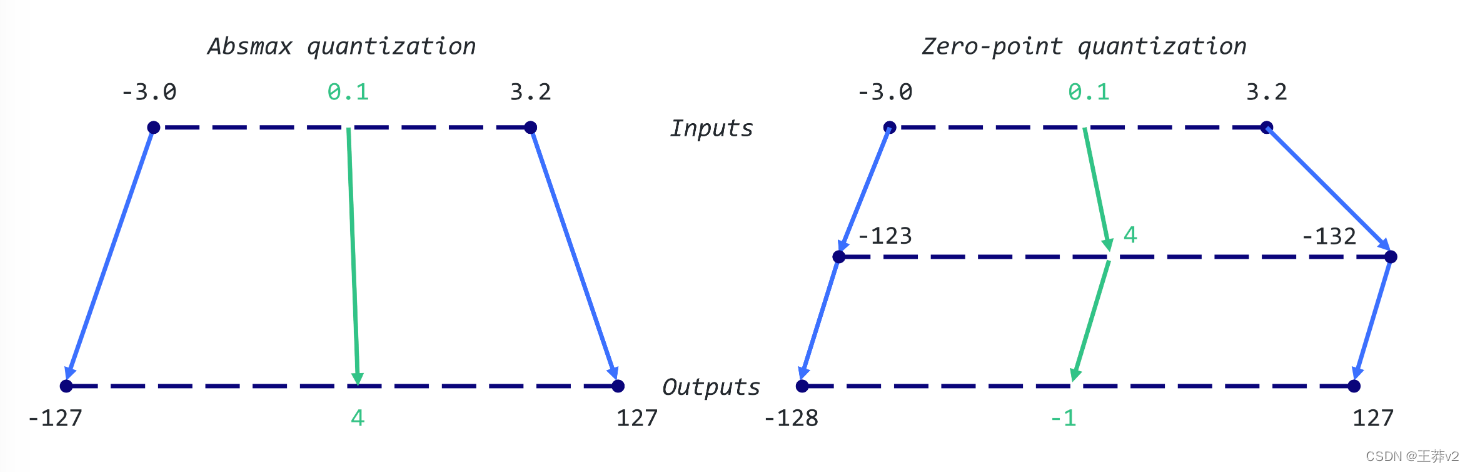
例如,假设我们的绝对最大值为3.2。0.1的weight将被量化为 r o u n d ( 0.1 x 127 / 3.2 ) = 4 round(0.1 x 127/3.2)=4 round(0.1x127/3.2)=4。如果我们想解量化它,我们会得到4/(127/3.2) = 0.1008,这意味着误差为0.1008。以下是相应的Python实现:
import torchdef absmax_quantize(X):# Calculate scalescale = 127 / torch.max(torch.abs(X))# QuantizeX_quant = (scale * X).round()# DequantizeX_dequant = X_quant / scalereturn X_quant.to(torch.int8), X_dequant
使用零点量化,我们可以考虑不对称的输入分布,这在您考虑ReLU函数的输出(仅为正值)时非常有用。输入值首先按值的总范围(255)除以最大值和最小值之间的差值进行缩放。然后将该分布移动零点,将其映射到范围-128,127。首先,我们计算比例因子和零点值:
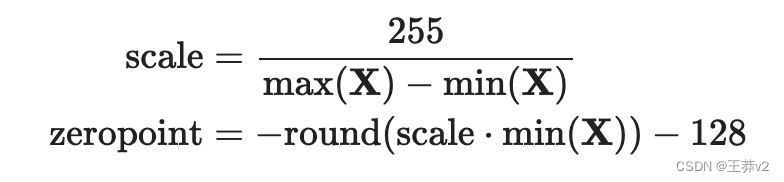
然后,我们可以使用这些变量来量化或去量化我们的权重
让我们举个例子:我们的最大值为3.2,最小值为-3.0。我们可以计算尺度是255/(3.2+3.0) = 41.13,zero point为 -round(41.13•-3.0)-128 = 123- 128 = -5,因此我们之前的0.1权重将被量化为round(41.13 * 0.1 - 5)= -1。这与之前使用absmax获得的值(4 vs. -1)非常不同。
Python的实现非常简单
def zeropoint_quantize(X):# Calculate value range (denominator)x_range = torch.max(X) - torch.min(X)x_range = 1 if x_range == 0 else x_range# Calculate scalescale = 255 / x_range# Shift by zero-pointzeropoint = (-scale * torch.min(X) - 128).round()# Scale and round the inputsX_quant = torch.clip((X * scale + zeropoint).round(), -128, 127)# DequantizeX_dequant = (X_quant - zeropoint) / scalereturn X_quant.to(torch.int8), X_dequant
多亏了 transformers 库,我们可以在真实模型上使用这两个功能,而不是依赖完整的玩具示例。
我们从加载GPT-2的模型和 tokenizer 开始。这是一个非常小的模型,我们可能不想量化,但它对本教程来说已经足够了。首先,我们想观察模型的大小,以便稍后进行比较,并评估由于8位量化而节省的内存。
!pip install -q bitsandbytes>=0.39.0
!pip install -q git+https://github.com/huggingface/accelerate.git
!pip install -q git+https://github.com/huggingface/transformers.git
from transformers import AutoModelForCausalLM, AutoTokenizer
import torch
torch.manual_seed(0)# Set device to CPU for now
device = 'cpu'# Load model and tokenizer
model_id = 'gpt2'
model = AutoModelForCausalLM.from_pretrained(model_id).to(device)
tokenizer = AutoTokenizer.from_pretrained(model_id)# Print model size
print(f"Model size: {model.get_memory_footprint():,} bytes")
===================================BUG REPORT===================================
Welcome to bitsandbytes. For bug reports, please runpython -m bitsandbytesand submit this information together with your error trace to: https://github.com/TimDettmers/bitsandbytes/issues
================================================================================
bin /usr/local/lib/python3.10/dist-packages/bitsandbytes/libbitsandbytes_cuda118.so
CUDA_SETUP: WARNING! libcudart.so not found in any environmental path. Searching in backup paths...
CUDA SETUP: CUDA runtime path found: /usr/local/cuda/lib64/libcudart.so.11.0
CUDA SETUP: Highest compute capability among GPUs detected: 7.5
CUDA SETUP: Detected CUDA version 118
CUDA SETUP: Loading binary /usr/local/lib/python3.10/dist-packages/bitsandbytes/libbitsandbytes_cuda118.so...
Model size: 510,342,192 bytes
/usr/local/lib/python3.10/dist-packages/bitsandbytes/cuda_setup/main.py:149: UserWarning: /usr/lib64-nvidia did not contain ['libcudart.so', 'libcudart.so.11.0', 'libcudart.so.12.0'] as expected! Searching further paths...warn(msg)
/usr/local/lib/python3.10/dist-packages/bitsandbytes/cuda_setup/main.py:149: UserWarning: WARNING: The following directories listed in your path were found to be non-existent: {PosixPath('/sys/fs/cgroup/memory.events /var/colab/cgroup/jupyter-children/memory.events')}warn(msg)
/usr/local/lib/python3.10/dist-packages/bitsandbytes/cuda_setup/main.py:149: UserWarning: WARNING: The following directories listed in your path were found to be non-existent: {PosixPath('http'), PosixPath('//172.28.0.1'), PosixPath('8013')}warn(msg)
/usr/local/lib/python3.10/dist-packages/bitsandbytes/cuda_setup/main.py:149: UserWarning: WARNING: The following directories listed in your path were found to be non-existent: {PosixPath('--logtostderr --listen_host=172.28.0.12 --target_host=172.28.0.12 --tunnel_background_save_url=https'), PosixPath('//colab.research.google.com/tun/m/cc48301118ce562b961b3c22d803539adc1e0c19/gpu-t4-s-20b5bv2xvtu9a --tunnel_background_save_delay=10s --tunnel_periodic_background_save_frequency=30m0s --enable_output_coalescing=true --output_coalescing_required=true')}warn(msg)
/usr/local/lib/python3.10/dist-packages/bitsandbytes/cuda_setup/main.py:149: UserWarning: WARNING: The following directories listed in your path were found to be non-existent: {PosixPath('/env/python')}warn(msg)
/usr/local/lib/python3.10/dist-packages/bitsandbytes/cuda_setup/main.py:149: UserWarning: WARNING: The following directories listed in your path were found to be non-existent: {PosixPath('module'), PosixPath('//ipykernel.pylab.backend_inline')}warn(msg)
/usr/local/lib/python3.10/dist-packages/bitsandbytes/cuda_setup/main.py:149: UserWarning: Found duplicate ['libcudart.so', 'libcudart.so.11.0', 'libcudart.so.12.0'] files: {PosixPath('/usr/local/cuda/lib64/libcudart.so.11.0'), PosixPath('/usr/local/cuda/lib64/libcudart.so')}.. We'll flip a coin and try one of these, in order to fail forward.
Either way, this might cause trouble in the future:
If you get `CUDA error: invalid device function` errors, the above might be the cause and the solution is to make sure only one ['libcudart.so', 'libcudart.so.11.0', 'libcudart.so.12.0'] in the paths that we search based on your env.warn(msg)
GPT-2模型的尺寸在FP32中约为487MB。下一步包括使用零点和absmax量化来量化权重。在以下示例中,我们将这些技术应用于GPT-2的第一个注意力层,以查看结果。
# Extract weights of the first layer
weights = model.transformer.h[0].attn.c_attn.weight.data
print("Original weights:")
print(weights)# Quantize layer using absmax quantization
weights_abs_quant, _ = absmax_quantize(weights)
print("\nAbsmax quantized weights:")
print(weights_abs_quant)# Quantize layer using absmax quantization
weights_zp_quant, _ = zeropoint_quantize(weights)
print("\nZero-point quantized weights:")
print(weights_zp_quant)
Original weights:
tensor([[-0.4738, -0.2614, -0.0978,  ...,  0.0513, -0.0584,  0.0250],[ 0.0874,  0.1473,  0.2387,  ..., -0.0525, -0.0113, -0.0156],[ 0.0039,  0.0695,  0.3668,  ...,  0.1143,  0.0363, -0.0318],...,[-0.2592, -0.0164,  0.1991,  ...,  0.0095, -0.0516,  0.0319],[ 0.1517,  0.2170,  0.1043,  ...,  0.0293, -0.0429, -0.0475],[-0.4100, -0.1924, -0.2400,  ..., -0.0046,  0.0070,  0.0198]])Absmax quantized weights:
tensor([[-21, -12,  -4,  ...,   2,  -3,   1],[  4,   7,  11,  ...,  -2,  -1,  -1],[  0,   3,  16,  ...,   5,   2,  -1],...,[-12,  -1,   9,  ...,   0,  -2,   1],[  7,  10,   5,  ...,   1,  -2,  -2],[-18,  -9, -11,  ...,   0,   0,   1]], dtype=torch.int8)Zero-point quantized weights:
tensor([[-20, -11,  -3,  ...,   3,  -2,   2],[  5,   8,  12,  ...,  -1,   0,   0],[  1,   4,  18,  ...,   6,   3,   0],...,[-11,   0,  10,  ...,   1,  -1,   2],[  8,  11,   6,  ...,   2,  -1,  -1],[-18,  -8, -10,  ...,   1,   1,   2]], dtype=torch.int8)
原始值(FP32)和量化值(INT8)之间的差异很明显,但abmax和零点权重之间的差异更微妙。在这种情况下,输入看起来移位了-1的值。这说明这一层的重量分布是相当对称的。
我们可以通过量化GPT-2中的每个层(线性层、注意力层等)来比较这些技术,并创建两个新模型:model_abs和model_zp。准确地说,我们实际上将用反量化的权重替换原始权重。这有两个好处:它允许我们
- 比较我们的权重分布(相同的比例)
- 实际运行模型
事实上,默认情况下,PyTorch不允许INT8矩阵乘法。在真实场景中,我们会将它们反量化以运行模型(例如在FP16中),但将它们存储为INT8。在下一节中,我们将使用 bitsandbytes 库来解决这个问题。
import numpy as np
from copy import deepcopy# Store original weights
weights = [param.data.clone() for param in model.parameters()]# Create model to quantize
model_abs = deepcopy(model)# Quantize all model weights
weights_abs = []
for param in model_abs.parameters():_, dequantized = absmax_quantize(param.data)param.data = dequantizedweights_abs.append(dequantized)# Create model to quantize
model_zp = deepcopy(model)# Quantize all model weights
weights_zp = []
for param in model_zp.parameters():_, dequantized = zeropoint_quantize(param.data)param.data = dequantizedweights_zp.append(dequantized)
现在我们的模型已经被量化了,我们想要检查这个过程的影响。直观地说,我们想要确保量化的权重接近原始的权重。一种直观的检验方法是绘制反量化和原始权重的分布。如果量化是有损的,它将彻底改变权重分布。
下图显示了这种比较,其中蓝色直方图表示原始(FP32)权重,红色直方图表示反量化(来自INT8)权重。请注意,我们只显示-2和2之间的图,因为异常值具有非常高的绝对值(稍后会详细介绍)。
import matplotlib.pyplot as plt
import matplotlib.ticker as ticker# Flatten weight tensors
weights = np.concatenate([t.cpu().numpy().flatten() for t in weights])
weights_abs = np.concatenate([t.cpu().numpy().flatten() for t in weights_abs])
weights_zp = np.concatenate([t.cpu().numpy().flatten() for t in weights_zp])# Set background style
plt.style.use('ggplot')# Create figure and axes
fig, axs = plt.subplots(2, figsize=(10,10), dpi=300, sharex=True)# Plot the histograms for original and zero-point weights
axs[0].hist(weights, bins=150, alpha=0.5, label='Original weights', color='blue', range=(-2, 2))
axs[0].hist(weights_abs, bins=150, alpha=0.5, label='Absmax weights', color='red', range=(-2, 2))# Plot the histograms for original and absmax weights
axs[1].hist(weights, bins=150, alpha=0.5, label='Original weights', color='blue', range=(-2, 2))
axs[1].hist(weights_zp, bins=150, alpha=0.5, label='Zero-point weights', color='green', range=(-2, 2))# Add grid
for ax in axs:ax.grid(True, linestyle='--', alpha=0.6)# Add legend
axs[0].legend()
axs[1].legend()# Add title and labels
axs[0].set_title('Comparison of Original and Absmax Quantized Weights', fontsize=16)
axs[1].set_title('Comparison of Original and Zeropoint Quantized Weights', fontsize=16)for ax in axs:ax.set_xlabel('Weights', fontsize=14)ax.set_ylabel('Count', fontsize=14)ax.yaxis.set_major_formatter(ticker.EngFormatter()) # Make y-ticks more human readable# Improve font
plt.rc('font', size=12)plt.tight_layout()
plt.show()
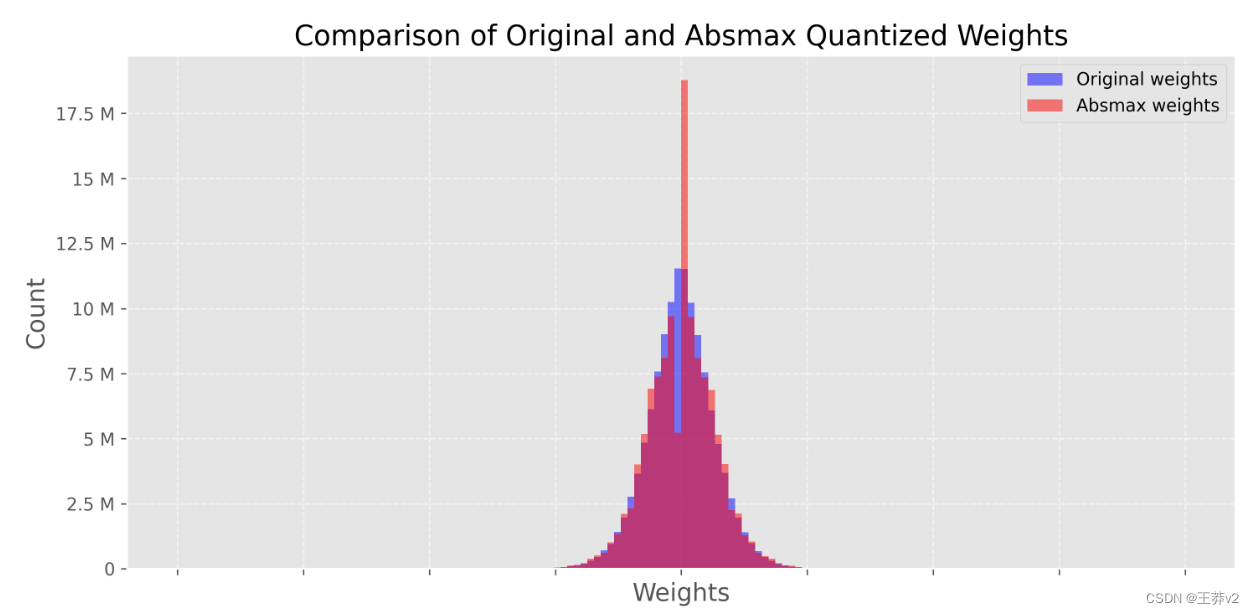
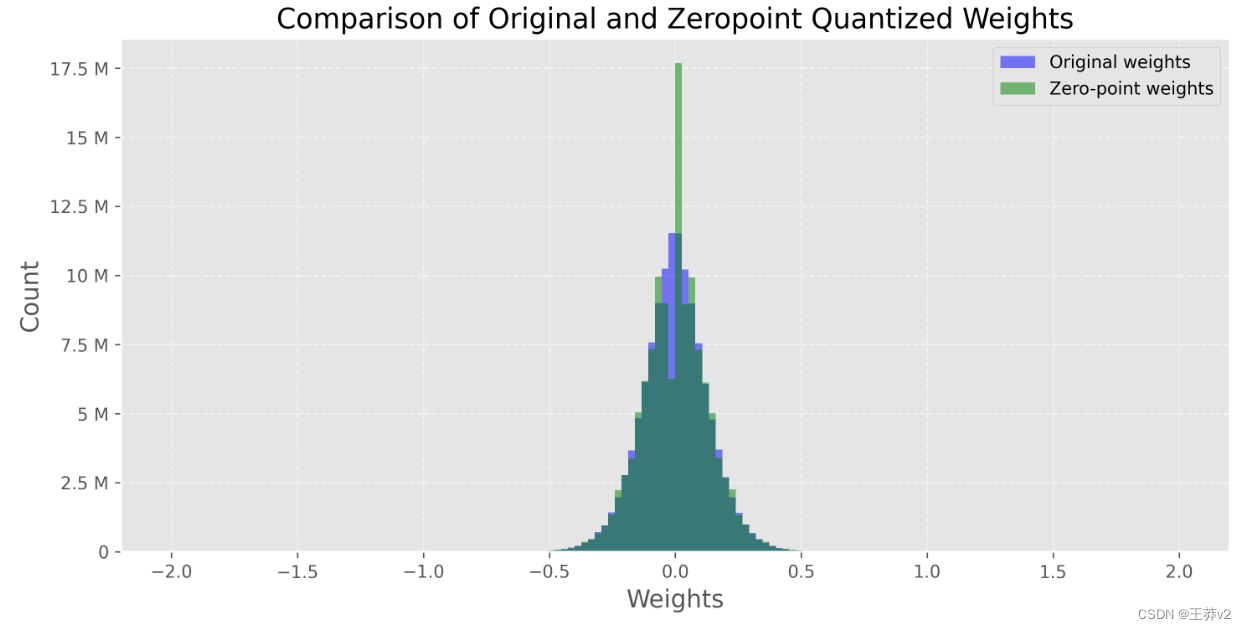
两个图非常相似,都在0附近出现了惊人的峰值。这个尖峰表明我们的量化是相当有损的,因为反向过程不会输出原始值。对于abmax模型来说尤其如此,它在0附近显示一个较低的谷值和一个较高的峰值。
让我们比较一下原始模型和量化模型的性能。为此,我们定义了一个generate text()函数,用top-k抽样生成50个标记。
def generate_text(model, input_text, max_length=50):input_ids = tokenizer.encode(input_text, return_tensors='pt').to(device)output = model.generate(inputs=input_ids,max_length=max_length,do_sample=True,top_k=30,pad_token_id=tokenizer.eos_token_id,attention_mask=input_ids.new_ones(input_ids.shape))return tokenizer.decode(output[0], skip_special_tokens=True)# Generate text with original and quantized models
original_text = generate_text(model, "I have a dream")
absmax_text   = generate_text(model_abs, "I have a dream")
zp_text       = generate_text(model_zp, "I have a dream")print(f"Original model:\n{original_text}")
print("-" * 50)
print(f"Absmax model:\n{absmax_text}")
print("-" * 50)
print(f"Zeropoint model:\n{zp_text}")
Original model:
I have a dream, and it is a dream I believe I would get to live in my future. I love my mother, and there was that one time I had been told that my family wasn't even that strong. And then I got the
--------------------------------------------------
Absmax model:
I have a dream to find out the origin of her hair. She loves it. But there's no way you could be honest about how her hair is made. She must be crazy.We found a photo of the hairstyle posted on
--------------------------------------------------
Zeropoint model:
I have a dream of creating two full-time jobs in America—one for people with mental health issues, and one for people who do not suffer from mental illness—or at least have an employment and family history of substance abuse, to work part
我们可以通过计算每个输出的 perplexity 来量化它,而不是试图看一个输出是否比其他输出更有意义。这是一个用于评估语言模型的常用度量,它测量模型在预测序列中的下一个标记时的不确定性。在这个比较中,我们通常假设分数越低,模型越好。在实践中,一个高度 perplexity 的句子也可能是正确的。
我们使用最小函数实现它,因为它不需要考虑上下文窗口的长度等细节,因为我们的句子很短。
def calculate_perplexity(model, text):# Encode the textencodings = tokenizer(text, return_tensors='pt').to(device)# Define input_ids and target_idsinput_ids = encodings.input_idstarget_ids = input_ids.clone()with torch.no_grad():outputs = model(input_ids, labels=target_ids)# Loss calculationneg_log_likelihood = outputs.loss# Perplexity calculationppl = torch.exp(neg_log_likelihood)return pplppl     = calculate_perplexity(model, original_text)
ppl_abs = calculate_perplexity(model_abs, absmax_text)
ppl_zp  = calculate_perplexity(model_zp, absmax_text)print(f"Original perplexity:  {ppl.item():.2f}")
print(f"Absmax perplexity:    {ppl_abs.item():.2f}")
print(f"Zeropoint perplexity: {ppl_zp.item():.2f}")
Original perplexity: 15.53
Absmax perplexity:   17.92
Zeropoint perplexity: 17.97
我们可以看到,原始模型的 perplexity 略低于其他两种模型。单次实验不是很可靠,但我们可以多次重复这个过程,看看每个模型之间的差异。理论上,零点量化应该比abmax稍微好一点,但计算成本也更高。
在本例中,我们将量化技术应用于整个层( (per-tensor basis)。然而,我们可以在不同的粒度级别上应用它: 从整个模型到单个值。一次量化整个模型会严重降低性能,而量化单个值会产生很大的开销。在实践中,我们通常更喜欢 vector-wise quantization,它考虑了同一张量内行和列值的可变性。
然而,即使是矢量量化也不能解决离群特征的问题。离群特征是模型达到一定尺度(>6.7B参数)时,各变压器层均出现的极值(负或正)。这是一个问题,因为单个异常值会降低所有其他值的精度。但是放弃这些异常特征是不可取的,因为这会大大降低模型的性能。
使用LLM.int8() 进行8位量化
由Dettmers等人(2022)提出的LLM.int8()是一个离群值问题的解决方案。它依赖于矢量量化方案,并引入了混合精度量化。这意味着异常值特征以FP16格式处理以保持其精度,而其他值以INT8格式处理。由于异常值约占值的0.1%,这有效地将LLM的内存占用减少了近2倍。
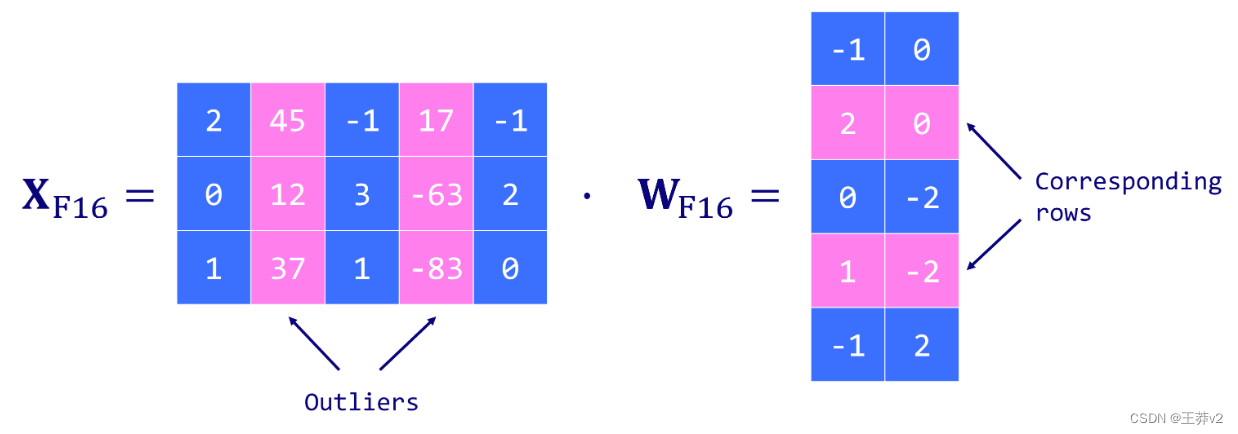
LLM.int8() 通过三个关键步骤进行矩阵乘法计算来工作:
-
使用自定义阈值从包含异常值特征的输入隐藏状态X中提取列。
-
使用FP16执行离群值的矩阵乘法,使用INT8进行非离群值的矩阵乘法,并进行向量量化(隐藏状态X为行,权重矩阵W为列)。
-
将非异常值结果(INT8到FP16)反量化,并将其添加到异常值结果中,以获得FP16的完整结果。
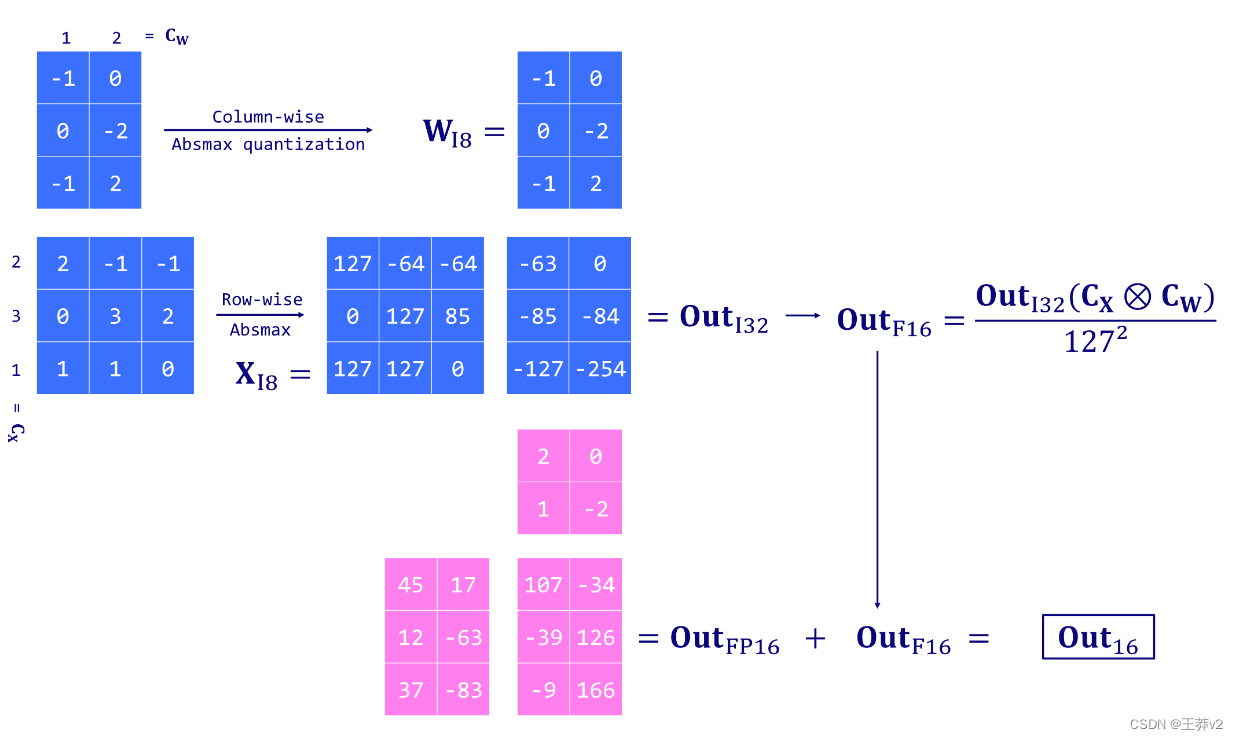
这种方法是必要的,因为8位精度是有限的,并且在量化具有大值的矢量时可能导致严重的错误。当这些误差通过多层传播时,它们也倾向于放大。
由于将bitsandbytes库集成到 Hugging 生态系统中,我们可以很容易地使用这种技术。我们只需要在加载模型时指定load_in_8bit=True(它也需要GPU)。
device = torch.device('cuda' if torch.cuda.is_available() else 'cpu')model_int8 = AutoModelForCausalLM.from_pretrained(model_id,device_map='auto',load_in_8bit=True,)
print(f"Model size: {model_int8.get_memory_footprint():,} bytes")
Some weights of GPT2LMHeadModel were not initialized from the model checkpoint at gpt2 and are newly initialized: ['lm_head.weight']
You should probably TRAIN this model on a down-stream task to be able to use it for predictions and inference.Model size: 176,527,896 bytes
有了这行额外的代码,模型现在几乎小了三倍(168MB vs 487MB)。我们甚至可以比较原始权重和量化权重的分布,就像我们之前做的那样
import matplotlib.pyplot as plt
import matplotlib.ticker as ticker# Flatten weight tensors
weights_int8 = [param.data.clone() for param in model_int8.parameters()]
weights_int8 = np.concatenate([t.cpu().numpy().flatten() for t in weights_int8])# Set background style
plt.style.use('ggplot')# Create figure and axis
fig, ax = plt.subplots(figsize=(10,5), dpi=300)# Plot the histograms
ax.hist(weights, bins=150, alpha=0.5, label='Original weights',color='blue', range=(-2, 2))
ax.hist(weights_int8, bins=150, alpha=0.5, label='LLM.int8() weights',color='red', range=(-2, 2))# Add grid
ax.grid(True, linestyle='--', alpha=0.6)# Add legend
ax.legend()# Add title and labels
ax.set_title('Comparison of Original and Dequantized Weights', fontsize=16)
ax.set_xlabel('Weights', fontsize=14)
ax.set_ylabel('Count', fontsize=14)
plt.gca().yaxis.set_major_formatter(ticker.EngFormatter())# Improve font
plt.rc('font', size=12)plt.tight_layout()
plt.show()
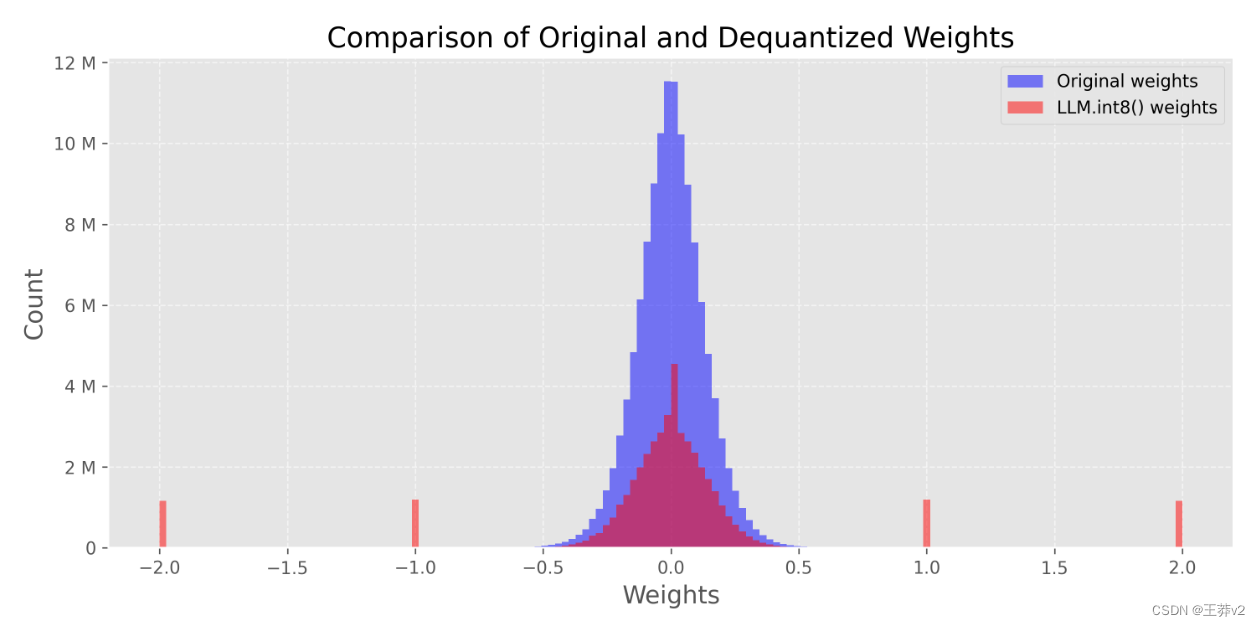
在这种情况下,我们可以看到-2、-1、0、1、2等周围的峰值。这些值对应于存储在INT8格式中的参数(非异常值)。您可以通过使用 model_int8.parameters() 打印模型的权重来验证它。
我们还可以使用这个量化模型生成文本,并将其与原始模型进行比较。
# Generate text with quantized model
text_int8 = generate_text(model_int8, "I have a dream")print(f"Original model:\n{original_text}")
print("-" * 50)
print(f"LLM.int8() model:\n{text_int8}")
Original model:
I have a dream, and it is a dream I believe I would get to live in my future. I love my mother, and there was that one time I had been told that my family wasn't even that strong. And then I got the
--------------------------------------------------
LLM.int8() model:
I have a dream. I don't know what will come of it, but I am going to have to look for something that will be right. I haven't thought about it for a long time, but I have to try to get that thing
再一次,很难判断什么是最好的输出,但我们可以依靠困惑度度量来给我们一个(近似的)答案。
print(f"Perplexity (original):   {ppl.item():.2f}")ppl = calculate_perplexity(model_int8, text_int8)
print(f"Perplexity (LLM.int8()): {ppl.item():.2f}")
Perplexity (original):   15.53
Perplexity (LLM.int8()): 7.93
在这种情况下,量化模型的 perplexity 比原始模型低两倍。一般来说,情况并非如此,但它表明这种量化技术非常有竞争力。实际上,LLM.int8()的作者表明,性能下降非常低,可以忽略不计(<1%)。然而,它在计算方面有额外的成本:LLM.int8()对于大型模型大约要慢20%。
结论
本文概述了最流行的权重量化技术。我们首先了解浮点表示,然后介绍两种8位量化技术:abmax和零点量化。然而,它们的局限性,特别是在处理异常值时,导致了LLM.int8(),这种技术也保留了模型的性能。这种方法强调了权重量化领域正在取得的进展,揭示了正确处理异常值的重要性。
References
T. Dettmers, M. Lewis, Y. Belkada, and L. Zettlemoyer, LLM.int8(): 8-bit Matrix Multiplication for Transformers at Scale. 2022.
Y. Beldaka, and T. Dettmers, A Gentle Introduction to 8-bit Matrix Multiplication, Hugging Face Blog (2022).
A. Gholami, S. Kim, Z. Dong, Z. Yao, M. W. Mahoney, and K. Keutzer, A Survey of Quantization Methods for Efficient Neural Network Inference. 2021.
H. Wu, P. Judd, X. Zhang, M. Isaev, and P. Micikevicius, Integer Quantization for Deep Learning Inference: Principles and Empirical Evaluation. 2020.
Lilian Weng, Large Transformer Model Inference Optimization, Lil’Log (2023).
Kamil Czarnogorski, Local Large Language Models, Int8 (2023).
https://mlabonne.github.io/blog/posts/Introduction_to_Weight_Quantization.html