PyQt5图片浏览器
- 实现方式
- 功能实现
- 具体代码
- 界面实现
- `pillow`源码修改
- `ImageQt`错误
- 主页面布局
- 项目开源地址
分享一个图片浏览器
实现方式
qt本身有一个QGraphicsView类用来当做视图框架。
具体参考:如何在pyqt中使用 QGraphicsView 实现图片查看器
不过大佬给的例子,功能有点少,因此需要添加一下其他的功能
功能实现
- 图片旋转(顺时针/逆时针)
- 设置 1:1 大小
- 缩放以适应
代码示例:
def setOriginalSize(self):"""设置 1:1 大小:return:"""self.resetTransform()self.setSceneRect(QRectF(self.pixmap.rect()))self.__setDragEnabled(self.__isEnableDrag())self.zoomInTimes = self.getZoomInTimes(self.pixmap.width())def setAdaptation(self):"""缩放以适应:return:"""self.setSceneRect(QRectF(self.pixmap.rect()))self.fitInView(self.pixmapItem, Qt.KeepAspectRatio)self.__setDragEnabled(False)self.zoomInTimes = 0def rotationAngle(self):return self._rotationAngledef rotateClockwise(self, stepSize: int = 90):"""顺时针旋转:param stepSize: 步长,旋转角度:return:"""if self.pixmap.fileName() is None:returnself._rotationAngle = self._rotationAngle + stepSizeself.__rotation(self._rotationAngle)def __rotation(self, stepSize: int):"""指定图片中心并旋转:return:"""self.pixmapItem.setTransformOriginPoint(self.pixmapItem.boundingRect().center()) # 指定图片旋转中心点self.pixmapItem.setRotation(stepSize)self.setAdaptation()
具体代码
# coding:utf-8
from PyQt5.QtCore import QRectF, QSize, Qt
from PyQt5.QtGui import QPainter, QPixmap, QWheelEvent, QResizeEvent
from PyQt5.QtWidgets import QGraphicsScene, QGraphicsView, QGraphicsPixmapItem, QGraphicsItemclass Pixmap(QPixmap):def __init__(self, fileName: str, *args, **kwargs):super().__init__(fileName, *args, **kwargs)self._fileName = fileNamedef fileName(self):return self._fileNameclass ImageGraphicsView(QGraphicsView):"""图片查看器"""def __init__(self, fileName: str = None, parent=None):super().__init__(parent)self._rotationAngle = 0self.zoomInTimes = 0self.maxZoomInTimes = 22self.pixmap = Pixmap(fileName)self.pixmapItem = QGraphicsPixmapItem()self.graphicsScene = QGraphicsScene()self.displayedImageSize = QSize(0, 0)self.__initWidget()def __initWidget(self):"""初始化小部件:return:"""self.setHorizontalScrollBarPolicy(Qt.ScrollBarPolicy.ScrollBarAlwaysOff)  # 隐藏水平滚动条self.setVerticalScrollBarPolicy(Qt.ScrollBarPolicy.ScrollBarAlwaysOff)  # 隐藏垂直滚动条self.setTransformationAnchor(QGraphicsView.ViewportAnchor.AnchorUnderMouse)  # 以鼠标所在位置为锚点进行缩放self.pixmapItem.setTransformationMode(Qt.TransformationMode.SmoothTransformation)  # 平滑转型self.setRenderHints(QPainter.Antialiasing | QPainter.SmoothPixmapTransform)  # 平滑像素图变换self.pixmapItem.setPixmap(self.pixmap)self.graphicsScene.addItem(self.pixmapItem)self.setScene(self.graphicsScene)self.setStyleSheet('background-color: #ffffff;')def setImage(self, fileName: str):"""设置显示的图片:param fileName::return:"""self.resetTransform()del self.pixmapself.pixmap = Pixmap(fileName)self.pixmapItem.setPixmap(self.pixmap)self.zoomInTimes = 0# 调整图片大小self.setSceneRect(QRectF(self.pixmap.rect()))ratio = self.__getScaleRatio()self.displayedImageSize = self.pixmap.size() * ratioif ratio < 1:self.fitInView(self.pixmapItem, Qt.KeepAspectRatio)self.pixmapItem.setTransformOriginPoint(self.pixmapItem.boundingRect().center())def setOriginalSize(self):"""设置 1:1 大小:return:"""self.resetTransform()self.setSceneRect(QRectF(self.pixmap.rect()))self.__setDragEnabled(self.__isEnableDrag())self.zoomInTimes = self.getZoomInTimes(self.pixmap.width())def setAdaptation(self):"""缩放以适应:return:"""self.setSceneRect(QRectF(self.pixmap.rect()))self.fitInView(self.pixmapItem, Qt.KeepAspectRatio)self.__setDragEnabled(False)self.zoomInTimes = 0def rotationAngle(self):return self._rotationAngledef rotateClockwise(self, stepSize: int = 90):"""顺时针旋转:param stepSize: 步长,旋转角度:return:"""if self.pixmap.fileName() is None:returnself._rotationAngle = self._rotationAngle + stepSizeself.__rotation(self._rotationAngle)def __rotation(self, stepSize: int):"""指定图片中心并旋转:return:"""self.pixmapItem.setTransformOriginPoint(self.pixmapItem.boundingRect().center())  # 指定图片旋转中心点self.pixmapItem.setRotation(stepSize)self.setAdaptation()def __isEnableDrag(self):"""根据图片的尺寸决定是否启动拖拽功能:return:"""v = self.verticalScrollBar().maximum() > 0h = self.horizontalScrollBar().maximum() > 0return v or hdef __setDragEnabled(self, isEnabled: bool):"""设置拖拽是否启动:param isEnabled: bool:return:"""if isEnabled:self.setDragMode(QGraphicsView.DragMode.ScrollHandDrag)else:self.setDragMode(QGraphicsView.DragMode.NoDrag)def __getScaleRatio(self):"""获取显示的图像和原始图像的缩放比例:return:"""if self.pixmap.isNull():return 1pw = self.pixmap.width()ph = self.pixmap.height()rw = min(1, self.width() / pw)rh = min(1, self.height() / ph)return min(rw, rh)def enlargePicture(self, anchor=QGraphicsView.AnchorUnderMouse):"""放大图片:return:"""if self.zoomInTimes == self.maxZoomInTimes:returnself.setTransformationAnchor(anchor)self.zoomInTimes += 1self.scale(1.1, 1.1)self.__setDragEnabled(self.__isEnableDrag())# 还原 anchorself.setTransformationAnchor(self.AnchorUnderMouse)def shrinkPicture(self, anchor=QGraphicsView.AnchorUnderMouse):"""缩小图片:return:"""if self.zoomInTimes == 0 and not self.__isEnableDrag():returnself.setTransformationAnchor(anchor)self.zoomInTimes -= 1# 原始图像的大小pw = self.pixmap.width()ph = self.pixmap.height()# 实际显示的图像宽度w = self.displayedImageSize.width() * 1.1 ** self.zoomInTimesh = self.displayedImageSize.height() * 1.1 ** self.zoomInTimesif pw > self.width() or ph > self.height():# 在窗口尺寸小于原始图像时禁止继续缩小图像比窗口还小if w <= self.width() and h <= self.height():self.fitInView(self.pixmapItem)else:self.scale(1 / 1.1, 1 / 1.1)else:# 在窗口尺寸大于图像时不允许缩小的比原始图像小if w <= pw:self.resetTransform()else:self.scale(1 / 1.1, 1 / 1.1)self.__setDragEnabled(self.__isEnableDrag())# 还原 anchorself.setTransformationAnchor(self.AnchorUnderMouse)def getZoomInTimes(self, width: int, step: int = 100):for i in range(0, self.maxZoomInTimes):if width - self.displayedImageSize.width() * 1.1 ** i <= step:return ireturn self.maxZoomInTimesdef fitInView(self, item: QGraphicsItem, mode=Qt.AspectRatioMode.KeepAspectRatio):"""缩放场景使其适应窗口大小:param item::param mode::return:"""super().fitInView(item, mode)self.displayedImageSize = self.__getScaleRatio() * self.pixmap.size()self.zoomInTimes = 0def resizeEvent(self, event: QResizeEvent):if self.zoomInTimes > 0:return# 调整图片大小ratio = self.__getScaleRatio()self.displayedImageSize = self.pixmap.size() * ratioif ratio < 1:self.fitInView(self.pixmapItem, Qt.KeepAspectRatio)else:self.resetTransform()def resetTransform(self):"""重置变换:return:"""self.zoomInTimes = 0self.__setDragEnabled(False)super().resetTransform()def wheelEvent(self, e: QWheelEvent):"""滚动鼠标滚轮缩放图片:param e::return:"""if e.angleDelta().y() > 0:self.enlargePicture()else:self.shrinkPicture()
该函数可以显示图片实现图片下旋转、放大、缩小等功能
界面实现
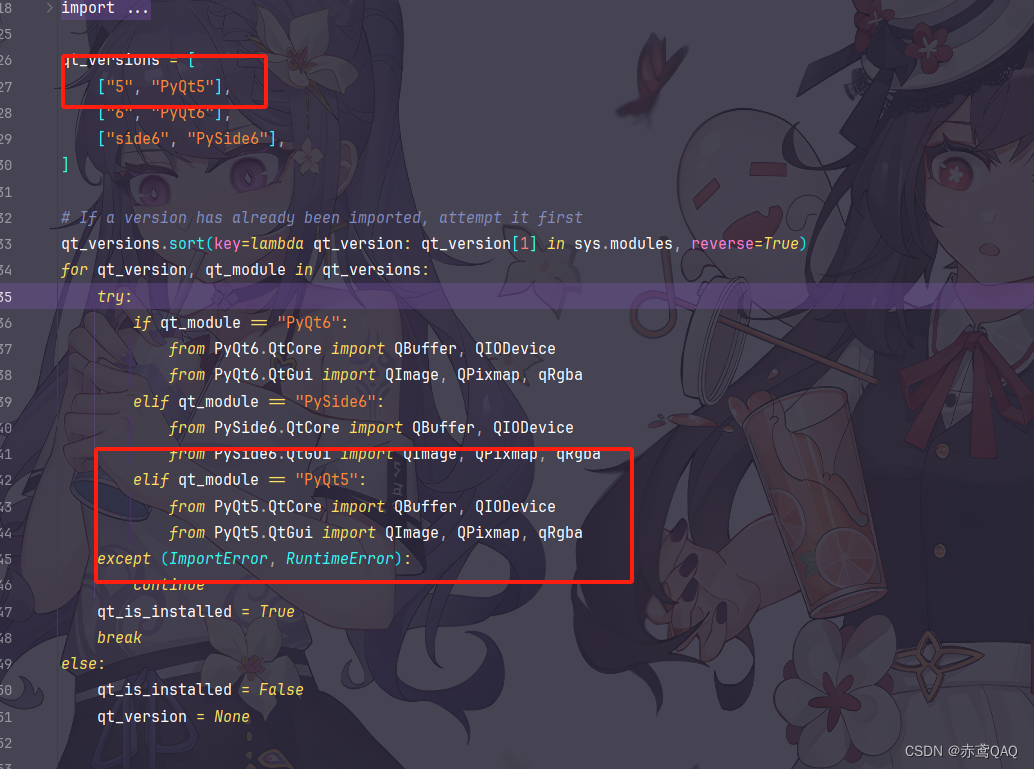
pillow源码修改
在实现图片列表时,如果全部加载出来会直接爆内存,因此需要借助
pillow生成缩略图,但是pillow最新版本没有适配PyQt5,如果使用需要改源码。
在ImageQt.py中修改源码
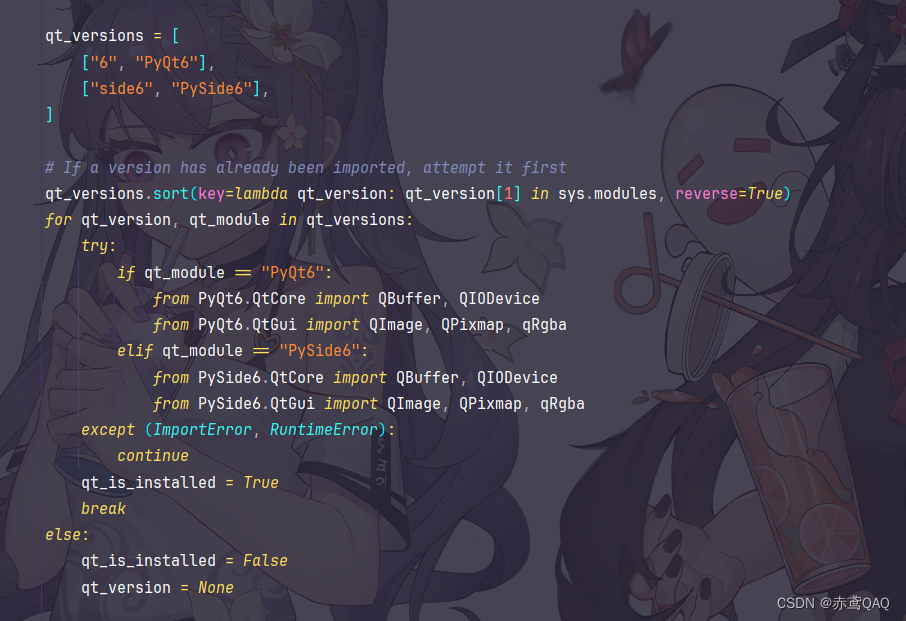
将红框中的代码加上就行了。
ImageQt错误
如果你使用了pillow这个库直接转为QPixmap你就会发现很多问题。
PyQt5+pillow实现缩略图,代码示例:
import sys
from PyQt5.Qt import *
import res.res_rc
from PIL import Image, ImageQtclass Window(QWidget):def __init__(self, parent=None):super().__init__(parent)self.vBox = QVBoxLayout(self)self.vBox.setContentsMargins(0, 0, 0, 0)self.vBox.setSpacing(0)file = r"G:\手机\壁纸\电脑壁纸\1689637545648.png"img = Image.open(file)img.thumbnail((200, 120))label = QLabel()label.setPixmap(ImageQt.toqpixmap(img))self.vBox.addWidget(label)if __name__ == '__main__':QApplication.setHighDpiScaleFactorRoundingPolicy(Qt.HighDpiScaleFactorRoundingPolicy.PassThrough)QApplication.setAttribute(Qt.AA_EnableHighDpiScaling)QApplication.setAttribute(Qt.AA_UseHighDpiPixmaps)app = QApplication(sys.argv)app.setQuitOnLastWindowClosed(True)demo = Window()demo.resize(800, 600)demo.show()sys.exit(app.exec_())
运行结果:
运行后,你会发现基本上所有图片都会变成花屏,于是就直接放弃了,那么只能生成本地图片,然后在显示出来,于是使用本地
sqlite数据库,为了使方便引入了SQLAlchemy来管理数据库,别问为什么,问就是不想写SQL,这要也方便了后期拓展
def CreateThumbnail(fileName, saveFile, *, size=(200, 120), **kwargs):"""创建缩略图"""img = Image.open(fileName)img.thumbnail(size=size, **kwargs)img.save(saveFile)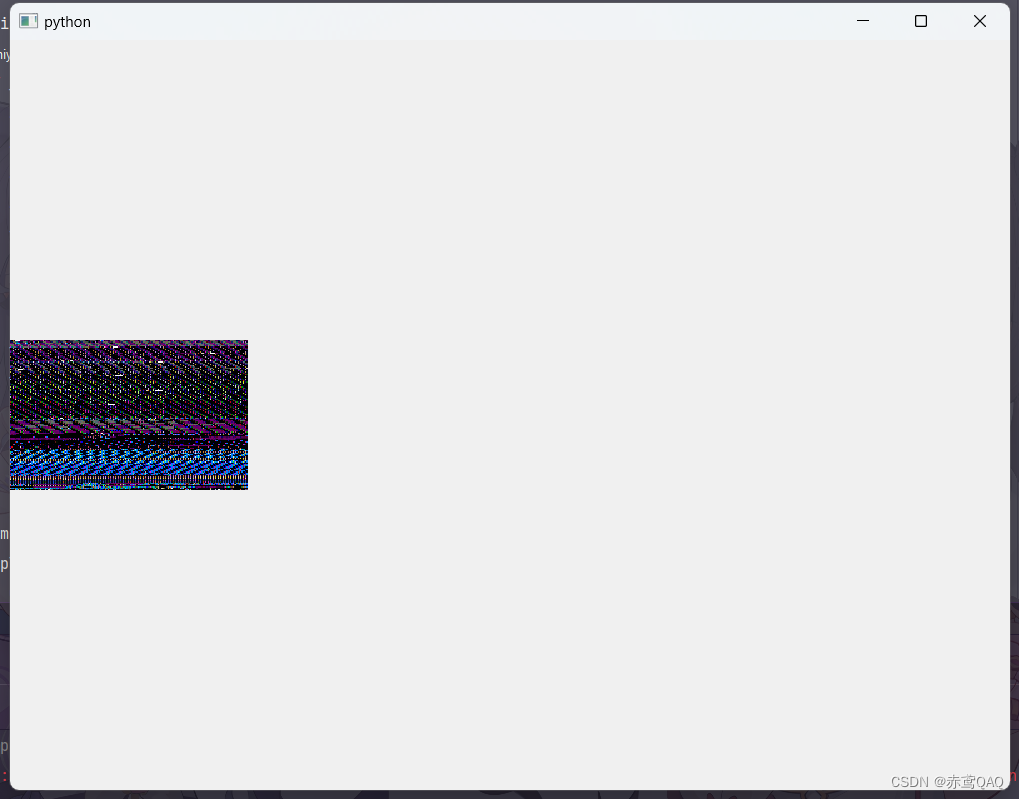
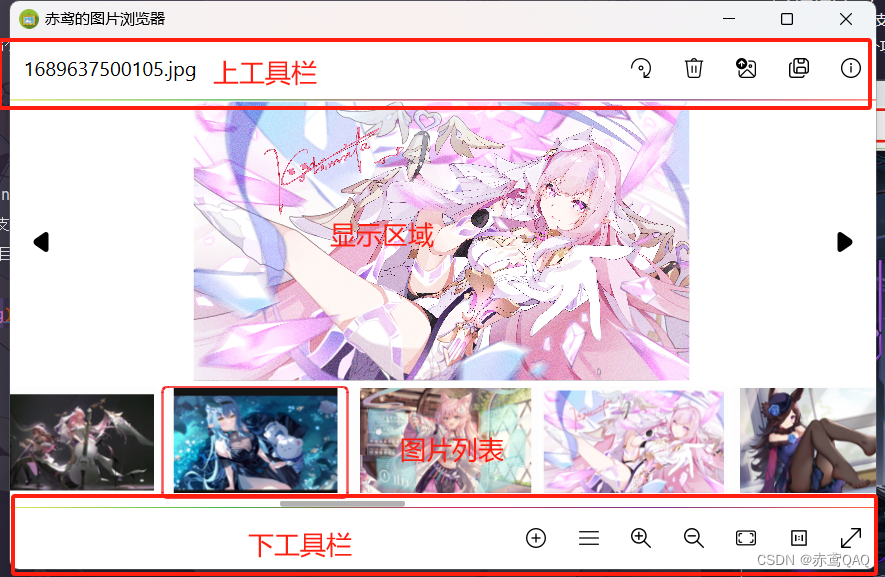
主页面布局
项目开源地址
https://gitee.com/chiyaun/picture-browser.git