目录
〇、对类或方法的Spring事务属性进行解析
0.1 解析标签
0.2 注册 InfrastructureAdvisorAutoProxyCreator
0.3 判断目标方法是否适合 canApply
0.4 匹配标签 match
0.5 小结
一、Spring事务的实现
1.1 准备事务
1.1.1 收集@Transactional注解属性信息,生成事务定义对象。
1.1.2 获取事务管理器
1.2 开启事务
1.2.1 获取TransactionStatus:AbstractPlatformTransactionManager.getTransaction()
1.2.2 获取事务:DataSourceTransactionManager.doBegin()
1.2.3 事务挂起和事务恢复
1.3 事务回滚
1.4 事务提交
1.5 小结
二、@Transactional注解的实现原理
2.1 @Transactional注解简介
2.2 Spring中声明式事务实现原理猜想
2.3 @Transactional作用
2.4 动态代理逻辑实现
2.5 TransactionInterceptor–最终事务管理者
2.6 总结
〇、对类或方法的Spring事务属性进行解析
0.1 解析标签
之前在解析自定义标签时提到,AOP 和 TX 都使用了自定义标签,按照我们上一篇 **AOP** 的学习,再来一遍解析自定义标签的套路:事务自定义标签。
定位到 TxNamespaceHandler 类的初始化方法:
@Override
public void init() {// 使用 TxAdviceBeanDefinitionParser 解析器,解析 tx:advice 标签registerBeanDefinitionParser("advice", new TxAdviceBeanDefinitionParser());// 使用 AnnotationDrivenBeanDefinitionParser 解析器,解析 annotation-driven 标签registerBeanDefinitionParser("annotation-driven", new AnnotationDrivenBeanDefinitionParser());// 使用 TransactionInterceptorBeanDefinitionParser 解析器,解析 tx:transaction-manager 标签registerBeanDefinitionParser("jta-transaction-manager", new JtaTransactionManagerBeanDefinitionParser());
}根据上面的方法,Spring 在初始化时候,如果遇到诸如 <tx:annotation-driven> 开头的配置后,将会使用 AnnotationDrivenBeanDefinitionParser 解析器的 parse 方法进行解析。
public BeanDefinition parse(Element element, ParserContext parserContext) {registerTransactionalEventListenerFactory(parserContext);String mode = element.getAttribute("mode");// AspectJ 另外处理if ("aspectj".equals(mode)) {// mode = "aspectj"registerTransactionAspect(element, parserContext);if (ClassUtils.isPresent("javax.transaction.Transactional", getClass().getClassLoader())) {registerJtaTransactionAspect(element, parserContext);}}else {// mode = "proxy"AopAutoProxyConfigurer.configureAutoProxyCreator(element, parserContext);}return null;
}
Spring 中的事务默认是以 AOP 为基础,如果需要使用 AspectJ 的方式进行事务切入,需要在 mode 属性中配置:
<tx:annotation-driven mode="aspectj"/>本篇笔记主要围绕着默认实现方式,动态 AOP 来学习,如果对于 AspectJ 实现感兴趣请查阅更多资料~
0.2 注册 InfrastructureAdvisorAutoProxyCreator
与 AOP 一样,在解析时,会创建一个自动创建代理器,在事务 TX 模块中,使用的是 InfrastructureAdvisorAutoProxyCreator。
首先来看,在默认配置情况下,AopAutoProxyConfigurer.configureAutoProxyCreator(element, parserContext) 做了什么操作:
private static class AopAutoProxyConfigurer {public static void configureAutoProxyCreator(Element element, ParserContext parserContext) {// 注册 InfrastructureAdvisorAutoProxyCreator 自动创建代理器AopNamespaceUtils.registerAutoProxyCreatorIfNecessary(parserContext, element);// txAdvisorBeanName = org.springframework.transaction.config.internalTransactionAdvisorString txAdvisorBeanName = TransactionManagementConfigUtils.TRANSACTION_ADVISOR_BEAN_NAME;if (!parserContext.getRegistry().containsBeanDefinition(txAdvisorBeanName)) {Object eleSource = parserContext.extractSource(element);// Create the TransactionAttributeSource definition.// 创建 TransactionAttributeSource 的 beanRootBeanDefinition sourceDef = new RootBeanDefinition("org.springframework.transaction.annotation.AnnotationTransactionAttributeSource");// 注册 bean,并使用 Spring 中的定义规则生成 beanNameString sourceName = parserContext.getReaderContext().registerWithGeneratedName(sourceDef);// 创建 TransactionInterceptor 的 beanRootBeanDefinition interceptorDef = new RootBeanDefinition(TransactionInterceptor.class);interceptorDef.getPropertyValues().add("transactionAttributeSource", new RuntimeBeanReference(sourceName));String interceptorName = parserContext.getReaderContext().registerWithGeneratedName(interceptorDef);// 创建 TransactionAttributeSourceAdvisor 的 beanRootBeanDefinition advisorDef = new RootBeanDefinition(BeanFactoryTransactionAttributeSourceAdvisor.class);// 将 sourceName 的 bean 注入 advisor 的 transactionAttributeSource 属性中advisorDef.getPropertyValues().add("transactionAttributeSource", new RuntimeBeanReference(sourceName));// 将 interceptorName 的 bean 注入到 advisor 的 adviceBeanName 属性中advisorDef.getPropertyValues().add("adviceBeanName", interceptorName);if (element.hasAttribute("order")) {// 如果配置了 order 属性,则加入到 bean 中advisorDef.getPropertyValues().add("order", element.getAttribute("order"));}// 以 txAdvisorBeanName 名字注册 advisorDefparserContext.getRegistry().registerBeanDefinition(txAdvisorBeanName, advisorDef);// 创建 CompositeComponentDefinitionCompositeComponentDefinition compositeDef = new CompositeComponentDefinition(element.getTagName(), eleSource);compositeDef.addNestedComponent(new BeanComponentDefinition(sourceDef, sourceName));compositeDef.addNestedComponent(new BeanComponentDefinition(interceptorDef, interceptorName));compositeDef.addNestedComponent(new BeanComponentDefinition(advisorDef, txAdvisorBeanName));parserContext.registerComponent(compositeDef);}}
}
在这里注册了代理类和三个 bean,这三个关键 bean 支撑了整个事务功能,为了待会更好的理解这三者的关联关系,我们先来回顾下 AOP 的核心概念:
- Pointcut 定义一个切点,可以在这个被拦截的方法前后进行切面逻辑。
- Advice 用来定义拦截行为,在这里实现增强的逻辑,它是一个祖先接口 org.aopalliance.aop.Advice。还有其它继承接口,例如 MethodBeforeAdvice ,特定指方法执行前的增强。
- Advisor 用来封装切面的所有信息,主要是上面两个,它用来充当 Advice 和 Pointcut的适配器。

回顾完 AOP 的概念后,继续来看下这三个关键 bean:
- TransactionInterceptor: 实现了 Advice 接口,在这里定义了拦截行为。
- AnnotationTransactionAttributeSource:封装了目标方法是否被拦截的逻辑,虽然没有实现 Pointcut 接口,但是在后面目标方法判断的时候,实际上还是委托给了 AnnotationTransactionAttributeSource.getTransactionAttributeSource,通过适配器模式,返回了 Pointcut 切点信息。
- TransactionAttributeSourceAdvisor: 实现了 Advisor 接口,包装了上面两个信息。
这三个 bean 组成的结构与 AOP 切面环绕实现的结构一致,所以先学习 AOP 的实现,对事务的了解会有所帮助。整个事务的实现原理就是基于AOP的,底层原理和AOP基本是一致的,都是基于代理增强。
接着看我们的自动创建代理器是如何创建的:
AopNamespaceUtils.registerAutoProxyCreatorIfNecessary(parserContext, element)
public static void registerAutoProxyCreatorIfNecessary(ParserContext parserContext, Element sourceElement) {// 获取 beanFactoryBeanDefinition beanDefinition = AopConfigUtils.registerAutoProxyCreatorIfNecessary(parserContext.getRegistry(), parserContext.extractSource(sourceElement));// 设置 beanDefinition 的属性useClassProxyingIfNecessary(parserContext.getRegistry(), sourceElement);// 注册 beanDefinitionregisterComponentIfNecessary(beanDefinition, parserContext);
}private static void registerComponentIfNecessary(@Nullable BeanDefinition beanDefinition, ParserContext parserContext) {if (beanDefinition != null) {// 注册的 beanName 是 org.springframework.aop.config.internalAutoProxyCreatorparserContext.registerComponent(new BeanComponentDefinition(beanDefinition, AopConfigUtils.AUTO_PROXY_CREATOR_BEAN_NAME));}
}
在这一步中,注册了一个 beanName 是org.springframework.aop.config.internalAutoProxyCreator 的 bean:InfrastructureAdsivorAutoProxyCreator,下图是它的继承体系图:
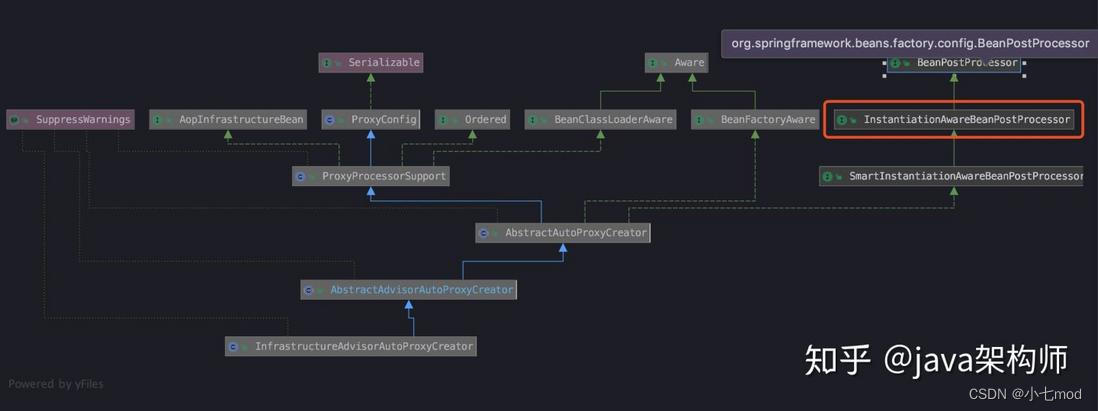
可以看到,它实现了 InstantiationAwareBeanPostProcessor 这个接口,也就是说在Spring 容器中,所有 bean 实例化时,Spring都会保证调用其postProcessAfterInitialization 方法。
与上一篇介绍的 AOP 代理器一样,在实例化 bean 的时候,调用了代理器父类 AbstractAutoProxyCreator 的 postProcessAfterInitialization 方法:
public Object postProcessAfterInitialization(@Nullable Object bean, String beanName) {if (bean != null) {// 组装 keyObject cacheKey = getCacheKey(bean.getClass(), beanName);if (this.earlyProxyReferences.remove(cacheKey) != bean) {// 如果适合被代理,则需要封装指定的 beanreturn wrapIfNecessary(bean, beanName, cacheKey);}}return bean;
}
其中关于 wrapIfNecessory 方法,在上一篇 AOP 中已经详细讲过,这里讲下这个方法做了什么工作:
- 找出指定bean对应的增强器
- 根据找出的增强器创建代理
与创建 AOP 代理相似的过程就不再重复说了。
0.3 判断目标方法是否适合 canApply
AopUtils#canApply(Advisor, Class<?>, boolean)
public static boolean canApply(Advisor advisor, Class<?> targetClass, boolean hasIntroductions) {// 判断是否是IntroductionAdvisorif (advisor instanceof IntroductionAdvisor) {// 判断是否匹配return ((IntroductionAdvisor) advisor).getClassFilter().matches(targetClass);}// 判断是否是PointcutAdvisorelse if (advisor instanceof PointcutAdvisor) {// 判断是否匹配PointcutAdvisor pca = (PointcutAdvisor) advisor;// 获取切点return canApply(pca.getPointcut(), targetClass, hasIntroductions);}else {// It doesn't have a pointcut so we assume it applies.// 没有切点,直接返回truereturn true;}
}
我们在前面看到,TransactionAttributeSourceAdvisor 的父类是 PointcutAdvisor,所以在目标方法判断的时候,会取出切点信息 pca.getPointcut()。
我们之前注入的切面类型 bean 是 AnnotationTransactionAttributeSource,通过下面的方法包装,最后返回对象类型是 TransactionAttributeSourcePointcut 的切点信息:
private final TransactionAttributeSourcePointcut pointcut = new TransactionAttributeSourcePointcut() {@Override@Nullableprotected TransactionAttributeSource getTransactionAttributeSource() {// 实现父类的方法,在子类中进行了扩展,返回之前在标签注册时的AnnotationTransactionAttributeSourcereturn transactionAttributeSource;}
};
0.4 匹配标签 match
在匹配 match 操作中,区别的是 AOP 识别的是 @Before 、@After,而我们的事务 TX识别的是 @Transactional 标签。
判断是否是事务方法的入口方法在这:
org.springframework.transaction.interceptor.TransactionAttributeSourcePointcut#matches
@Override
// 判断方法是否匹配
public boolean matches(Method method, Class<?> targetClass) {// 事务切点匹配的方法TransactionAttributeSource tas = getTransactionAttributeSource();return (tas == null || tas.getTransactionAttribute(method, targetClass) != null);
}
那它到底到哪一步解析事务注解的呢,继续跟踪代码,答案是:
AnnotationTransactionAttributeSource#determineTransactionAttribute
// 该方法用于解析事务注解,返回事务属性
protected TransactionAttribute determineTransactionAttribute(AnnotatedElement element) {// 遍历所有的事务注解解析器,尝试使用各种注解解析器看能否解析注解,获得事务属性for (TransactionAnnotationParser parser : this.annotationParsers) {// 调用事务注解解析器的parseTransactionAnnotation方法解析事务注解TransactionAttribute attr = parser.parseTransactionAnnotation(element);// 如果解析成功,返回事务属性if (attr != null) {return attr;}}return null;
}
在这一步中,遍历注册的注解解析器进行解析,由于我们关注的是事务解析,所以直接定位到事务注解的解析器:
SpringTransactionAnnotationParser#parseTransactionAnnotation(AnnotatedElement)
public TransactionAttribute parseTransactionAnnotation(AnnotatedElement element) {// 解析事务注解的属性AnnotationAttributes attributes = AnnotatedElementUtils.findMergedAnnotationAttributes(element, Transactional.class, false, false);if (attributes != null) {return parseTransactionAnnotation(attributes);}else {return null;}
}
首先判断是否含有 @Transactional 注解,如果有的话,才继续调用 parse 解析方法:
protected TransactionAttribute parseTransactionAnnotation(AnnotationAttributes attributes) {RuleBasedTransactionAttribute rbta = new RuleBasedTransactionAttribute();// 解析事务注解的每一个属性Propagation propagation = attributes.getEnum("propagation");rbta.setPropagationBehavior(propagation.value());Isolation isolation = attributes.getEnum("isolation");rbta.setIsolationLevel(isolation.value());rbta.setTimeout(attributes.getNumber("timeout").intValue());rbta.setReadOnly(attributes.getBoolean("readOnly"));rbta.setQualifier(attributes.getString("value"));List<RollbackRuleAttribute> rollbackRules = new ArrayList<>();for (Class<?> rbRule : attributes.getClassArray("rollbackFor")) {rollbackRules.add(new RollbackRuleAttribute(rbRule));}for (String rbRule : attributes.getStringArray("rollbackForClassName")) {rollbackRules.add(new RollbackRuleAttribute(rbRule));}for (Class<?> rbRule : attributes.getClassArray("noRollbackFor")) {rollbackRules.add(new NoRollbackRuleAttribute(rbRule));}for (String rbRule : attributes.getStringArray("noRollbackForClassName")) {rollbackRules.add(new NoRollbackRuleAttribute(rbRule));}rbta.setRollbackRules(rollbackRules);return rbta;
}
0.5 小结
通过上面的步骤,完成了对应类或者方法的事务属性解析。
主要步骤在于寻找增强器,以及判断这些增强器是否与方法或者类匹配。
如果某个 bean 属于可被事务增强时,也就是适用于增强器 BeanFactoryTransactionAttributeSourceAdvisor 进行增强。
之前我们注入了 TransactionInterceptor 到BeanFactoryTransactionAttributeSourceAdvisor 中,所以在调用事务增强器增强的代理类时,会执行 TransactionInterceptor 进行增强。同时,也就是在TransactionInterceptor 类中的 invoke 方法中完成整个事务的逻辑。
一、Spring事务的实现
上面我们讲完了对事务的解析,下面就来讲一下实现事务管理的流程。
Spring事务把整个事务流程模板化,采用AOP的形式增强到需要事务的方法,所以按照 AOP 的实现一定存在一个事务的增强器,这个增强器就是 BeanFactoryTransactionAttributeSourceAdvisor,该增强器中有个环绕通知TransactionInterceptor,TransactionInterceptor 支撑着整个事务功能的架构。跟之前 AOP 的 JDK 动态代理 分析的一样,TransactionInterceptor 拦截器继承于 MethodInterceptor,所有的事务逻辑都在这个类的invoke()方法中,分析Spring事务实现就从这个函数开始。
- TransactionInterceptor :: invoke()
// invocation 维护了 AOP 拦截器链 ,执行 invocation.prcess 方法 会沿着拦截器链执行下去直到目标方法。public Object invoke(final MethodInvocation invocation) throws Throwable {// 获取目标对象Class<?> targetClass = (invocation.getThis() != null ? AopUtils.getTargetClass(invocation.getThis()) : null);// 执行 父类 TransactionAspectSupport's invokeWithinTransaction...// 在这个方法中完成目标方法的执行,并且其中会实现事务管理return invokeWithinTransaction(invocation.getMethod(), targetClass, new InvocationCallback() {@Overridepublic Object proceedWithInvocation() throws Throwable {// 继续执行下拦截器 也可能是目标方法return invocation.proceed();}});}
invoke()方法实际调用了父类的方法:TransactionAspectSupport#invokeWithinTransaction
- TransactionAspectSupport :: invokeWithinTransaction()
protected Object invokeWithinTransaction(Method method, Class<?> targetClass, final InvocationCallback invocation)throws Throwable {// 1. 准备事务的基本信息// If the transaction attribute is null, the method is non-transactional.// 事务定义 TransactionAttribute 是 TransationDefinition 的子类// 如果之前已经解析过事务信息了,那么可以直接从缓存中获取。如果第一次解析就从头开始解析事务信息final TransactionAttribute txAttr = getTransactionAttributeSource().getTransactionAttribute(method, targetClass);// 获取事务管理器 ,这里是一个策略模式,根据事务定义指定的事务管理器获取到指定的事务管理器。final PlatformTransactionManager tm = determineTransactionManager(txAttr);// 连接点 标识final String joinpointIdentification = methodIdentification(method, targetClass, txAttr);if (txAttr == null || !(tm instanceof CallbackPreferringPlatformTransactionManager)) {// Standard transaction demarcation with getTransaction and commit/rollback calls.// 2. 开启事务 // 如果必要才会开启事务,这里会根据事务的传播行为信息来决定是否开启事务还是加入一个已经存在的事务。这里会涉及到事务的挂起 TransactionInfo txInfo = createTransactionIfNecessary(tm, txAttr, joinpointIdentification);Object retVal = null;try {// 执行目标方法或者执行AOP拦截器链中的下一个拦截器。// This is an around advice: Invoke the next interceptor in the chain.// This will normally result in a target object being invoked.retVal = invocation.proceedWithInvocation();}catch (Throwable ex) {// target invocation exception// 3. 事务的回滚 当捕获到目标方法发生异常之后就去执行回滚事务的逻辑// 是否回滚会根据rollback属性判断completeTransactionAfterThrowing(txInfo, ex);throw ex;}finally {// 清理事务信息 不管怎么样都要在最后清理事务信息cleanupTransactionInfo(txInfo);}// 4. 提交事务 执行到这里说明目标方法顺利完成了,没有发生异常就会执行提交事务的逻辑commitTransactionAfterReturning(txInfo);return retVal;}}//省略部代码
贴出的代码有删减,简略了错误异常的 try / catch 和编程式事务处理的逻辑。因为我们更多使用到的是声明式事务处理,就是在 **XML** 文件配置或者 **@Transactional** 注解编码,实际通过 **AOP** 实现,而编程式事务处理是通过 **Transaction Template** 实现,比较少使用到,所以省略了这部分处理代码。
1.1 准备事务
准备事务的基本信息主要是做了两件事情。
1.1.1 收集@Transactional注解属性信息,生成事务定义对象。
由于@Transactional可以作用在类上又可以作用在方法上,所以在收集属性信息的时候,就考虑到这种情况。
AnnotationTransactionAttributeSource 类就是用来解析类和方法上面的@Transactional 注解属性。
那么到底先解析类上面的还是先解析方法上面的注解呢?如果方法上面和类上面同时存在呢,是完整替换? 还是取并集?
定义解析@Transactional注解的逻辑定义在其父类AbstractFallbackTransactionAttributeSource的computeTransactionAttribute,通过查看代码便可以一目了然:
protected TransactionAttribute computeTransactionAttribute(Method method, Class<?> targetClass) {// Don't allow no-public methods as required.if (allowPublicMethodsOnly() && !Modifier.isPublic(method.getModifiers())) {return null;}// Ignore CGLIB subclasses - introspect the actual user class.Class<?> userClass = ClassUtils.getUserClass(targetClass);// The method may be on an interface, but we need attributes from the target class.// If the target class is null, the method will be unchanged.Method specificMethod = ClassUtils.getMostSpecificMethod(method, userClass);// If we are dealing with method with generic parameters, find the original method.specificMethod = BridgeMethodResolver.findBridgedMethod(specificMethod);// 首先解析方法上面的属性信息// First try is the method in the target class.TransactionAttribute txAttr = findTransactionAttribute(specificMethod);// 如果方法上面存在就返回。if (txAttr != null) {return txAttr;}// 其次解析作用在类上面的注解属性信息,如果找到就返回。// Second try is the transaction attribute on the target class.txAttr = findTransactionAttribute(specificMethod.getDeclaringClass());if (txAttr != null && ClassUtils.isUserLevelMethod(method)) {return txAttr;}// 解析接口方法上面的注解属性信息 ,如果找到返回。if (specificMethod != method) {// Fallback is to look at the original method.txAttr = findTransactionAttribute(method);if (txAttr != null) {return txAttr;}// 最后解析接口上面的注解信息。// Last fallback is the class of the original method.txAttr = findTransactionAttribute(method.getDeclaringClass());if (txAttr != null && ClassUtils.isUserLevelMethod(method)) {return txAttr;}}return null;
}
通过上面的代码可以看出来,@Transactional 注解定义在不同位置的优先级
为 :实列方法 > 实列类 > 接口方法 > 接口类。不会取并集 ,也不会覆盖,按照优先级查找,直到找到为止。
虽然解析注解属性不是那么的耗时,但是也不能每次执行事务方法都要解析一次注解属性,所以在解析注解的时候Spring采用了缓存,这样就只需要一次解析注解,而后的每次执行都会存缓存中获取。这是一个典型的拿空间换时间的列子。采用缓存的代码在其父类 AbstractFallbackTransactionAttributeSource 的getTransactionAttribute函数。
在使用缓存的时候难免遇到缓存穿透的现象,就是用key获取缓存的时候没有获取到对象,然后就要去解析@Transactional ,结果发现还是没有,此后的每次调用都会持续这个现象,所以Spring 在发现不存在的时候就会定义一个特殊的 value 放到缓存中,以标识这个已经解析过了,确实不存在。
解析注解的时机:解析的时机是在IOC 第一次初始化 Bean的时候,具体点就是在为目标对象匹配增强器的时候,会触发解析注解。
1.1.2 获取事务管理器
如果使用@Transactional 指定了使用哪个事务管理器 ,就会获取响应的事务管理器。如果没有就从IOC容器中获取。
通过该方法,确定要用于给定事务的特定事务管理器:
TransactionAspectSupport#determineTransactionManager
protected PlatformTransactionManager determineTransactionManager(@Nullable TransactionAttribute txAttr) {// Do not attempt to lookup tx manager if no tx attributes are set// 寻找事务管理器if (txAttr == null || this.beanFactory == null) {// 如果没有事务属性或者 BeanFactory 为空时,从缓存里面寻找return asPlatformTransactionManager(getTransactionManager());}String qualifier = txAttr.getQualifier();// 如果注解配置中指定了事务管理器,直接取出使用if (StringUtils.hasText(qualifier)) {return determineQualifiedTransactionManager(this.beanFactory, qualifier);}else if (StringUtils.hasText(this.transactionManagerBeanName)) {return determineQualifiedTransactionManager(this.beanFactory, this.transactionManagerBeanName);}else {// 上面步骤都没找到,最后才去IoC容器中,根据 className 来寻找PlatformTransactionManager defaultTransactionManager = asPlatformTransactionManager(getTransactionManager());...return defaultTransactionManager;}
}
由于最开始我们在 XML 文件中配置过 transactionManager 属性,所以该方法在我们例子中将会返回类型是 DataSourceTransactionManager 的事务管理器,下面是 DataSourceTransactionManager 的继承体系:

它实现了 InitializingBean 接口,不过只是在 afterPropertiesSet() 方法中,简单校验 dataSource 是否为空,不细说这个类。
1.2 开启事务
收集到了事务定义信息和事务管理器之后,就可以利用PlatformTransactionManager.getTransactional 开启事务了,但是开启事务,有很多情况需要考虑,比如繁多的事务传播行为,比如是否已经存在事务,不同的条件都会影响是否要开启一个新事务。有的传播行为还会设计到挂起已经存在的事务。也是相当复杂的。
TransactionAspectSupport#createTransactionIfNecessary
protected TransactionInfo createTransactionIfNecessary(PlatformTransactionManager tm, TransactionAttribute txAttr, final String joinpointIdentification) {// 采用委托的方式包装事务定义对象.// 如果没有名称指定则使用方法唯一标识,并使用 DelegatingTransactionAttribute 包装 txAttrif (txAttr != null && txAttr.getName() == null) {txAttr = new DelegatingTransactionAttribute(txAttr) {@Overridepublic String getName() {return joinpointIdentification;}};}TransactionStatus status = null;if (txAttr != null) {if (tm != null) {// 调用事务管理器开启事务,并获取TransactionStatusstatus = tm.getTransaction(txAttr);}else {if (logger.isDebugEnabled()) {logger.debug("Skipping transactional joinpoint [" + joinpointIdentification +"] because no transaction manager has been configured");}}}// 根据指定的属性与 status封装一个事务信息对象TransactionInfo。return prepareTransactionInfo(tm, txAttr, joinpointIdentification, status);
}
在创建事务方法中,主要完成以下三件事:
- 使用DelegatingTransactionAttribute包装txAttr实例
- 获取事务:tm.getTransaction(txAttr)
- 构建事务信息:prepareTransactionInfo(tm, txAttr, joinpointIdentification, status)
核心方法在第二点和第三点,分别摘取核心进行熟悉。
1.2.1 获取TransactionStatus:AbstractPlatformTransactionManager.getTransaction()
status = tm.getTransaction(txAttr);
这个方法可以当作是一个模板,它搭建了整体的代码流程,并且在该方法中有两个抽象方法供子类实现(抽象方法是子类必须要覆写的,并且抽象方法都是空方法)。
该方法主要逻辑:
- 判断当前线程是否存在事务
- 如果存在事务,根据事务的传播行为来创建事务或者加入当前事务或者抛出不支持异常
- 如果不存在事务,则判断传播行为是否为 TransactionDefinition.PROPAGATION_MANDATORY ,如果是抛出异常;如果是PROPAGATION_REQUIRED,PROPAGATION_REQUIRED_NEW ,TransactionDefinition.PROPAGATION_NESTED创建事务
- 如果不运行在事务中,创建空事务。
public final TransactionStatus getTransaction(TransactionDefinition definition) throws TransactionException {// 获取事务,从线程绑定的信息中获取事务,该抽象方法留给子类实现。Object transaction = doGetTransaction();// Cache debug flag to avoid repeated checks.boolean debugEnabled = logger.isDebugEnabled();if (definition == null) {// Use defaults if no transaction definition given.definition = new DefaultTransactionDefinition();}//  判断是否已经存在事务if (isExistingTransaction(transaction)) {//已经存在事务根据传播行为 创建事务 或者 加入当前已存在的事务return handleExistingTransaction(definition, transaction, debugEnabled);}// 检查超时时间的设置是否合法if (definition.getTimeout() < TransactionDefinition.TIMEOUT_DEFAULT) {throw new InvalidTimeoutException("Invalid transaction timeout", definition.getTimeout());}// 如果传播行为是PROPAGATION_MANDATORY if (definition.getPropagationBehavior() == TransactionDefinition.PROPAGATION_MANDATORY) {throw new IllegalTransactionStateException("No existing transaction found for transaction marked with propagation 'mandatory'");}// 开启新事务else if (definition.getPropagationBehavior() == TransactionDefinition.PROPAGATION_REQUIRED ||definition.getPropagationBehavior() == TransactionDefinition.PROPAGATION_REQUIRES_NEW ||definition.getPropagationBehavior() == TransactionDefinition.PROPAGATION_NESTED) {SuspendedResourcesHolder suspendedResources = suspend(null);if (debugEnabled) {logger.debug("Creating new transaction with name [" + definition.getName() + "]: " + definition);}try {boolean newSynchronization = (getTransactionSynchronization() != SYNCHRONIZATION_NEVER);DefaultTransactionStatus status = newTransactionStatus(definition, transaction, true, newSynchronization, debugEnabled, suspendedResources);// 抽象方法 开启事务。留给子类实现。doBegin(transaction, definition);prepareSynchronization(status, definition);return status;}catch (RuntimeException ex) {resume(null, suspendedResources);throw ex;}catch (Error err) {resume(null, suspendedResources);throw err;}}else {// Create "empty" transaction: no actual transaction, but potentially synchronization.if (definition.getIsolationLevel() != TransactionDefinition.ISOLATION_DEFAULT && logger.isWarnEnabled()) {logger.warn("Custom isolation level specified but no actual transaction initiated; " +"isolation level will effectively be ignored: " + definition);}boolean newSynchronization = (getTransactionSynchronization() == SYNCHRONIZATION_ALWAYS);return prepareTransactionStatus(definition, null, true, newSynchronization, debugEnabled, null);}
}
创建对应的事务实例,这里我们使用的是 DataSourceTransactionManager 中的 doGetTransaction 方法,创建基于 JDBC 的事务实例。
protected Object doGetTransaction() {DataSourceTransactionObject txObject = new DataSourceTransactionObject();txObject.setSavepointAllowed(isNestedTransactionAllowed());// 如果当前线程已经记录数据库链接则使用原有链接ConnectionHolder conHolder =(ConnectionHolder) TransactionSynchronizationManager.getResource(obtainDataSource());// false 表示非新创建连接txObject.setConnectionHolder(conHolder, false);return txObject;
}
其中在同一个线程中,判断是否有重复的事务,是在TransactionSynchronizationManager.getResource(obtainDataSource()) 中完成的,关键判断逻辑是下面这个:
private static final ThreadLocal<Map<Object, Object>> resources =new NamedThreadLocal<>("Transactional resources");private static Object doGetResource(Object actualKey) {Map<Object, Object> map = resources.get();if (map == null) {return null;}Object value = map.get(actualKey);// Transparently remove ResourceHolder that was marked as void...if (value instanceof ResourceHolder && ((ResourceHolder) value).isVoid()) {map.remove(actualKey);// Remove entire ThreadLocal if empty...if (map.isEmpty()) {resources.remove();}value = null;}return value;
}
结论:resources 是一个 ThreadLocal 线程私有对象,每个线程独立存储,所以判断是否存在事务,判断的依据是当前线程、当前数据源(DataSource)中是否存在活跃的事务 -map.get(actualKey)。
1.2.2 获取事务:DataSourceTransactionManager.doBegin()
这里是获取数据库连接并开启事务的地方,从DataSource中获取连接,并且设置自动提交为false。该方法的流程如下:
- 获取数据库连接
- 设置数据库连接自动提交为false,并开启事务
- 绑定数据库连接到线程
/*** This implementation sets the isolation level but ignores the timeout.*/
@Override
protected void doBegin(Object transaction, TransactionDefinition definition) {DataSourceTransactionObject txObject = (DataSourceTransactionObject) transaction;Connection con = null;try {// 如果当前不存在数据库 if (!txObject.hasConnectionHolder() ||txObject.getConnectionHolder().isSynchronizedWithTransaction()) {// 通过dataSource获取数据库连接Connection,如果采用数据库连接池 这里就是连接池对象。Connection newCon = this.dataSource.getConnection();// 设置连接到事务对象中。txObject.setConnectionHolder(new ConnectionHolder(newCon), true);}txObject.getConnectionHolder().setSynchronizedWithTransaction(true);con = txObject.getConnectionHolder().getConnection();// 记录上一个事务的隔离级别,如果没有外层事务,隔离级别就是nullInteger previousIsolationLevel = DataSourceUtils.prepareConnectionForTransaction(con, definition);txObject.setPreviousIsolationLevel(previousIsolationLevel);// 设置自动提交为false,如果使用连接池,连接池或许已经设置自动提交为false了,所以这里先判断一下。if (con.getAutoCommit()) {txObject.setMustRestoreAutoCommit(true);if (logger.isDebugEnabled()) {logger.debug("Switching JDBC Connection [" + con + "] to manual commit");}con.setAutoCommit(false);}// 如果事务是只读事务 ,那么就会执行SQL "SET TRANSACTION READ ONLY".prepareTransactionalConnection(con, definition);txObject.getConnectionHolder().setTransactionActive(true);int timeout = determineTimeout(definition);if (timeout != TransactionDefinition.TIMEOUT_DEFAULT) {txObject.getConnectionHolder().setTimeoutInSeconds(timeout);}// 如果是一个新的连接 ,绑定数据库连接到当前线程if (txObject.isNewConnectionHolder()) {// 调用事务同步回调管理器的绑定资源方法,key= dataSource,value = ConnectionHodlerTransactionSynchronizationManager.bindResource(getDataSource(), txObject.getConnectionHolder());}}catch (Throwable ex) {if (txObject.isNewConnectionHolder()) {//异常之后 释放连接,DataSourceUtils.releaseConnection(con, this.dataSource);txObject.setConnectionHolder(null, false);}throw new CannotCreateTransactionException("Could not open JDBC Connection for transaction", ex);}
}
结论:Spring 事务的开启,就是将数据库自动提交属性设置为 false
1.2.3 事务挂起和事务恢复
事务挂起
当线程中已经存在事务,在某些事务传播行为下就需要挂起外层事务。
比如PROPAGATION_NOT_SUPPORTED:不能运行在一个事务中,如果存在事务就挂起当前事务。
PROPAGATION_REQUIRES_NEW: 必须运行在一个新事务中,如果当前存在事务,则挂起当前事务,开启新事务执行。
对于挂起操作,主要目的是记录原有事务的状态,以便于后续操作对事务的恢复:
实际上,suspend() 方法调用的是事务管理器 DataSourceTransactionManager 中的 doSuspend() 方法
protected Object doSuspend(Object transaction) {DataSourceTransactionObject txObject = (DataSourceTransactionObject) transaction;//  将数据库连接设置为 nulltxObject.setConnectionHolder(null);return TransactionSynchronizationManager.unbindResource(obtainDataSource());
}
最后调用的关键方法是 TransactionSynchronizationManager#doUnbindResource
private static Object doUnbindResource(Object actualKey) {Map<Object, Object> map = resources.get();if (map == null) {return null;}Object value = map.remove(actualKey);if (map.isEmpty()) {resources.remove();}if (value instanceof ResourceHolder && ((ResourceHolder) value).isVoid()) {value = null;}if (value != null && logger.isTraceEnabled()) {Thread.currentThread().getName() + "]");}return value;
}
看了第七条参考资料中的文章,结合代码理解了事务挂起的操作:移除当前线程、数据源活动事务对象的一个过程
那它是如何实现事务挂起的呢,答案是在 doSuspend() 方法中的 txObject.setConnectionHolder(null),将 connectionHolder 设置为 null。
一个 connectionHolder 表示一个数据库连接对象,如果它为 null,表示在下次需要使用时,得从缓存池中获取一个连接,新连接的自动提交是 true。
如何实现挂起一个事务呢?
挂起事务需要完成几项工作:
- TransactionSynchronizationManager中解除绑定的 TransactionSynchronization 集合
- 重置当前事务名称绑定
- 重置事务只读属性绑定
- 重置事务隔离级别绑定
- 重置实际事务激活标志绑定
- 记录以上几步的数据,封装到 SuspendedResourceHolder对象中。
- 将SuspendedResourceHolder对象,交给内部事务 ,以便内部事务执行结束后,恢复外层事务。
事务恢复
如果内部事务出现异常或者内部事务提交都会触发外层事务的恢复,事务的恢复就是将内存事务TransactionStauts 中记录的挂起事务的信息,重新绑定到 TransactionSynchronizationManager中去。
1.3 事务回滚
如果事务运行过程中出现某些异常会导致事务回滚,在JDBC中我们执行connection.rollback()回滚事务,Spring事务也不列外,只是Spring事务在JDBC的基础之上提供了更多丰富的功能,比如对某些指定异常进行回滚。
关于事务回滚rollback 设置,还有一个容易被忽视 和 误解的地方。就是如果我们设置rollbackFor = IllegalArgumentException.class,那么事务运行期间出现了IndexOutOfBoundsException异常会不会导致事务回滚?出现了 Error 错误会不会回滚?
处理事务回滚的在TransactionAspectSupport.completeTransactionAfterThrowing()函数中。
- 首先判断异常是否需要回滚。判断逻辑最终是委托给RuleBasedTransactionAttribute.rollbackOn()
public boolean rollbackOn(Throwable ex) {RollbackRuleAttribute winner = null;int deepest = Integer.MAX_VALUE;if (this.rollbackRules != null) {// 遍历 查找 指定的 rollbackException 进行匹配for (RollbackRuleAttribute rule : this.rollbackRules) {int depth = rule.getDepth(ex);if (depth >= 0 && depth < deepest) {deepest = depth;winner = rule;}}}// 如果没有匹配到 采用默认的回滚规则进行判断。// 默认的规则就是 ex instanceof RuntimeException || ex instanceof Error(遇到运行时异常和Error进行回滚),// 所以如果我们指定了rollback = IllegalArgumentException,当遇到 IndexOutOfBoundsException时 或者 Error 时也会回滚事务。if (winner == null) {logger.trace("No relevant rollback rule found: applying default rules");return super.rollbackOn(ex);}return !(winner instanceof NoRollbackRuleAttribute);}
- 如果需要回滚则会执行AbstranctPlatformTransactionManager.processRollback()函数
- if (status.hasSavepoint())
- 如果存在保存点,则回滚到保存点
- else if (status.isNewTransaction())
- 如果是一个新事务则执行回滚。
- else if (status.hasTransaction())
- 如果是嵌套事务,则设置当前数据库链接rollbackOnly
- if (status.hasSavepoint())
- 如果不需要回滚 则提交事务
- 触发钩子函数
在回滚前后会分别触发 TransactionSynchronuzation的beforeCompletion,afterCompletion 函数,进行资源释放,连接关闭等。
1.4 事务提交
只有当事务是一个新事务的时候才会进行提交,就是如果有一个内嵌事务传播行为 PROPAGATION_SUPPORTS、PROPAGATION_REQUIRED、PROPAGATION_MANDATORY的事务执行完之后不会提交,会随着外层事务的提交而提交。
事务的提交最终是调用 connect.commit()函数提交事务。
在事务提交前后会触发TransactionSynchronuzation 钩子函数。进行资源释放操作。
mybatis会在beforeCommit中执行Sqlsession commit。
1.5 小结
在声明式的事务处理中,主要有以下几个处理步骤:
- 获取事务的属性:tas.getTransactionAttribute(method, targetClass)
- 加载配置中配置的TransactionManager:determineTransactionManager(txAttr);
- 不同的事务处理方式使用不同的逻辑:关于声明式事务和编程式事务,可以看这篇笔记Spring事务的介绍与使用方法
- 在目标方法执行前获取事务并收集事务信息:createTransactionIfNecessary(tm, txAttr, joinpointIdentification)
- 执行目标方法:invocation.proceed()
- 出现异常,尝试异常处理:completeTransactionAfterThrowing(txInfo, ex);
- 提交事务前的事务信息消除:cleanupTransactionInfo(txInfo)
- 提交事务:commitTransactionAfterReturning(txInfo)
知识点:
- 方法上面 @Transaction 注解会覆盖类上面的 @Transaction注解信息。是完全的覆盖,而不是部分覆盖,就是说如果类上设置了事务超时时间为 10秒,但是方法上面没有设置事务超时时间,那么最终事务就是没有超时时间,并不会采用类上面的超时时间。
- 事务隔离级别 和 超时时间只能作用于一个新事务,也就是说,当内部事务参与到一个已经存在的事务中时,事务隔离级别和 超时时间将会被忽略。因为内部事务是参与到外层事务。
- 事务rollbackFor 的含义是默认异常或指定异常,就是说默认回滚异常时 runtimeException 或 Error 或 自己指定的异常。
二、@Transactional注解的实现原理
2.1 @Transactional注解简介
@Transactional是Spring中声明式事务管理的注解配置方式,相信这个注解的作用大家都很清楚。@Transactional注解可以帮助我们把事务开启、提交或者回滚的操作,通过aop的方式进行管理。通过@Transactional注解就能让Spring为我们管理事务,免去了重复的事务管理逻辑,减少对业务代码的侵入,使我们开发人员能够专注于业务层面开发。
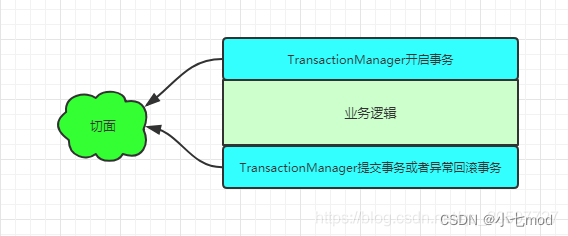
我们知道实现@Transactional原理是基于Spring AOP,AOP又是动态代理模式的实现,通过对源码的阅读,总结出下面的步骤来了解实际中,在Spring是如何利用AOP来实现@Transactional的功能的。
2.2 Spring中声明式事务实现原理猜想
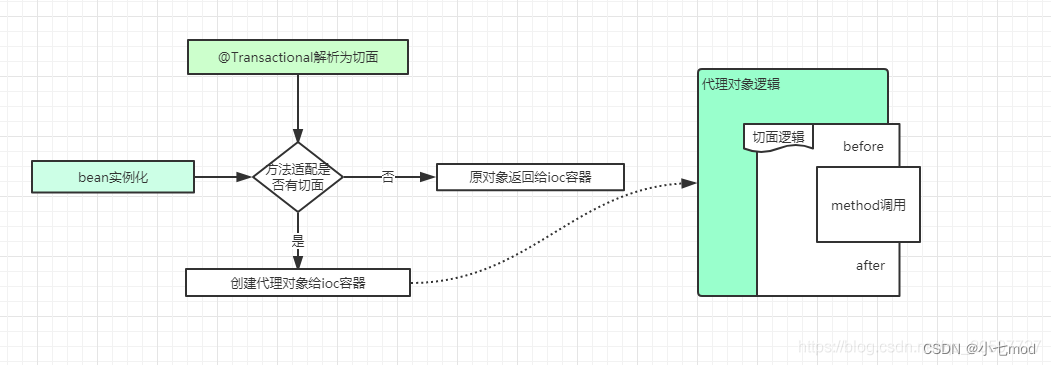
- 首先,对于Spring中AOP实现原理有了解的话,应该知道想要对一个方法进行代理的话,肯定需要定义切点。在@Transactional的实现中,同样如此,Spring为我们定义了以 @Transactional 注解为植入点的切点,这样才能知道@Transactional注解标注的方法需要被代理。
- 有了切面定义之后,在Spring的bean的初始化过程中,就需要对实例化的bean进行代理,并且生成代理对象。
- 生成代理对象的代理逻辑中,进行方法调用时,需要先获取切面逻辑,@Transactional注解的切面逻辑类似于@Around,在Spring中是实现一种类似代理逻辑。
猜想图:
2.3 @Transactional作用
根据上面的原理猜想,下面简单介绍每个步骤的源码以进行验证。
首先是@Transactional,作用是定义代理植入点。【AOP实现原理分析】中,分析知道代理对象创建的通过BeanPostProcessor的实现类AnnotationAwareAspectJAutoProxyCreator的postProcessAfterInstantiation方法来实现的,如果需要进行代理,那么在这个方法就会返回一个代理对象给容器,同时判断织入点也是在这个方法中。
那么下面开始分析,在配置好注解驱动方式的事务管理之后,spring会在IoC容器创建一个BeanFactoryTransactionAttributeSourceAdvisor实例,这个实例可以看作是一个切点,在判断一个bean在初始化过程中是否需要创建代理对象,都需要验证一次BeanFactoryTransactionAttributeSourceAdvisor是否是适用这个bean的切点。如果是,就需要创建代理对象,并且把BeanFactoryTransactionAttributeSourceAdvisor实例注入到代理对象中。
其中由【AOP实现原理分析】知道在AopUtils#findAdvisorsThatCanApply中判断切面是否适用当前bean,可以在这个地方断点分析调用堆栈,AopUtils#findAdvisorsThatCanApply一致调用,最终通过以下代码判断是否适用切点:
- AbstractFallbackTransactionAttributeSource#computeTransactionAttribute(Method method, Class<?> targetClass) 这里可以根据参数打上条件断点进行调试分析调用栈,targetClass就是目标class
- …一系列调用
- 最终SpringTransactionAnnotationParser#parseTransactionAnnotation(java.lang.reflect.AnnotatedElement)
@Override
public TransactionAttribute parseTransactionAnnotation(AnnotatedElement ae) {// 这里就是分析Method是否被@Transactional注解标注,// 有的话,BeanFactoryTransactionAttributeSourceAdvisor适配当前bean,进行代理,并且注入切点// BeanFactoryTransactionAttributeSourceAdvisorAnnotationAttributes attributes = AnnotatedElementUtils.getMergedAnnotationAttributes(ae, Transactional.class);if (attributes != null) {return parseTransactionAnnotation(attributes);}else {return null;}
}
上面就是判断是否需要根据@Transactional进行代理对象创建的判断过程。@Transactional的作用有两个:1、标识方法需要被代理。2、携带事务管理需要的一些属性信息。
2.4 动态代理逻辑实现
【AOP实现原理分析】中知道,AOP最终的代理对象的代理方法是
- DynamicAdvisedInterceptor#intercept
所以我们可以在这个方法断点分析代理逻辑:
@Override
public Object intercept(Object proxy, Method method, Object[] args, MethodProxy methodProxy) throws Throwable {Object oldProxy = null;boolean setProxyContext = false;Class<?> targetClass = null;Object target = null;try {if (this.advised.exposeProxy) {// Make invocation available if necessary.oldProxy = AopContext.setCurrentProxy(proxy);setProxyContext = true;}// May be null. Get as late as possible to minimize the time we// "own" the target, in case it comes from a pool...target = getTarget();if (target != null) {targetClass = target.getClass();}//followList<Object> chain = this.advised.getInterceptorsAndDynamicInterceptionAdvice(method, targetClass);Object retVal;// Check whether we only have one InvokerInterceptor: that is,// no real advice, but just reflective invocation of the target.if (chain.isEmpty() && Modifier.isPublic(method.getModifiers())) {// We can skip creating a MethodInvocation: just invoke the target directly.// Note that the final invoker must be an InvokerInterceptor, so we know// it does nothing but a reflective operation on the target, and no hot// swapping or fancy proxying.Object[] argsToUse = AopProxyUtils.adaptArgumentsIfNecessary(method, args);retVal = methodProxy.invoke(target, argsToUse);}else {// We need to create a method invocation...retVal = new CglibMethodInvocation(proxy, target, method, args, targetClass, chain, methodProxy).proceed();}retVal = processReturnType(proxy, target, method, retVal);return retVal;}finally {if (target != null) {releaseTarget(target);}if (setProxyContext) {// Restore old proxy.AopContext.setCurrentProxy(oldProxy);}}
}
通过分析 List<Object> chain = this.advised.getInterceptorsAndDynamicInterceptionAdvice(method, targetClass)返回的是TransactionInterceptor,利用TransactionInterceptor是如何实现代理逻辑调用的?
跟踪new CglibMethodInvocation(proxy, target, method, args, targetClass, chain, methodProxy).proceed();
发现最终是调用TransactionInterceptor#invoke方法,并且把CglibMethodInvocation注入到invoke方法中,从上面可以看到CglibMethodInvocation是包装了目标对象的方法调用的所有必须信息,因此,在TransactionInterceptor#invoke里面也是可以调用目标方法的,并且还可以实现类似@Around的逻辑,在目标方法调用前后继续注入一些其他逻辑,比如事务管理逻辑。
2.5 TransactionInterceptor–最终事务管理者
- TransactionInterceptor#invoke
@Override
public Object invoke(final MethodInvocation invocation) throws Throwable {// Work out the target class: may be {@code null}.// The TransactionAttributeSource should be passed the target class// as well as the method, which may be from an interface.Class<?> targetClass = (invocation.getThis() != null ? AopUtils.getTargetClass(invocation.getThis()) : null);// Adapt to TransactionAspectSupport's invokeWithinTransaction...return invokeWithinTransaction(invocation.getMethod(), targetClass, new InvocationCallback() {@Overridepublic Object proceedWithInvocation() throws Throwable {return invocation.proceed();}});
}
继续跟踪invokeWithinTransaction,下面的代码中其实就可以看出一些逻辑端倪,就是我们猜想的实现方式,事务管理。
protected Object invokeWithinTransaction(Method method, Class<?> targetClass, final InvocationCallback invocation)throws Throwable {// If the transaction attribute is null, the method is non-transactional.final TransactionAttribute txAttr = getTransactionAttributeSource().getTransactionAttribute(method, targetClass);final PlatformTransactionManager tm = determineTransactionManager(txAttr);final String joinpointIdentification = methodIdentification(method, targetClass);if (txAttr == null || !(tm instanceof CallbackPreferringPlatformTransactionManager)) {// Standard transaction demarcation with getTransaction and commit/rollback calls.// 开启事务TransactionInfo txInfo = createTransactionIfNecessary(tm, txAttr, joinpointIdentification);Object retVal = null;try {// This is an around advice: Invoke the next interceptor in the chain.// This will normally result in a target object being invoked.// 方法调用retVal = invocation.proceedWithInvocation();}catch (Throwable ex) {// target invocation exception// 回滚事务completeTransactionAfterThrowing(txInfo, ex);throw ex;}finally {cleanupTransactionInfo(txInfo);}// 提交事务commitTransactionAfterReturning(txInfo);return retVal;}else {// It's a CallbackPreferringPlatformTransactionManager: pass a TransactionCallback in.try {Object result = ((CallbackPreferringPlatformTransactionManager) tm).execute(txAttr,new TransactionCallback<Object>() {@Overridepublic Object doInTransaction(TransactionStatus status) {TransactionInfo txInfo = prepareTransactionInfo(tm, txAttr, joinpointIdentification, status);try {return invocation.proceedWithInvocation();}catch (Throwable ex) {if (txAttr.rollbackOn(ex)) {// A RuntimeException: will lead to a rollback.if (ex instanceof RuntimeException) {throw (RuntimeException) ex;}else {throw new ThrowableHolderException(ex);}}else {// A normal return value: will lead to a commit.return new ThrowableHolder(ex);}}finally {cleanupTransactionInfo(txInfo);}}});// Check result: It might indicate a Throwable to rethrow.if (result instanceof ThrowableHolder) {throw ((ThrowableHolder) result).getThrowable();}else {return result;}}catch (ThrowableHolderException ex) {throw ex.getCause();}}
}
2.6 总结
下面我们总结一下使用注解的Spring声明式事务的实现原理。
首先我们需要在主配置类(JavaConfig类)上添加@EnableTransactionManagement注解来开启事务,这个注解通过@Import注解向容器中引入了两个类:AutoProxyRegistrar和ProxyTransactionManagementConfiguration。
AutoProxyRegistrar向容器中导入了InfrastructureAdvisorAutoProxyCreator,该类继承于AbstractAutoProxyCreator,作用类似于AOP,只不过是用于给加了@Transactional注解的类生成代理对象。
ProxyTransactionManagementConfiguration向容器中导入了3个Bean:AnnotationTransactionAttributeSource、TransactionInterceptor、BeanFactoryTransactionAttributeSourceAdvisor,其中前两个Bean都是第三个Bean的成员属性,也就是AnnotationTransactionAttributeSource和TransactionInterceptor是被包含在BeanFactoryTransactionAttributeSourceAdvisor中的。
AnnotationTransactionAttributeSource相当于切点,用于判断是否加了@Transactional注解;TransactionInterceptor是一个拦截器,具体事务管理的逻辑就是在该拦截器的invoke()方法中实现的;而BeanFactoryTransactionAttributeSourceAdvisor是一个Advisor。
整体的执行流程:当创建一个Bean时,会去执行AbstractAutoProxyCreator的postProcessAfterInitialization,在这个方法中会去判断是否需要为该Bean生成代理对象。这时会去获取所有的Advisor,然后遍历并从中找出与该Bean相匹配的,此时就会用BeanFactoryTransactionAttributeSourceAdvisor的属性AnnotationTransactionAttributeSource去对该Bean进行判断,如果该Bean或它的方法加了@Transactional注解则匹配成功(注意:非public方法加了该注解也没用,不匹配),将该BeanFactoryTransactionAttributeSourceAdvisor返回。由于返回值不为空,所以就会为该Bean创建代理对象。
当调用该代理对象的方法时,会先去获取该方法的拦截器链(遍历该Bean的所有Advisor,然后找到和该方法相匹配的Advisor)。BeanFactoryTransactionAttributeSourceAdvisor的属性AnnotationTransactionAttributeSource会去判断该方法是否有@Transactional注解,如果有则匹配成功,则将该Advisor的属性TransactionInterceptor添加到拦截器链中。然后从头开始遍历拦截器链(通过递归调用proceed()方法完成遍历),当执行TransactionInterceptor的invoke()方法时,会先去开启一个事务,然后再去递归调用proceed()方法向下遍历,直至执行完业务方法,如果在这个过程中出现了异常就回滚事务,否则就提交事务。
在整个事务过程中,如何保证操作数据库时使用的是同一个连接?在开启事务时,首先会从数据库连接池中获得一个connection,然后将这个连接与一个ThradLocal对象绑定起来,以后需要操作数据库时都通过该ThradLocal对象来获取connection,最后在事务提交或回滚后释放绑定关系,并将connection归还到数据库连接池中。这样,通过ThradLocal对象,我们就保证了操作的是同一个connection。
最终的原理图:

相关文章: 【Spring框架】Spring事务的介绍与使用方法
