1测试图片
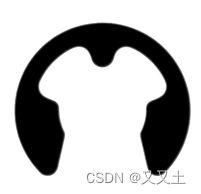
2初步推测是否是提取的点太多而导致匹配时间很长
2.1通过canny的算法来提取检测点
import numpy as np
import cv2
import time
import matplotlib.pyplot as pltclass GeoMatch:def __init__(self):self.noOfCordinates=0   # 坐标数组中元素的个数self.cordinates = []   # 坐标数组存储模型点self.modelHeight=0   # 模型高self.modelWidth=0   # 模型宽self.edgeMagnitude = []  # 梯度大小self.edgeDerivativeX = []  # 在X方向的梯度self.edgeDerivativeY = []  # 在Y方向的梯度self.centerOfGravity  = []  # 模板重心self.modelDefined=0# 创建模版maxContrast,minContrast为滞后处理的阈值。def CreateGeoMatchModel(self, templateArr, maxContrast, minContrast):Ssize = []src = templateArr.copy()# 设置宽和高Ssize.append(src.shape[1])  # 宽Ssize.append(src.shape[0])  # 高self.modelHeight = src.shape[0]  # 存储模板的高self.modelWidth = src.shape[1]  # 存储模板的宽self.noOfCordinates = 0  # 初始化self.cordinates = [] #self.modelWidth * self.modelHeight  # 为模板图像中选定点的联合分配内存self.edgeMagnitude = []  # 为选定点的边缘幅度分配内存self.edgeDerivativeX = []  # 为选定点的边缘X导数分配内存self.edgeDerivativeY = []  # 为选定点的边缘Y导数分配内存## 计算模板的梯度gx = cv2.Sobel(src, cv2.CV_32F, 1, 0, 3)gy = cv2.Sobel(src, cv2.CV_32F, 0, 1, 3)MaxGradient = -99999.99orients = []nmsEdges = np.zeros((Ssize[1], Ssize[0]))magMat = np.zeros((Ssize[1], Ssize[0]))# 该for循环可以得到 1、梯度图magMat 2、方向列表orientsfor i in range(1, Ssize[1]-1):for j in range(1, Ssize[0]-1):fdx = gx[i][j]  # 读x, y的导数值fdy = gy[i][j]MagG = (float(fdx*fdx) + float(fdy * fdy))**(1/2.0)  # Magnitude = Sqrt(gx^2 +gy^2)direction = cv2.fastAtan2(float(fdy), float(fdx))  # Direction = invtan (Gy / Gx)magMat[i][j] = MagG  # 把梯度放在图像对应位置if MagG > MaxGradient:MaxGradient = MagG  # 获得最大梯度值进行归一化。# 从0,45,90,135得到最近的角if (direction > 0 and direction < 22.5) or (direction > 157.5 and direction < 202.5) or (direction > 337.5 and direction < 360):direction = 0elif (direction > 22.5 and direction < 67.5) or (direction >202.5 and direction <247.5):direction = 45elif (direction >67.5 and direction < 112.5) or (direction>247.5 and direction<292.5):direction = 90elif (direction >112.5 and direction < 157.5) or (direction>292.5 and direction<337.5):direction = 135else:direction = 0orients.append(int(direction))  # 存储方向信息count = 0 # 初始化count# 非最大抑制 # 这个for循环可以保留边缘点# 请问什么是图像的梯度?这里的图像梯度来自于gx和gy的矢量相加。for i in range(1, Ssize[1]-1):  # 图像边缘像素点没有包含在内for j in range(1, Ssize[0]-1):if orients[count] == 0:leftPixel = magMat[i][j-1]rightPixel = magMat[i][j+1]elif orients[count] == 45:leftPixel = magMat[i - 1][j + 1]rightPixel = magMat[i+1][j - 1]elif orients[count] == 90:leftPixel = magMat[i - 1][j]rightPixel = magMat[i+1][j]elif orients[count] == 135:leftPixel = magMat[i - 1][j-1]rightPixel = magMat[i+1][j+1]if (magMat[i][j] < leftPixel) or (magMat[i][j] < rightPixel):nmsEdges[i][j] = 0else:nmsEdges[i][j] = int(magMat[i][j]/MaxGradient*255)count = count + 1RSum = 0CSum = 0flag = 1# 做滞后阈值# 将阈值再筛选一遍for i in range(1, Ssize[1]-1):for j in range(1, Ssize[0]-1):fdx = gx[i][j]fdy = gy[i][j]MagG = (fdx*fdx + fdy*fdy)**(1/2)   # Magnitude = Sqrt(gx^2 +gy^2)DirG = cv2.fastAtan2(float(fdy), float(fdx))  # Direction = tan(y/x)flag = 1if float(nmsEdges[i][j]) < maxContrast:  # 边缘小于最大阈值if float(nmsEdges[i][j]) < minContrast:  # 边缘小于最小阈值nmsEdges[i][j] = 0flag = 0else: # 如果8个相邻像素中的任何一个不大于maxContrast,则从边缘删除if float(nmsEdges[i-1][j-1]) < maxContrast and \float(nmsEdges[i-1][j]) < maxContrast and \float(nmsEdges[i-1][j+1]) < maxContrast and \float(nmsEdges[i][j-1]) < maxContrast and \float(nmsEdges[i][j+1]) < maxContrast and \float(nmsEdges[i+1][j-1]) < maxContrast and \float(nmsEdges[i+1][j]) < maxContrast and \float(nmsEdges[i+1][j+1]) < maxContrast:nmsEdges[i][j] = 0flag = 0# 保存选中的边缘信息curX = i  # 坐标值curY = jif(flag != 0):  # float(nmsEdges[i][j]) > maxContrastif fdx != 0 or fdy != 0: # 所有有效的梯度值RSum = RSum+curX  # 重心的行和和列和;为了求取重心CSum = CSum+curYself.cordinates.append([curX, curY])  # 边缘点的坐标列表self.edgeDerivativeX.append(fdx)self.edgeDerivativeY.append(fdy)# handle divide by zero 归一化if MagG != 0:self.edgeMagnitude.append(1/MagG)  # 建立归一化后的梯度向量else:self.edgeMagnitude.append(0)self.noOfCordinates = self.noOfCordinates+1  # 记录梯度向量的个数self.centerOfGravity.append(RSum//self.noOfCordinates)  # 重心 = 边缘坐标值累加//总边缘点数self.centerOfGravity.append(CSum // self.noOfCordinates)  # 重心# 改变坐标以反映重心  这里将边缘点坐标变成了相对于重心的坐标。for m in range(0, self.noOfCordinates):temp = 0temp = self.cordinates[m][0]self.cordinates[m][0] = temp - self.centerOfGravity[0]temp = self.cordinates[m][1]self.cordinates[m][1] = temp - self.centerOfGravity[1]self.modelDefined = Truereturn 1# 模版匹配 srcarr图像 minScore最小分数def FindGeoMatchModel(self, srcarr, minScore, greediness):Ssize = []Sdx = []Sdy = []resultScore = 0partialSum = 0sumOfCoords = 0resultPoint = []src = srcarr.copy()if not self.modelDefined:return 0Ssize.append(src.shape[1])  # 高Ssize.append(src.shape[0])  # 宽matGradMag = np.zeros((Ssize[1], Ssize[0]))Sdx = cv2.Sobel(src, cv2.CV_32F, 1, 0, 3)  # 找到X导数Sdy = cv2.Sobel(src, cv2.CV_32F, 0, 1, 3)  # 找到Y导数normMinScore = minScore/ self.noOfCordinates  # 预计算minScorenormGreediness = ((1- greediness*minScore)/(1-greediness)) / self.noOfCordinates  # 预计算greedinessfor i in range(0, Ssize[1]):for j in range(0, Ssize[0]):iSx = Sdx[i][j]  # 搜索图像的X梯度iSy = Sdy[i][j]  # 搜索图像的Y梯度gradMag = ((iSx*iSx)+(iSy*iSy))**(1/2)  # Magnitude = Sqrt(dx^2 +dy^2)if gradMag != 0:matGradMag[i][j] = 1/gradMag  # 1/Sqrt(dx^2 +dy^2)else:matGradMag[i][j] = 0height = Ssize[1]wight = Ssize[0]Nof = self.noOfCordinates   # 模版边缘点的总数for i in range(0, height):for j in range(0, wight):partialSum = 0  # 初始化partialSumfor m in range(0, Nof):curX = i + self.cordinates[m][0]  # 模板X坐标  从模版坐标推导出待测图像的坐标curY = j + self.cordinates[m][1]  # 模板Y坐标iTx = self.edgeDerivativeX[m]  # 模板X的导数iTy = self.edgeDerivativeY[m]  # 模板Y的导数if curX < 0 or curY < 0 or curX > Ssize[1] - 1 or curY > Ssize[0] - 1:continueiSx = Sdx[curX][curY]  # 从源图像得到相应的X导数iSy = Sdy[curX][curY]  # 从源图像得到相应的Y导数if (iSx != 0 or iSy != 0) and (iTx != 0 or iTy != 0):# //partial Sum  = Sum of(((Source X derivative* Template X drivative) + Source Y derivative * Template Y derivative)) / Edge magnitude of(Template)* edge magnitude of(Source))# self.edgeMagnitude(列表)归一化之后的梯度# 这里matGradMag表示待测图片的梯度图# 求解相似度度量partialSum = partialSum + ((iSx*iTx)+(iSy*iTy))*(self.edgeMagnitude[m] * matGradMag[curX][curY])sumOfCoords = m+1partialScore = partialSum/sumOfCoords  # 求解相似度量的平均值# 检查终止条件# 如果部分得分小于该位置所需的得分# 在那个坐标中断serching。# 此处使用了贪心算法if partialScore < min((minScore - 1) + normGreediness*sumOfCoords, normMinScore*sumOfCoords):breakif partialScore > resultScore:resultPoint = []resultScore = partialScore  # 匹配分;匹配分会随着匹配个数,慢慢变化,得到最后的匹配分。但不是一直在增大resultPoint.append(i)  # 结果X坐标resultPoint.append(j)  # 结果Y坐标return resultPoint, resultScoredef DrawContours(self, source, color, lineWidth):for i in range(0, self.noOfCordinates):point = []point.append(self.cordinates[i][1] + self.centerOfGravity[1])point.append(self.cordinates[i][0] + self.centerOfGravity[0])point = map(int, point)point = tuple(point)cv2.line(source, point, point, color, lineWidth)def DrawSourceContours(self, source, COG, color, lineWidth):for i in range(0, self.noOfCordinates):point = [0, 0]point[1] = self.cordinates[i][0] + COG[0]point[0] = self.cordinates[i][1] + COG[1]point = map(int, point)point = tuple(point)cv2.line(source, point, point, color, lineWidth)
if __name__ == '__main__':GM = GeoMatch()lowThreshold = 10 # deafult valuehighThreashold = 100 # deafult valueminScore = 0.4 # deafult valuegreediness = 0.8 # deafult valuetotal_time = 0 # deafult valuescore = 0 # deafult valuetemplateImage = cv2.imread("Template.jpg") # 读取模板图像searchImage = cv2.imread("Search2.jpg") # 读取待搜索图片templateImage = np.uint8(templateImage)searchImage = np.uint8(searchImage)# ------------------创建基于边缘的模板模型------------------------#if templateImage.shape[-1] == 3:grayTemplateImg = cv2.cvtColor(templateImage, cv2.COLOR_BGR2GRAY)else:grayTemplateImg = templateImage.copy()print("\nEdge Based Template Matching Program")print("--------------------------------------------------------")print(len(GM.cordinates))if not GM.CreateGeoMatchModel(grayTemplateImg, lowThreshold, highThreashold):print("ERROR: could not create model...")assert 0GM.DrawContours(templateImage, (255, 0, 0), 1)print("Shape model created..with Low Threshold = {} High Threshold = {}".format(lowThreshold, highThreashold))# ------------------找到基于边缘的模板模型------------------------## 转换彩色图像为灰色图像。if searchImage.shape[-1] == 3:graySearchImg = cv2.cvtColor(searchImage, cv2.COLOR_BGR2GRAY)else:graySearchImg = searchImage.copy()print("Finding Shape Model..Minumum Score = {} Greediness = {}".format(minScore, greediness))print("--------------------------------------------------------")start_time1 = time.time()result, score = GM.FindGeoMatchModel(graySearchImg, minScore, greediness)finish_time1 = time.time()total_time = finish_time1 - start_time1if score > minScore:print("Found at [{}, {}]\nScore = {} \nSearching Time = {} s".format(result[0], result[1], score, total_time))GM.DrawSourceContours(searchImage, result, (0, 255, 0), 1)else:print("Object Not found")plt.figure("template Image")plt.imshow(templateImage)plt.figure("search Image")plt.imshow(searchImage)plt.show()
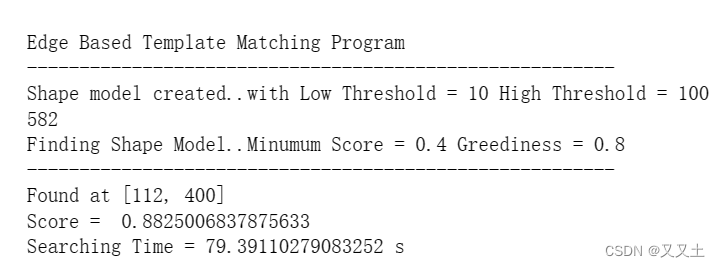
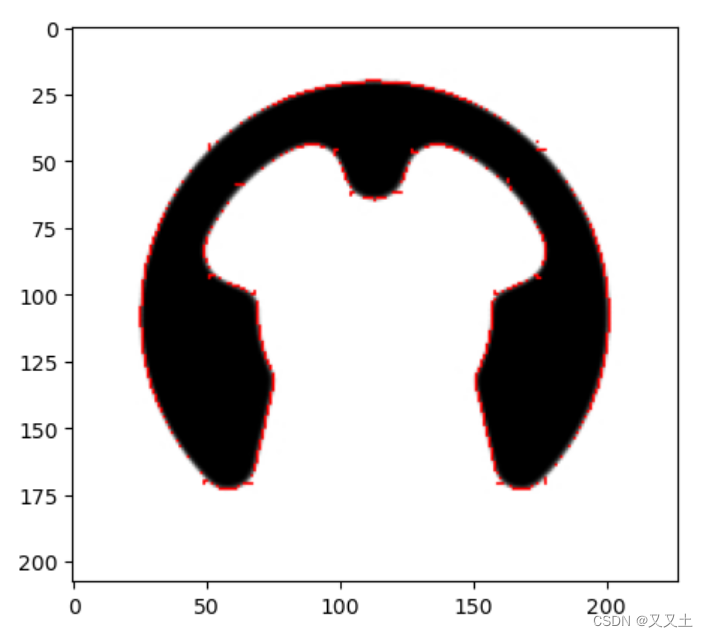
也就是说,canny的提取检测点的办法找出了582个点。时间上可以看出用了80s的时间才匹配到了模版对吧。
利用角点检测检测轮廓点
#include<opencv2/opencv.hpp>
#include<iostream>using namespace std;
using namespace cv;int main(int agrc, char** argv) {Mat src = imread("E:/Template Matching/Template.jpg");imshow("input", src);Mat gray;cvtColor(src, gray, COLOR_RGB2GRAY);vector<Point>corners;goodFeaturesToTrack(gray, corners, 50, 0.015, 5);for (size_t t = 0; t < corners.size(); t++){circle(src, corners[t], 2, Scalar(0, 0, 255), 2, 8, 0);}imshow("角点检测", src);waitKey(0);return 0;}
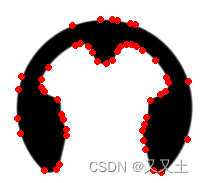
这里可以看到角点50个边缘的效果就挺好的。
利用关键点检测检测轮廓点
#include<opencv2/opencv.hpp>
#include<iostream>using namespace std;
using namespace cv;int main(int agrc, char** argv) {Mat src = imread("E:/Template Matching/Template.jpg");imshow("input", src);auto orb = ORB::create(100);Mat result;vector<KeyPoint>kypts;orb->detect(src, kypts);drawKeypoints(src, kypts, result, Scalar::all(-1), DrawMatchesFlags::DEFAULT);imshow("关键点检测", result);waitKey(0);return 0;

可以看到关键点的检测和轮廓确实不一样。
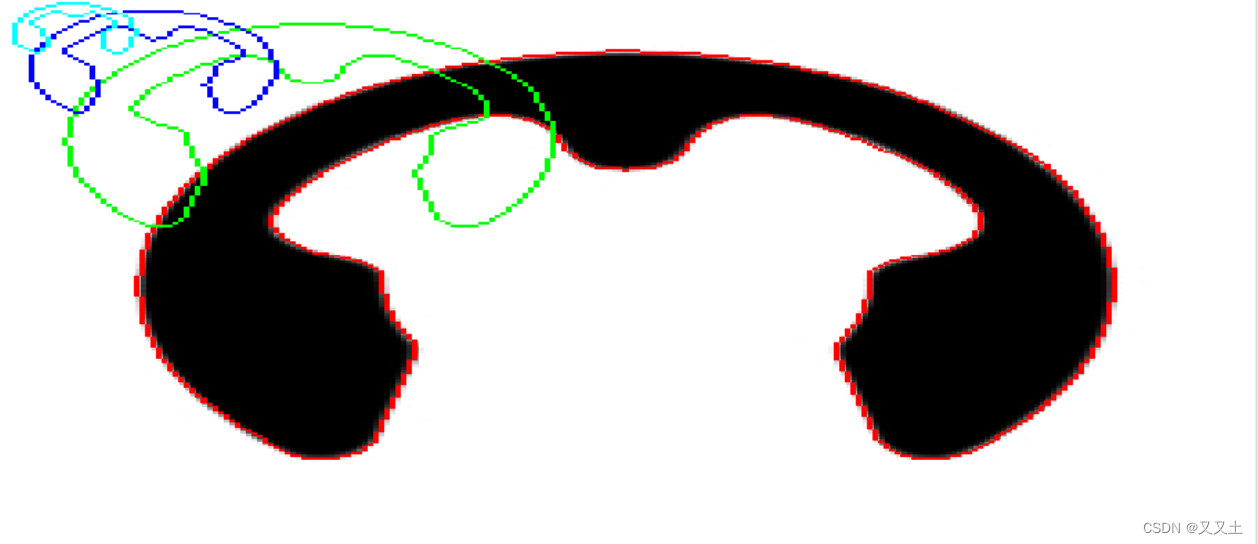
halcon提取出模版是什么样子的。
点超级多呀,真的是需要这么多点吗?
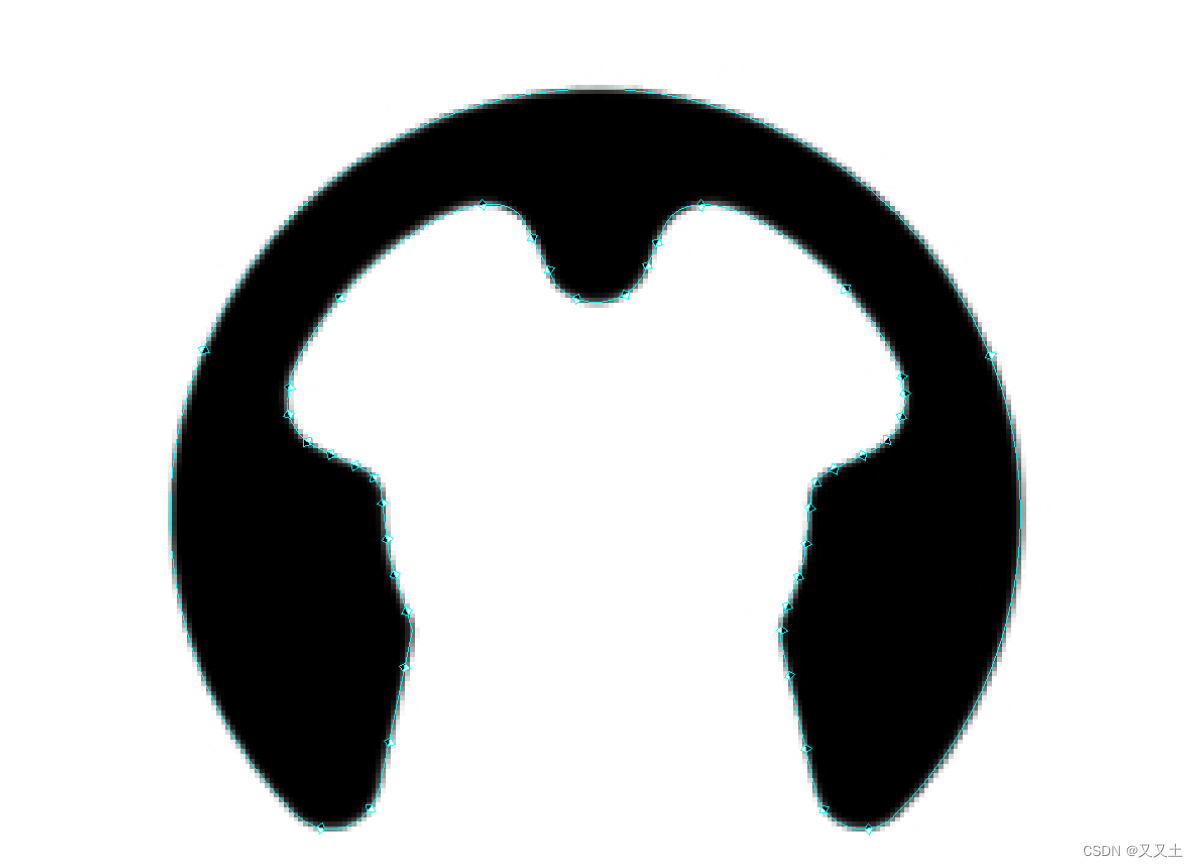
visionpro提取的模版是什么样子的。
这个点就不会特别多了,有点类似关键点。所以猜想是不是曲线拟合了一下,然后提取出来了轮廓,外加关键点。
总结
看了一些资料,个人感觉匹配的点不是最主要的。如果我们的主要矛盾在于解决匹配的速度和精度,那么最先要解决的主要矛盾应该是金字塔结构。如果主要矛盾是旋转匹配,那就解决旋转匹配的问题。再之后尝试解决匹配点,并且可能和轮廓拟合存在一定关系,拟合不好轮廓梯度是会发生变化的。
在一篇论文中提到的一种改进思路:
1、边缘点稀疏通过等距采样边缘点减少模板的匹配运算量。
2、逐层重叠筛选通过对每一层候选对象进行非极大值筛选来排除无效区域。
3、并行算法使用SSE指令优化了亚像素点梯度的插值计算方法,使用PPL并行库实现了多模版的并行匹配。
4、针对传统形状匹配算法位姿匹配精度不高的问题,提出了结合小批量梯度下降法的位姿逼近算法。该方法使用基于二次曲面拟合改进的Canny算法获得亚像素精度的边缘点,提高了形状模版的精度。通过最小化边缘点与对应边缘切线的距离,将位姿逼近问题转化为非线性最小二乘问题来逐步求解,获取更高精度的位姿参数。
