一.bean的实例化
1.spring通过反射调用类的无参构造方法
在pom.xml文件中导入坐标:
<dependencies><dependency><groupId>org.springframework</groupId><artifactId>spring-context</artifactId><version>5.3.29</version></dependency></dependencies>创建Student类:
public class Student {public Student(){System.out.println("执行student类的无参构造方法");}
}
在Application.xml文件中创建bean(无参):
<?xml version="1.0" encoding="UTF-8"?>
<beans xmlns="http://www.springframework.org/schema/beans"xmlns:xsi="http://www.w3.org/2001/XMLSchema-instance"xsi:schemaLocation="http://www.springframework.org/schema/beans http://www.springframework.org/schema/beans/spring-beans.xsd"><!--====================bean的创建方式1(无参)===========================--><bean id="student" class="com.apesource.bean.Student"></bean></beans>
2.通过指定工厂创建bean
创建Student类:
public class Student {public Student(){}
}
在Application.xml文件中创建bean(工厂):
<?xml version="1.0" encoding="UTF-8"?>
<beans xmlns="http://www.springframework.org/schema/beans"xmlns:xsi="http://www.w3.org/2001/XMLSchema-instance"xsi:schemaLocation="http://www.springframework.org/schema/beans http://www.springframework.org/schema/beans/spring-beans.xsd"><!--====================bean的创建方式2(工厂)===========================--><bean id="student" class="com.apesource.bean.Student"></bean><bean id="factory" class="com.apesource.factory.StudentFactory"></bean></beans>
3.通过指定静态工厂创建bean
创建Student类:
public class Student {public Student(){}
}
在Application.xml文件中创建bean(静态工厂):
<?xml version="1.0" encoding="UTF-8"?>
<beans xmlns="http://www.springframework.org/schema/beans"xmlns:xsi="http://www.w3.org/2001/XMLSchema-instance"xsi:schemaLocation="http://www.springframework.org/schema/beans http://www.springframework.org/schema/beans/spring-beans.xsd"><!--====================bean的创建方式3(静态工厂)===========================--><bean id="student" class="com.apesource.factory.StudentStaticFactory" factory-method="creartBean"></bean>
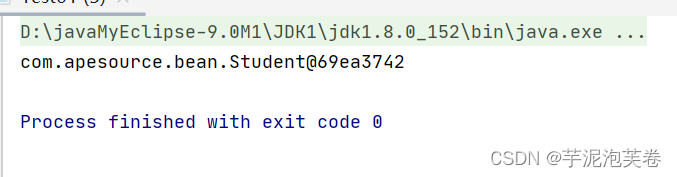
</beans>测试Test:
public class Test01 {public static void main(String[] args) {ApplicationContext applicationContext = new ClassPathXmlApplicationContext("Application.xml");Student student = (Student) applicationContext.getBean("student");System.out.println(student);}测试结果如下:


二.bean的作用域
语法:<bean scope="属性值"></bean>
属性:
singleton单例:spring只会为该bean对象只会创建唯一实例(默认)
<!--====================bean的作用域===========================--><bean id="student" class="com.apesource.bean.Student" scope="singleton"></bean>运行结果:True,只创建一次,所以内存地址相同
public class Test01 {public static void main(String[] args) {ApplicationContext applicationContext = new ClassPathXmlApplicationContext("Application.xml");Student student1 = (Student) applicationContext.getBean("student");Student student2 = (Student) applicationContext.getBean("student");System.out.println(student1==student2);}
}
prototype多例:每次获取bean,Spring会创建一个新的bean实例
<!--====================bean的作用域===========================--><bean id="student" class="com.apesource.bean.Student" scope="prototype"></bean>运行结果:false 创建两次,所以内存地址不同
public class Test01 {public static void main(String[] args) {ApplicationContext applicationContext = new ClassPathXmlApplicationContext("Application.xml");Student student1 = (Student) applicationContext.getBean("student");Student student2 = (Student) applicationContext.getBean("student");System.out.println(student1==student2);}
}
request:每一次HTTP请求,Spring会创建一个新的bean实例
session:不同的HTTP会话,Spring会创建不同的bean实例
三.bean的生命周期
实例化:springIOC创建对象,根据配置文件中Bean的定义,利用Java Reflection反射技术创建Bean的实例
属性赋值:springDI
初始化:
1.接口实现(执行InitializingBean初始化方法)
2.属性实现(执行init-method 自定义初始化方法)
操作使用
销毁:
1.接口实现(执行DisposableBean初始化方法)
2.属性实现(执行destroy-method自定义初始化方法)
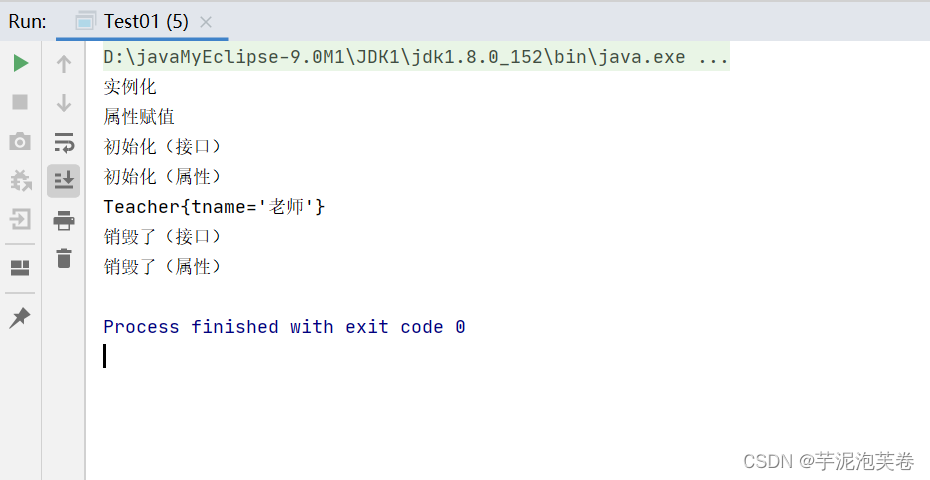
public class Teacher implements InitializingBean, DisposableBean {public void doinit(){System.out.println("初始化(属性)");}public void dodestory(){System.out.println("销毁了(属性)");}public String tname;@Overridepublic void destroy() throws Exception {System.out.println("销毁了(接口)");}@Overridepublic void afterPropertiesSet() throws Exception {System.out.println("初始化(接口)");}@Overridepublic String toString() {return "Teacher{" +"tname='" + tname + '\'' +'}';}public void setTname(String tname) {System.out.println("属性赋值");this.tname = tname;}public Teacher() {System.out.println("实例化");}
}
Application.xml文件配置:
<bean id="teacher" class="com.apesource.bean.Teacher" init-method="doinit" destroy-method="dodestory"><property name="tname" value="老师"></property></bean>测试代码:
public class Test01 {public static void main(String[] args) {ClassPathXmlApplicationContext applicationContext = new ClassPathXmlApplicationContext("Application.xml");Teacher teacher = (Teacher) applicationContext.getBean("teacher");System.out.println(teacher);applicationContext.close(); //关闭spring容器}
}
运行结果:
四.bean的自动装配
spring的配置
1.spring2.5前==xml
2.spring2.5后==xml+annotation
3.spring3.0后==annotation+JavaConfig配置类
spring2.5后=xml+annotation
目的优化一下代码:
<bean id="" class="" init-method="" destroy-method="" scope=""><property></property><constructor-arg></constructor-arg></bean>注解:
1.注入类
替换:
<bean id="" class=""></bean>位置:类
语法:
@Component
eg:Class User{}
<bean id="user" class="com.apesource.包.User"></bean>
||等价于||
@Component
Class User{}
语法:@Component(value="注入容器中的id,如果省略id为类名且首字母小写,value属性名称可以省略")
<context:component-scan base-package=""></context:component-scan>含义:扫描所有被@Component注解所修饰的类,注入容器
@Repository=====>注入数据访问层
@Service========>注入业务层
@Controller=====>注入控制层
以上三个注解与@Component功能语法一致
2.注入基本数据
@Value
含义:注入基本数据
替换:<property></property>
修饰:成员变量或对应的set方法
语法:@Value("数据内容")
@Value("${动态获取}")
注意:不能单独用必须配合
<context:property-placeholder location="classpath:jdbc.properties"></context:property-placeholder>@Autowired
语法:@Autowired(required = "true-默认、false、是否必须进行装配")
修饰:成员变量或对应的set方法
含义:按照通过set方法进行“类型装配”,set方法可以省略
注意:
1.默认是按照类型装配且同set方法
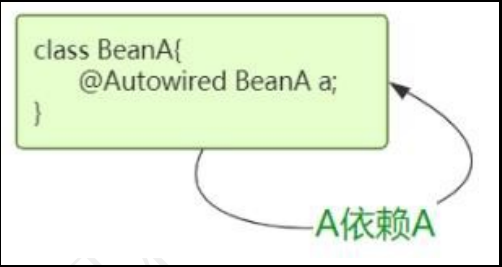
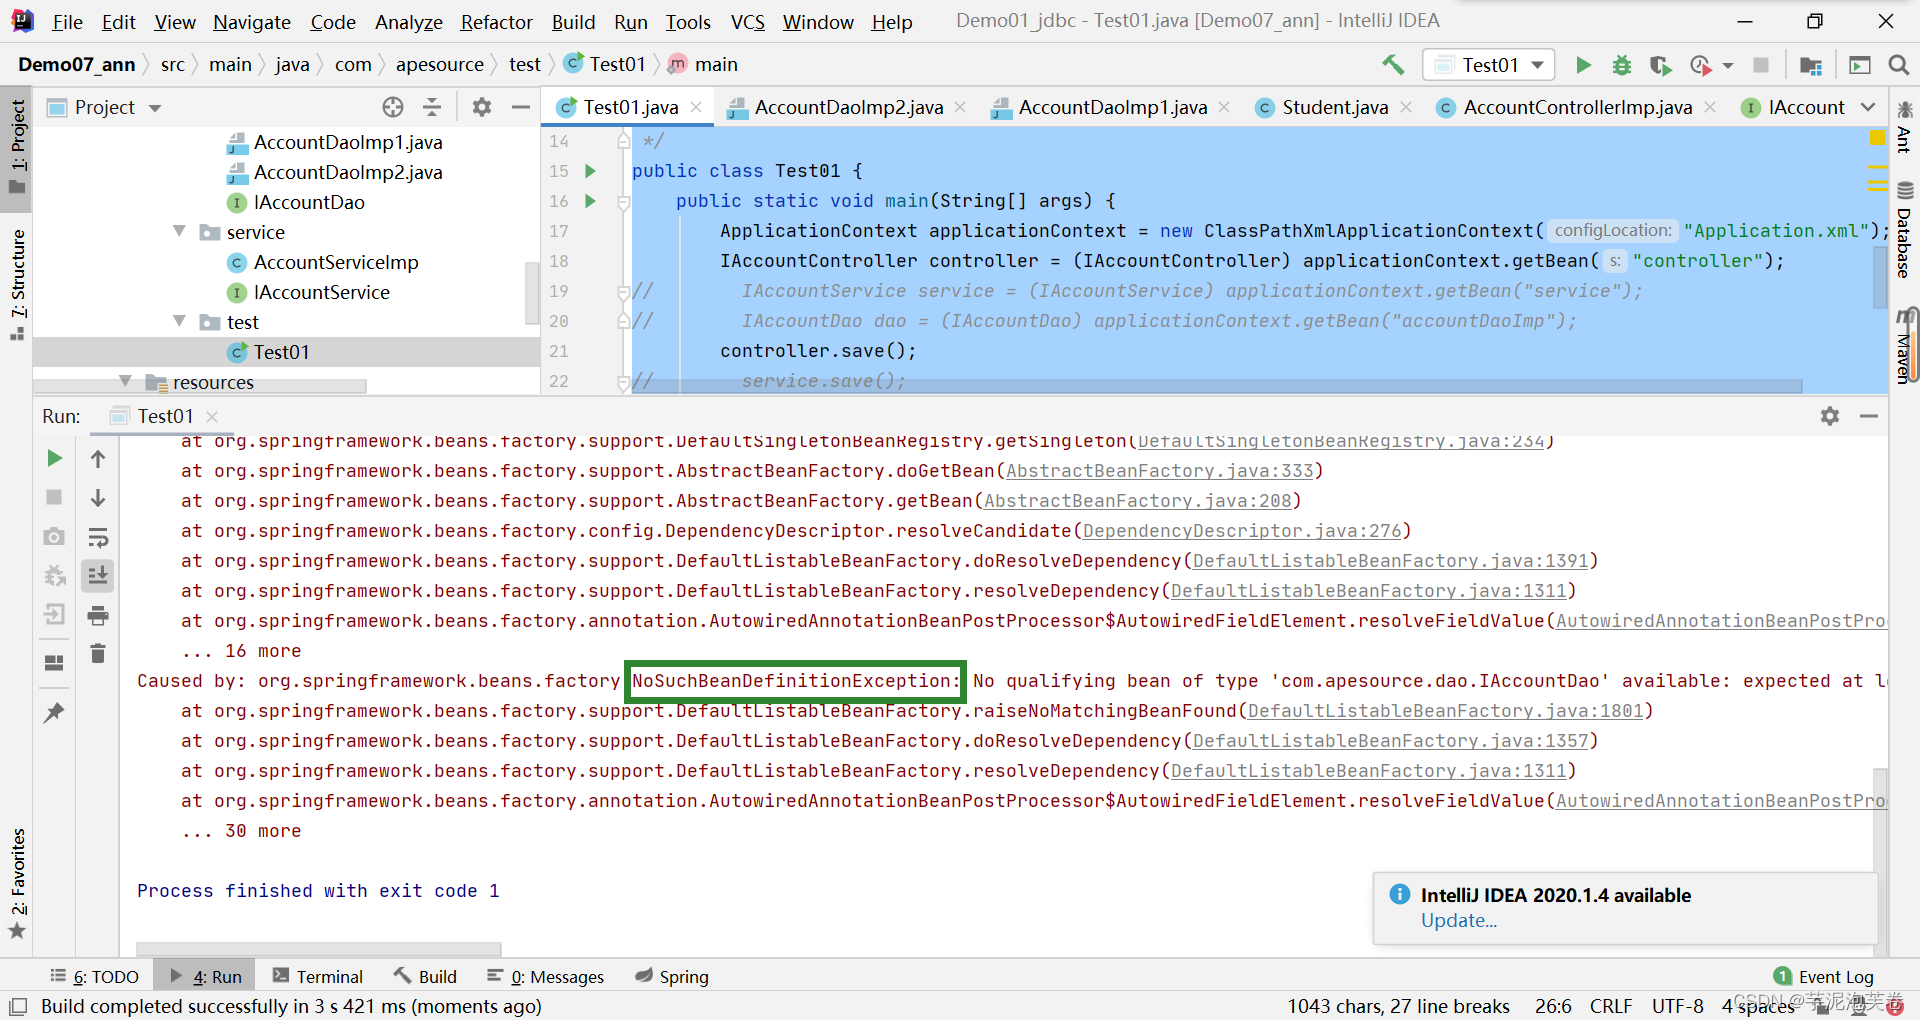
2.若容器中有一个类型可以与之匹配则装配成功,若没有一个类型可以匹配则报错NoSuchBeanDefinitionException
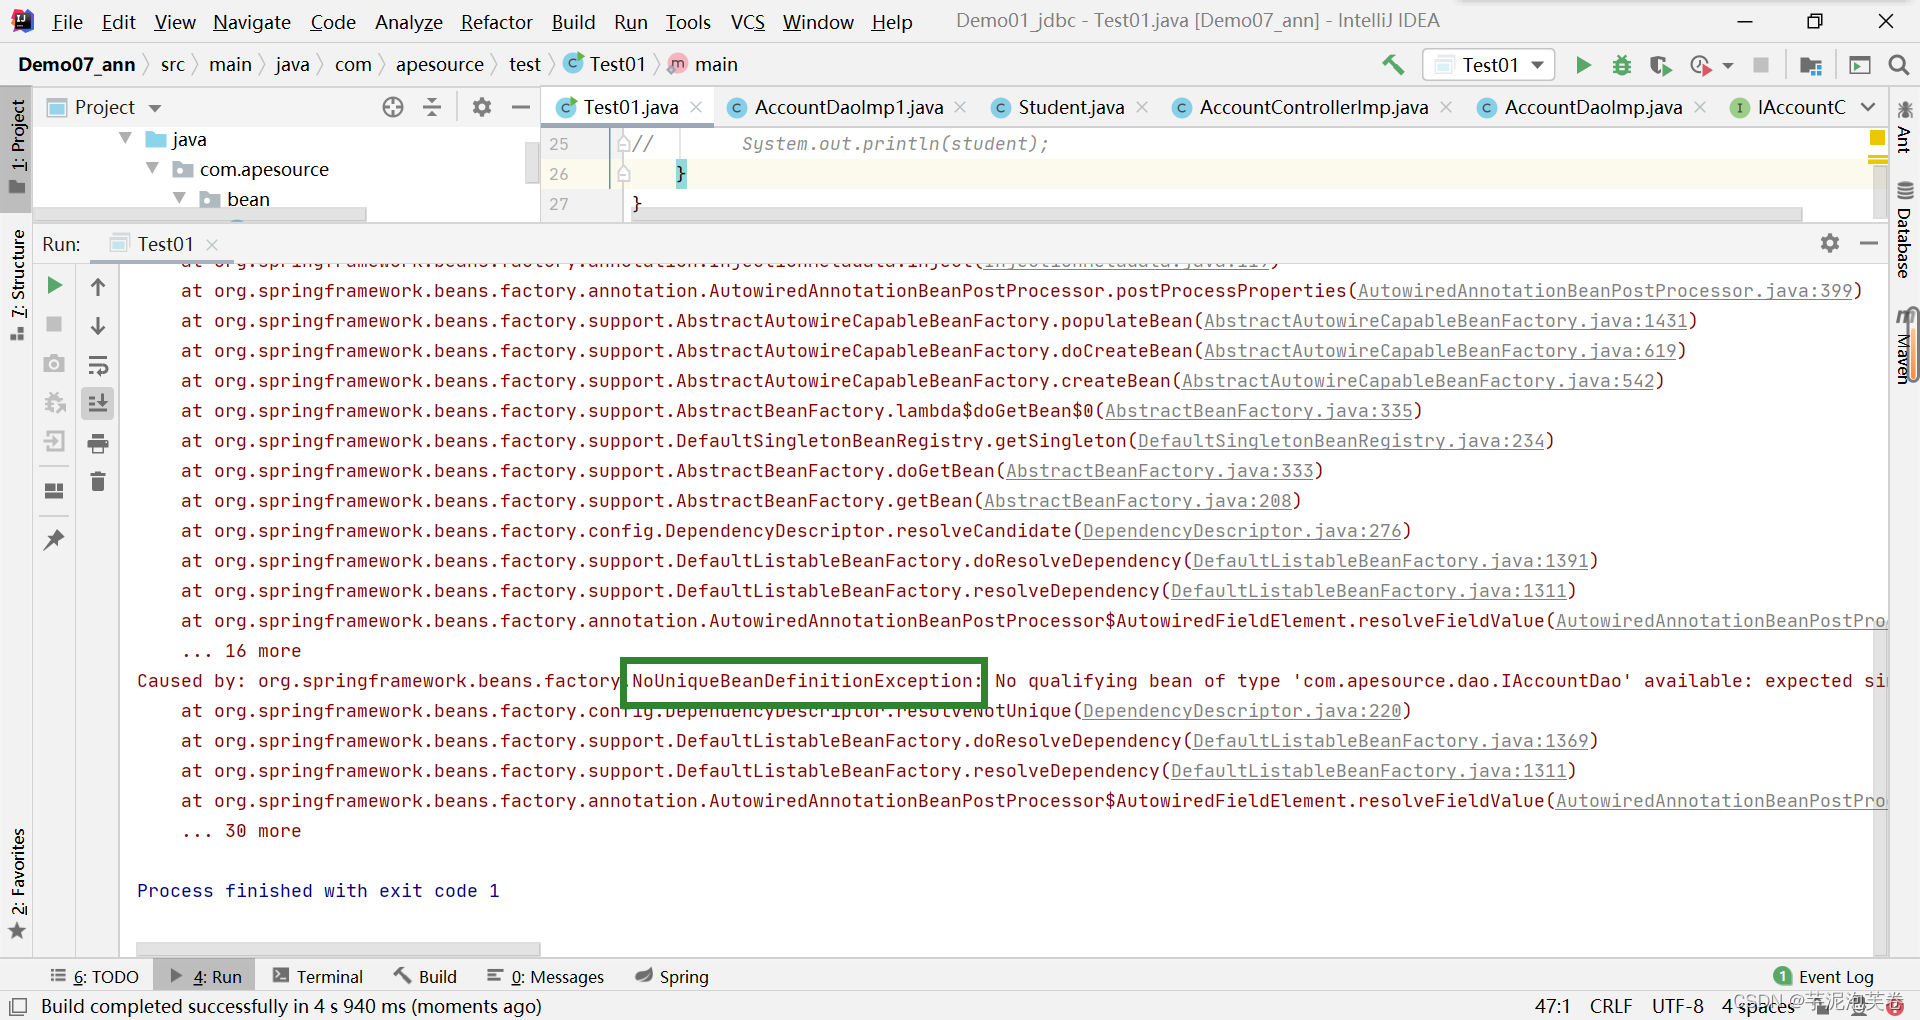
3.若容器中有多个类型可以与之匹配,则自动切换为按照名称装配,若名称没有对应,则报错NoUniqueBeanDefinitionException
3.其他注解
@Primary
@Component
@Primary//首选
public class AccountDaoImp2 implements IAccountDao{@Overridepublic void save() {System.out.println("dao2的新增");}
}
含义:首选项,当类型冲突的情况下,此注解修饰的类被列为首选(备胎扶正)
修饰:类
注意:不能单独使用,必须与@Component....联合使用
@Qualifier(value="名称")
@Component("service")
public class AccountServiceImp implements IAccountService {@Autowired@Qualifier(value = "accountDaoImp1")private IAccountDao dao;@Overridepublic void save() {System.out.println("service的新增");dao.save();}
}
含义:按照名称装配
修饰:成员变量
注意:不能单独使用,必须与@Autowired联合使用
@Resource(name="名称")
@Component("service")
public class AccountServiceImp implements IAccountService {@Resource(name="accountDaoImp2")private IAccountDao dao;@Overridepublic void save() {System.out.println("service的新增");dao.save();}
}
含义:按照名称装配
修饰:成员变量
注意:单独使用
@Scope
@Component
@Scope("prototype")
@Scope("singleton")
public class AccountDaoImp2 implements IAccountDao{@Overridepublic void save() {System.out.println("dao2的新增");}
}
替换:<bean scope="替换"></bean>
含义:配置类的作用域
修饰:类
注意:不能单独使用,必须与@Component....联合使用
@Scope("prototype") 单例
@Scope("singleton") 多例
@Scope(ConfigurableBeanFactory.SCOPE_PROTOTYPE)
@Scope(ConfigurableBeanFactory.SCOPE_SINGLETON)
@PostConstruct:初始化,修饰方法
替换:<bean init-method=""></bean>
@PreDestroy:销毁,修饰方法
替换:<bean destory-method=""></bean>
@PostConstruct
public void doinit(){System.out.println("初始化");
}@PreDestroy
public void dodestory(){System.out.println("销毁了");
}
Spring3.0=====JavaConfig+annonation
此类充当配置类,替代applicationContext.xml文件
spring中的新注解
@Configuration
@Configuration作用:指定当前类是一个配置类
细节:当配置类作为AnnotationConfigApplicationContext对象创建的参数时,该注解可以不写。
@ComponentScan
@ComponentScan(basePackages = {"com.apesource"})作用:用于通过注解指定spring在创建容器时要扫描的包
属性:
value:它和basePackages的作用是一样的,都是用于指定创建容器时要扫描的包。
我们使用此注解就等同于在xml中配置了:
<context:component-scan base-package="com.apesource"></context:component-scan>
@Bean
 //注入id为方法名teacher类型为Teacher的JavaBean
@Bean
public Teacher teacher(){return new Teacher();
}//注入id为方法名abc类型为Teacher的JavaBean
@Bean(name = "abc")
public Teacher teachers(){return new Teacher();
}//注入id为方法名dao类型为AccountDao的JavaBean
@Bean
public IAccountDao dao(){return new AccountDaoImp1();
}//注入id为方法名time类型为Date的JavaBean
@Bean
public Date time(){return new Date();
}
作用:用于把当前方法的返回值作为bean对象存入spring的容器中
属性:
name:用于指定bean的id。当不写时,默认值是当前方法的名称
@Import
@Import(DataSourceConfig.class)作用:用于导入其他的配置类
属性:
value:用于指定其他配置类的字节码。
例子:@Import(SystemSpringConfig.class)
@PropertySource
@PropertySource(value = "classpath:msg.properties")作用:用于指定properties文件的位置
属性:
value:指定文件的名称和路径。
关键字:classpath,表示类路径下
配合@Value使用
例子:@PropertySource("classpath:SystemSpringConfig.properties")