1.JPA
1.1.创建User实体类
public class User {private Integer uId;private String uName;private Integer uGender;private Integer uAge;private String uLoginname;private String uPassword;private Date uBirth;private String uEmail;private String uAddress;
}
1.2.创建UserMapper类
public interface UserMapper {@Select("select * from department where u_loginname = #{uLoginname} and u_password = #{uPassword}")public User login(User user);
}
1.3.创建UserController类
@Controller
public class LoginController {@AutowiredUserMapper userMapper;@PostMapping(value="/user/login")public String login(@RequestParam("username")String username,@RequestParam("password")String password,Map<String,String> map,HttpSession session) {User user = new User();user.setuLoginname(username);user.setuPassword(password);User login = userMapper.login(user);if(login != null) {session.setAttribute("loginName", login.getuName());//session.setAttribute("password", password);//重定向,防止表单重复提交return "redirect:/main.html";}map.put("message","用户名密码错误!");return "login";}
}
1.4.SpringData-JPA简介
SpringData下有三大模块分别是:
Repository support:常应用的是:JPA,因为其中包含大量的CRUD的操作
Templates:SpringData Redis
Object Mapping:SpringData MongoDB
1.5.SpringBoot整合JPA
创建项目选择依赖

JPA本质上还是一个OPM(实体对象关系映射)【Object Relational Mapping】,首先需要创建项目勾选jpa、web、JDBC和MySQL驱动,既然JPA本质ORP,离不开实体对象,那么我们先创建实体类
1.编写User类(实体类),有一个Entity和数据库表去进行映射,并且进行映射关系的配置
//使用JPA注解声明映射关系
@Entity//告诉JPA这是一个实体类(和数据表映射的实体类)
@Table(name="t_user")//告诉JPA与数据库中那张表进行映射
public class User {@Id//告诉JPA这是主键列@GeneratedValue(strategy=GenerationType.IDENTITY)//这是使用主键自增的策略private Integer id;@Column(name="last_name",length=50)//这是对应的数据表中的一列数据private String lastName;@Column(name="email")//省略就是属性名就是数据表中的列名private String email;@Column(name="did")private Integer dId;
2.编写Repository接口去继承JAPRepository接口,实现操作数据库的表中的数据
/*** 继承JpaRepository来实现对数据库进行CRUD的操作* @author Administrator*/
public interface UserRepository extends JpaRepository<User, Integer>{
}
3.基本配置:yml文件中配置:jpa的创建表和显示执行时的sql语句;
spring:datasource:driver-class-name: com.mysql.cj.jdbc.Driverurl: jdbc:mysql://101.132.192.20:3306/jpausername: rootpassword: 123456initialization-mode: always
#101.132.192.20   jpa:hibernate:#更新或创建实体类对应的数据表ddl-auto: update#在执行sql时控制台显示SQL语句show-sql: true
在主程序需要剥离一些SpringBoot自动配置的数据源,否则SpringBoot使用默认数据源!那么自己配置的数据源是不会生效!也就是需要排除自动配置,手动配置(指定)数据源
@EnableAutoConfiguration //把UserRepository初始化,并把其对象放在Spring容器中去
@SpringBootApplication(exclude = {DataSourceAutoConfiguration.class, DataSourceTransactionManagerAutoConfiguration.class})(exclude = { DataSourceAutoConfiguration.class, DataSourceTransactionManagerAutoConfiguration.class })
4.在pom文件中加上Hibernate的依赖,因为JPA底层是依赖于Hibernate
<!-- https://mvnrepository.com/artifact/org.hibernate/hibernate-core -->
<dependency><groupId>org.hibernate</groupId><artifactId>hibernate-core</artifactId>
</dependency>
在MySQL中创建数据库jpa,接下来运行SpringBootApplication(springboot的启动程序),控制台显示建表sql语句,数据库中t_user表创建成功!
5.创建UserController类
@RestController
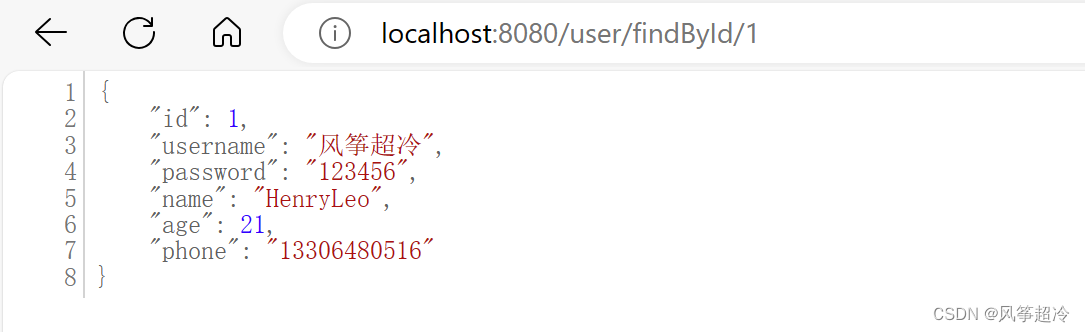
public class UserController {@AutowiredUserRepository repository;@GetMapping("/user")public User addUser(User user){User u = repository.save(user);return u;}@GetMapping("/user/{id}")public User findUserById(@PathVariable("id") Integer id){Optional<User> opt = repository.findById(id);return opt.get();}
}访问地址:http://localhost:8080/user/1
2.缓存
2.1.缓存简介
2.1.1.什么是缓存
从三个角度了解缓存:性能:将相应数据存储起来以避免数据的重复创建、处理和传输,可有效提高性能。
稳定性:同一个应用中,对同一数据、逻辑功能和用户界面的多次请求时经常发生的。当用户基数很大时,如果每次请求都进行处理,消耗的资源是很大的浪费,也同时造成系统的不稳定。例如,web应用中,对一些静态页面的呈现内容进行缓存能有效的节省资源,提高稳定性。而缓存数据也能降低对数据库的访问次数,降低数据库的负担和提高数据库的服务能力;
可用性:有时,提供数据信息的服务可能会意外停止,如果使用了缓存技术,可以在一定时间内仍正常提供对最终用户的支持,提高了系统的可用性。
2.1.2.为什么学习缓存
减少交互通讯量:缓存数据能有效减少在进程和机器间的传输量;
降低系统中的处理量:减少处理次数;
降低需要做的磁盘访问次数:比如缓存在内存中的数据。
2.1.3.缓存数据特点
数据量不大;访问频率高;数据更改频率低
2.2.JSR107
Java Caching定义了5个核心接口,分别是:CachingProvider, CacheManager, Cache, Entry 和 Expiry。
CachingProvider:定义了创建、配置、获取、管理和控制多个CacheManager。一个应用可以在运行期访问多个CachingProvider。
CacheManager:定义了创建、配置、获取、管理和控制多个唯一命名的Cache,这些Cache存在于CacheManager的上下文中。一个CacheManager仅被一个CachingProvider所拥有。
Cache:是一个类似Map的数据结构并临时存储以Key为索引的值。一个Cache仅被一个CacheManager所拥有。
Entry:是一个存储在Cache中的key-value对。
Expiry:每一个存储在Cache中的条目有一个定义的有效期。一旦超过这个时间,条目为过期的状态。一旦过期,条目将不可访问、更新和删除。缓存有效期可以通过ExpiryPolicy设置。

2.2.Spring缓存抽象
2.2.1.介绍
Spring为了简化缓存开发,定义了org.springframework.cache包下的Cache和CacheManager两个接口来统一不同的缓存技术;并支持使用JCache(JSR-107)注解简化我们开发;Cache接口为缓存的组件规范定义,包含缓存的各种操作集合;Cache接口下Spring提供了各种xxxCache的实现;如RedisCache,EhCacheCache , ConcurrentMapCache等;每次调用需要缓存功能的方法时,Spring会检查检查指定参数的指定的目标方法是否已经被调用过;如果有就直接从缓存中获取方法调用后的结果,如果没有就调用方法并缓存结果后返回给用户。下次调用直接从缓存中获取。
使用Spring缓存抽象时我们需要关注以下两点:确定方法需要被缓存以及他们的缓存策略;从缓存中读取之前缓存存储的数据
2.2.2.Spring缓存概念以及注解:
| 概念 | 描述 |
| Cache | 缓存接口,定义缓存操作。实现有:RedisCache、EhCacheCache、ConcurrentMapCache等 |
| CacheManager | 缓存管理器,管理各种缓存(Cache)组件 |
| @Cacheable | 主要针对方法配置,能够根据方法的请求参数对其结果进行缓存 |
| @CacheEvict | 清空缓存 |
| @CachePut | 保证方法被调用,又希望结果被缓存。 |
| @EnableCaching | 开启基于注解的缓存 |
| keyGenerator | 缓存数据时key生成策略 |
| serialize | 缓存数据时value序列化策略 |
2.3.项目搭建及测试
2.3.1.创建项目测试和使用缓存及环境
创建项目需要使用的模块有:core模块下的:cache;web模块下的:web;SQL模块下的:MySQL、MyBatis
搭建基本环境:创建数据库:创建出department和employee表;创建实体类:创建实体类封装数据(department和employee类拷贝到项目中);整合MyBatis整合数据库 (配置数据源信息;写mapper接口);创建Service;创建Control。
注意:环境搭配正确,如果springboot的版本是2.4.4,mybatis推荐2.1.4
<dependency><groupId>org.mybatis.spring.boot</groupId><artifactId>mybatis-spring-boot-starter</artifactId><version>2.1.4</version>
</dependency>
2.3.2.建库语句
SET FOREIGN_KEY_CHECKS=0;
DROP TABLE IF EXISTS `department`;
CREATE TABLE `department` (`id` int(11) NOT NULL AUTO_INCREMENT,`departmentName` varchar(255) DEFAULT NULL,PRIMARY KEY (`id`)
) ENGINE=InnoDB DEFAULT CHARSET=utf8;
DROP TABLE IF EXISTS `employee`;
CREATE TABLE `employee` (`id` int(11) NOT NULL AUTO_INCREMENT,`lastName` varchar(255) DEFAULT NULL,`email` varchar(255) DEFAULT NULL,`gender` int(2) DEFAULT NULL,`d_id` int(11) DEFAULT NULL,PRIMARY KEY (`id`)
) ENGINE=InnoDB DEFAULT CHARSET=utf8;
2.3.3.拷贝是注意类路径
实体类,加上getter、setter、toString和有参无参构造方法
public class Employee {private Integer id;private String lastName;private String email;private Integer gender; //性别 1男  0女private Integer dId;
}public class Department {private Integer id;private String departmentName;
}
2.3.4.整合MyBatis整合数据库(开启驼峰)
配置数据源信息
spring:datasource:driver-class-name: com.mysql.cj.jdbc.Driverurl: jdbc:mysql:// 192.168.202.203:3306/spring_cacheusername: rootpassword: 123456写mapper接口
public interface EmployeeMapper {@Insert("insert into employee(lastName,email,gender,d_id) values(#{lastName},#{email},#{gender},#{dId})")public void insertEmp(Employee employee);@Delete("delect from employee where id = #{id}")public void deleteEmp(Integer id);@Update("update employee set lastName=#{lastName},email=#{email},gender=#{gender},dId=#{d_id} where id = #{id}")public void updateEmp(Employee employee);@Select("select * from employee")public List<Employee> selectAllEmp();@Select("select * from employee where id = #{id}")public Employee selectEmpNyId(Integer id);
}
开启驼峰命名法
mybatis.configuration.map-underscore-to-camel-case=true2.4.测试类
选中项目右键-》Build Path-》Configure Build Path-》Add Library-》JUnit-》选中Junit 4->Apply
@RunWith(SpringRunner.class)
@SpringBootTest
class SpringBootData09Cache1ApplicationTests {@AutowiredEmployeeMapper employeeMapper;@Testvoid contextLoads() {Employee emp = employeeMapper.selectEmpNyId(1);System.out.println(emp.toString());}
}
2.4.1.创建Service层:EmployeeService类
@Service
public class EmployeeService {@AutowiredEmployeeMapper mapper;public Employee findEmpById(Integer id) {System.out.println("查询id为:" + id +"员工信息!");return mapper.selectEmpNyId(id);}
}
2.4.2.创建Controller
@RestController
public class EmployeeControl {@AutowiredEmployeeService employeeService;@GetMapping("/emp/{id}")public Employee getEmpByIt(@PathVariable("id")Integer id) {return employeeService.findEmpById(id);}
}
2.4.3.快速体验缓存
步骤:1.开启基于注解的缓存(@EnableCaching),启动类
import org.mybatis.spring.annotation.MapperScan;
import org.springframework.boot.SpringApplication;
import org.springframework.boot.autoconfigure.SpringBootApplication;
import org.springframework.cache.annotation.EnableCaching;@MapperScan("com.school.demo.mapper")
@SpringBootApplication
@EnableCaching
public class SpringBootData09Cache1Application {public static void main(String[] args) {SpringApplication.run(SpringBootData09Cache1Application.class, args);}}
2.标注缓存注解(@Cacheable:能够根据方法的请求参数对其结果进行缓存;@CacheEvict: 清空缓存;@CachePut:保证方法被调用,又希望结果被缓存。)
为了控制台方便观看,需要把方法执行时的日志和SQL显示出来:
#开启驼峰命名法校验规则
mybatis.configuration.map-underscore-to-camel-case=true
#输出mapper文件中的日志
logging.level.com.com.zpark.demo.mapper=debug
#输出执行时的SQL语句
mybatis.configuration.log-impl=org.apache.ibatis.logging.stdout.StdOutImpl
将刚才的方法查询的结果,放到缓存中去,以后调用相同的方法以后,需要到缓存中去找,缓存中没有再去连接数据库查询
@Cacheable的几个属性:cacheName/value:指定缓存组件的名字
- CacheManager管理多个Cache组件,对缓存进行CRUD
- key:缓存数据用的key,如果不指定key,默认使用的是方法的参数
- keyGenerator:key的生成器,可以自己指定key的生成器的组件id
- cacheManager:可以指定缓存管理器
- cacheResolver:可以指定缓存解析器
- condition:指定符合条件的情况下才会缓存
- condition="#id > 0":表示参数id>0的时候,才可以缓存到Cache中
- sync:是否使用异步
- unless:unless=“#result == null”
- unless:除非满足条件的情况下不缓存,可以获取到结果进行判断
| 名字 | 位置 | 描述 |
| methodName | root object | 当前被调用的方法名 |
| method | root object | 当前被调用的方法 |
| target | root object | 当前被调用的目标对象 |
| targetClass | root object | 当前被调用的目标对象类 |
| args | root object | 当前被调用的方法的参数列表 |
| caches | root object | 当前方法调用使用的缓存列表(如@Cacheable(value={"cache1", "cache2"})),则有两个cache |
| argument name | evaluation context | 方法参数的名字. 可以直接 #参数名 ,也可以使用 #p0或#a0 的形式,0代表参数的索引; |
| result | evaluation context | 方法执行后的返回值(仅当方法执行之后的判断有效,如‘unless’,’cache put’的表达式 ’cache evict’的表达式beforeInvocation=false) |
// 在service进行测试
@Service
public class EmployeeService {	@AutowiredEmployeeMapper mapper;//@Cacheable(value="Emp",key="#id")@Cacheable(value="Emp",condition="#id > 1")public Employee findEmpById(Integer id) {	System.out.println("查询id为:" + id +"员工信息!");	return mapper.selectEmpNyId(id);	}
}