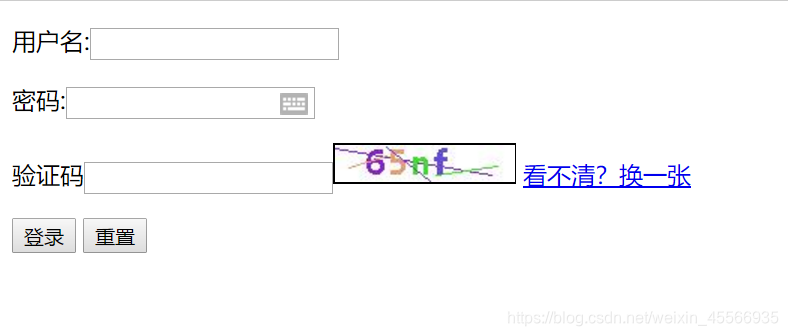
项目中可能会用到图形验证码的功能,源码分享给大家。以下是实际效果图:

一、后端JAVA代码
1.生成图形验证码工具类
public class imgVerifyCode {private int weight = 100;           //验证码图片的长和宽private int height = 40;private String text;                //用来保存验证码的文本内容private Random r = new Random();    //获取随机数对象//private String[] fontNames = {"宋体", "华文楷体", "黑体", "微软雅黑", "楷体_GB2312"};   //字体数组//字体数组private String[] fontNames = {"Georgia"};//验证码数组private String codes = "23456789abcdefghjkmnopqrstuvwxyzABCDEFGHJKMNPQRSTUVWXYZ";/*** 获取随机的颜色** @return*/private Color randomColor() {int r = this.r.nextInt(225);  //这里为什么是225,因为当r,g,b都为255时,即为白色,为了好辨认,需要颜色深一点。int g = this.r.nextInt(225);int b = this.r.nextInt(225);return new Color(r, g, b);            //返回一个随机颜色}/*** 获取随机字体** @return*/private Font randomFont() {int index = r.nextInt(fontNames.length);  //获取随机的字体String fontName = fontNames[index];int style = r.nextInt(4);         //随机获取字体的样式,0是无样式,1是加粗,2是斜体,3是加粗加斜体int size = r.nextInt(10) + 24;    //随机获取字体的大小return new Font(fontName, style, size);   //返回一个随机的字体}/*** 获取随机字符** @return*/private char randomChar() {int index = r.nextInt(codes.length());return codes.charAt(index);}/*** 画干扰线,验证码干扰线用来防止计算机解析图片** @param image*/private void drawLine(BufferedImage image) {int num = r.nextInt(10); //定义干扰线的数量Graphics2D g = (Graphics2D) image.getGraphics();for (int i = 0; i < num; i++) {int x1 = r.nextInt(weight);int y1 = r.nextInt(height);int x2 = r.nextInt(weight);int y2 = r.nextInt(height);g.setColor(randomColor());g.drawLine(x1, y1, x2, y2);}}/*** 创建图片的方法** @return*/private BufferedImage createImage() {//创建图片缓冲区BufferedImage image = new BufferedImage(weight, height, BufferedImage.TYPE_INT_RGB);//获取画笔Graphics2D g = (Graphics2D) image.getGraphics();//设置背景色随机
//        g.setColor(new Color(255, 255, r.nextInt(245) + 10));g.setColor(Color.white);g.fillRect(0, 0, weight, height);//返回一个图片return image;}/*** 获取验证码图片的方法** @return*/public BufferedImage getImage() {BufferedImage image = createImage();Graphics2D g = (Graphics2D) image.getGraphics(); //获取画笔StringBuilder sb = new StringBuilder();for (int i = 0; i < 4; i++)             //画四个字符即可{String s = randomChar() + "";      //随机生成字符,因为只有画字符串的方法,没有画字符的方法,所以需要将字符变成字符串再画sb.append(s);                      //添加到StringBuilder里面float x = i * 1.0F * weight / 4;   //定义字符的x坐标g.setFont(randomFont());           //设置字体,随机g.setColor(randomColor());         //设置颜色,随机g.drawString(s, x, height - 5);}this.text = sb.toString();drawLine(image);return image;}/*** 获取验证码文本的方法** @return*/public String getText() {return text;}public static void output(BufferedImage image, OutputStream out) throws IOException                  //将验证码图片写出的方法{ImageIO.write(image, "JPEG", out);}
}
由于项目需求,图形验证码的背景色我改为白色了,可根据自身情况选择图片背景色
        //设置背景色随机
//        g.setColor(new Color(255, 255, r.nextInt(245) + 10));g.setColor(Color.white);
2.生成验证码接口
@RequestMapping("/getVerifiCode.action")@ResponseBodypublic String getVerifiCode(Map<String, Object> requestMap, HttpSession session, HttpServletRequest request, HttpServletResponse response) throws IOException {ImageVerificationCode ivc = new ImageVerificationCode(); //使用验证码类,生成验证码类对象BufferedImage image = ivc.getImage(); //获取验证码request.getSession().setAttribute("text", ivc.getText()); //将验证码的文本存在session中ivc.output(image, response.getOutputStream());//将验证码图片响应给客户端request.setCharacterEncoding("utf-8");String session_vcode=(String) request.getSession().getAttribute("text"); //从session中获取真正的验证码return session_vcode;}
3.校验验证码接口
@RequestMapping(value = "/checkVerify", method = RequestMethod.POST, headers = "Accept=application/json")@ResponseBodypublic boolean checkVerify(@RequestParam String verifyInput, HttpSession session) {try {//从session中获取随机数String inputStr = verifyInput;String random = (String) session.getAttribute("text");if (random == null || "".equals(random) || !random.equalsIgnoreCase(inputStr)) {return false;} else {return true;}} catch (Exception e) {log.error("验证码校验失败", e);return false;}}
4.拦截器
不要忘记把拦截器放行这两个接口
二、HTML
<div class="form-group"><input type="text" id="verify_input" name="title" class="form-control"  placeholder="验证码" autocomplete="off" /><div id="verify_image" style="margin: -43px 0px 3px 200px;"><img id="imgVerify" style="color: white; cursor:pointer;width: 100px;height: 38px;margin: -38px -32px -22px 0;border-radius: 4px;" title="刷新验证码" onclick="getVerify(this);"></div>
</div>
三、JS
function getVerify() {$("#verify_input").val("");$("#imgVerify").attr("src", './getVerifiCode.action?' + Math.random());//jquery方式
}function aVerify() {let value = $("#verify_input").val();if (value == '') {alert('[[#{login.hint10}]]');return 0;}$.ajax({async: false,type: 'post',url: './checkVerify',dataType: "json",data: {verifyInput: value},success: function (result) {if (result) {.....//验证用户名密码逻辑} else {alert("验证码输入错误,请重新输入!");getVerify();}}});
}


