In our previous articles, we have learnt about the SASjs ecosystem and seen how we can build a SAS app with Angular.
在之前的文章中,我们了解了SASjs生态系统,并了解了如何使用Angular构建SAS应用程序 。
In this article, we will look at how to spin up a minimal app that uses plain HTML5 and JavaScript along with the SASjs adapter.
在本文中,我们将研究如何启动一个使用普通HTML5和JavaScript以及SASjs适配器的最小应用程序。
We will describe two ways to build and deploy the @sasjs/minimal-seed-app— a basic approach without using the @sasjs/cli tool, and a faster / more flexible approach that requires the CLI.
我们将描述两种构建和部署@sasjs/minimal-seed-app的方法-一种不使用@sasjs/cli工具的基本方法,以及一种需要CLI的更快/更灵活的方法。
先决条件 (Prerequisites)
You must have Node.js and NPM installed on your computer to be able to use SASjs.
您必须在计算机上安装Node.js和NPM才能使用SASjs。
基本方法 (Basic Approach)
第1步:克隆仓库 (Step 1: Clone the repo 📦)
The minimal seed app for SASjs is available at https://github.com/sasjs/minimal-seed-app.
可从https://github.com/sasjs/minimal-seed-app获得SASjs的最小种子应用程序。
The app contains a src folder with three files:
该应用程序包含一个带有三个文件的src文件夹:
An
index.htmlwith markup for a login form and an area to display data. This file references the@sasjs/adapterlibrary via ascripttag.一个带标记的
index.html,用于登录表单和一个用于显示数据的区域。 该文件通过script标记引用@sasjs/adapter库。A
styles.cssfile with basic styling for UI elements.具有UI元素基本样式的
styles.css文件。A
scripts.jsfile containing functions that interface with the adapter and put the received data on screen.一个
scripts.js文件,其中包含与适配器接口并将接收到的数据显示在屏幕上的函数。
The root folder of the app contains a package.json file that manages dependencies and provides a deploy script.
该应用程序的根文件夹包含一个package.json文件,该文件管理依赖项并提供部署脚本。
There is also a sasjs folder which contains service definitions to be deployed to your SAS server. This is also the place to save any macros (sasjs/macros), services (sasjs/services) and DDL files (sasjs/db/{LIBREF}).
还有一个sasjs文件夹,其中包含要部署到SAS服务器的服务定义。 这也是保存任何宏( sasjs/macros ),服务( sasjs/services )和DDL文件( sasjs/db/{LIBREF} )的地方。
第2步:创建后端SAS服务⚙️ (Step 2: Create the backend SAS services ⚙️)
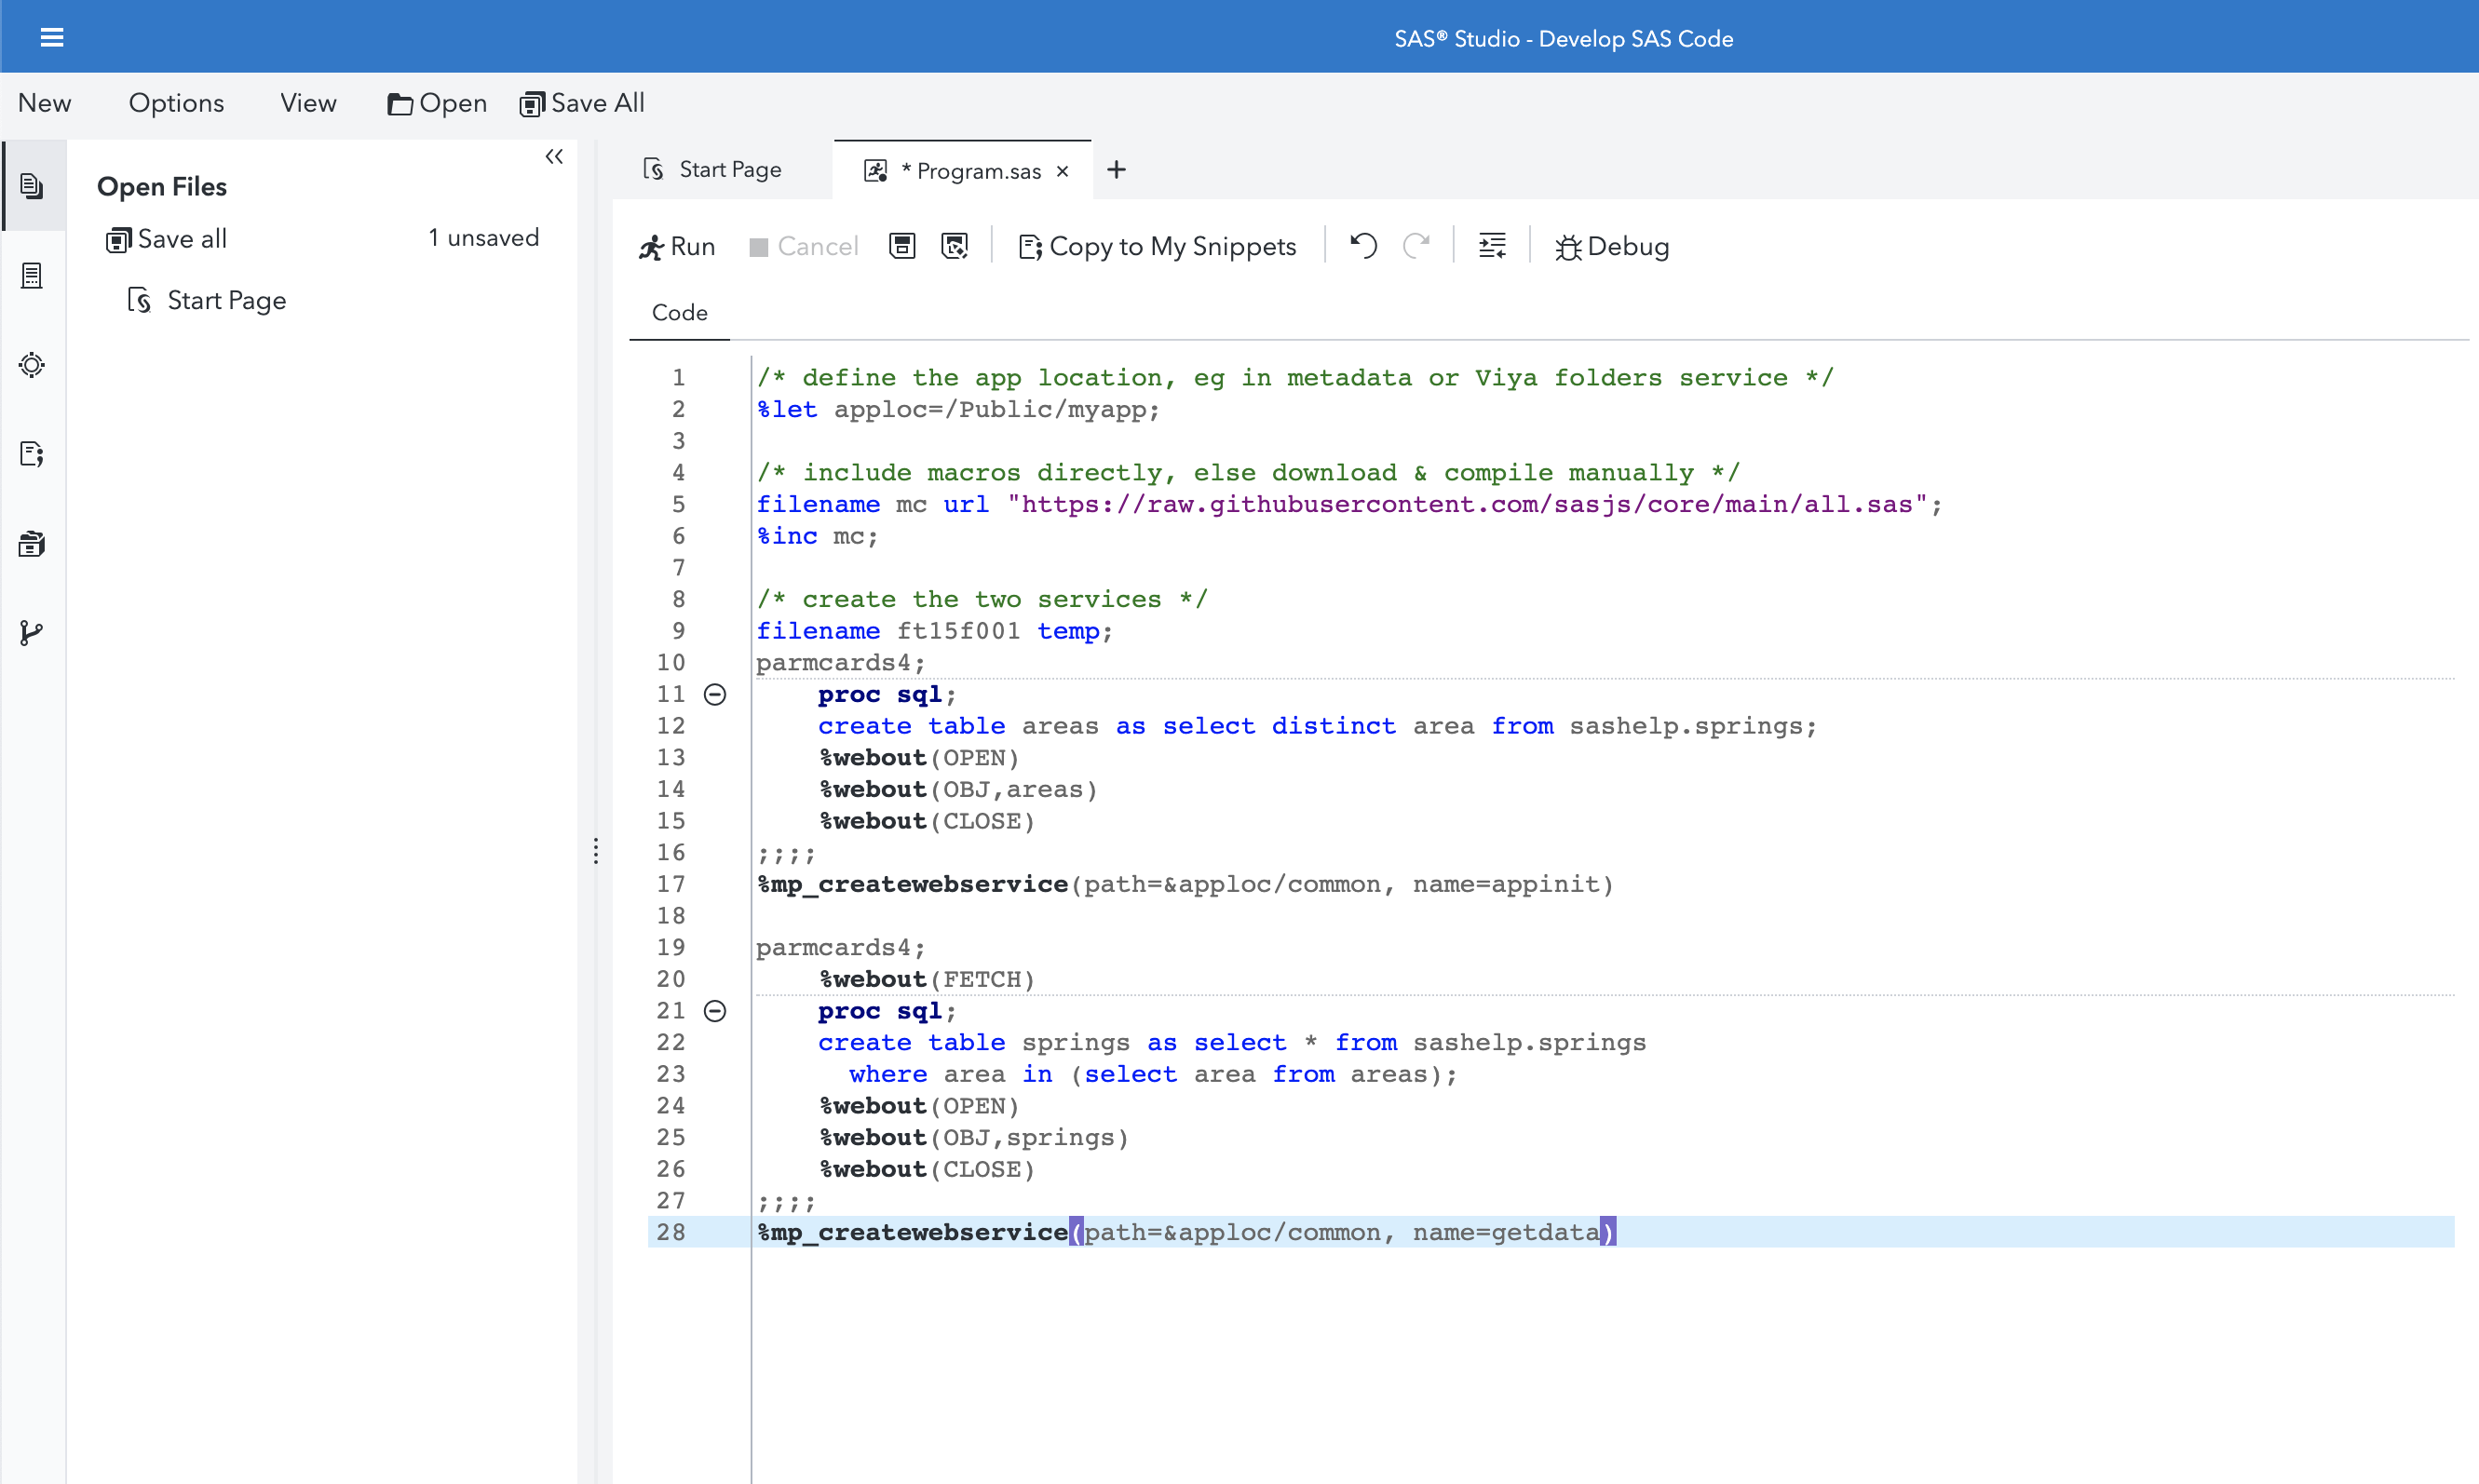
For convenience we will generate the demo services using SAS Studio. Copy and paste the SAS code from the README into the SAS program editor. Modify the value for appLoc– this is the SAS Folder location where the services (Stored Processes or Job Execution Services) will be created. Now execute the program by clicking Run.
为了方便起见,我们将使用SAS Studio生成演示服务。 从README复制SAS代码并将其粘贴到SAS程序编辑器中。 修改appLoc的值–这是将在其中创建服务(存储过程或作业执行服务)的SAS文件夹位置。 现在,通过单击运行执行程序。
步骤3:添加代码和配置👩💻 (Step 3: Add your code and configuration 👩💻)
The reference implementation is quite barebones, and provides basic examples for how to make requests to the SAS server, and display the returned data on the screen. It also does not include any JavaScript dependencies apart from @sasjs/adapter and @sasjs/core.
该参考实现只是一个准系统,并提供了有关如何向SAS服务器发出请求以及如何在屏幕上显示返回数据的基本示例。 除了@sasjs/adapter和@sasjs/core之外,它也不包含任何JavaScript依赖项。
Depending on your use case, you can add any required HTML files, JavaScript code or styling, or include any third-party dependencies to implement your desired features.
根据您的用例,您可以添加任何必需HTML文件,JavaScript代码或样式,或者包括任何第三方依赖项以实现所需的功能。
There is a <script> tag in the index.html file that defines the server configuration for the SASjs adapter. You can edit this to match your SAS server’s configuration. The key attributes are:
index.html文件中有一个<script>标记,用于定义SASjs适配器的服务器配置。 您可以对其进行编辑以匹配SAS服务器的配置。 关键属性是:
serverType— eitherSAS9orSASVIYA.serverType-无论是SAS9或SASVIYA。appLoc— the location to which you deployed your backend services in step 2 above.appLoc在上面的步骤2中将后端服务部署到的位置。
You can also add any backend services, macros and DDL files to the sasjs folder as described above.
您还可以如上所述将任何后端服务,宏和DDL文件添加到sasjs文件夹中。
步骤4:开始! 🚀 (Step 4: Go! 🚀)
You are now ready to deploy your app! 💥
您现在可以部署您的应用程序了! 💥
You can deploy it using the NPM deploy script provided in package.json. This script requires two environment variables to be set:
您可以使用package.json提供的NPM deploy脚本来部署它。 该脚本需要设置两个环境变量:
SSH_ACCOUNT — your SSH account, this is of the form username@domain.com
SSH_ACCOUNT —您的SSH帐户,格式为username@domain.com
DEPLOY_PATH — the path on the server where the app will be deployed to, typically /var/www/html/<some-subfolder> in SAS Viya. More information on finding your static content folder is available here.
DEPLOY_PATH —将应用程序部署到的服务器上的路径,通常是SAS Viya中的/var/www/html/<some-subfolder> 。 有关查找静态内容文件夹的更多信息,请参见此处 。
You can run the script like so:
您可以像这样运行脚本:
SSH_ACCOUNT=me@my-sas-server.com DEPLOY_PATH=/var/www/html/my-folder/myapp npm run deployAnd that’s it! You now have a working app deployed to your SAS server, e.g. <your-sas-server>/<some-subfolder>/<app-name>.
就是这样! 现在,您已将一个可运行的应用程序部署到SAS服务器,例如<your-sas-server>/<some-subfolder>/<app-name> 。
使用SASjs CLI (Using the SASjs CLI)
To make it even easier to scaffold up SASjs apps, we’ve created a CLI that provides a create command (We’ll have a full article about all the commands and features of the CLI later in the series 🎁).
为了更轻松地搭建SASjs应用程序,我们创建了一个提供create命令的CLI(在系列later中,我们将提供有关CLI的所有命令和功能的完整文章)。
步骤1:安装CLI🛠 (Step 1: Install the CLI 🛠)
You can install the CLI using this command.
您可以使用此命令安装CLI。
npm install -g @sasjs/cliThe sasjs command will now be available on your command line!
现在,您可以在命令行上使用sasjs命令!
第2步:创建一个最小的Web应用程序🏗 (Step 2: Create a minimal web app 🏗)
You can use this command to scaffold a minimal web app.
您可以使用此命令来搭建最小的Web应用程序。
sasjs create <your-app-name> --template minimalor
要么
sasjs create <your-app-name> -t minimalThis will create the exact same folder structure that we’ve seen above, as well as install the @sasjs/core macro library in the node_modules folder.
这将创建与我们上面看到的完全相同的文件夹结构,并将@sasjs/core宏库安装在node_modules文件夹中。
步骤3:添加代码和配置👨💻 (Step 3: Add your code and configuration 👨💻)
This step is the same as above. You can add any HTML, JavaScript or CSS into the src folder in the app.
此步骤与上面相同。 您可以将任何HTML,JavaScript或CSS添加到应用程序的src文件夹中。
Any new SAS services should be placed in a subfolder under sasjs/services. Any new subfolders should be defined in the cmnServices array in the sasjsconfig.json file.
任何新的SAS服务都应放在sasjs/services下的子文件夹中。 任何新的子文件夹都应该在sasjsconfig.json文件的cmnServices数组中定义。
If those services have macro dependencies, place them in the header under a <h4> dependencies </h4> tag, as shown here. The macro itself should be saved in the sasjs/macros folder. There is no need store any @sasjs/core macros here — they will be compiled automatically.
如果这些服务有宏观的依赖关系,将它们放置在一个下标头<h4> dependencies </h4>标签,如图这里 。 宏本身应保存在sasjs/macros文件夹中。 无需在此处存储任何@sasjs/core宏-它们将自动编译。
You can run sasjs add to add a new build target — this will prompt for several items including the appLoc, server details, and client ID/ secret if SAS Viya is chosen. You can get a client ID and secret from your SAS administrator. If you are an administrator, you can use the SASjs Viya Token Generator to generate new client registrations.
您可以运行sasjs add来添加新的构建目标-如果选择了SAS Viya,这将提示输入多个项目,包括appLoc ,服务器详细信息和客户端ID /密钥。 您可以从SAS管理员处获取客户端ID和密码。 如果您是管理员,则可以使用SASjs Viya令牌生成器来生成新的客户端注册。
Your configuration will be saved to the sasjsconfig.json file.
您的配置将保存到sasjsconfig.json文件。
Take note of the target name you provide, as you will require this in subsequent steps.
记下您提供的目标名称,因为在后续步骤中将需要使用该名称。
步骤4:构建和部署SAS服务👷♀️ (Step 4: Build and deploy your SAS services 👷♀️)
编译 (Build & Compile)
From the root of the project, run sasjs build <target-name-from-step-3>. This will create one file per service, in a temporary sasjsbuild folder.
从项目的根目录运行sasjs build <target-name-from-step-3> 。 每个服务将在一个临时的sasjsbuild文件夹中创建一个文件。
You can now run sasjs compile <target-name>. This will concatenate all the services into a single SAS deployment program inside the sasjsbuild folder.
现在,您可以运行sasjs compile <target-name> 。 这会将所有服务连接到sasjsbuild文件夹内的单个SAS部署程序中。
To run both of these steps at once, you can run sasjs cb.
要同时运行这两个步骤,可以运行sasjs cb 。
部署 (Deploy)
You now have a couple of options for deployment:
您现在有几个部署选项:
1) Run sasjs deploy <target-name>to automatically deploy the services using the REST APIs (if running on Viya).
1)运行sasjs deploy <target-name>以使用REST API自动部署服务(如果在Viya上运行)。
2) Execute the .sas file in the sasjsbuild folder in SAS Studio (useful for SAS 9, or if you have not provided a client / secret for SAS Viya).
2)执行.sas在文件sasjsbuild在SAS Studio文件夹(用于SAS 9,或者如果你还没有提供SAS Viya客户端/秘密)。
步骤5:部署您的应用程序🚀 (Step 5: Deploy your app 🚀)
You can use the NPM deploy described earlier in this article to deploy the frontend to your SAS server.
您可以使用本文前面介绍的NPM deploy将前端部署到SAS服务器。
By wrapping your frontend build / deployment command in a shell script, and adding to the tgtDeployScripts array, you can now compile / build / deploy both frontend AND backend in a single command!
通过将前端build / Deployment命令包装在shell脚本中,并添加到tgtDeployScripts数组中,您现在可以在一个命令中编译/构建/部署前端和后端!
sasjs cbd <target-name>The deployed app will now be accessible at <your-sas-server>/<some-subfolder>/<app-name>.
现在可以在<your-sas-server>/<some-subfolder>/<app-name>上访问已部署的应用程序。
The CLI also provides another deployment option — the ability to create a streamable web app using the sasjs web command. We will dive deeper into this in a future article.
CLI还提供了另一个部署选项-使用sasjs web命令创建可流式Web应用程序的sasjs web 。 我们将在以后的文章中更深入地探讨这一点。
总结🎁 (Wrap up 🎁)
In this article, we have learnt two ways to scaffold a minimal HTML5 and JavaScript-based SAS web app — by cloning the GitHub repo and via the SASjs CLI.
在本文中,我们学习了两种构建最小的基于HTML5和基于JavaScript的SAS Web应用程序的方法-通过克隆GitHub存储库和通过SASjs CLI 。
To learn more you can go to https://sasjs.io.
要了解更多信息,请访问https://sasjs.io 。
Feel free to raise a GitHub issue if you encounter any problems.
如果遇到任何问题,请随时提出GitHub问题。
If you found this useful, please support us by slapping a star on the @sasjs/adapter and @sasjs/cli GitHub repos.
如果您觉得这很有用,请在@sasjs/adapter和@sasjs/cli GitHub存储库上打一个星号,以支持我们。
Happy coding! 🤓
编码愉快! 🤓
翻译自: https://medium.com/@krishna.acondy/building-an-html5-javascript-css-app-with-sasjs-4cdbdb7c466f
本文来自互联网用户投稿,该文观点仅代表作者本人,不代表本站立场。本站仅提供信息存储空间服务,不拥有所有权,不承担相关法律责任。如若转载,请注明出处:http://xiahunao.cn/news/353641.html
如若内容造成侵权/违法违规/事实不符,请联系瞎胡闹网进行投诉反馈,一经查实,立即删除!


