文章目录
- 前言
- 一、创建自定义的 C++ OOT 块
- 1、创建 timestamp_sender C++ OOT 模块
- ①、创建 timestamp_sender OOT 块
- ②、修改 C++ 代码
- 2、创建 timestamp_receiver C++ OOT 模块
- ①、创建 timestamp_receiver OOT 块
- ②、修改 C++ 代码
- 3、创建 delayMicroSec C++ OOT 模块
- ①、创建 delayMicroSec OOT 块
- ②、修改 C++ 代码
- 二、编译及安装 OOT 块
- 三、测试
- 1、grc 图
- 2、运行结果
- 四、资源自取
前言
目前有这么样一个需求,我想在 GNU Radio 中计算从一个模块到其他模块执行所花费的时间,我的做法是将获取的时间戳信息作为标签添加到数据流中,然后传入到待计算时间的那个模块后再获取当前时间并与流标签中的时间戳信息进行相减,即可得到所耗费的时间,也就达到了计算时间间隔的目的。
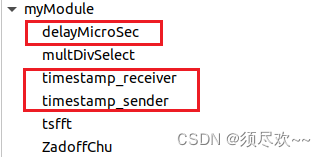
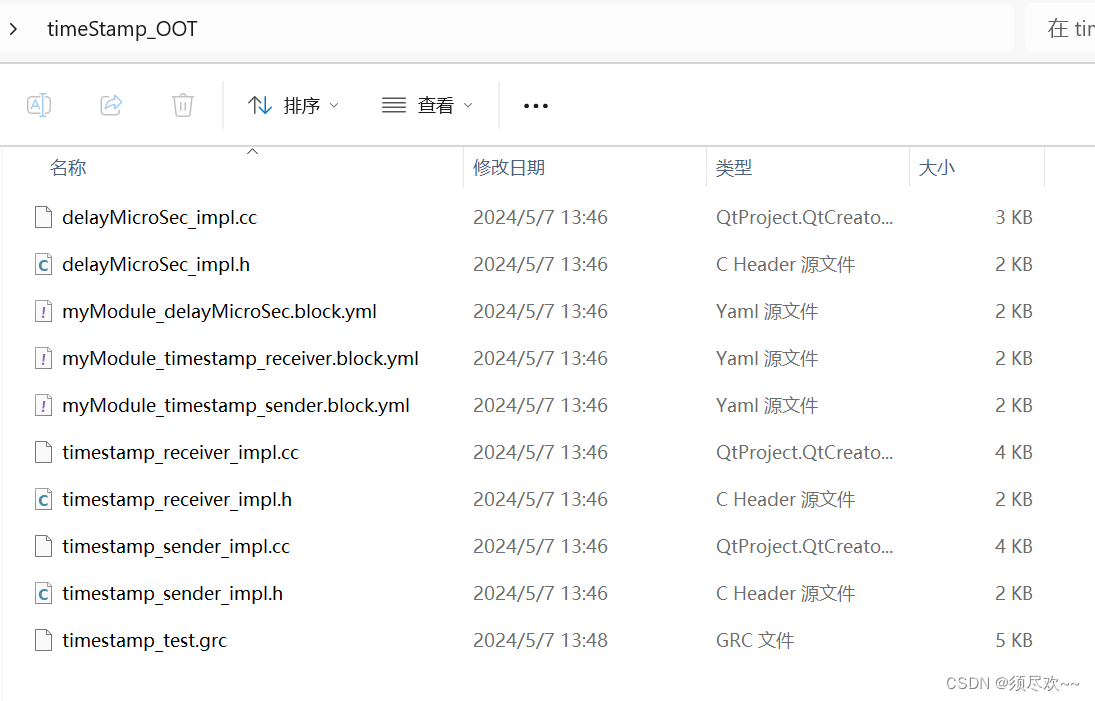
因此本文将创建红框内的三个 C++ OOT块,实现时间测量。
一、创建自定义的 C++ OOT 块
参考官方教程 Creating C++ OOT with gr-modtool 创建自定义的 OOT块
1、创建 timestamp_sender C++ OOT 模块
可以参考我之前的博客内容,做法都是差不多的:GNU Radio创建Zadoff-Chu序列C++ OOT块
详细代码及配置文件文末自取
①、创建 timestamp_sender OOT 块
gr_modtool newmod myModule
cd gr-myModule
gr_modtool add timestamp_sender
当让你输入模块类型时,选择 sync
Enter block type: sync
当让你输入参数时,按照如下方式输入:
Enter valid argument list, including default arguments:
size_t itemsize
②、修改 C++ 代码
修改 gr-myModule/lib/ 目录下的 timestamp_sender_impl.cc 和 timestamp_sender_impl.h 文件和 gr-myModule/grc/ 目录下的配置文件myModule_timestamp_sender_impl.block.yml
timestamp_sender_impl.cc 核心部分程序:
auto now = std::chrono::high_resolution_clock::now();
// 返回自纪元(通常是1970年1月1日)以来的时间间隔, 获取以微秒为单位的时间间隔值
auto now_us = std::chrono::duration_cast<std::chrono::microseconds>(now.time_since_epoch()).count();	// 以微秒(microseconds)为单位输出// 创建标签并添加时间戳
pmt::pmt_t key = pmt::string_to_symbol("timestamp");
pmt::pmt_t value = pmt::from_long(now_us);
add_item_tag(0, nitems_written(0), key, value);
timestamp_sender_impl.h 核心部分程序:
private:// Nothing to declare in this block.size_t d_itemsize;public:timestamp_sender_impl(size_t itemsize);~timestamp_sender_impl();void send_timestamp(pmt::pmt_t msg);
myModule_timestamp_sender_impl.block.yml 部分核心配置:
parameters:
-   id: typelabel: Typedtype: enumoptions: [complex, float, int, short, byte]option_attributes:size: [gr.sizeof_gr_complex, gr.sizeof_float, gr.sizeof_int, gr.sizeof_short,gr.sizeof_char]hide: part
2、创建 timestamp_receiver C++ OOT 模块
①、创建 timestamp_receiver OOT 块
gr_modtool newmod myModule
cd gr-myModule
gr_modtool add timestamp_receiver
当让你输入模块类型时,选择 sync
Enter block type: sync
当让你输入参数时,按照如下方式输入:
Enter valid argument list, including default arguments:
size_t itemsize
②、修改 C++ 代码
修改 gr-myModule/lib/ 目录下的 timestamp_receiver_impl.cc 和 timestamp_receiver_impl.h 文件和 gr-myModule/grc/ 目录下的配置文件myModule_timestamp_receiver_impl.block.yml
timestamp_receiver_impl.cc 核心部分程序:
std::vector<tag_t> tags;
get_tags_in_window(tags, 0, 0, noutput_items);	// 获取输入样本范围内的所有标签,并存储在 tags 向量中for (const auto& tag : tags)					// 遍历 tags 向量中的每个标签
{calculate_delay(tag.key, tag.value);
}
timestamp_receiver_impl.h 核心部分程序:
private:size_t d_itemsize;void calculate_delay(const pmt::pmt_t& key, const pmt::pmt_t& value);
myModule_timestamp_receiver_impl.block.yml 部分核心配置:
parameters:
-   id: typelabel: Typedtype: enumoptions: [complex, float, int, short, byte]option_attributes:size: [gr.sizeof_gr_complex, gr.sizeof_float, gr.sizeof_int, gr.sizeof_short,gr.sizeof_char]hide: part
3、创建 delayMicroSec C++ OOT 模块
①、创建 delayMicroSec OOT 块
gr_modtool newmod myModule
cd gr-myModule
gr_modtool add delayMicroSec
当让你输入模块类型时,选择 sync
Enter block type: sync
当让你输入参数时,按照如下方式输入:
Enter valid argument list, including default arguments:
size_t itemsize, int delay_us
②、修改 C++ 代码
修改 gr-myModule/lib/ 目录下的 delayMicroSec_impl.cc 和 delayMicroSec_impl.h 文件和 gr-myModule/grc/ 目录下的配置文件myModule_delayMicroSec_impl.block.yml
delayMicroSec_impl.cc 核心部分程序:
// 延时指定的微秒数,只在第一次时延迟
if (first_time) {// 延时指定的微秒数std::this_thread::sleep_for(std::chrono::microseconds(d_delay_us));first_time = false; // 重置标志位,后续不再延迟
}
delayMicroSec_impl.h 核心部分程序:
private:size_t d_itemsize;int d_delay_us;bool first_time;
myModule_delayMicroSec_impl.block.yml 部分核心配置:
parameters:
-   id: typelabel: Typedtype: enumoptions: [complex, float, int, short, byte]option_attributes:size: [gr.sizeof_gr_complex, gr.sizeof_float, gr.sizeof_int, gr.sizeof_short,gr.sizeof_char]hide: part
-   id: delay_uslabel: delay usdtype: intdefault: 0
详细代码及配置文件文末自取
二、编译及安装 OOT 块
1、上面创建的三个 OOT 块需要编译和安装,确保目前位于 gr-myModule 目录中:
cd gr-myModule
2、如果 build/ 目录已存在,请将其删除:
rm -rf build/
3、创建 build/ 目录
mkdir build
4、进入 build 目录
cd build/
5、运行 cmake 来构建 makefile
cmake ..
6、编译模块
make
7、安装模块
sudo make install
8、更新 myModule 库的链接
sudo ldconfig
三、测试
打开 gnuradio-companion
gnuradio-companion
可以看到安装成功的模块
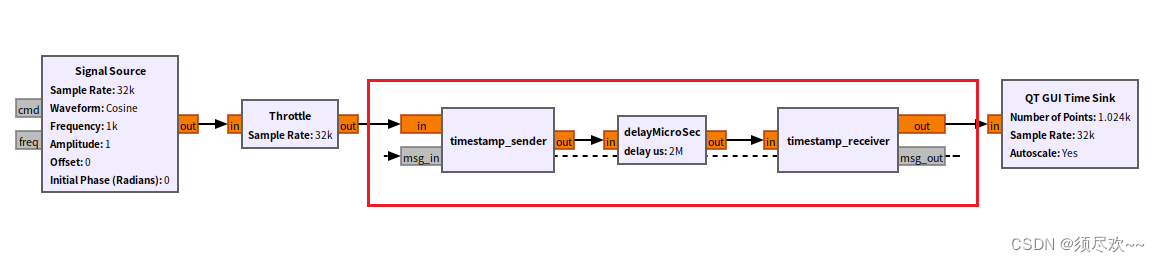
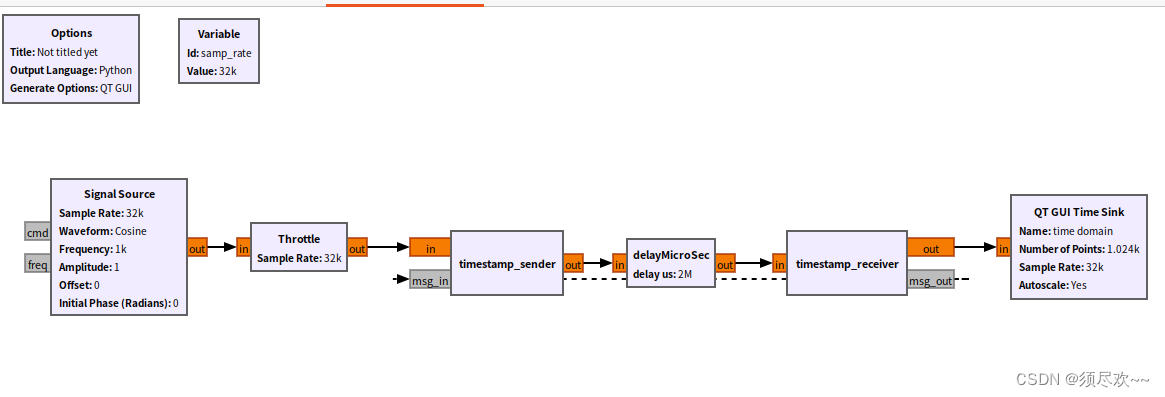
1、grc 图
正弦波信号源通过限流器后传递给 timestamp_sender 模块,timestamp_sender 将数据流附加上时间戳标签后,通过延时模块对信号延时 2s 后再将其传递至 timestamp_receiver 模块,timestamp_receiver 模块会计算所经历的时间间隔,当计算完成后会向 timestamp_sender 模块传递消息,告知 timestamp_sender 模块模块我目前已经计算完成,你可以继续往数据流上面附加时间戳标签方便我进行下次的计算。
2、运行结果
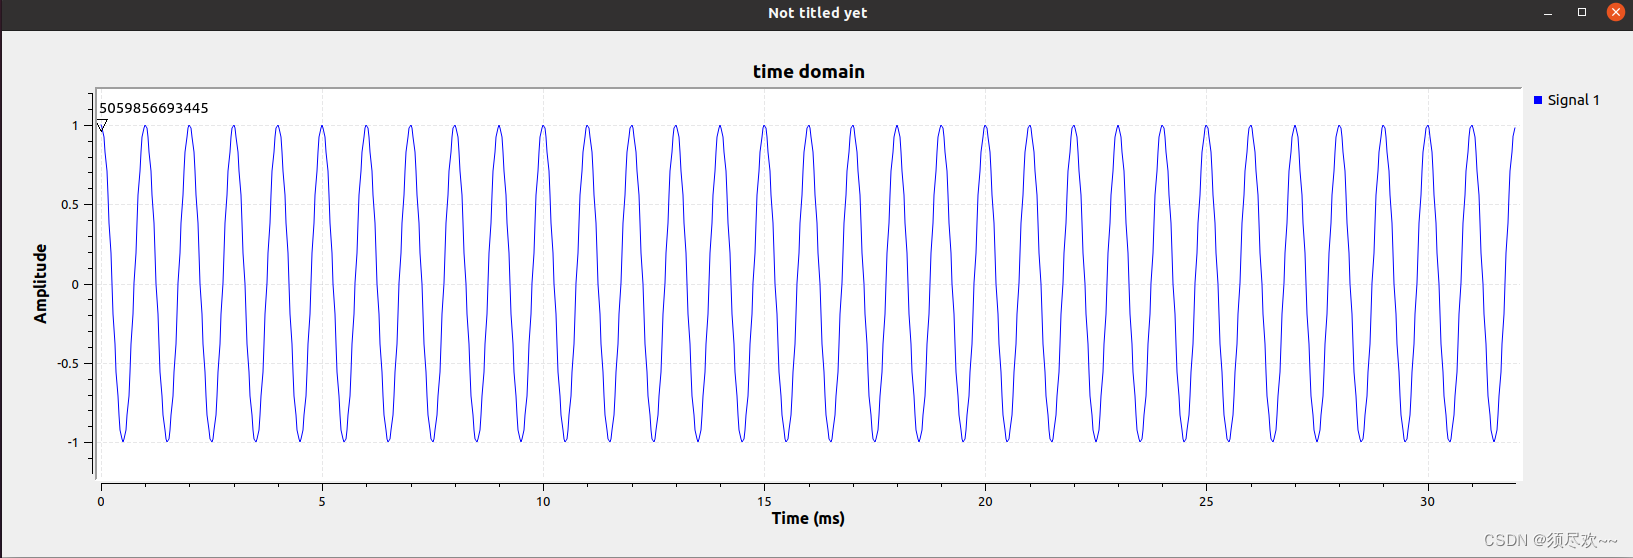
首先可以看到正弦波信号时域波形图附加着时间戳标签(微秒)
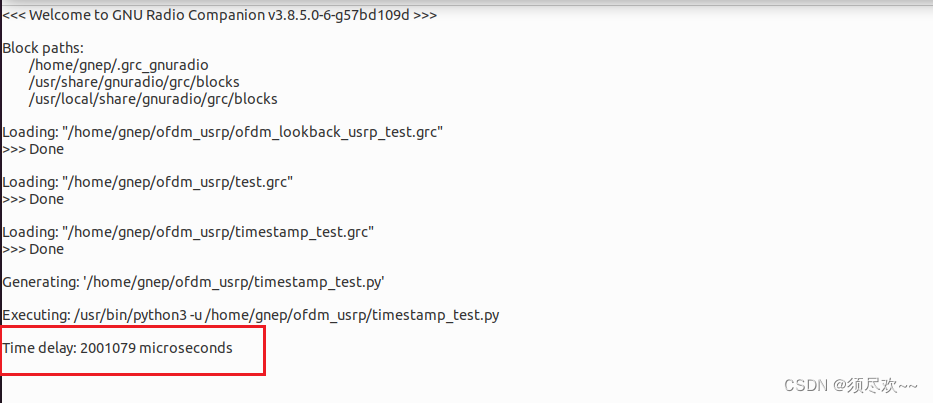
其次可以在console 端看到打印的时间间隔信息,为 2001073 us,大约为 2s,因为程序执行也需要一定的时间,当我们进行时间测量的时候,可以先将程序运行所需要的时间计算出来,并在计算时间间隔的时候减去这个值,以便计算的时间更加精准。
四、资源自取
链接:GNU Radio创建时间戳 C++ OOT块
我的qq:2442391036,欢迎交流!