Spring Boot
- 前言
- 实现增删改查功能

前言
增删改查功能作为 Web 应用中的基础且重要的组成部分,是基本的数据库操作,也是实现业务逻辑和功能的关键要素。下面简单介绍使用 Spring Boot 实现增删改查的功能。
实现增删改查功能
在上一章 Spring Boot:Web应用开发之登录与退出的实现 文章的案例基础上,进行实现增删改查的功能。
简单示例:
首先,创建一个 PublicTemplate.html ,将 html 的公共代码抽离到这页面上,方便其他页面进行复用(使用方式:th:replace=“模版名称::模版⽚段名称”)
<!DOCTYPE html>
<html lang="en">
<head><meta charset="UTF-8"><title>公共页面-抽离与复用</title>
</head>
<body><!-- th:fragment 属性来定义被包含的模版⽚段,以供其他模版使用。模版⽚段名称为 top --><div class="header" th:fragment="header">主页面的头部区域</div><div class="center"><!-- 通用侧边栏区域 --><div class="sidebar" th:fragment="sidebar"><!-- 增强效果设置:th:class="${isActive=='Main.html'?'active':''}" 当切换到该页面时,内容设定为 active 的样式 --><a href="#" th:class="${isActive=='Main.html'?'active':''}" th:href="@{Main.html}">主页</a> <br><a href="#" th:class="${isActive=='UserList.html'?'active':''}" th:href="@{UserList.html}">用户列表</a> <br><a th:href="@{/logout.html}">退出</a></div></div><div class="footer" th:fragment="footer">主页面的脚部区域</div>
</body>
</html>
创建需要用到的页面,有公共的代码便使用 th:replace 调用
Main.html:主页面
<!DOCTYPE html>
<html lang="en">
<head><meta charset="UTF-8"><title>MainDemo</title><!--  存放 css 文件默认在 static 目录下 --><link rel="stylesheet" type="text/css" th:href="@{/css/PublicCss.css}">
</head>
<body><!-- th:replace 替换整个标签到引入的文件。使用方式——th:replace="模版名称::模版⽚段名称" --><div th:replace="PublicTemplate::header"></div><dic class="center"><!-- 增强效果设置:(isActive='Main.html') --><div th:replace="PublicTemplate::sidebar(isActive='Main.html')"></div><div class="main">主页面内容</div></dic><div th:replace="PublicTemplate::footer"></div>
</body>
</html>
UserList.html:显示用户列表页面
<!DOCTYPE html>
<html lang="en">
<head><meta charset="UTF-8"><title>UserListDemo</title><!--  存放 css 文件默认在 static 目录下 --><link rel="stylesheet" type="text/css" th:href="@{/css/PublicCss.css}">
</head>
<body><!-- th:replace 替换整个标签到引入的文件。使用方式——th:replace="模版名称::模版⽚段名称" --><div th:replace="PublicTemplate::header"></div><dic class="center"><div th:replace="PublicTemplate::sidebar(isActive='UserList.html')"></div><div class="main"><form th:action="UserSearch.html" method="post"><input type="text" name="searchByUsername" /><input type="submit" value="查询" /><a th:href="@{/UserAdd.html}">添加</a></form><table><tr><td>id</td><td>账号</td><td>密码</td><td>注册时间</td><td>地址</td><td>操作</td></tr><tr th:each="user:${users}"><td th:text="${user.id}"></td><td th:text="${user.username}"></td><td th:text="${user.password}"></td><td th:text="${user.regDate}"></td><td th:text="${user.address}"></td><td><a th:href="@{/UserDelete.html(id=${user.id})}" onclick="return confirm('确定要删除吗?')">删除</a><a th:href="@{/UserUpdate.html(id=${user.id})}">修改</a></td></tr></table></div></dic><div th:replace="PublicTemplate::footer"></div></body>
</html>
UserAdd.html:添加用户页面
<!DOCTYPE html>
<html lang="en">
<head><meta charset="UTF-8"><title>UserAddDemo</title>
</head>
<body><form th:action="@{/UserAdd.html}" method="post">账号:<input type="text" name="username"/> <br>密码:<input type="text" name="password"/> <br>地址:<select name="address.id"><option th:value="${address.id}" th:each="address:${addresses}">[[${address.addressInfo}]]</option></select> <br><input type="submit" th:value="添加"></form>
</body>
</html>
UserUpdate.html:修改用户页面
<!DOCTYPE html>
<html lang="en">
<head><meta charset="UTF-8"><title>UserUpdateDemo</title>
</head>
<body><div class="main"><form th:action="@{/UserUpdate.html}" method="post"><input type="hidden" name="id" th:value="${user.id}">账号:<input type="text" name="username" th:value="${user.username}"/> <br>密码:<input type="text" name="password" th:value="${user.password}"/> <br>注册时间:<input type="text" name="regDate" th:value="${#dates.format(user.regDate,'yyyy-MM-dd HH:mm:ss')}"/> <br>地址:<select name="address.id"><option th:value="${address.id}" th:selected="${user.address.id == address.id}" th:each="address:${addresses}">[[${address.addressInfo}]]</option></select> <br><input type="submit" th:value="修改"></form></div>
</body>
</html>
然后,在 User 实体类上使用 @DateTimeFormat 注解指定日期样式(否则在修改注册时间时,会出现类型转换问题),再创建一个 Address 类

package cn.edu.SpringBootWebDemo.Entity;import jakarta.persistence.*;@Entity
@Table(name = "address")
public class Address {private int id;private String addressInfo; // 地址详情@Id@GeneratedValue(strategy = GenerationType.IDENTITY) // 自增public int getId() {return id;}public void setId(int id) {this.id = id;}@Column(name = "address_info") // 指定字段名public String getAddressInfo() {return addressInfo;}public void setAddressInfo(String addressInfo) {this.addressInfo = addressInfo;}@Overridepublic String toString() {return "Address{" +"id=" + id +", addressInfo='" + addressInfo + '\'' +'}';}
}
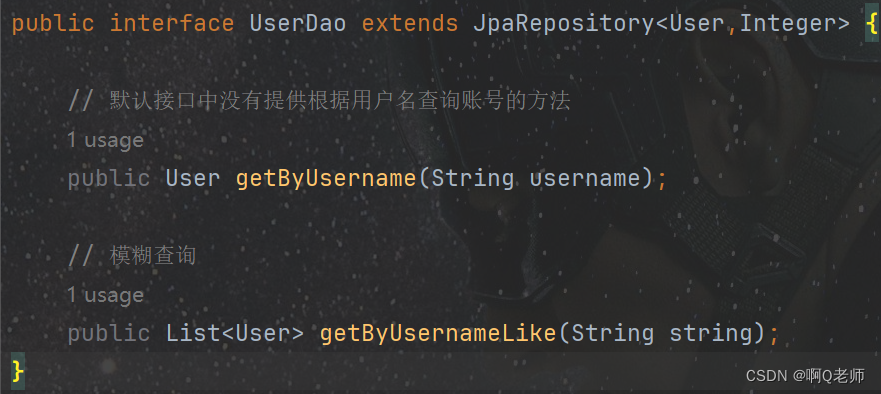
随之,在 UserDao 接口上声明一个模糊查询方法,在 AddressDao 接口上直接继承 JpaRepository<实体类,主键类型> 即可

接着,在 Service 包内创建一个 UserService 接口,声明增删改查方法,并创建一个 UserServiceImpl 实现类实现该接口方法; AddressService 接口与 AddressServiceImpl 实现类同理
UserService 接口:
package cn.edu.SpringBootWebDemo.Service;import cn.edu.SpringBootWebDemo.Entity.User;import java.util.List;public interface UserService {public User login(User user);//增删改查public void add(User user);public void delete(int id);public void update(User user);public User get(int id);public List<User> getALLUsers();public List<User> getByUsernameLike(String string);
}
UserServiceImpl 实现类:
package cn.edu.SpringBootWebDemo.Service;import cn.edu.SpringBootWebDemo.Dao.UserDao;
import cn.edu.SpringBootWebDemo.Entity.User;
import jakarta.transaction.Transactional;
import org.springframework.beans.factory.annotation.Autowired;
import org.springframework.stereotype.Service;import java.util.List;@Service("userService")
@Transactional // 放在类上,类上的所有方法都支持事务;也可以只放在一个方法上,只指定那个方法支持事务
public class UserServiceImpl implements UserService{@Autowiredprivate UserDao userDao;@Overridepublic User login(User user) {// 根据用户名查询有没有对应的账号User user1 = userDao.getByUsername(user.getUsername());// 判断是否为空或密码错误,登录失败返回 nullif (user1 == null) return null;if(!user1.getPassword().equals(user.getPassword())) return null;// 返回 User 对象,登录成功return user1;}@Overridepublic void add(User user) {userDao.save(user);}@Overridepublic void delete(int id) {userDao.deleteById(id);}@Overridepublic void update(User user) {userDao.saveAndFlush(user);}@Overridepublic User get(int id) {return userDao.findById(id).get();}@Overridepublic List<User> getALLUsers() {return userDao.findAll();}@Overridepublic List<User> getByUsernameLike(String string) {return userDao.getByUsernameLike(string);}
}
AddressService 接口:
package cn.edu.SpringBootWebDemo.Service;import cn.edu.SpringBootWebDemo.Entity.Address;import java.util.List;public interface AddressService {public void add(Address address);public void delete(int id);public void update(Address address);public Address get(int id);public List<Address> getAllAddress();
}
AddressServiceImpl 实现类:
package cn.edu.SpringBootWebDemo.Service;import cn.edu.SpringBootWebDemo.Dao.AddressDao;
import cn.edu.SpringBootWebDemo.Entity.Address;
import org.springframework.beans.factory.annotation.Autowired;
import org.springframework.stereotype.Service;import java.util.List;@Service
public class AddressServiceImpl implements AddressService{@Autowiredprivate AddressDao addressDao;@Overridepublic void add(Address address) {addressDao.save(address);}@Overridepublic void delete(int id) {addressDao.deleteById(id);}@Overridepublic void update(Address address) {addressDao.saveAndFlush(address);}@Overridepublic Address get(int id) {return addressDao.findById(id).get();}@Overridepublic List<Address> getAllAddress() {return addressDao.findAll();}
}
再在 Controller 包内的 UserController 控制类上处理用户相关的 HTTP 请求
package cn.edu.SpringBootWebDemo.Controller;import cn.edu.SpringBootWebDemo.Entity.Address;
import cn.edu.SpringBootWebDemo.Entity.User;
import cn.edu.SpringBootWebDemo.Service.AddressService;
import cn.edu.SpringBootWebDemo.Service.UserService;
import jakarta.servlet.http.HttpSession;
import org.springframework.beans.factory.annotation.Autowired;
import org.springframework.stereotype.Controller;
import org.springframework.ui.Model;
import org.springframework.web.bind.annotation.GetMapping;
import org.springframework.web.bind.annotation.PostMapping;import java.util.Date;
import java.util.List;@Controller
public class UserController {@Autowiredprivate UserService userService;@Autowiredprivate AddressService addressService;@GetMapping("/Login.html")public String login(HttpSession httpSession){// 成功登录后不能再返回登录页面,而是跳转到主页boolean flag = httpSession.getAttribute("loginUser")==null?true:false;if (flag){return "Login";}else {return "redirect:/Main.html";}}@GetMapping("/Main.html")public String main(){return "Main";}// 判断登录@PostMapping("/Login.html")public String login(User user, HttpSession httpSession, Model model){// 控制层——接受页面的账号和密码。调用服务层的 login 方法,判断登录是否成功。// 成功将返回的 user 对象保存到 session 的域空间;反之返回一个错误提示。User user1 = userService.login(user);if(user1 != null) {// 将返回的 user 对象保存到 session 的域空间,页面跳转到主页中httpSession.setAttribute("loginUser",user1);return "redirect:/Main.html";}else {// 登录失败,返回错误提示model.addAttribute("loginError","用户名或密码错误!");return "Login";}}// 退出@GetMapping("/logout.html")public String logout(HttpSession httpSession){// 通过 invalidate 方法清空 httpSession 里的内容httpSession.invalidate();return "redirect:/Login.html";}// 显示用户@GetMapping("/UserList.html")public String userlist(Model model){List<User> users = userService.getALLUsers();model.addAttribute("users",users);System.out.println(users);return "UserList";}// 模糊查询用户@PostMapping("/UserSearch.html")// 接受的参数,searchByUsername 名字与页面 input 标签的 name 属性值一致public String userSearch(String searchByUsername,Model model){List<User> users = userService.getByUsernameLike("%" + searchByUsername + "%");model.addAttribute("users",users);return "UserList";}// 先获取所有的地址信息,再进行添加用户@GetMapping("/UserAdd.html")public String addUser(Model model){List<Address> addresses = addressService.getAllAddress();model.addAttribute("addresses",addresses);return "UserAdd";}@PostMapping("/UserAdd.html")public String addUser(User user){user.setRegDate(new Date());userService.add(user);return "redirect:/UserList.html";}// 修改实现:1.点击修改按钮,打开修改页面@GetMapping("/UserUpdate.html")public String updateUser(Model model,Integer id){// 获取指定用户信息User user = userService.get(id);model.addAttribute("user",user);// 获取指定地址信息List<Address> addresses = addressService.getAllAddress();model.addAttribute("addresses",addresses);return "UserUpdate";}// 2.修改实现@PostMapping("/UserUpdate.html")public String updateUserAchieve(User user){userService.update(user);return "redirect:/UserList.html";}// 删除用户@GetMapping("/UserDelete.html")public String deleteUser(Integer id){userService.delete(id);return "redirect:/UserList.html";}
}
最后,在 SpringBootWebDemoApplication 启动类上使用 @EnableTransactionManagement 注解开启事务,并启动 Spring Boot 进行测试
package cn.edu.SpringBootWebDemo;import org.springframework.boot.SpringApplication;
import org.springframework.boot.autoconfigure.SpringBootApplication;
import org.springframework.context.annotation.Bean;
import org.springframework.jdbc.datasource.DataSourceTransactionManager;
import org.springframework.transaction.PlatformTransactionManager;
import org.springframework.transaction.annotation.EnableTransactionManagement;import javax.sql.DataSource;@EnableTransactionManagement // 开启事务
@SpringBootApplication
public class SpringBootWebDemoApplication {// 获取事务管理器类型
//    @Bean
//    public Object testBean(PlatformTransactionManager platformTransactionManager){
//        System.out.println("事务管理器类型:" + platformTransactionManager.getClass().getName());
//        return new Object();
//    }// 指定事务管理器,设置后会覆盖默认的事务管理器
//    @Bean
//    public PlatformTransactionManager manager(DataSource dataSource){
//        return new DataSourceTransactionManager(dataSource);
//    }public static void main(String[] args) {SpringApplication.run(SpringBootWebDemoApplication.class, args);}}
结果如图:
1.登录,进入主页

2.点击用户列表,进入显示用户列表页面

3.在显示用户列表页面上,进行模糊查询,输入 “刘” 点击查询

模糊查询结果:

4.在显示用户列表页面上,点击添加,进入添加页面,输入用户信息,点击添加用户
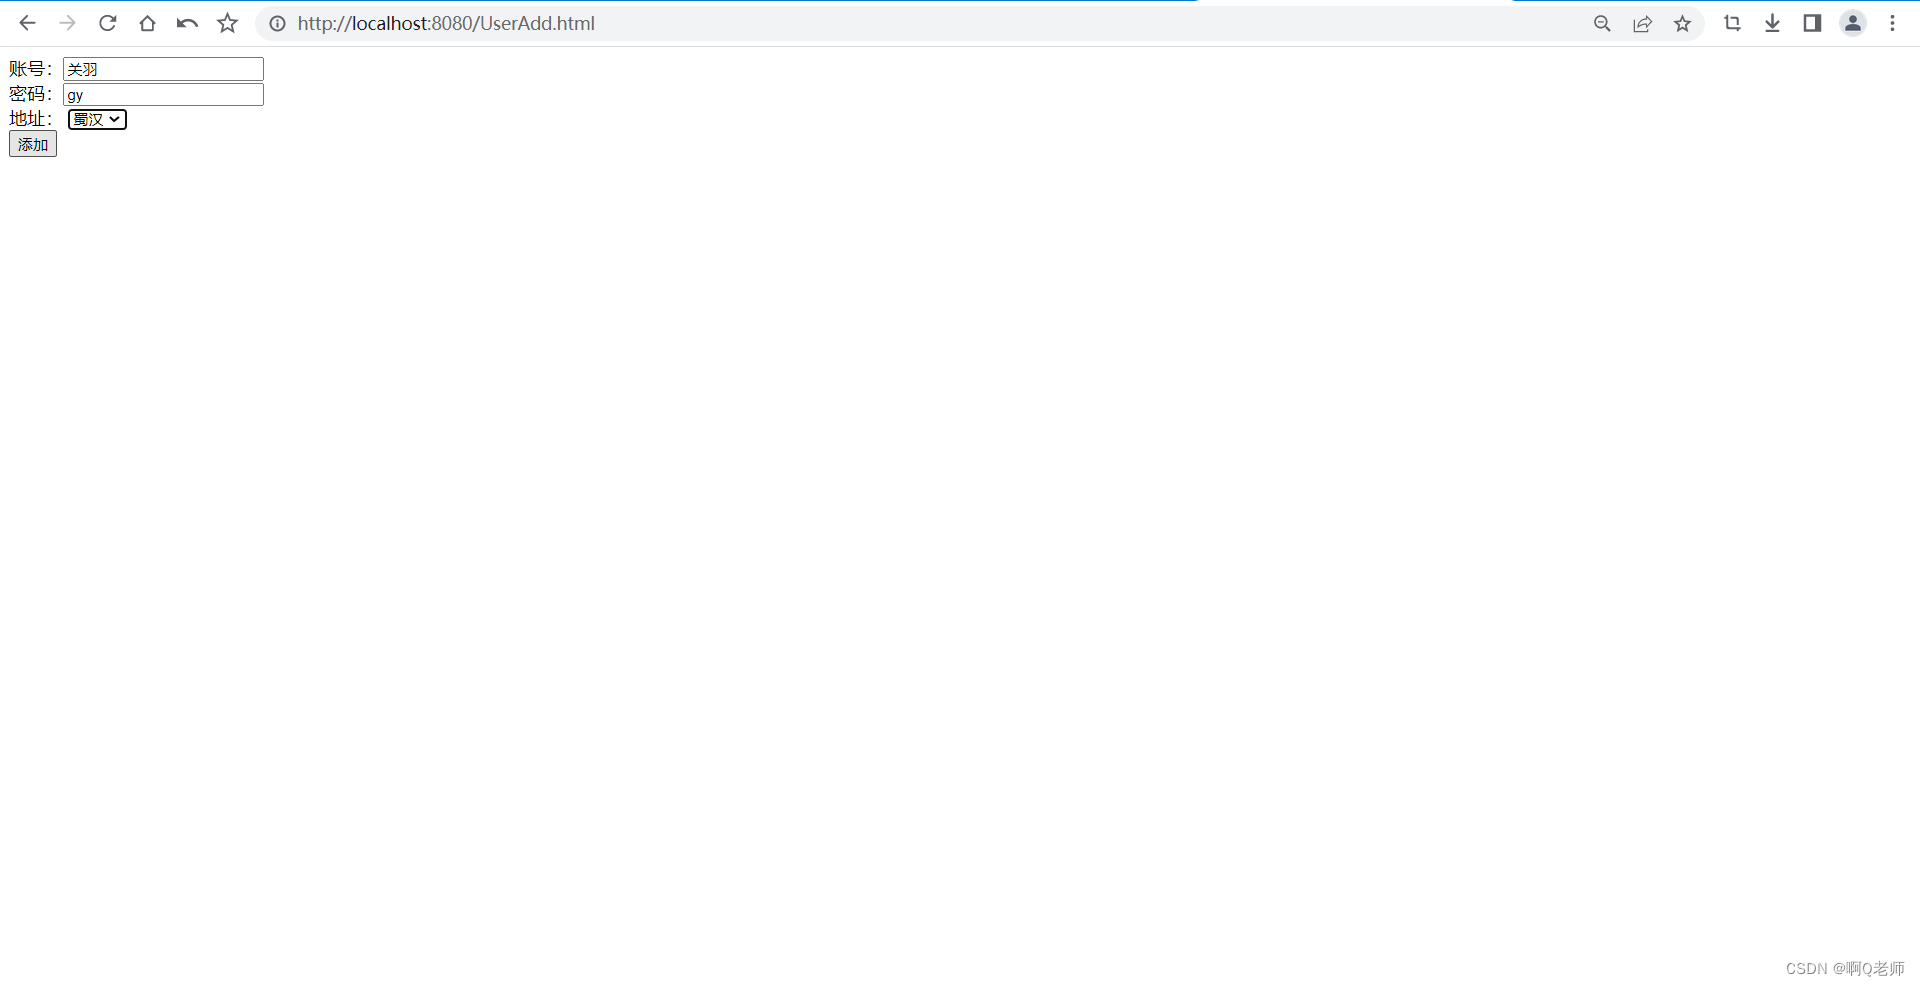
添加用户结果:
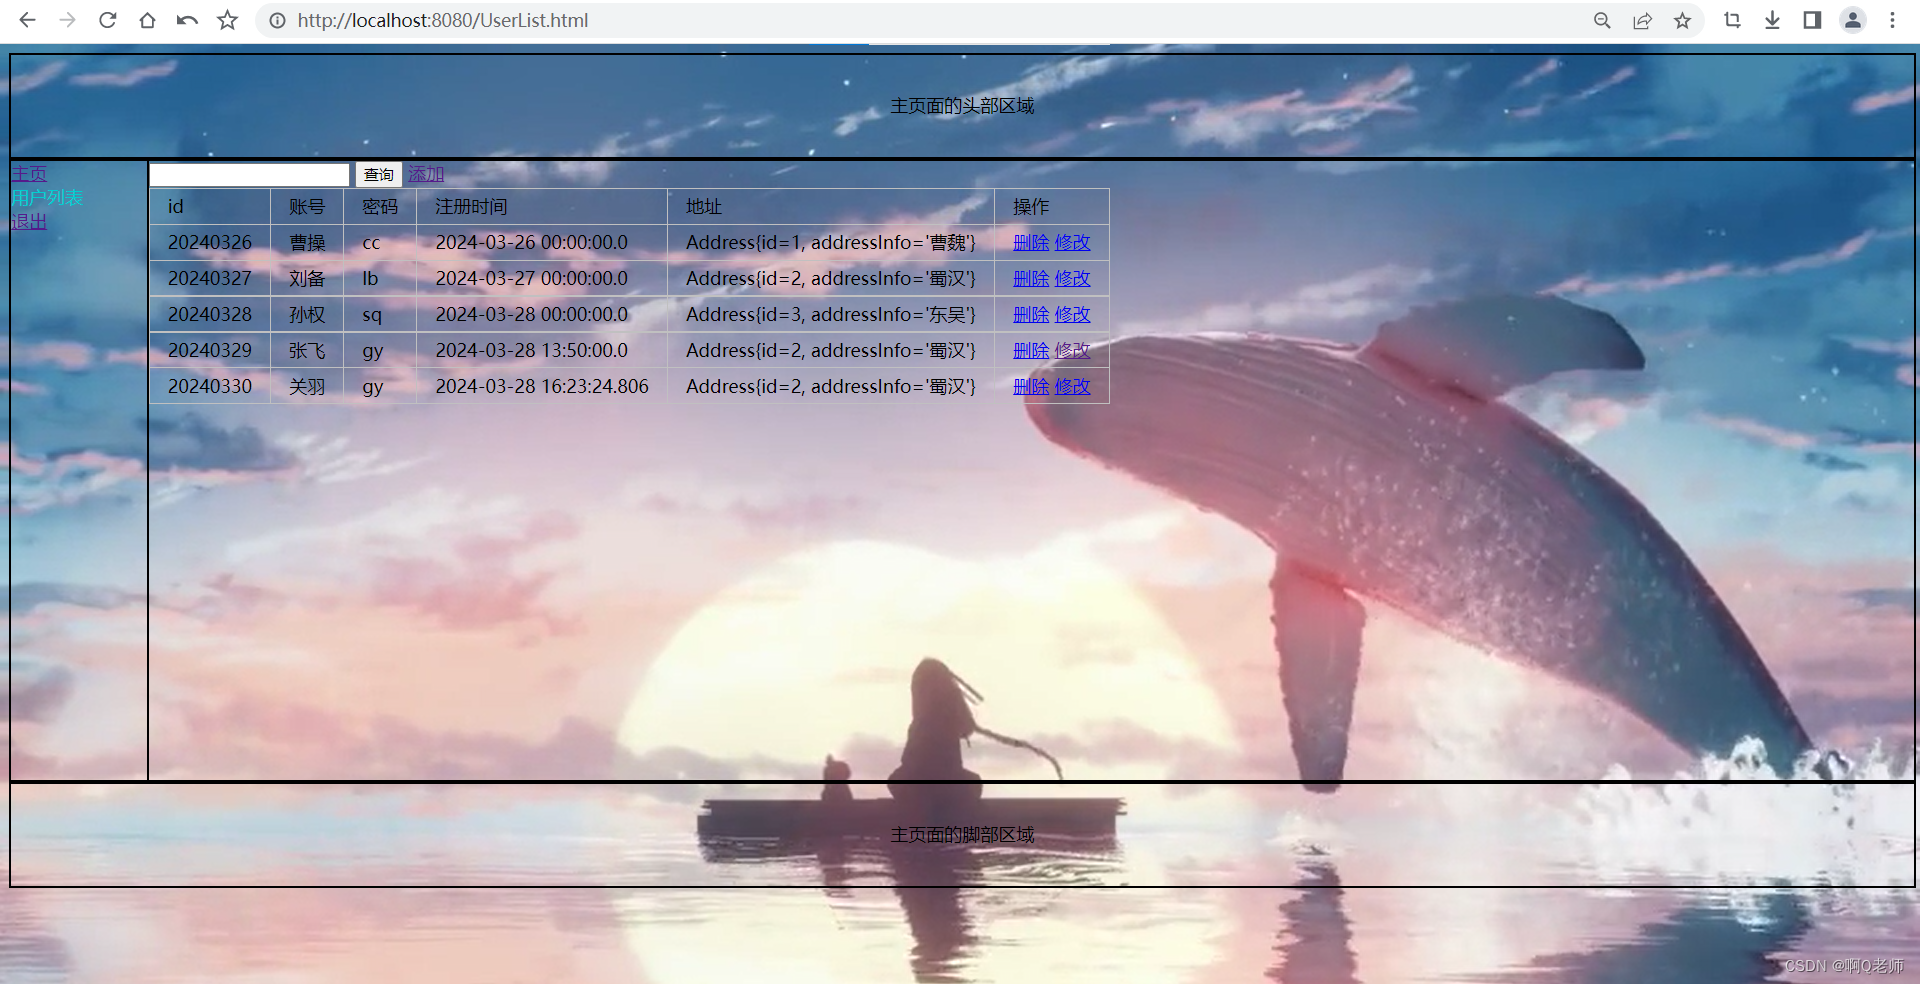
5.在显示用户列表页面上,点击修改,进入修改页面,修改用户信息,点击修改用户
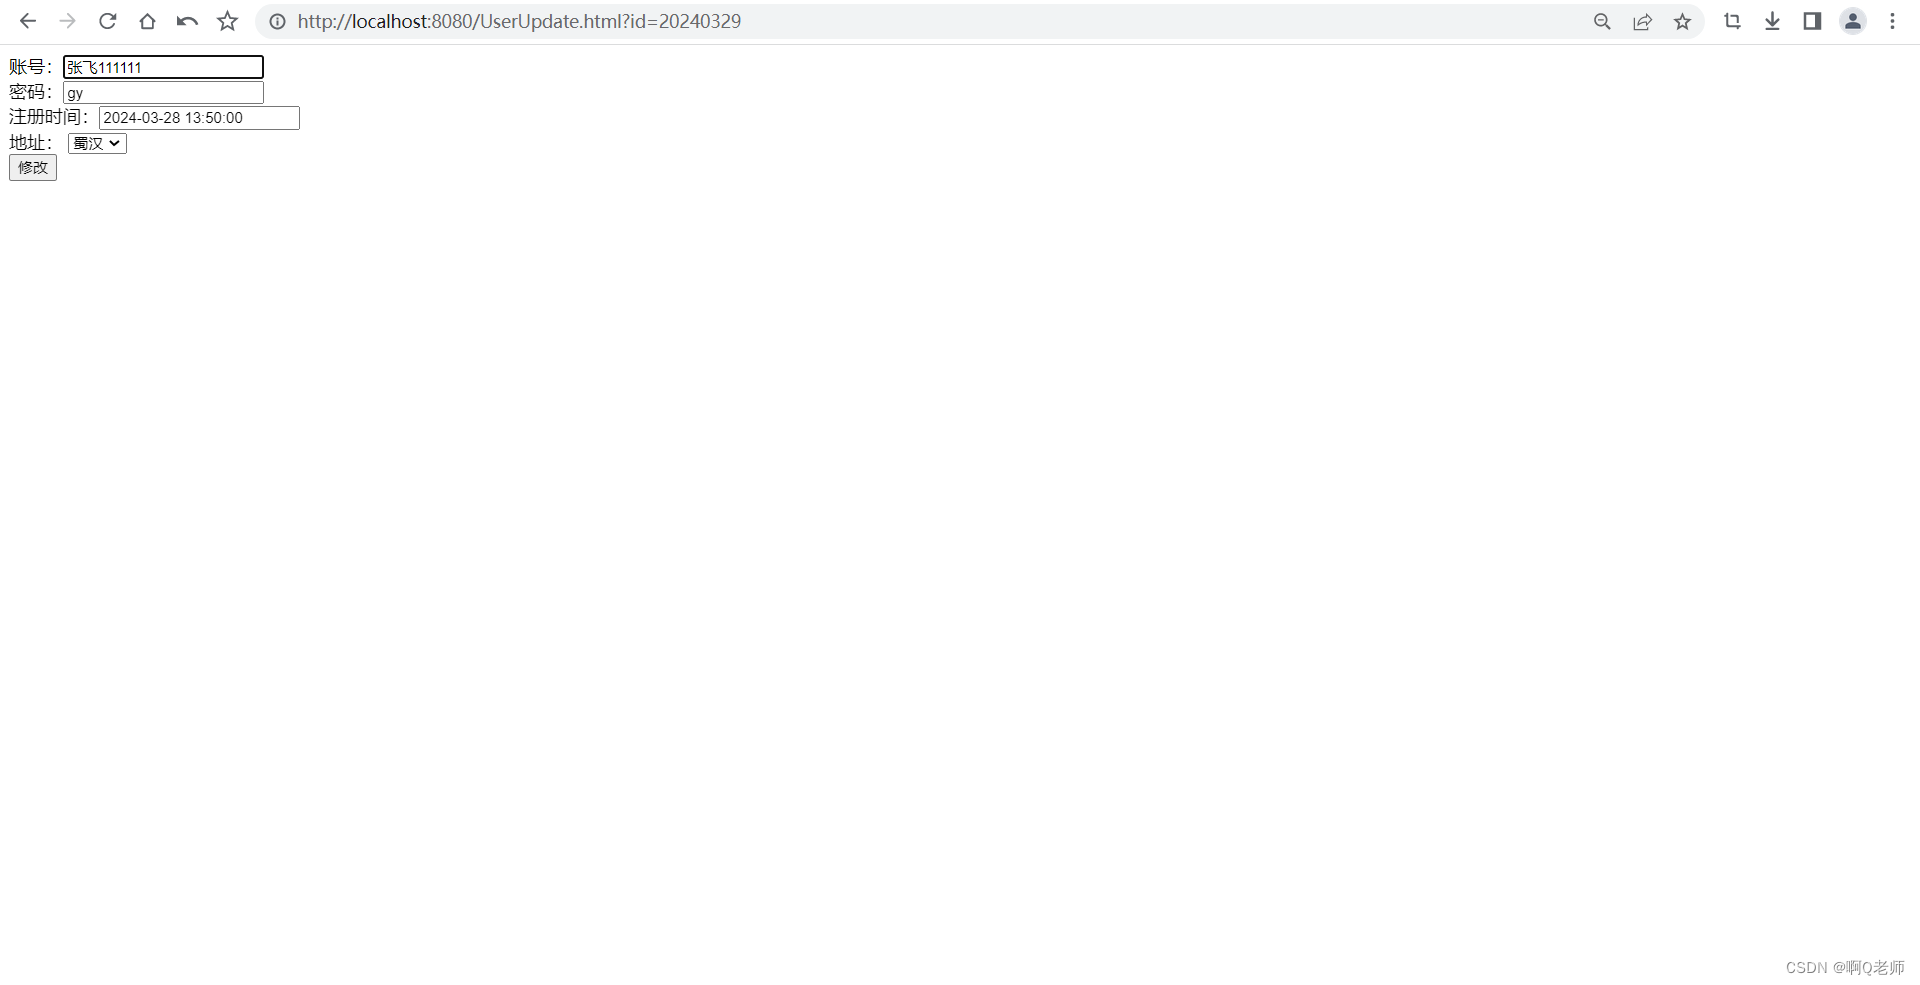
修改用户结果:
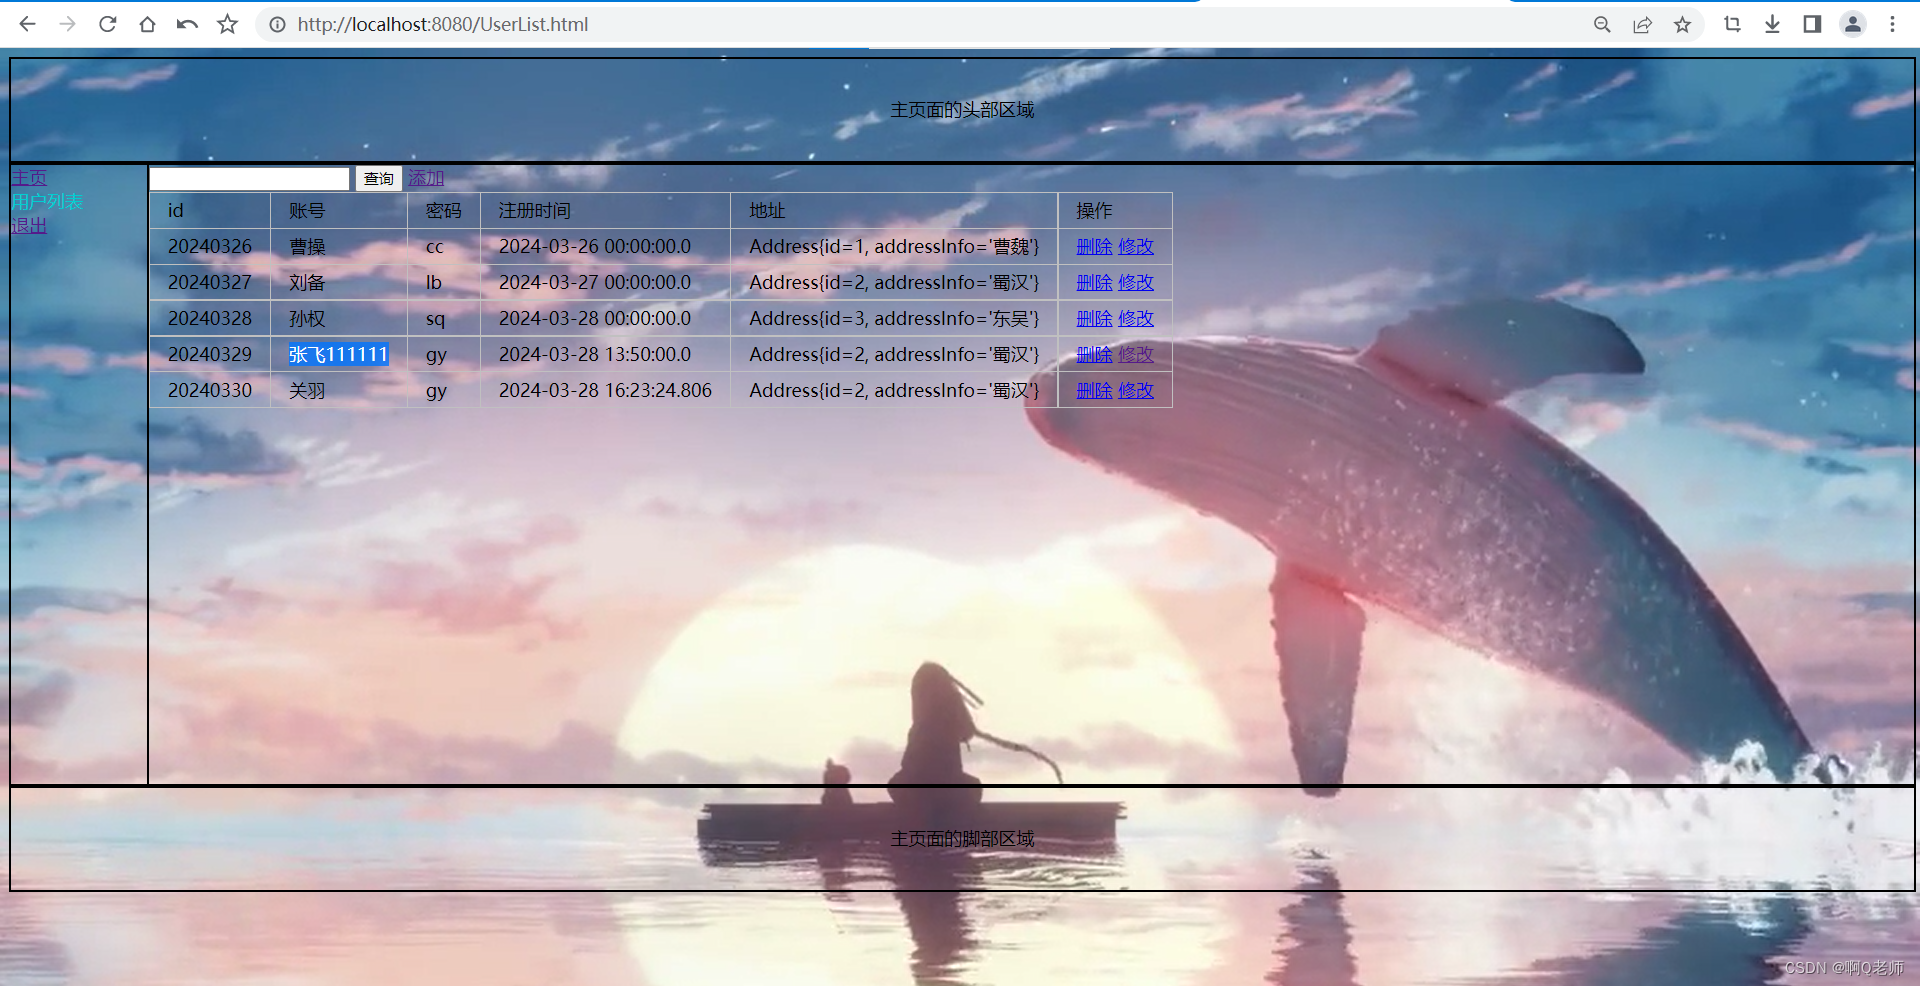
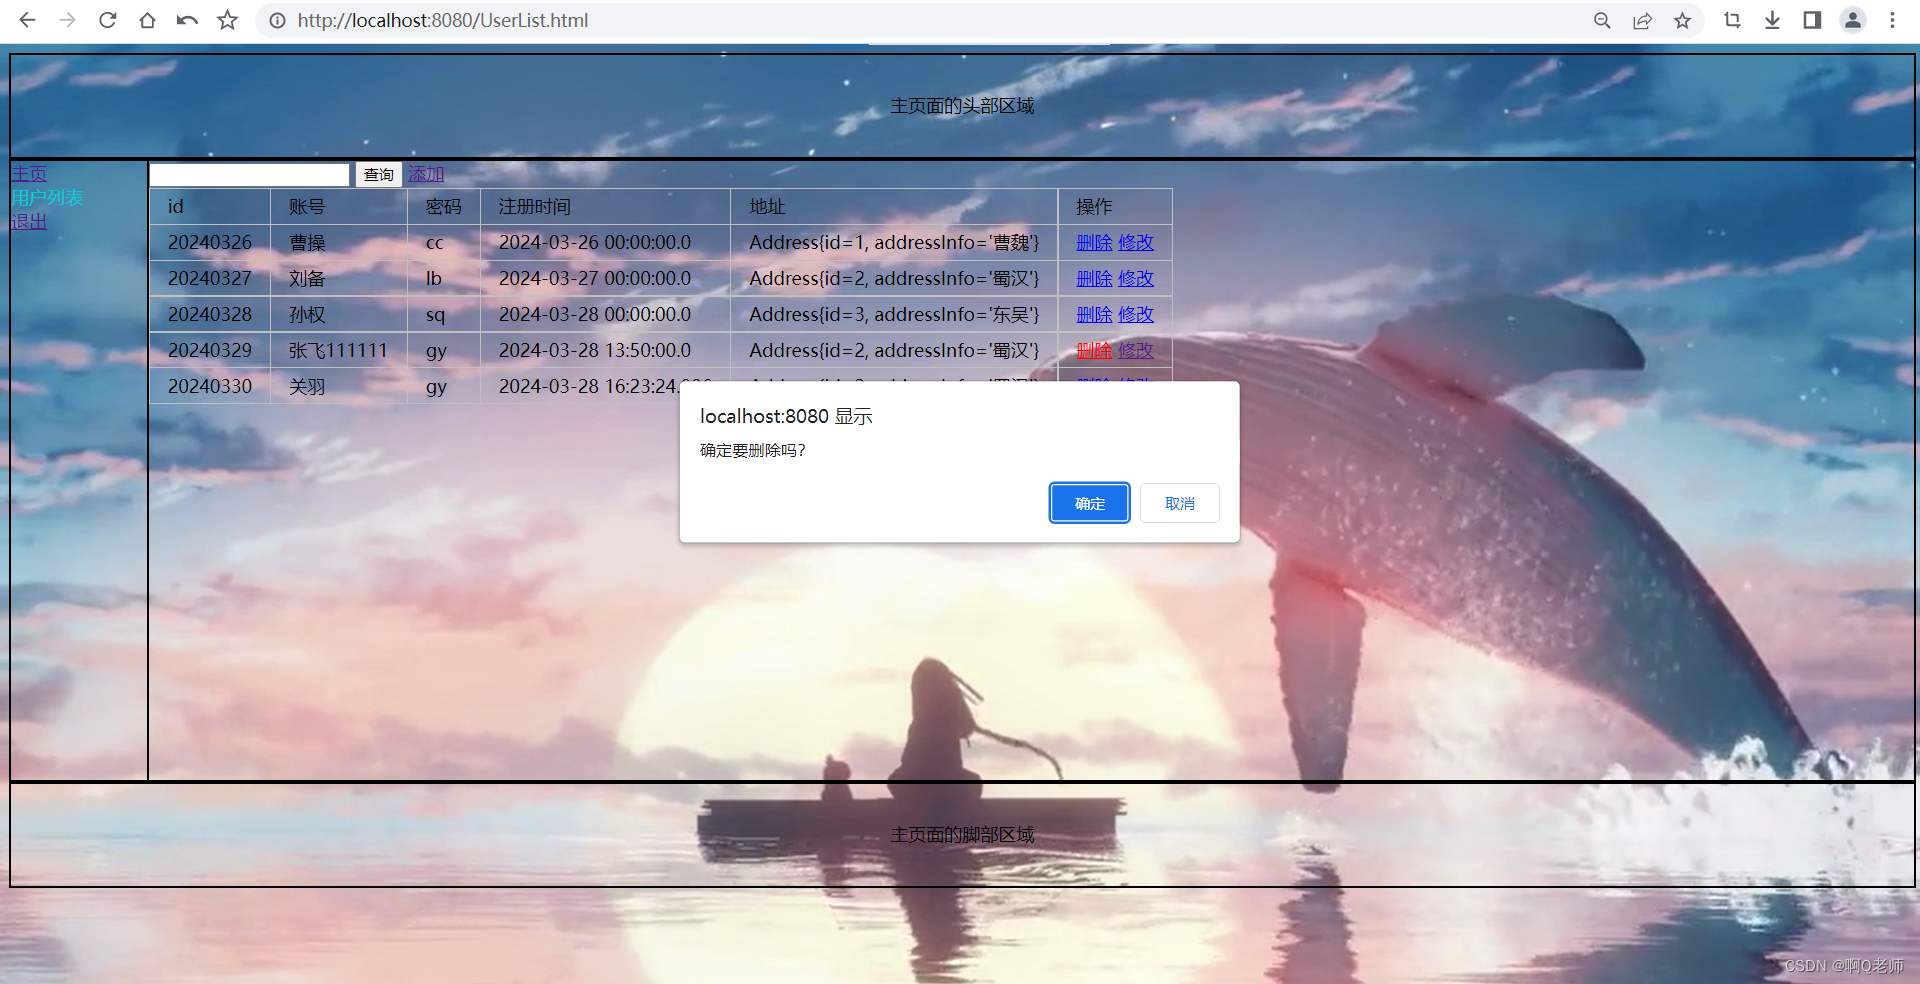
6.在显示用户列表页面上,点击删除,弹出确认窗口,点击确定
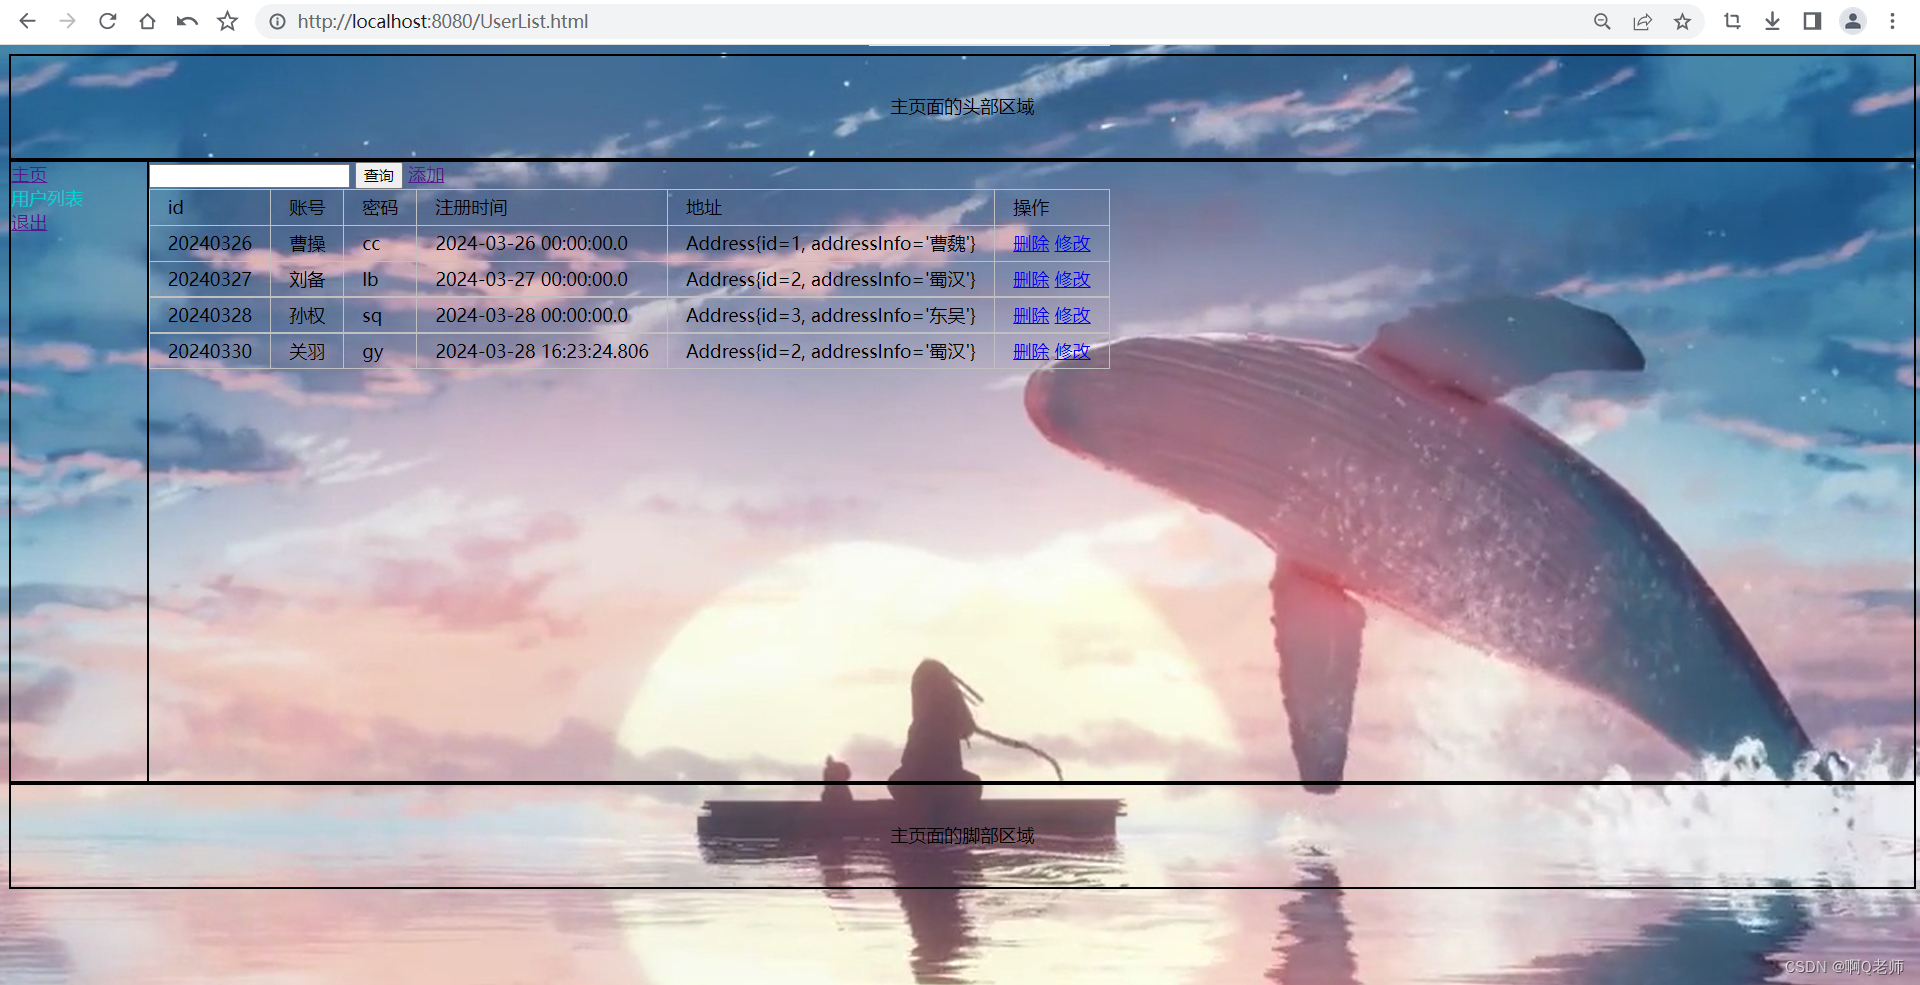
删除用户结果:
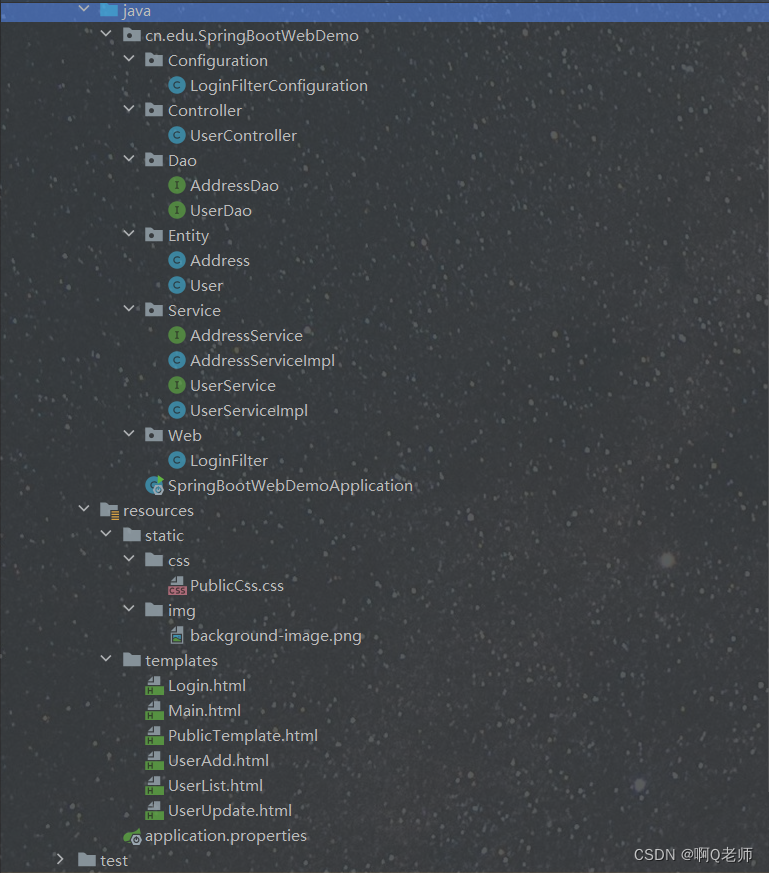
Web 应用开发案例中的主要目录结构:
PublicCss.css:设置页面样式的文本文件
body{background-image: url("../img/background-image.png");background-attachment: fixed;background-size: cover;background-repeat: no-repeat;
}.header{text-align: center;height: 90px;line-height: 90px;width: 100%;border: 2px black solid;
}.center{width: 100%;height: 450px;
}.center .sidebar{width: 120px;height: 550px;float: left;border: 2px black solid;
}.center .main{width: 100%;height: 550px;border: 2px black solid;
}table{border-collapse: collapse;
}th, td {border: 1px silver solid;padding: 0.3em 1em;
}.footer{text-align: center;height: 90px;line-height: 90px;width: 100%;border: 2px black solid;
}/* 增强效果设置 */
.active{color: darkturquoise;text-decoration: none;
}
background-image.png:页面背景图片




![BUUCTF---[SWPU2019]神奇的二维码](https://img-blog.csdnimg.cn/direct/fd7bed55442348ed907a076b96e40689.png)

![[2021年最新]国产时序性数据TDenige入门](https://img-blog.csdnimg.cn/2021031400022064.png?x-oss-process=image/watermark,type_ZmFuZ3poZW5naGVpdGk,shadow_10,text_aHR0cHM6Ly9ibG9nLmNzZG4ubmV0L3FxXzQ0NDkxNzA5,size_16,color_FFFFFF,t_70#pic_center)
