目录
Dockerfile获取
dfimage逆向获取
Nginx官网获取
Dockerfile分析
启动命令分析
Docker 容器入口点脚本分析
exec "$@"
exec 命令
"$@" 参数
总结
在云原生技术快速发展的今天,Docker 作为容器技术的代表,为软件的打包、分发和部署提供了一种轻量级、可移植的解决方案。Dockerfile 作为 Docker 的核心组件之一,其设计和编写直接关系到容器镜像的构建效率和运行时的性能。了解和掌握 Dockerfile 的关键技术点,对于任何希望在云原生领域内进行开发和运维的工程师来说都是至关重要的。
本文旨在通过分析 Nginx 官方 Docker 镜像的 Dockerfile,探讨 Dockerfile 的获取方法、结构和编写策略,以及容器启动脚本的作用和设计原则。我们将深入讨论在 Dockerfile 中使用 exec "$@" 的好处,以及这种做法在其他镜像设计中的应用价值,为构建更加高效、可靠的容器化应用打下坚实的基础。
Dockerfile获取
dfimage逆向获取
alias dfimage='docker run -v /var/run/docker.sock:/var/run/docker.sock --rm alpine/dfimage'/usr/bin/dockerdfimage nginx:1.25.4或
dfimage='docker run -v /var/run/docker.sock:/var/run/docker.sock --rm alpine/dfimage'/usr/bin/docker nginx:1.25.4
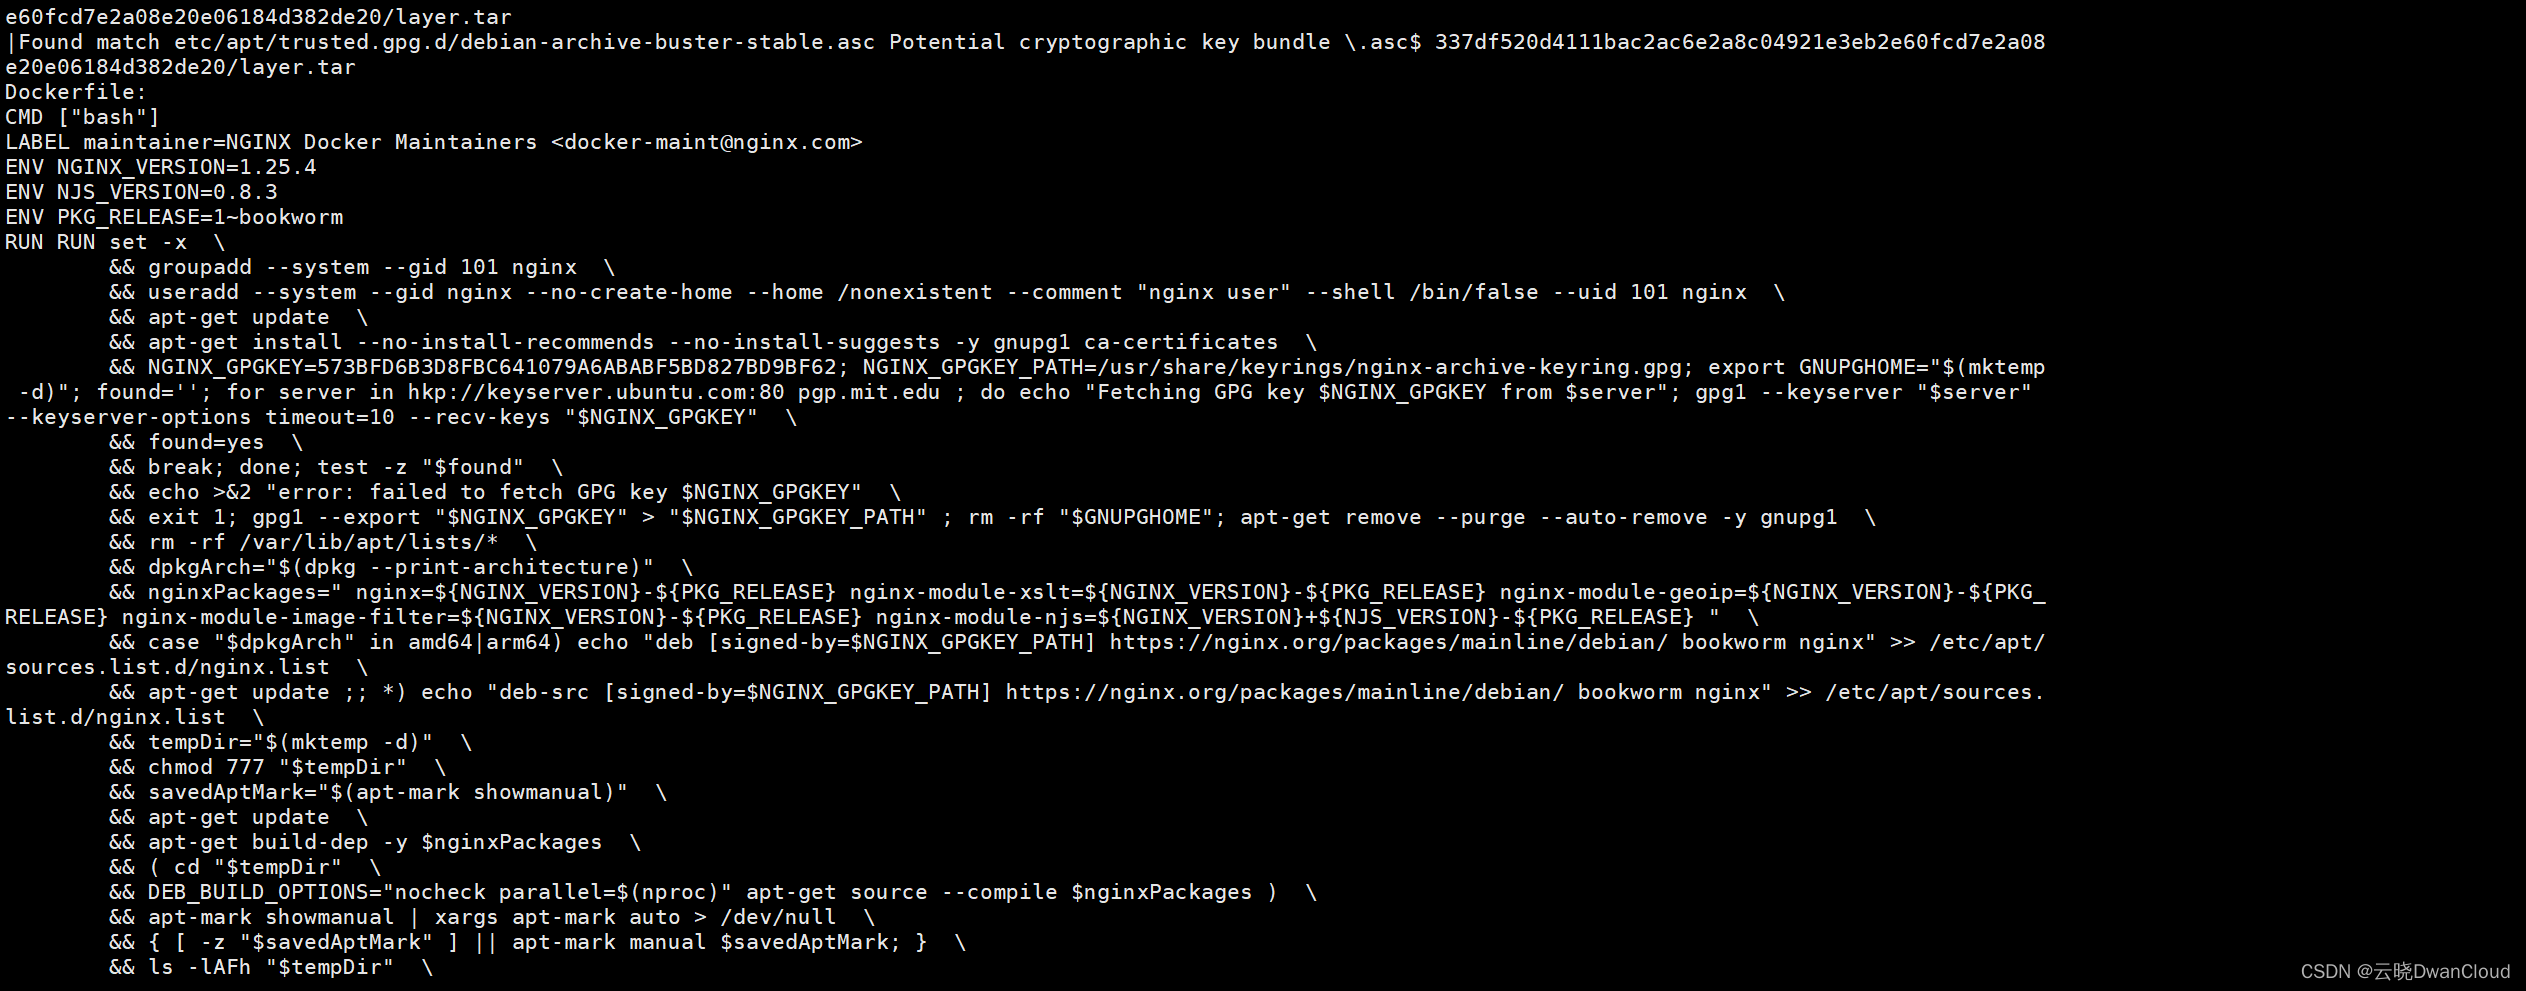
逆向Dockerfile
CMD ["bash"]
LABEL maintainer=NGINX Docker Maintainers <docker-maint@nginx.com>
ENV NGINX_VERSION=1.25.4
ENV NJS_VERSION=0.8.3
ENV PKG_RELEASE=1~bookworm
RUN RUN set -x  \&& groupadd --system --gid 101 nginx  \&& useradd --system --gid nginx --no-create-home --home /nonexistent --comment "nginx user" --shell /bin/false --uid 101 nginx  \&& apt-get update  \&& apt-get install --no-install-recommends --no-install-suggests -y gnupg1 ca-certificates  \&& NGINX_GPGKEY=573BFD6B3D8FBC641079A6ABABF5BD827BD9BF62; NGINX_GPGKEY_PATH=/usr/share/keyrings/nginx-archive-keyring.gpg; export GNUPGHOME="$(mktemp -d)"; found=''; for server in hkp://keyserver.ubuntu.com:80 pgp.mit.edu ; do echo "Fetching GPG key $NGINX_GPGKEY from $server"; gpg1 --keyserver "$server" --keyserver-options timeout=10 --recv-keys "$NGINX_GPGKEY"  \&& found=yes  \&& break; done; test -z "$found"  \&& echo >&2 "error: failed to fetch GPG key $NGINX_GPGKEY"  \&& exit 1; gpg1 --export "$NGINX_GPGKEY" > "$NGINX_GPGKEY_PATH" ; rm -rf "$GNUPGHOME"; apt-get remove --purge --auto-remove -y gnupg1  \&& rm -rf /var/lib/apt/lists/*  \&& dpkgArch="$(dpkg --print-architecture)"  \&& nginxPackages=" nginx=${NGINX_VERSION}-${PKG_RELEASE} nginx-module-xslt=${NGINX_VERSION}-${PKG_RELEASE} nginx-module-geoip=${NGINX_VERSION}-${PKG_RELEASE} nginx-module-image-filter=${NGINX_VERSION}-${PKG_RELEASE} nginx-module-njs=${NGINX_VERSION}+${NJS_VERSION}-${PKG_RELEASE} "  \&& case "$dpkgArch" in amd64|arm64) echo "deb [signed-by=$NGINX_GPGKEY_PATH] https://nginx.org/packages/mainline/debian/ bookworm nginx" >> /etc/apt/sources.list.d/nginx.list  \&& apt-get update ;; *) echo "deb-src [signed-by=$NGINX_GPGKEY_PATH] https://nginx.org/packages/mainline/debian/ bookworm nginx" >> /etc/apt/sources.list.d/nginx.list  \&& tempDir="$(mktemp -d)"  \&& chmod 777 "$tempDir"  \&& savedAptMark="$(apt-mark showmanual)"  \&& apt-get update  \&& apt-get build-dep -y $nginxPackages  \&& ( cd "$tempDir"  \&& DEB_BUILD_OPTIONS="nocheck parallel=$(nproc)" apt-get source --compile $nginxPackages )  \&& apt-mark showmanual | xargs apt-mark auto > /dev/null  \&& { [ -z "$savedAptMark" ] || apt-mark manual $savedAptMark; }  \&& ls -lAFh "$tempDir"  \&& ( cd "$tempDir"  \&& dpkg-scanpackages . > Packages )  \&& grep '^Package: ' "$tempDir/Packages"  \&& echo "deb [ trusted=yes ] file://$tempDir ./" > /etc/apt/sources.list.d/temp.list  \&& apt-get -o Acquire::GzipIndexes=false update ;; esac  \&& apt-get install --no-install-recommends --no-install-suggests -y $nginxPackages gettext-base curl  \&& apt-get remove --purge --auto-remove -y  \&& rm -rf /var/lib/apt/lists/* /etc/apt/sources.list.d/nginx.list  \&& if [ -n "$tempDir" ]; then apt-get purge -y --auto-remove  \&& rm -rf "$tempDir" /etc/apt/sources.list.d/temp.list; fi  \&& ln -sf /dev/stdout /var/log/nginx/access.log  \&& ln -sf /dev/stderr /var/log/nginx/error.log  \&& mkdir /docker-entrypoint.d # buildkit
COPY docker-entrypoint.sh / # buildkitdocker-entrypoint.shCOPY 10-listen-on-ipv6-by-default.sh /docker-entrypoint.d # buildkitdocker-entrypoint.d/docker-entrypoint.d/10-listen-on-ipv6-by-default.shCOPY 15-local-resolvers.envsh /docker-entrypoint.d # buildkitdocker-entrypoint.d/docker-entrypoint.d/15-local-resolvers.envshCOPY 20-envsubst-on-templates.sh /docker-entrypoint.d # buildkitdocker-entrypoint.d/docker-entrypoint.d/20-envsubst-on-templates.shCOPY 30-tune-worker-processes.sh /docker-entrypoint.d # buildkitdocker-entrypoint.d/docker-entrypoint.d/30-tune-worker-processes.shENTRYPOINT ["/docker-entrypoint.sh"]
EXPOSE map[80/tcp:{}]
STOPSIGNAL SIGQUIT
CMD ["nginx" "-g" "daemon off;"]
Nginx官网获取
docker-nginx/mainline/debian/Dockerfile at 1f227619c1f1baa0bed8bed844ea614437ff14fb · nginxinc/docker-nginx · GitHub
官网Dockerfile
#
# NOTE: THIS DOCKERFILE IS GENERATED VIA "update.sh"
#
# PLEASE DO NOT EDIT IT DIRECTLY.
#
FROM debian:bookworm-slimLABEL maintainer="NGINX Docker Maintainers <docker-maint@nginx.com>"ENV NGINX_VERSION   1.25.4
ENV NJS_VERSION     0.8.3
ENV PKG_RELEASE     1~bookwormRUN set -x \
# create nginx user/group first, to be consistent throughout docker variants&& groupadd --system --gid 101 nginx \&& useradd --system --gid nginx --no-create-home --home /nonexistent --comment "nginx user" --shell /bin/false --uid 101 nginx \&& apt-get update \&& apt-get install --no-install-recommends --no-install-suggests -y gnupg1 ca-certificates \&& \NGINX_GPGKEY=573BFD6B3D8FBC641079A6ABABF5BD827BD9BF62; \NGINX_GPGKEY_PATH=/usr/share/keyrings/nginx-archive-keyring.gpg; \export GNUPGHOME="$(mktemp -d)"; \found=''; \for server in \hkp://keyserver.ubuntu.com:80 \pgp.mit.edu \; do \echo "Fetching GPG key $NGINX_GPGKEY from $server"; \gpg1 --keyserver "$server" --keyserver-options timeout=10 --recv-keys "$NGINX_GPGKEY" && found=yes && break; \done; \test -z "$found" && echo >&2 "error: failed to fetch GPG key $NGINX_GPGKEY" && exit 1; \gpg1 --export "$NGINX_GPGKEY" > "$NGINX_GPGKEY_PATH" ; \rm -rf "$GNUPGHOME"; \apt-get remove --purge --auto-remove -y gnupg1 && rm -rf /var/lib/apt/lists/* \&& dpkgArch="$(dpkg --print-architecture)" \&& nginxPackages=" \nginx=${NGINX_VERSION}-${PKG_RELEASE} \nginx-module-xslt=${NGINX_VERSION}-${PKG_RELEASE} \nginx-module-geoip=${NGINX_VERSION}-${PKG_RELEASE} \nginx-module-image-filter=${NGINX_VERSION}-${PKG_RELEASE} \nginx-module-njs=${NGINX_VERSION}+${NJS_VERSION}-${PKG_RELEASE} \" \&& case "$dpkgArch" in \amd64|arm64) \
# arches officialy built by upstreamecho "deb [signed-by=$NGINX_GPGKEY_PATH] https://nginx.org/packages/mainline/debian/ bookworm nginx" >> /etc/apt/sources.list.d/nginx.list \&& apt-get update \;; \*) \
# we're on an architecture upstream doesn't officially build for
# let's build binaries from the published source packagesecho "deb-src [signed-by=$NGINX_GPGKEY_PATH] https://nginx.org/packages/mainline/debian/ bookworm nginx" >> /etc/apt/sources.list.d/nginx.list \\
# new directory for storing sources and .deb files&& tempDir="$(mktemp -d)" \&& chmod 777 "$tempDir" \
# (777 to ensure APT's "_apt" user can access it too)\
# save list of currently-installed packages so build dependencies can be cleanly removed later&& savedAptMark="$(apt-mark showmanual)" \\
# build .deb files from upstream's source packages (which are verified by apt-get)&& apt-get update \&& apt-get build-dep -y $nginxPackages \&& ( \cd "$tempDir" \&& DEB_BUILD_OPTIONS="nocheck parallel=$(nproc)" \apt-get source --compile $nginxPackages \) \
# we don't remove APT lists here because they get re-downloaded and removed later\
# reset apt-mark's "manual" list so that "purge --auto-remove" will remove all build dependencies
# (which is done after we install the built packages so we don't have to redownload any overlapping dependencies)&& apt-mark showmanual | xargs apt-mark auto > /dev/null \&& { [ -z "$savedAptMark" ] || apt-mark manual $savedAptMark; } \\
# create a temporary local APT repo to install from (so that dependency resolution can be handled by APT, as it should be)&& ls -lAFh "$tempDir" \&& ( cd "$tempDir" && dpkg-scanpackages . > Packages ) \&& grep '^Package: ' "$tempDir/Packages" \&& echo "deb [ trusted=yes ] file://$tempDir ./" > /etc/apt/sources.list.d/temp.list \
# work around the following APT issue by using "Acquire::GzipIndexes=false" (overriding "/etc/apt/apt.conf.d/docker-gzip-indexes")
#   Could not open file /var/lib/apt/lists/partial/_tmp_tmp.ODWljpQfkE_._Packages - open (13: Permission denied)
#   ...
#   E: Failed to fetch store:/var/lib/apt/lists/partial/_tmp_tmp.ODWljpQfkE_._Packages  Could not open file /var/lib/apt/lists/partial/_tmp_tmp.ODWljpQfkE_._Packages - open (13: Permission denied)&& apt-get -o Acquire::GzipIndexes=false update \;; \esac \\&& apt-get install --no-install-recommends --no-install-suggests -y \$nginxPackages \gettext-base \curl \&& apt-get remove --purge --auto-remove -y && rm -rf /var/lib/apt/lists/* /etc/apt/sources.list.d/nginx.list \\
# if we have leftovers from building, let's purge them (including extra, unnecessary build deps)&& if [ -n "$tempDir" ]; then \apt-get purge -y --auto-remove \&& rm -rf "$tempDir" /etc/apt/sources.list.d/temp.list; \fi \
# forward request and error logs to docker log collector&& ln -sf /dev/stdout /var/log/nginx/access.log \&& ln -sf /dev/stderr /var/log/nginx/error.log \
# create a docker-entrypoint.d directory&& mkdir /docker-entrypoint.dCOPY docker-entrypoint.sh /
COPY 10-listen-on-ipv6-by-default.sh /docker-entrypoint.d
COPY 15-local-resolvers.envsh /docker-entrypoint.d
COPY 20-envsubst-on-templates.sh /docker-entrypoint.d
COPY 30-tune-worker-processes.sh /docker-entrypoint.d
ENTRYPOINT ["/docker-entrypoint.sh"]EXPOSE 80STOPSIGNAL SIGQUITCMD ["nginx", "-g", "daemon off;"]
Dockerfile分析
启动命令分析
ENTRYPOINT ["/docker-entrypoint.sh"]
EXPOSE map[80/tcp:{}]
STOPSIGNAL SIGQUIT
CMD ["nginx" "-g" "daemon off;"]-
ENTRYPOINT 设置了容器启动时执行的主命令,即执行 /docker-entrypoint.sh 脚本。
-
CMD 提供了额外的参数,这些参数将传递给 /docker-entrypoint.sh。
这意味着当容器启动时,实际执行的命令会是 /docker-entrypoint.sh nginx -g "daemon off;"。这里,nginx -g "daemon off;" 是作为参数传递给 /docker-entrypoint.sh 脚本的。
Docker 容器入口点脚本分析
docker-entrypoint.sh
#!/bin/sh
# vim:sw=4:ts=4:etset -e  # 如果任何语句的执行结果不是true则立即退出脚本# 定义一个用于输出日志的函数
entrypoint_log() {# 如果环境变量NGINX_ENTRYPOINT_QUIET_LOGS未设置或为空,打印日志信息if [ -z "${NGINX_ENTRYPOINT_QUIET_LOGS:-}" ]; thenecho "$@"fi
}# 检查传递给脚本的第一个参数是否是nginx或nginx-debug
if [ "$1" = "nginx" ] || [ "$1" = "nginx-debug" ]; then# 查找/docker-entrypoint.d/目录下是否有文件存在if /usr/bin/find "/docker-entrypoint.d/" -mindepth 1 -maxdepth 1 -type f -print -quit 2>/dev/null | read v; thenentrypoint_log "$0: /docker-entrypoint.d/ 目录不为空,尝试进行配置"entrypoint_log "$0: 在 /docker-entrypoint.d/ 目录中查找shell脚本"# 遍历目录下所有文件,并按版本号排序find "/docker-entrypoint.d/" -follow -type f -print | sort -V | while read -r f; docase "$f" in*.envsh)# 如果文件具有执行权限,使用source命令执行它if [ -x "$f" ]; thenentrypoint_log "$0: 正在加载 $f";. "$f"else# 如果文件没有执行权限,打印警告日志entrypoint_log "$0: 忽略 $f,没有执行权限";fi;;*.sh)# 如果文件具有执行权限,直接执行它if [ -x "$f" ]; thenentrypoint_log "$0: 正在执行 $f";"$f"else# 如果文件没有执行权限,打印警告日志entrypoint_log "$0: 忽略 $f,没有执行权限";fi;;# 忽略其他类型的文件*) entrypoint_log "$0: 忽略 $f";;esacdoneentrypoint_log "$0: 配置完成;准备启动"elseentrypoint_log "$0: 在 /docker-entrypoint.d/ 目录中未找到文件,跳过配置"fi
fi# 使用传递给脚本的参数替换当前进程,通常用于启动主程序
exec "$@"
exec "$@"
exec "$@"是上面docker-entrypoint.sh脚本的最后一行,这行命令是 Docker 容器入口点脚本的核心部分,它负责执行容器启动时用户指定的命令。
exec 命令
-
exec 用于执行命令并用该命令替换当前的 shell 进程。这意味着 exec 后面的命令将接管当前的进程,并且当 exec 执行的命令结束时,进程也会结束。
-
使用 exec 执行命令的好处是,它不会启动新的进程,而是直接在当前进程中运行命令。在 Docker 容器的环境中,这意味着执行的命令(如 nginx)将成为容器进程的主进程。这对于 Docker 容器的生命周期管理非常重要。

"$@" 参数
-
"$@" 是一个特殊的 shell 参数,代表传递给脚本的所有命令行参数的列表,且每个参数都作为独立的引用字符串处理。
-
在 Docker 容器的上下文中,当运行一个容器并传递命令行参数时,这些参数会被传递给容器的入口点脚本。"$@" 就是用来接收这些参数的。
-
例如,如果运行 docker run [image] nginx -g "daemon off;",那么 nginx -g "daemon off;" 就是传递给入口点脚本的参数,"$@" 就会包含这些参数。
总结
综上所述,exec "$@" 这行命令的作用是执行传递给入口点脚本的命令(如 nginx -g "daemon off;"),并且以这个命令为容器的主进程。这保证了容器直接运行指定服务,如 Nginx,并且当该服务停止时,容器也会停止。
在设计其他镜像时,尤其是需要处理信号或需要确保容器优雅停止的场景中,使用 exec "$@" 可以提供类似的优势。例如,数据库镜像、Web 服务器镜像或任何长期运行的服务都可以从这种模式中受益。它确保了容器能够接收到停止信号并优雅地终止,同时也避免了资源泄漏的问题。
总的来说,使用 exec "$@" 是一种常见的最佳实践,可以提高容器的运行效率和可靠性。在设计容器镜像时,尤其是当容器需要优雅地处理停止和重启信号时,应该考虑采用这种模式。