目录
一、实验
1.环境
2. 网络配置
3. MobaXterm远程连接
4. apache 2.4.58 源码编译安装
5. php 8.3.1源码编译安装
6.配置httpd 连接 php-fpm
6. nginx 1.24.0源码编译安装
7. mysql 8.0.36安装
二、问题
1.MobaXterm设置右键复制粘贴
2.OpenEuler如何查看CPU的核数
3. Web 浏览器不显示 htdocs 目录中的 index.html
4.设置httpd开机自启报错
一、实验
1.环境
(1)主机
表1 主机
| 系统 | 架构 | 版本 | IP | 备注 |
| Linux | openEuler | 22.03 LTS SP2 | 192.168.204.131(动态) 192.168.204.141(静态) 192.168.204.142(静态) | |
| apache | 2.4.58 | |||
| php | 8.3.1 | |||
| nginx | 1.24.0 | |||
| mysql | 8.0.36 |
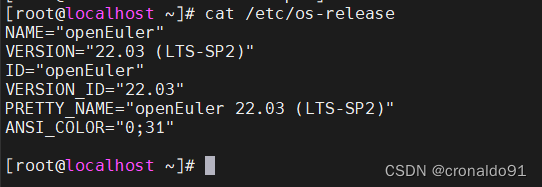
(2)查看系统版本
[root@localhost ~]# cat /etc/os-release
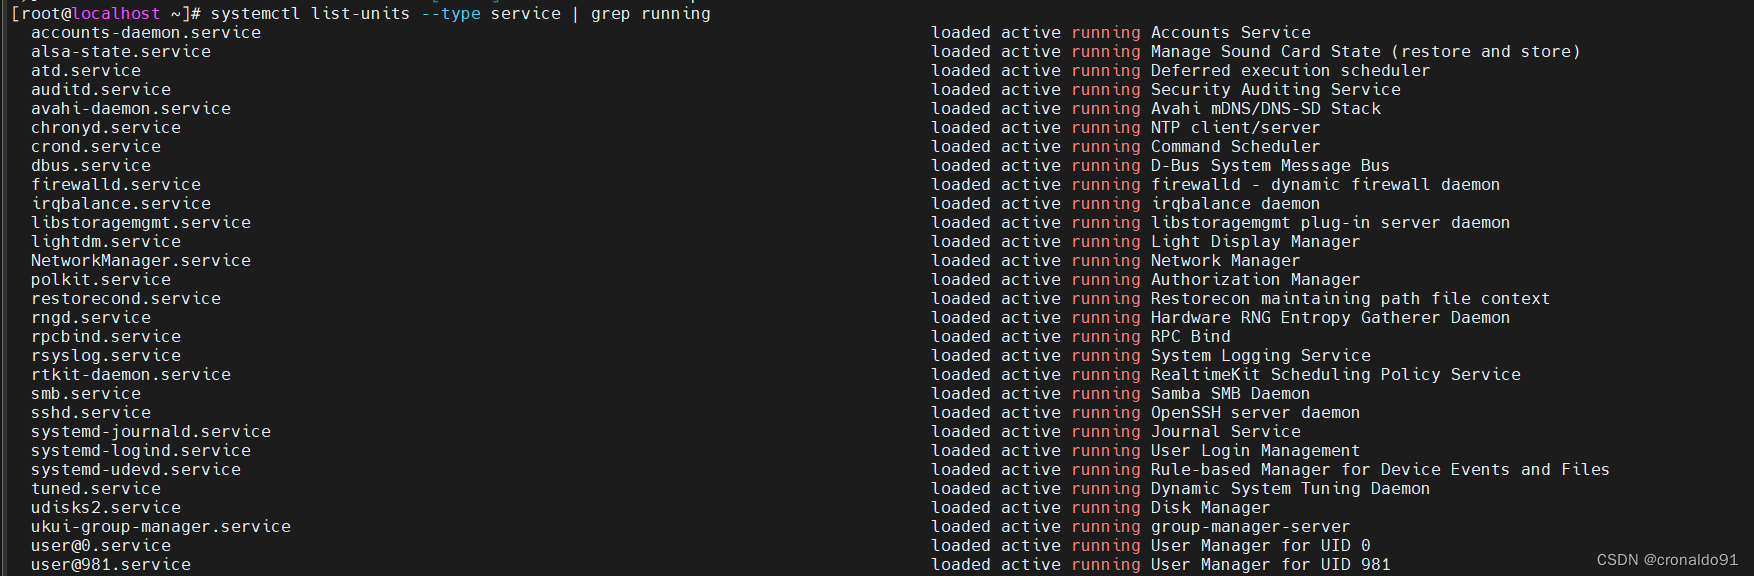
(3) 查看当前运行服务
[root@localhost ~]# systemctl list-units --type service | grep running
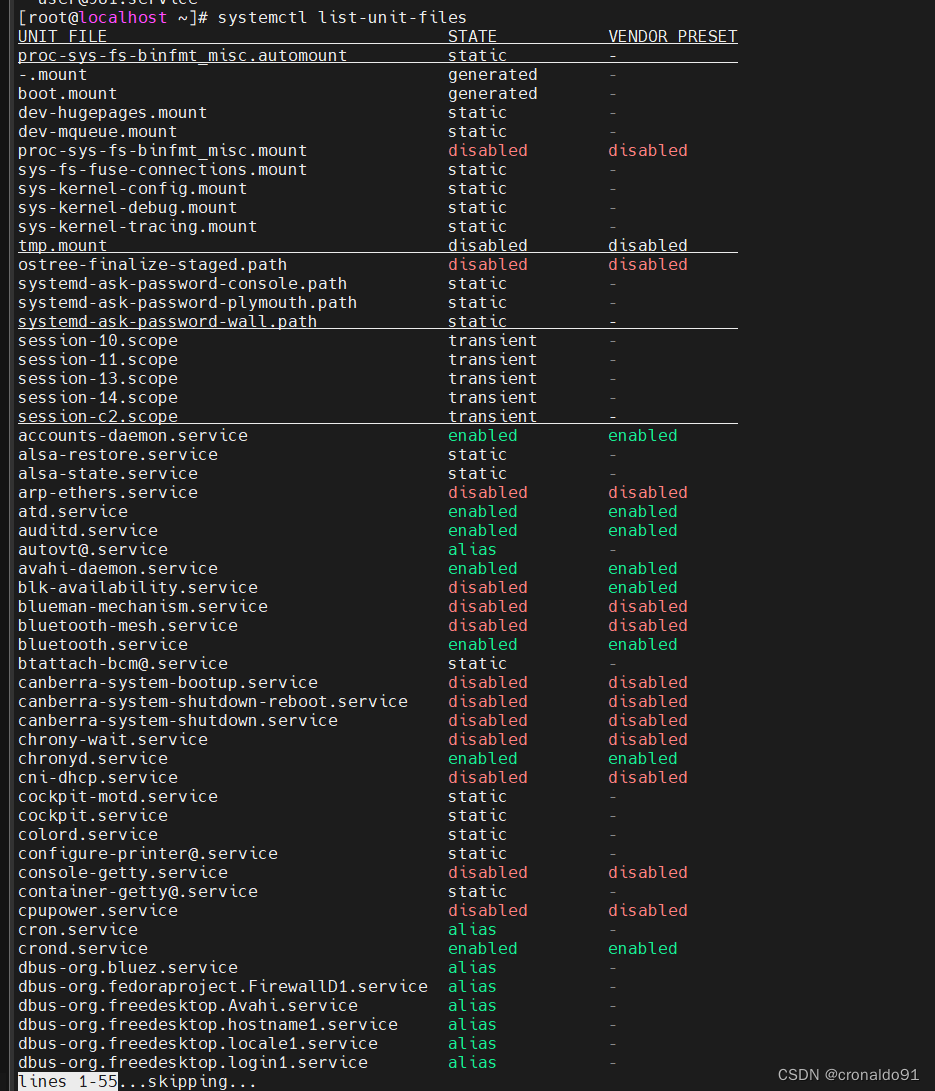
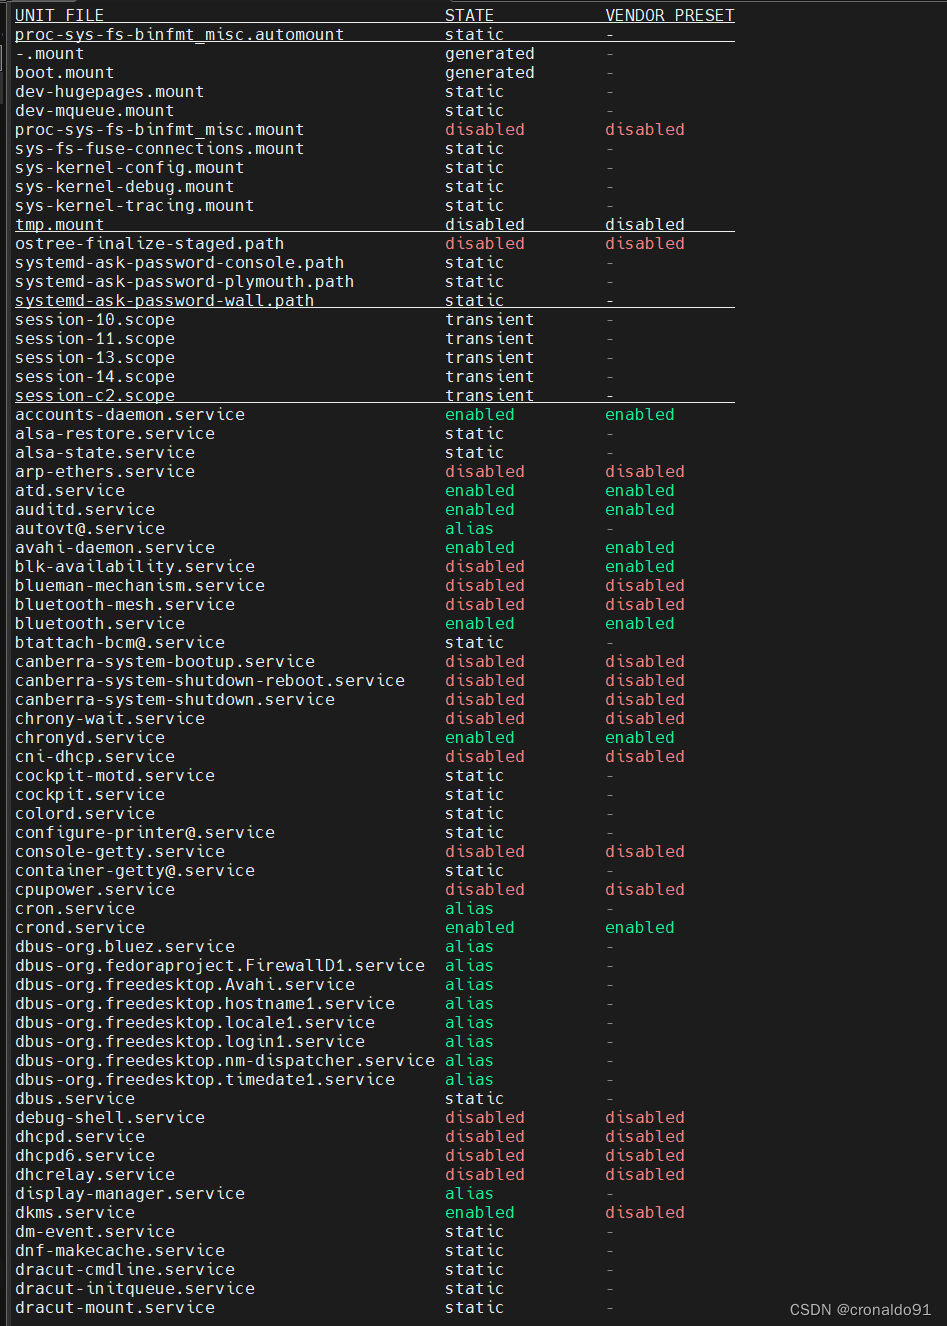
(4)查看服务文件
[root@localhost ~]# systemctl list-unit-files
2. 网络配置
(1)编辑
目标:配置三个ip,一个动态分配,二个是静态ip
[root@localhost network-scripts]# vim ifcfg-ens33 +$
+$ 直接移动到文件末尾编辑
![]()
(2)修改
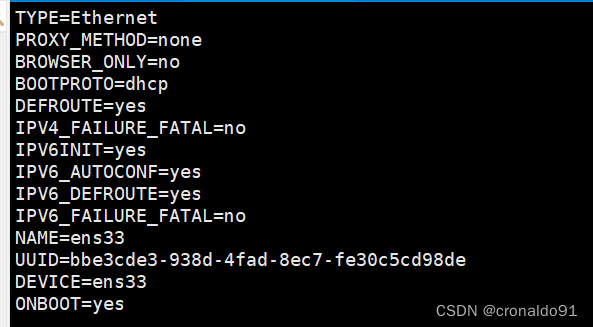
修改前:
TYPE=Ethernet
PROXY_METHOD=none
BROWSER_ONLY=no
BOOTPROTO=dhcp
DEFROUTE=yes
IPV4_FAILURE_FATAL=no
IPV6INIT=yes
IPV6_AUTOCONF=yes
IPV6_DEFROUTE=yes
IPV6_FAILURE_FATAL=no
NAME=ens33
UUID=bbe3cde3-938d-4fad-8ec7-fe30c5cd98de
DEVICE=ens33
ONBOOT=yes
修改后:
TYPE=Ethernet
PROXY_METHOD=none
BROWSER_ONLY=no
BOOTPROTO=dhcp
DEFROUTE=yes
IPV4_FAILURE_FATAL=no
IPV6INIT=yes
IPV6_AUTOCONF=yes
IPV6_DEFROUTE=yes
IPV6_FAILURE_FATAL=no
NAME=ens33
UUID=bbe3cde3-938d-4fad-8ec7-fe30c5cd98de
DEVICE=ens33
ONBOOT=yesIPADDR1=192.168.204.141
IPADDR2=192.168.204.142
NETMASK=255.255.255.0
GATEWAY=192.168.204.2
DNS1=114.114.114.114
DNS2=192.168.204.2

(3)重启服务
[root@localhost network-scripts]# systemctl restart NetworkManager
[root@localhost network-scripts]# systemctl status NetworkManager
(4)重启主机
[root@localhost network-scripts]# sudo reboot
![]()
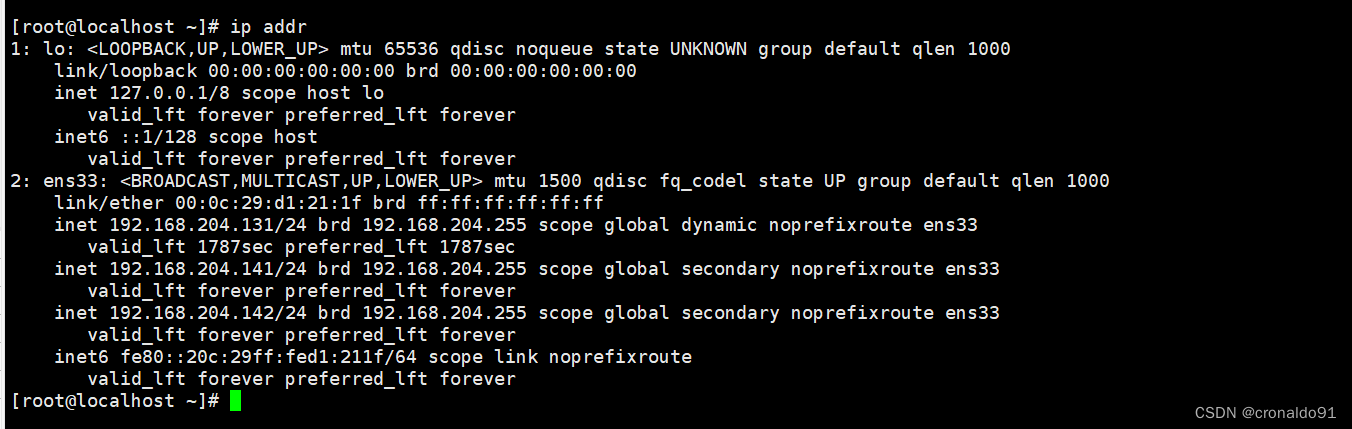
(5)查看
[root@localhost ~]# ip addr一个动态分配(192.168.204.131),二个是静态ip(192.168.204.141、192.168.204.142)
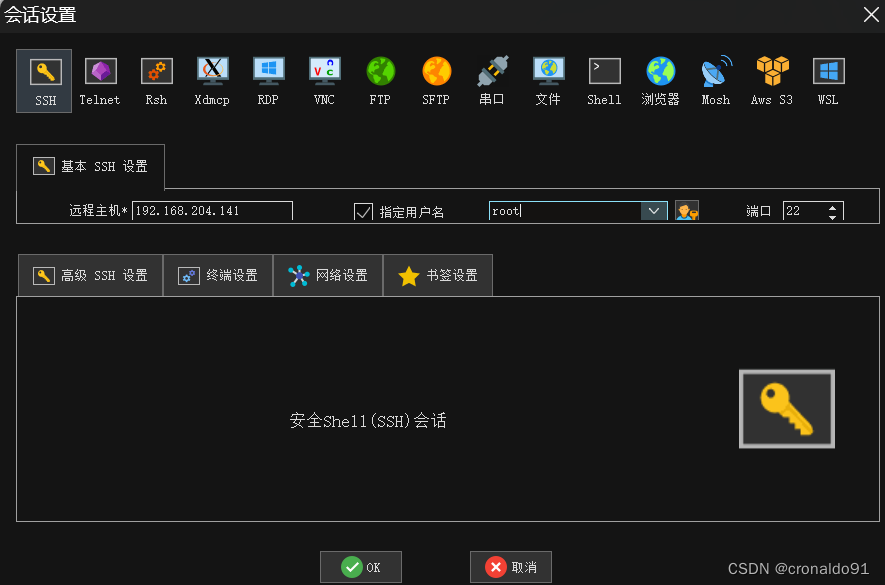
3. MobaXterm远程连接
(1)下载
MobaXterm free Xserver and tabbed SSH client for Windows (mobatek.net)
(2)设置SSH
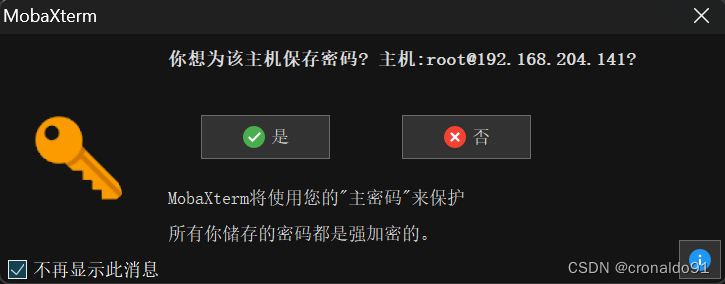
接受(Accept)

弹出对话框(如不需要免密,可以取消关闭)
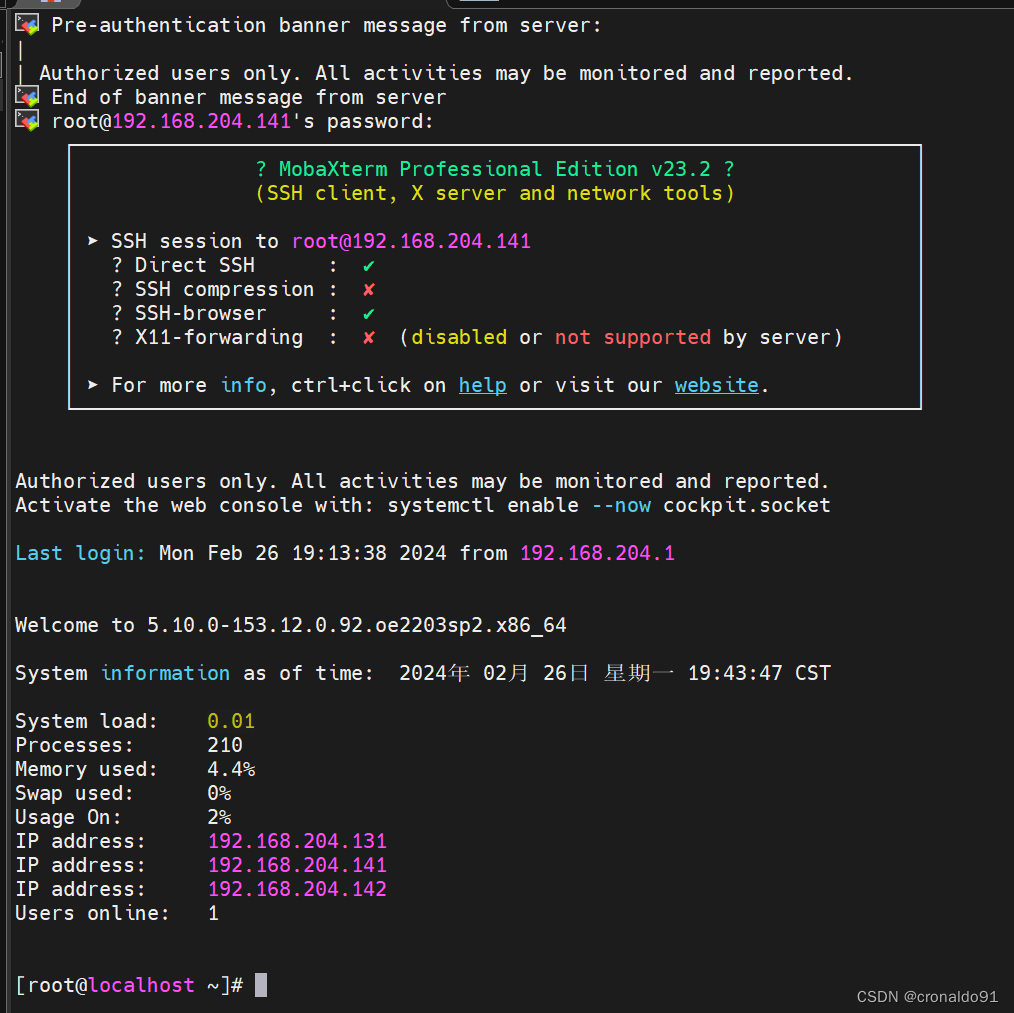
输入密码登录
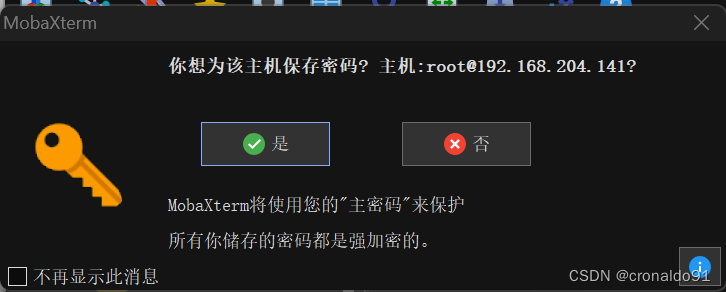
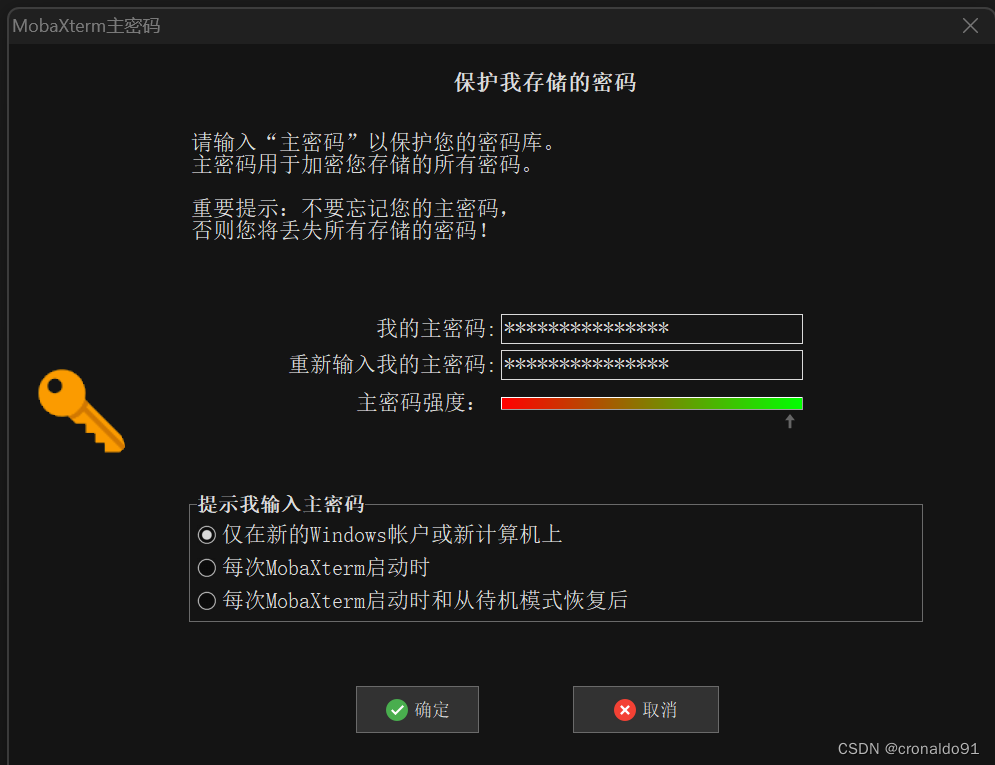
(3)设置免密
是
输入密码(登录免密)
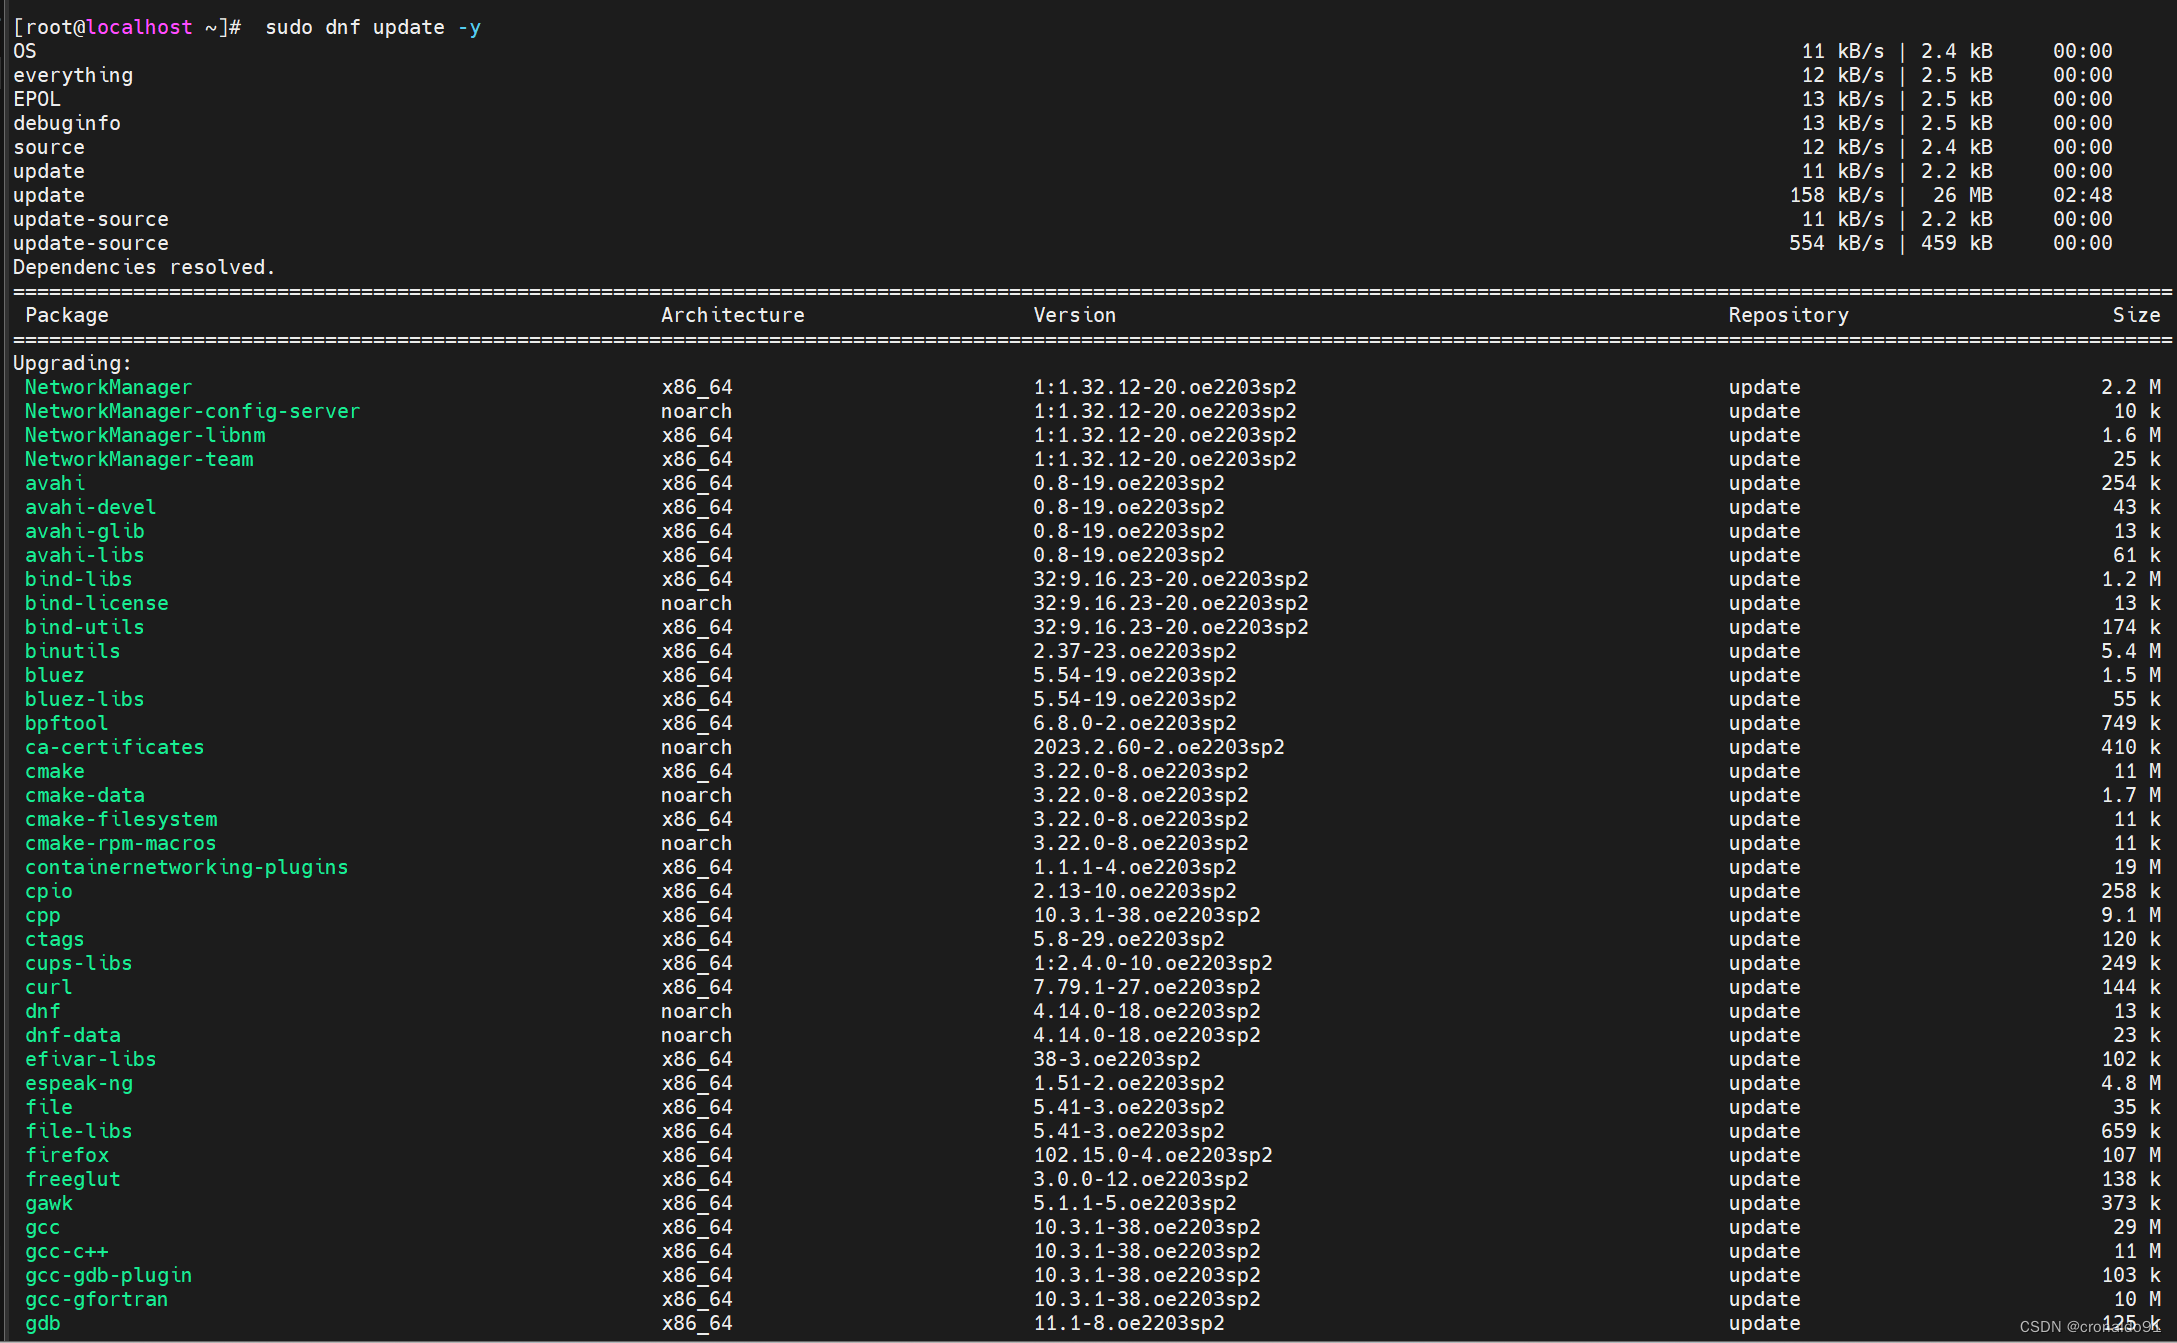
(4)更新
[root@localhost ~]# sudo dnf update -y


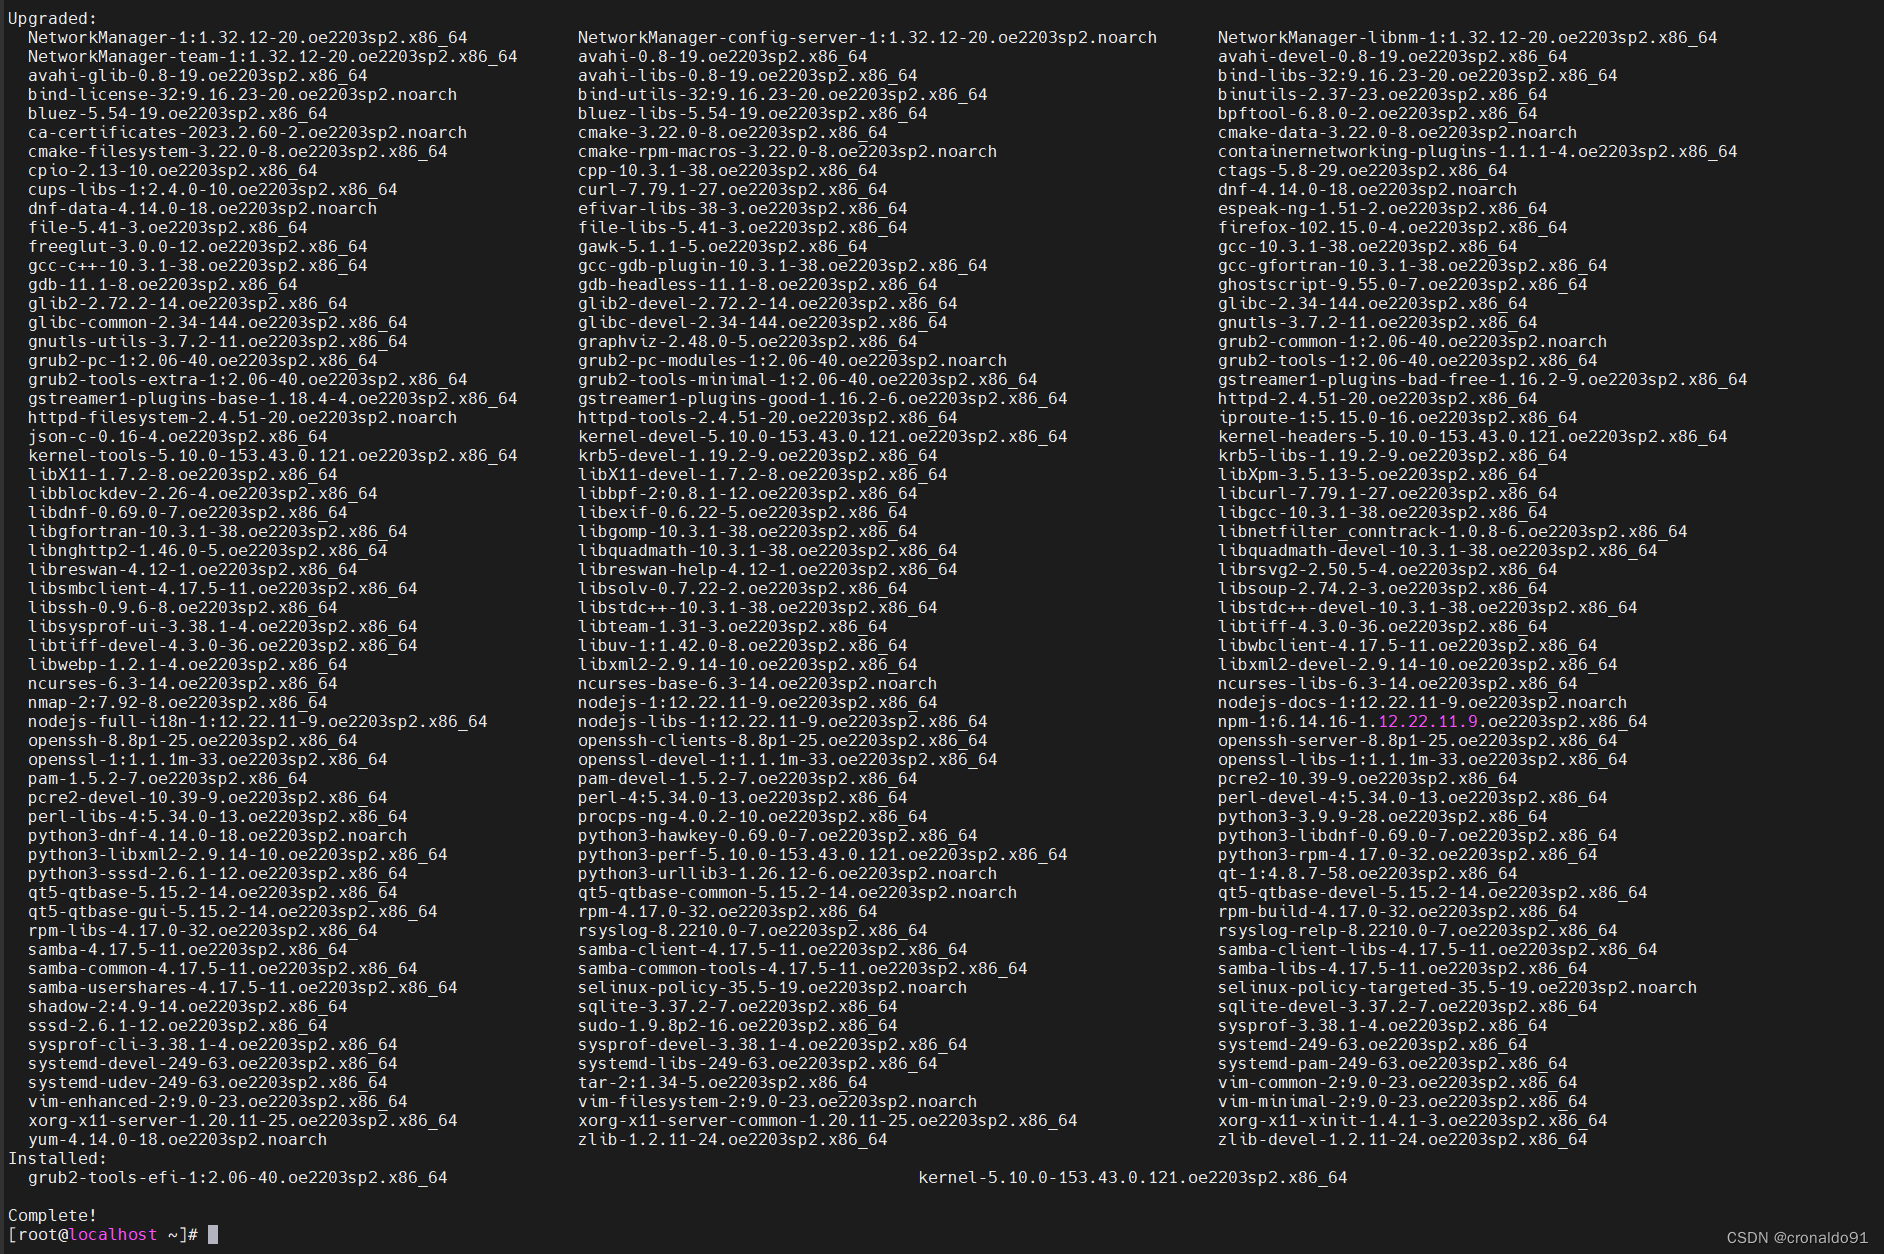
(5)再次更新
[root@localhost ~]# sudo dnf update -y
提示已更新

4. apache 2.4.58 源码编译安装
(1) 官网
Download - The Apache HTTP Server Project

(2)下载
wget https://dlcdn.apache.org/httpd/httpd-2.4.58.tar.gz(3) 安装依赖组件
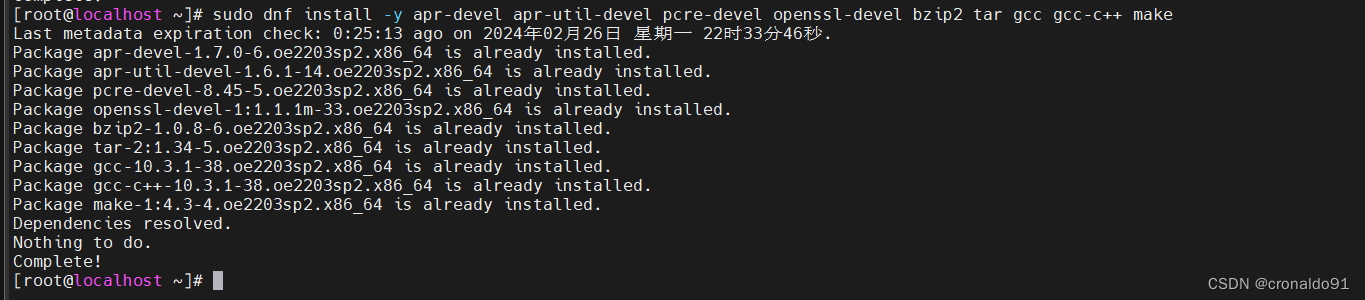
[root@localhost ~]# sudo dnf install -y apr-devel apr-util-devel pcre-devel openssl-devel bzip2 tar gcc gcc-c++ make
(4)解压
[root@localhost opt]# tar zxvf httpd-2.4.58.tar.gz
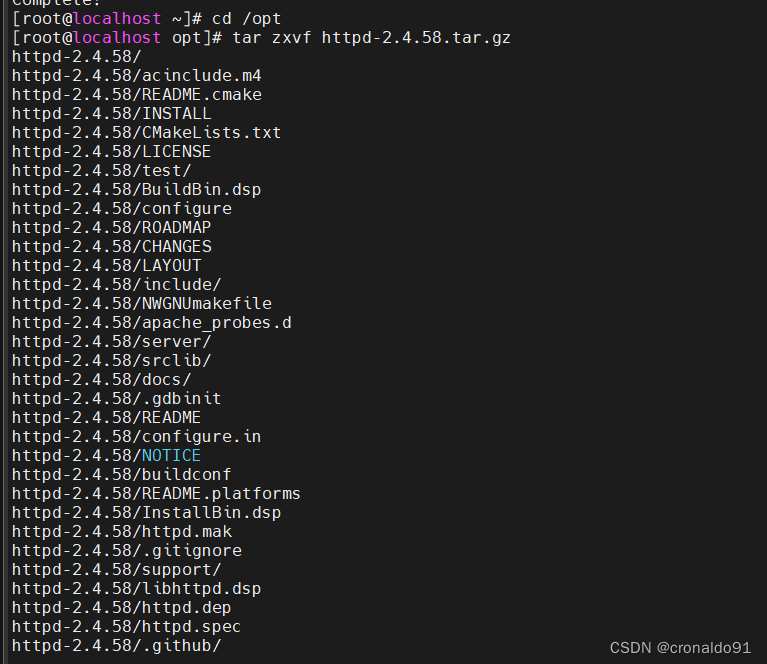
(5)切换目录
[root@localhost opt]# cd httpd-2.4.58![]()
(6)安装前配置
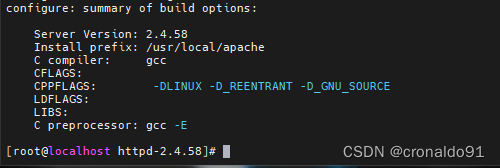
[root@localhost httpd-2.4.58]# sudo ./configure --prefix=/usr/local/apache --enable-so --enable-rewrite
![]()
完成
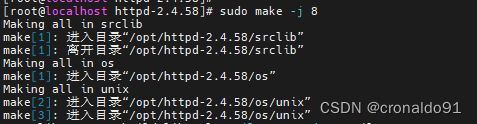
(7)编译
[root@localhost httpd-2.4.58]# sudo make -j 8
完成
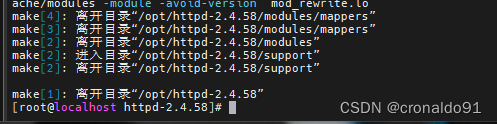
(8)安装
默认安装位置是 /usr/local/apache
[root@localhost httpd-2.4.58]# sudo make install![]()
完成:
(9)编写服务配置文件
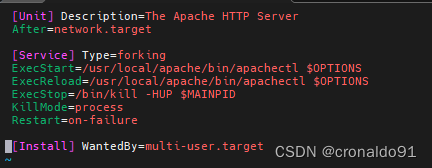
sudo vim /usr/lib/systemd/system/httpd.service [Unit] Description=The Apache HTTP ServerAfter=network.target[Service] Type=forkingExecStart=/usr/local/apache/bin/apachectl $OPTIONSExecReload=/usr/local/apache/bin/apachectl $OPTIONSExecStop=/bin/kill -HUP $MAINPIDKillMode=processRestart=on-failure[Install] WantedBy=multi-user.target(10)服务操作
[root@localhost httpd-2.4.58]# sudo vim /etc/systemd/system/httpd.service[root@localhost httpd-2.4.58]# sudo systemctl enable httpd[root@localhost httpd-2.4.58]# sudo systemctl enable --now httpd[root@localhost httpd-2.4.58]# sudo systemctl daemon-reload[root@localhost httpd-2.4.58]# sudo systemctl start httpd

(11)防火墙操作
[root@localhost httpd-2.4.58]# sudo firewall-cmd --zone=public --add-port=80/tcp --permanent[root@localhost httpd-2.4.58]# sudo firewall-cmd --reload
(12)测试
[root@localhost httpd-2.4.58]# curl localhost
![]()
(13)查看版本信息
[root@localhost httpd-2.4.58]# /usr/local/apache/bin/httpd -v
![]()
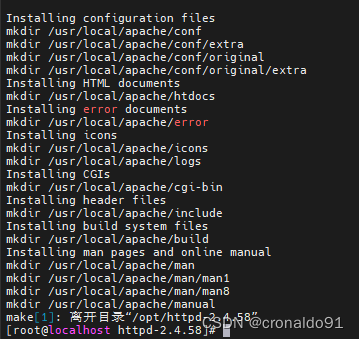
查看服务状态
[root@localhost httpd-2.4.58]# sudo systemctl status httpd
(14)访问
http://192.168.204.141/
5. php 8.3.1源码编译安装
(1) 官网
PHP: Downloads
(2)下载
wget https://www.php.net/distributions/php-8.3.1.tar.gz(3)安装依赖组件
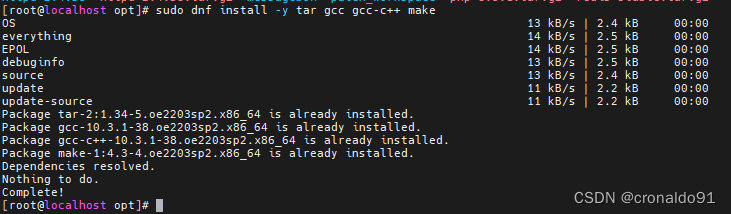
[root@localhost opt]# sudo dnf install -y tar gcc gcc-c++ make
sudo dnf install -y bzip2-devel libcurl-devel libxml2-devel sqlite-devel oniguruma oniguruma-devel libxml2-devel bzip2-devel libcurl-devel libjpeg-devel zstd libzstd-devel libcurl-devel libpng-devel libffi-devel libjpeg-devel libpng-devel sqlite-devel libwebp libwebp-devel openssl-devel libzip-devel
完成

(4)解压缩并进入源码目录
[root@localhost opt]# tar zxvf php-8.3.1.tar.gz
![]()
[root@localhost opt]# cd php-8.3.1
![]()
(5)配置
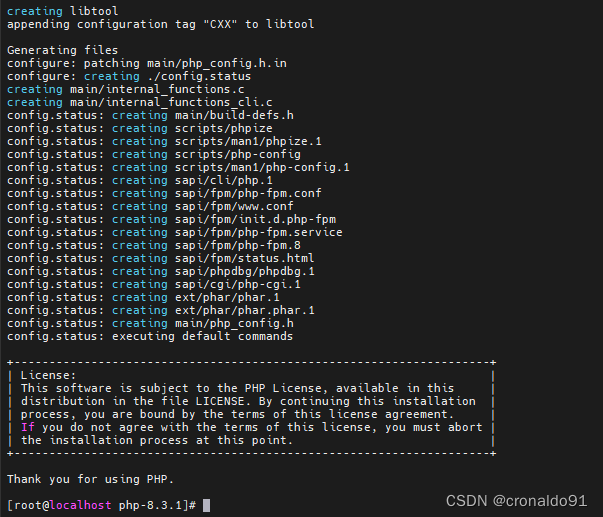
sudo ./configure --prefix=/usr/local/php --enable-gd --with-webp --with-jpeg --with-mhash --enable-mbstring --with-imap-ssl --with-mysqli --with-pdo-mysql --enable-exif --with-ffi --with-zip --enable-sockets --with-openssl --with-pcre-jit --enable-fpm --enable-pcntl
完成
(6)编译
[root@localhost php-8.3.1]# sudo make -j 8
![]()
完成

(7)安装
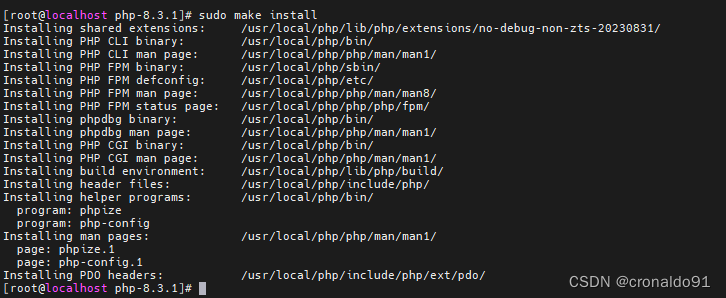
[root@localhost php-8.3.1]# sudo make install
Installing shared extensions:     /usr/local/php/lib/php/extensions/no-debug-non-zts-20230831/
Installing PHP CLI binary:        /usr/local/php/bin/
Installing PHP CLI man page:      /usr/local/php/php/man/man1/
Installing PHP FPM binary:        /usr/local/php/sbin/
Installing PHP FPM defconfig:     /usr/local/php/etc/
Installing PHP FPM man page:      /usr/local/php/php/man/man8/
Installing PHP FPM status page:   /usr/local/php/php/php/fpm/
Installing phpdbg binary:         /usr/local/php/bin/
Installing phpdbg man page:       /usr/local/php/php/man/man1/
Installing PHP CGI binary:        /usr/local/php/bin/
Installing PHP CGI man page:      /usr/local/php/php/man/man1/
Installing build environment:     /usr/local/php/lib/php/build/
Installing header files:          /usr/local/php/include/php/
Installing helper programs:       /usr/local/php/bin/program: phpizeprogram: php-config
Installing man pages:             /usr/local/php/php/man/man1/page: phpize.1page: php-config.1
Installing PDO headers:           /usr/local/php/include/php/ext/pdo/
(8)查看
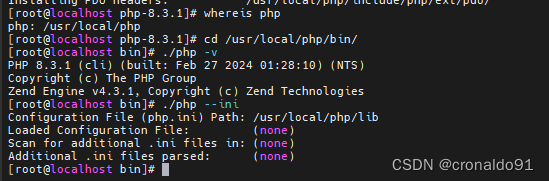
[root@localhost php-8.3.1]# whereis php
php: /usr/local/php[root@localhost php-8.3.1]# cd /usr/local/php/bin/[root@localhost bin]# ./php -v
PHP 8.3.1 (cli) (built: Feb 27 2024 01:28:10) (NTS)
Copyright (c) The PHP Group
Zend Engine v4.3.1, Copyright (c) Zend Technologies[root@localhost bin]# ./php --ini
Configuration File (php.ini) Path: /usr/local/php/lib
Loaded Configuration File:         (none)
Scan for additional .ini files in: (none)
Additional .ini files parsed:      (none)
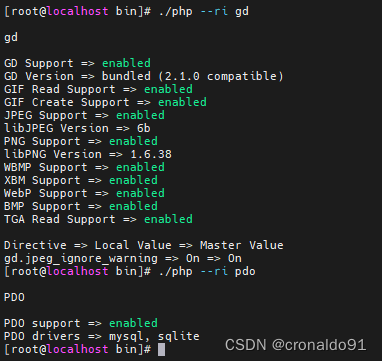
查看组件
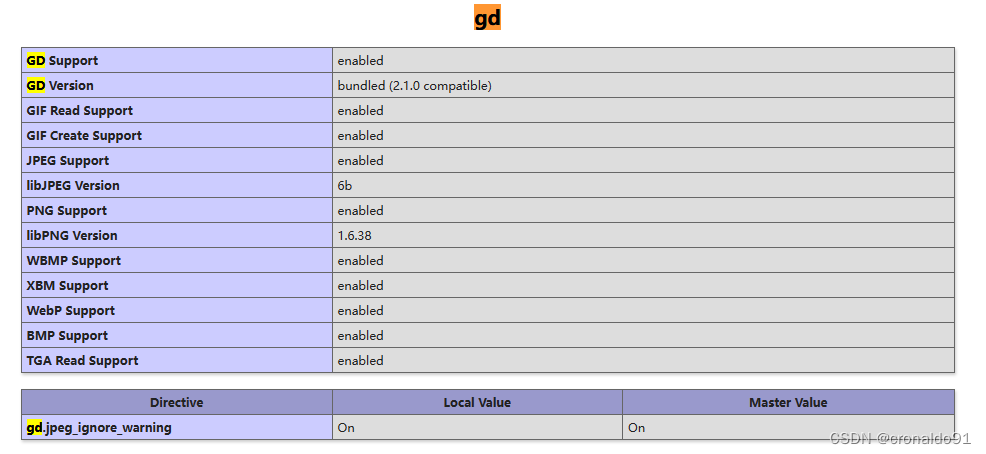
[root@localhost bin]# ./php --ri gdgdGD Support => enabled
GD Version => bundled (2.1.0 compatible)
GIF Read Support => enabled
GIF Create Support => enabled
JPEG Support => enabled
libJPEG Version => 6b
PNG Support => enabled
libPNG Version => 1.6.38
WBMP Support => enabled
XBM Support => enabled
WebP Support => enabled
BMP Support => enabled
TGA Read Support => enabledDirective => Local Value => Master Value
gd.jpeg_ignore_warning => On => On
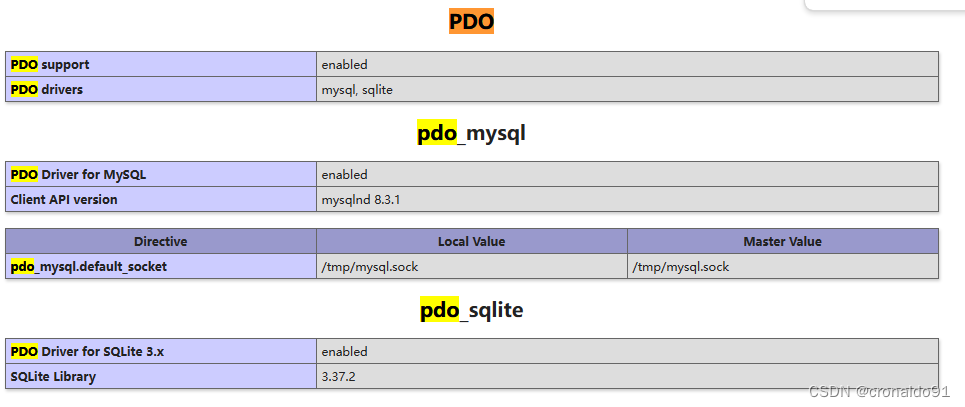
[root@localhost bin]# ./php --ri pdoPDOPDO support => enabled
PDO drivers => mysql, sqlite
[root@localhost bin]#
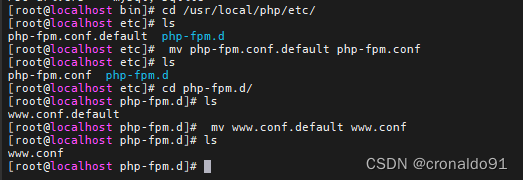
(9)修改配置文件
[root@localhost bin]# cd /usr/local/php/etc/[root@localhost etc]# ls
php-fpm.conf.default  php-fpm.d[root@localhost etc]#  mv php-fpm.conf.default php-fpm.conf[root@localhost etc]# ls
php-fpm.conf  php-fpm.d[root@localhost etc]# cd php-fpm.d/[root@localhost php-fpm.d]# ls
www.conf.default[root@localhost php-fpm.d]#  mv www.conf.default www.conf[root@localhost php-fpm.d]# ls
www.conf
(10)复制服务配置文件
[root@localhost fpm]# cp /opt/php-8.3.1/sapi/fpm/php-fpm.service /usr/lib/systemd/system/
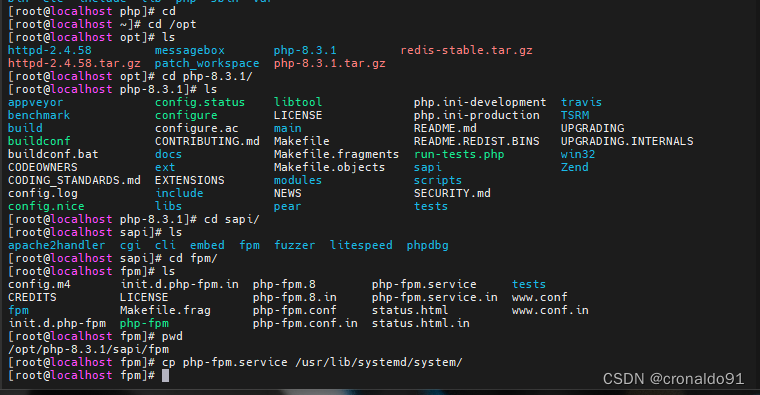
(11)查看配置文件
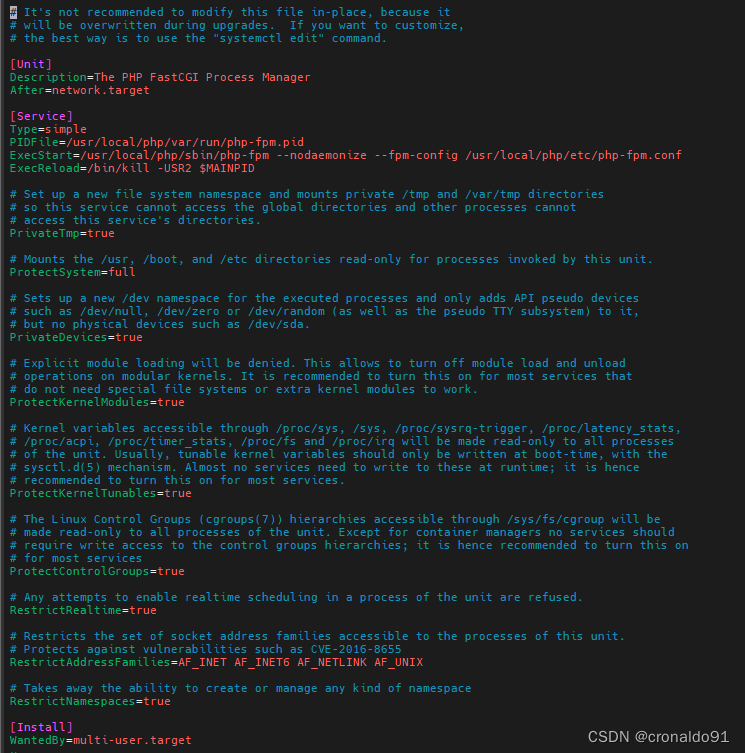
[root@localhost fpm]# sudo vim /usr/lib/systemd/system/php-fpm.service
![]()
# It's not recommended to modify this file in-place, because it
# will be overwritten during upgrades.  If you want to customize,
# the best way is to use the "systemctl edit" command.[Unit]
Description=The PHP FastCGI Process Manager
After=network.target[Service]
Type=simple
PIDFile=/usr/local/php/var/run/php-fpm.pid
ExecStart=/usr/local/php/sbin/php-fpm --nodaemonize --fpm-config /usr/local/php/etc/php-fpm.conf
ExecReload=/bin/kill -USR2 $MAINPID# Set up a new file system namespace and mounts private /tmp and /var/tmp directories
# so this service cannot access the global directories and other processes cannot
# access this service's directories.
PrivateTmp=true# Mounts the /usr, /boot, and /etc directories read-only for processes invoked by this unit.
ProtectSystem=full# Sets up a new /dev namespace for the executed processes and only adds API pseudo devices
# such as /dev/null, /dev/zero or /dev/random (as well as the pseudo TTY subsystem) to it,
# but no physical devices such as /dev/sda.
PrivateDevices=true# Explicit module loading will be denied. This allows to turn off module load and unload
# operations on modular kernels. It is recommended to turn this on for most services that
# do not need special file systems or extra kernel modules to work.
ProtectKernelModules=true# Kernel variables accessible through /proc/sys, /sys, /proc/sysrq-trigger, /proc/latency_stats,
# /proc/acpi, /proc/timer_stats, /proc/fs and /proc/irq will be made read-only to all processes
# of the unit. Usually, tunable kernel variables should only be written at boot-time, with the
# sysctl.d(5) mechanism. Almost no services need to write to these at runtime; it is hence
# recommended to turn this on for most services.
ProtectKernelTunables=true# The Linux Control Groups (cgroups(7)) hierarchies accessible through /sys/fs/cgroup will be
# made read-only to all processes of the unit. Except for container managers no services should
# require write access to the control groups hierarchies; it is hence recommended to turn this on
# for most services
ProtectControlGroups=true# Any attempts to enable realtime scheduling in a process of the unit are refused.
RestrictRealtime=true# Restricts the set of socket address families accessible to the processes of this unit.
# Protects against vulnerabilities such as CVE-2016-8655
RestrictAddressFamilies=AF_INET AF_INET6 AF_NETLINK AF_UNIX# Takes away the ability to create or manage any kind of namespace
RestrictNamespaces=true[Install]
WantedBy=multi-user.target
修改后:
# It's not recommended to modify this file in-place, because it
# will be overwritten during upgrades.  If you want to customize,
# the best way is to use the "systemctl edit" command.[Unit]
Description=The PHP FastCGI Process Manager
After=network.target[Service]
Type=simple
PIDFile=/usr/local/php/var/run/php-fpm.pid
ExecStart=/usr/local/php/sbin/php-fpm --nodaemonize --fpm-config /usr/local/php/etc/php-fpm.conf
ExecReload=/bin/kill -USR2 $MAINPID# Set up a new file system namespace and mounts private /tmp and /var/tmp directories
# so this service cannot access the global directories and other processes cannot
# access this service's directories.
PrivateTmp=true# Takes away the ability to create or manage any kind of namespace
RestrictNamespaces=true[Install]
WantedBy=multi-user.target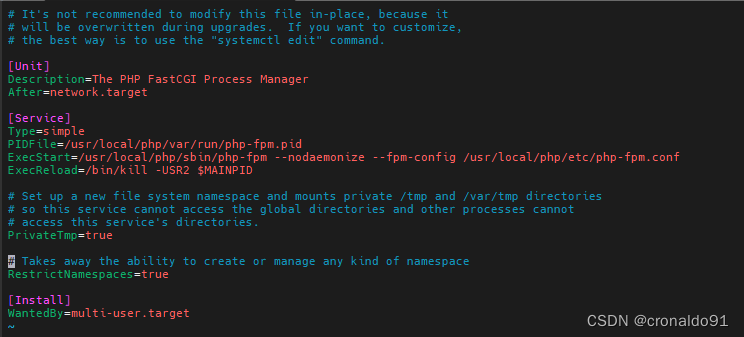
(12)启动
[root@localhost fpm]# sudo systemctl enable --now php-fpm[root@localhost fpm]# sudo systemctl status php-fpm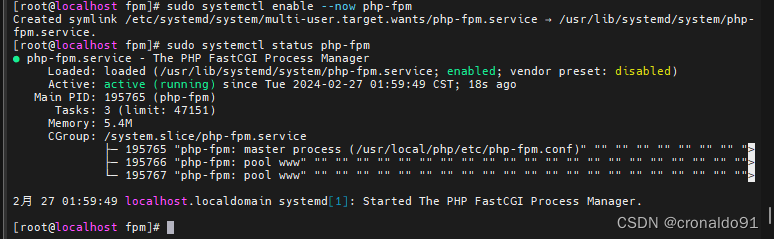
(13) 申明变量
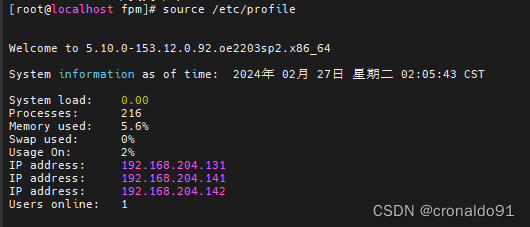
[root@localhost fpm]# sudo vim /etc/profile +$
![]()
export PATH=.:$PATH:/usr/local/php/bin
![]()
更新
[root@localhost fpm]# source /etc/profile
(14)查看版本
[root@localhost fpm]# php -v

(15)查看模块
[root@localhost fpm]# php -m
[PHP Modules]
Core
ctype
date
dom
exif
FFI
fileinfo
filter
gd
hash
iconv
json
libxml
mbstring
mysqli
mysqlnd
openssl
pcntl
pcre
PDO
pdo_mysql
pdo_sqlite
Phar
posix
random
Reflection
session
SimpleXML
sockets
SPL
sqlite3
standard
tokenizer
xml
xmlreader
xmlwriter
zip[Zend Modules]

6.配置httpd 连接 php-fpm
(1)创建目录
[root@localhost ~]# mkdir -p /var/www
![]()
(2)创建网页文件
[root@localhost ~]# sudo vim /var/www/index.php
![]()
<?php
phpinfo();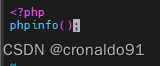
(3)修改配置文件
[root@localhost ~]# vim /usr/local/apache/conf/httpd.conf
![]()
开启序号
set nu
启用119行
![]()
![]()
启用123行
![]()
![]()
修改189行

修改198行

修改257行

大G 切换最后一行

(4) 重启主机
[root@localhost ~]# sudo reboot
![]()
(5)重启服务
[root@localhost ~]# sudo systemctl daemon-reload
[root@localhost ~]# sudo systemctl start httpd
[root@localhost ~]# sudo systemctl status httpd

(6)访问
http://192.168.204.141/index.php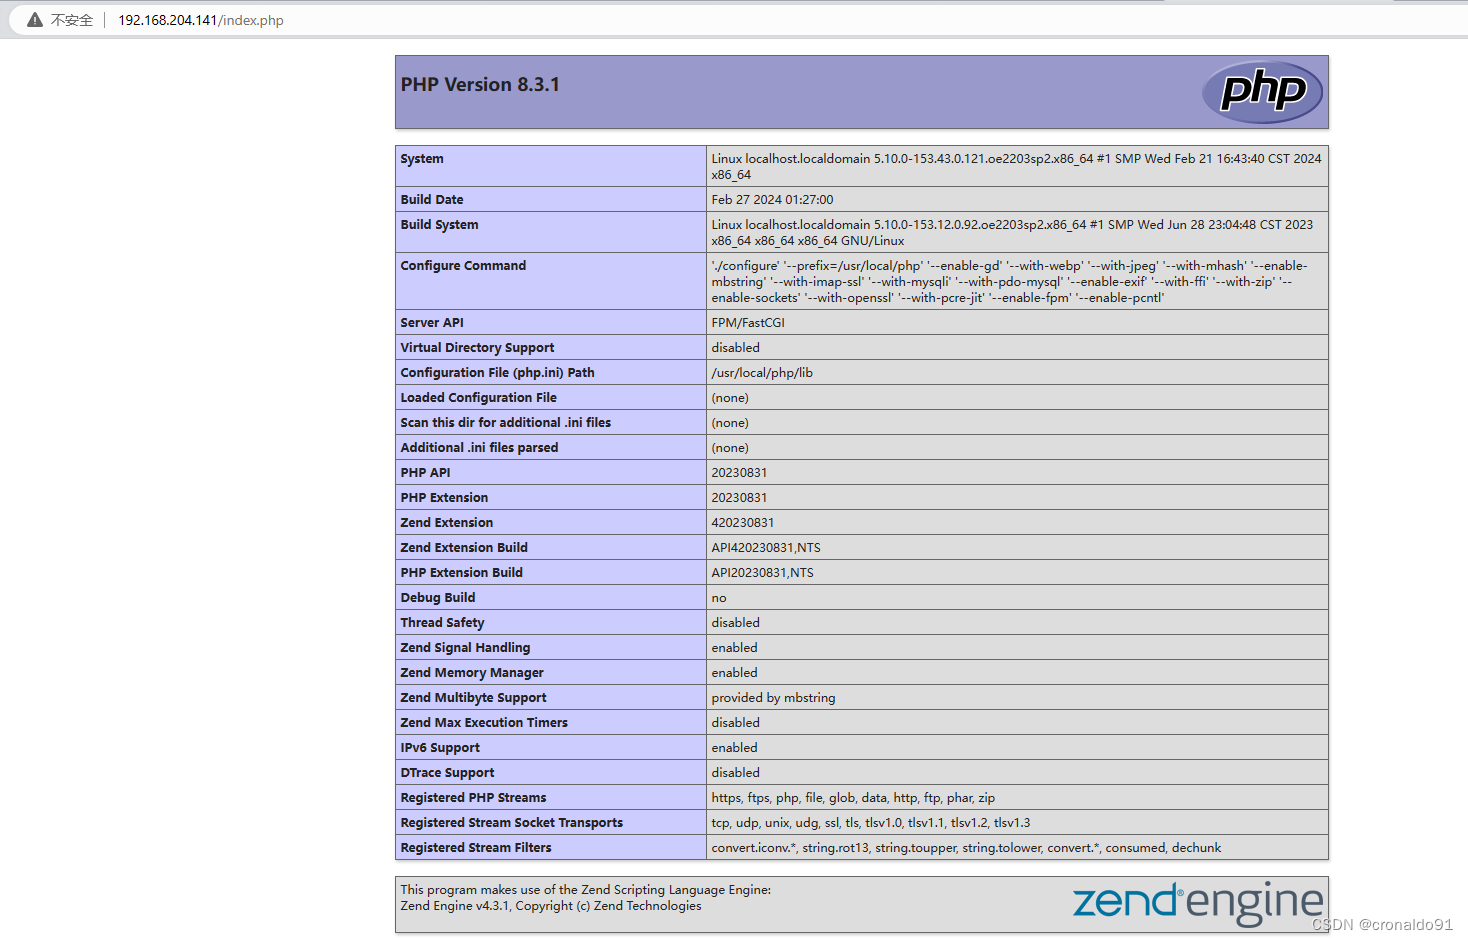
gd组件
pdo组件
版本
![]()
(7)修改时区
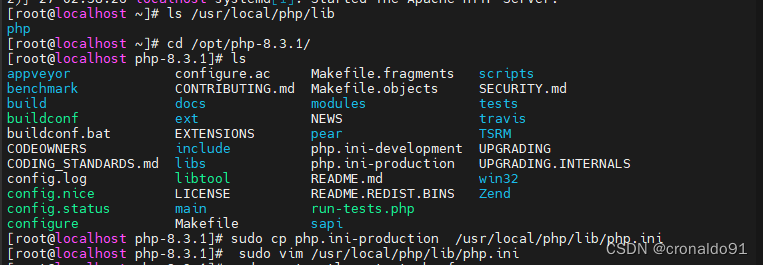
复制配置文件
[root@localhost ~]# ls /usr/local/php/lib
php[root@localhost ~]# cd /opt/php-8.3.1/[root@localhost php-8.3.1]# ls
appveyor             configure.ac     Makefile.fragments   scripts
benchmark            CONTRIBUTING.md  Makefile.objects     SECURITY.md
build                docs             modules              tests
buildconf            ext              NEWS                 travis
buildconf.bat        EXTENSIONS       pear                 TSRM
CODEOWNERS           include          php.ini-development  UPGRADING
CODING_STANDARDS.md  libs             php.ini-production   UPGRADING.INTERNALS
config.log           libtool          README.md            win32
config.nice          LICENSE          README.REDIST.BINS   Zend
config.status        main             run-tests.php
configure            Makefile         sapi[root@localhost php-8.3.1]# sudo cp php.ini-production  /usr/local/php/lib/php.ini[root@localhost php-8.3.1]#  sudo vim /usr/local/php/lib/php.ini
搜索timezone
![]()
修改前:

修改后:
date.timezone = PRC

重启服务
[root@localhost php-8.3.1]# sudo systemctl restart php-fpm
![]()
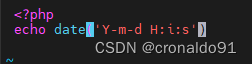
测试
sudo vim /var/www/d.php<?phpecho date('Y-m-d H:i:s')![]()
6. nginx 1.24.0源码编译安装
(1) 官网
Index of /download/ (nginx.org)
(2)下载
wget http://nginx.org/download/nginx-1.24.0.tar.gz(3)解压
[root@localhost opt]# tar zxvf nginx-1.24.0.tar.gz
![]()
(4)安装依赖组件
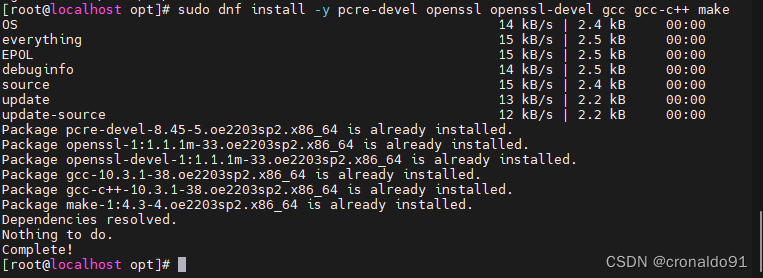
[root@localhost opt]# sudo dnf install -y pcre-devel openssl openssl-devel gcc gcc-c++ make
(5)切换目录
[root@localhost opt]# cd nginx-1.24.0
![]()
(6)配置
自动配置 默认安装在/usr/local/nginx 目录下
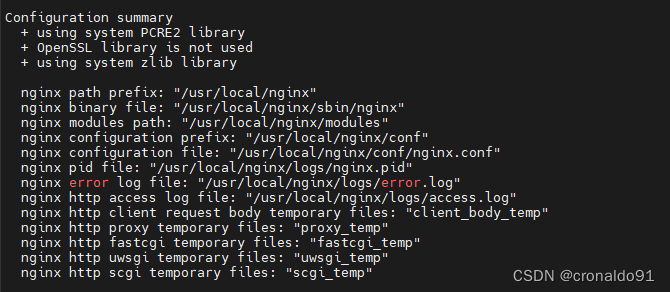
[root@localhost nginx-1.24.0]# sudo ./configure
![]()
完成
(7)编译
[root@localhost nginx-1.24.0]# sudo make -j 8
![]()
完成

(8)安装
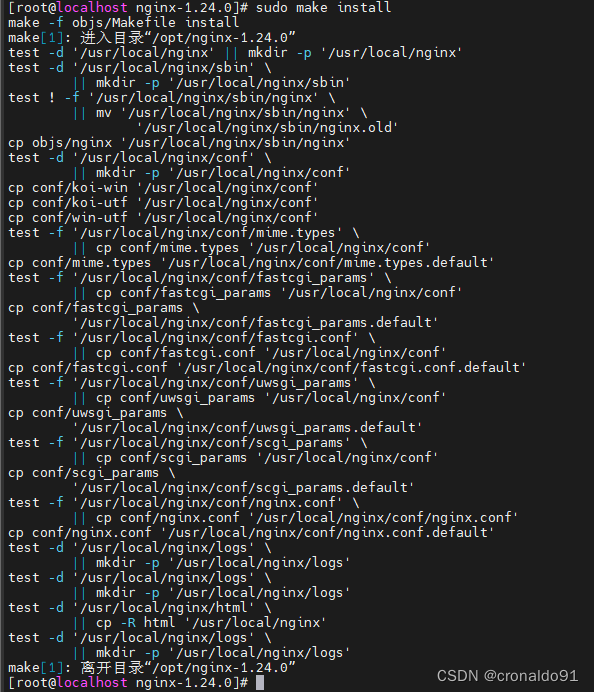
[root@localhost nginx-1.24.0]# sudo make install
(9)查看
[root@localhost nginx-1.24.0]# whereis nginx

(10)配置服务文件
[root@localhost nginx-1.24.0]# sudo vim /usr/lib/systemd/system/nginx.service
![]()
[Unit]Description=nginxAfter=network.target remote-fs.target nss-lookup.target[Service]Type=forkingExecStart=/usr/local/nginx/sbin/nginxExecReload=/usr/local/nginx/sbin/nginx -s reloadExecStop=/usr/local/nginx/sbin/nginx -s stopPrivateTmp=true[Install]WantedBy=multi-user.target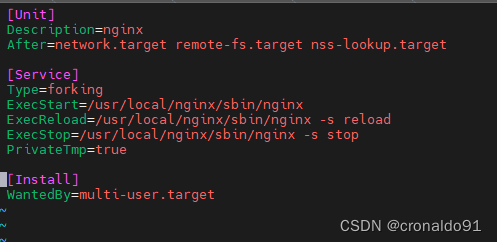
(11)配置nginx
[root@localhost nginx-1.24.0]# sudo vim /usr/local/nginx/conf/nginx.conf
![]()
修改前:

修改后:添加index.php

取消注释
修改前:

修改后:添加 $document_root

(12)启动
如httpd占用80端口,需要将其关闭
[root@localhost nginx-1.24.0]# ps -ef |grep httpd

[root@localhost nginx-1.24.0]# sudo systemctl stop httpd
![]()
[root@localhost nginx-1.24.0]# sudo reboot
![]()
启动nginx服务
[root@localhost ~]# sudo systemctl enable --now nginx[root@localhost ~]# sudo systemctl status nginx
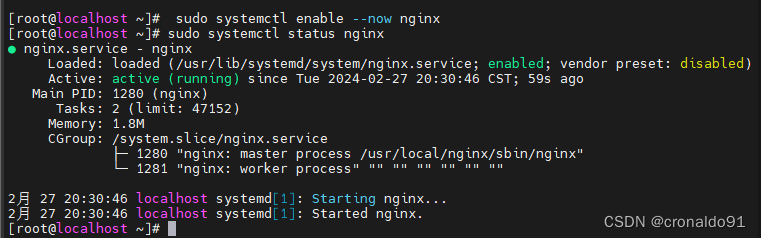
查看进程
[root@localhost ~]# ps -ef |grep nginx

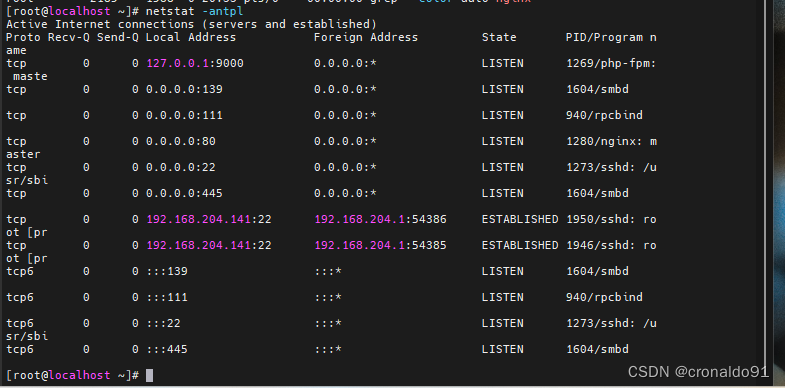
查看端口占用
[root@localhost ~]# netstat -antpl
(13)配置环境变量
[root@localhost sbin]# vim /etc/profile
[root@localhost sbin]# source /etc/profile
![]()
export PATH=.:$PATH:/usr/local/php/bin:/usr/local/nginx/sbin
![]()
查看版本
[root@localhost sbin]# nginx -v
![]()
(14)新建文件
[root@localhost ~]# sudo vim /usr/local/nginx/html/index.php
![]()
<?phpphpinfo();![]()
(15)访问
http://192.168.204.141/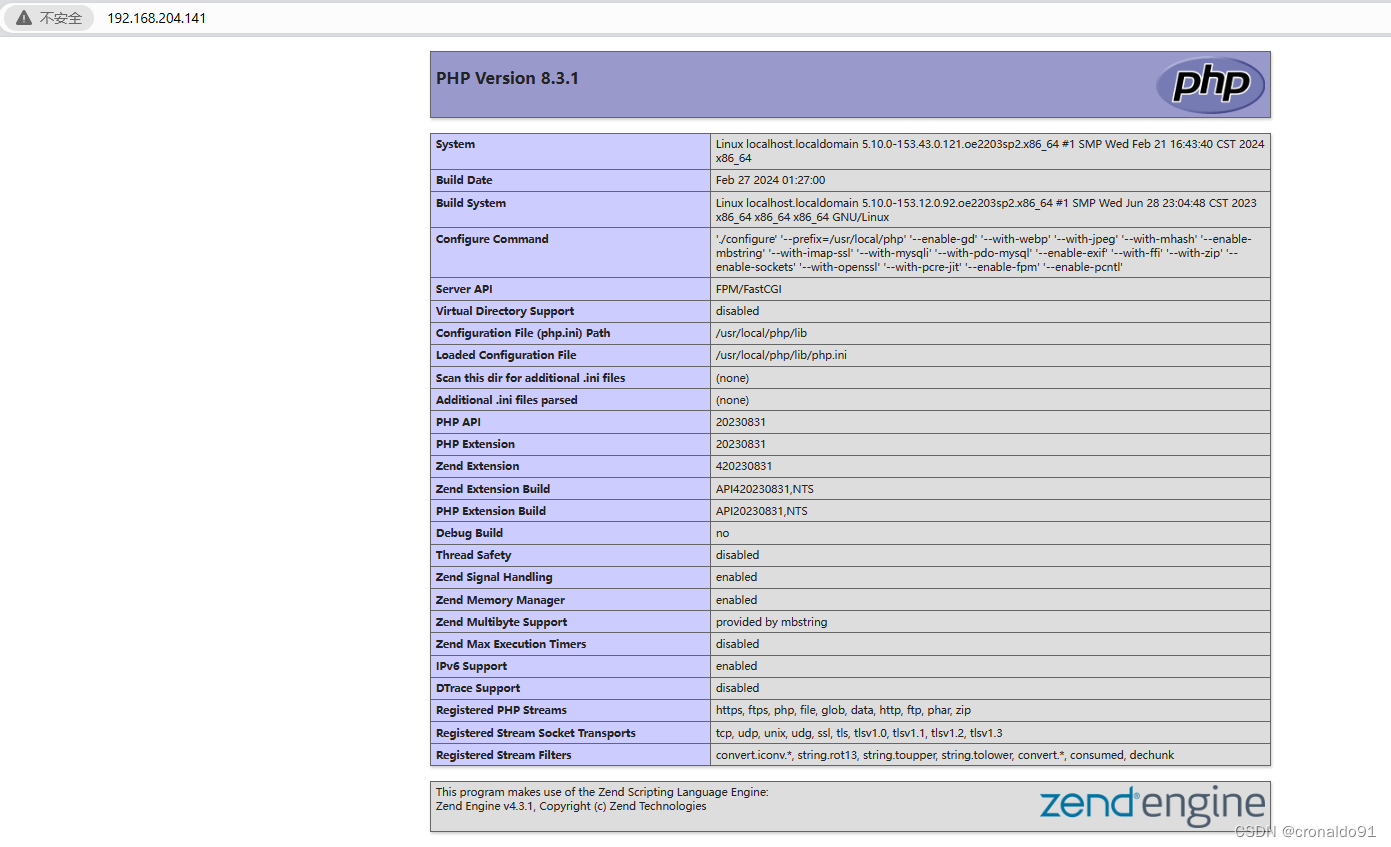
查看nginx版本
![]()
7. mysql 8.0.36安装
(1) 官网
MySQL :: Download MySQL Community Server
(2)下载
wget https://dev.mysql.com/get/Downloads/MySQL-8.0/mysql-8.0.36-linux-glibc2.28-x86_64.tar.xz(3) 新建用户
[root@localhost opt]# groupadd -r -g 306 mysql
[root@localhost opt]# useradd -r -u 306 -g 306 -s /bin/false mysql
![]()
(4)解压
[root@localhost opt]# tar xf mysql-8.0.36-linux-glibc2.28-x86_64.tar.xz -C /usr/local/
![]()
(5)软链接
[root@localhost opt]# ln -s /usr/local/mysql-8.0.36-linux-glibc2.28-x86_64/ /usr/local/mysql
![]()
(6)初始化
需要记住最后生成的密码
[root@localhost opt]# /usr/local/mysql/bin/mysqld --initialize --user=mysql --basedir=/usr/local/mysql --datadir=/usr/local/mysql/data
2024-02-27T13:11:56.263920Z 0 [System] [MY-013169] [Server] /usr/local/mysql/bin/mysqld (mysqld 8.0.36) initializing of server in progress as process 2504
2024-02-27T13:11:56.298069Z 1 [System] [MY-013576] [InnoDB] InnoDB initialization has started.
2024-02-27T13:11:57.751470Z 1 [System] [MY-013577] [InnoDB] InnoDB initialization has ended.
2024-02-27T13:12:04.149485Z 6 [Note] [MY-010454] [Server] A temporary password is generated for root@localhost: >.BjWK3q(qAp

(7)提供配置文件和服务脚本
[root@localhost opt]# cp /usr/local/mysql/support-files/mysql.server /etc/init.d/mysqld
[root@localhost opt]# chkconfig --add mysqld
[root@localhost opt]# chkconfig mysqld on

[root@localhost opt]# vim /etc/my.cnf.d/mysql-server.cnf[mysqld]
datadir=/usr/local/mysql/data
basedir=/usr/local/mysql/
socket=/tmp/mysql.sock
log-error=/usr/local/mysql/data/mysqld.log
pid-file=/usr/local/mysql/mysqld.pid
![]()

(8)配置环境变量
[root@localhost opt]# echo 'export PATH=$PATH:/usr/local/mysql/bin/' > /etc/profile.d/mysql.sh
[root@localhost opt]#  source /etc/profile.d/mysql.sh
![]()
(9)重启服务
[root@localhost opt]# systemctl restart mysqld
![]()
(10)查看版本
[root@localhost opt]# mysql -V
![]()
(11)修改密码
[root@localhost opt]# mysql -uroot -p
Enter password:
Welcome to the MySQL monitor.  Commands end with ; or \g.
Your MySQL connection id is 8
Server version: 8.0.36Copyright (c) 2000, 2024, Oracle and/or its affiliates.Oracle is a registered trademark of Oracle Corporation and/or its
affiliates. Other names may be trademarks of their respective
owners.Type 'help;' or '\h' for help. Type '\c' to clear the current input statement.mysql> alter user root@localhost identified by 'Admin@123';
Query OK, 0 rows affected (0.07 sec)mysql-> \q
Bye

二、问题
1.MobaXterm设置右键复制粘贴
(1)点击设置

(2)终端

取消右键粘贴

2.OpenEuler如何查看CPU的核数
(1)查看CPU的核数
1)CPU总核数 = 物理CPU个数 * 每颗物理CPU的核数 2)逻辑CPU总数 = 物理CPU个数 * 每颗物理CPU的核数 * 超线程数3)多核超线程:1>多个物理CPU: 物理CPU间通过总线进行通信,效率比较低。1>多核CPU: 不同的核通过L2 cache进行通信,存储和外设通过总线与CPU通信。2>超线程: 每个核有两个逻辑的处理单元,两个处理单元共享一个核的资源。(2)查看
#查看CPU的型号
cat /proc/cpuinfo | grep name | cut -f2 -d: | uniq -c#查看物理CPU的个数
cat /proc/cpuinfo| grep "physical id"| sort| uniq| wc -l#查看每颗物理CPU的核数
cat /proc/cpuinfo| grep "cpu cores"| uniq#查看逻辑CPU的个数
cat /proc/cpuinfo| grep "processor"| wc -l#计算超线程数:
逻辑CPU/CPU总核数
# 8/(2*4)=1![]()

3. Web 浏览器不显示 htdocs 目录中的 index.html
(1)报错

(2)原因分析
查看版本,系统更新默认dnf 安装了 httpd ,所以默认配置文件在 /etc/httpd/conf/httpd.conf
[root@localhost httpd-2.4.58]# httpd -v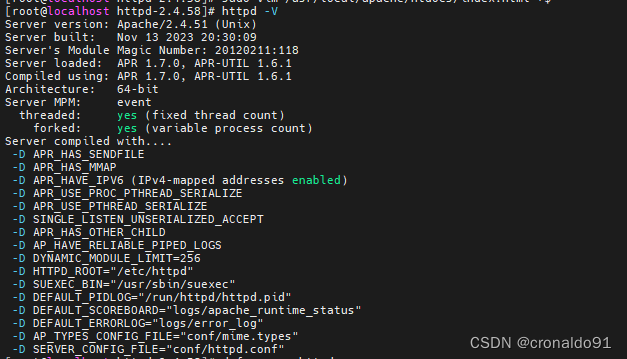
查看配置文件,此为dnf安装的配置文件
[root@localhost httpd-2.4.58]# sudo vim /usr/lib/systemd/system/httpd.service
![]()
# See httpd.service(8) for more information on using the httpd service.# Modifying this file in-place is not recommended, because changes
# will be overwritten during package upgrades.  To customize the
# behaviour, run "systemctl edit httpd" to create an override unit.# For example, to pass additional options (such as -D definitions) to
# the httpd binary at startup, create an override unit (as is done by
# systemctl edit) and enter the following:#       [Service]
#       Environment=OPTIONS=-DMY_DEFINE[Unit]
Description=The Apache HTTP Server
Wants=httpd-init.service
After=network.target remote-fs.target nss-lookup.target httpd-init.service
Documentation=man:httpd.service(8)[Service]
Type=notify
Environment=LANG=CExecStart=/usr/sbin/httpd $OPTIONS -DFOREGROUND
ExecStartPost=/usr/bin/sleep 0.1
ExecReload=/usr/sbin/httpd $OPTIONS -k graceful
# Send SIGWINCH for graceful stop
KillSignal=SIGWINCH
KillMode=mixed
PrivateTmp=true[Install]
WantedBy=multi-user.target
(3)解决方法
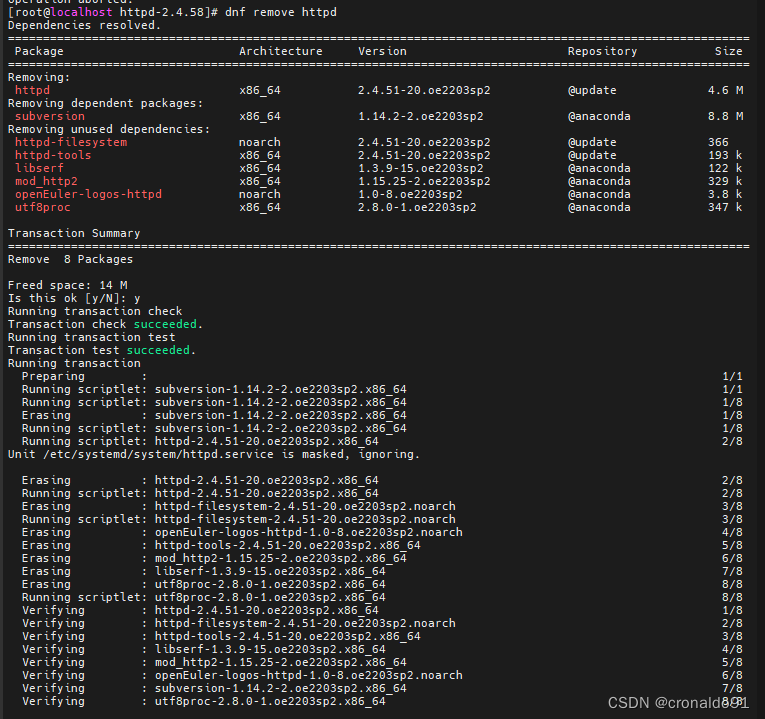
卸载 dnf安装的httpd
[root@localhost httpd-2.4.58]# dnf remove httpd

编写编译安装服务配置文件
sudo vim /usr/lib/systemd/system/httpd.service [Unit] Description=The Apache HTTP ServerAfter=network.target[Service] Type=forkingExecStart=/usr/local/apache/bin/apachectl $OPTIONSExecReload=/usr/local/apache/bin/apachectl $OPTIONSExecStop=/bin/kill -HUP $MAINPIDKillMode=processRestart=on-failure[Install] WantedBy=multi-user.target服务操作
[root@localhost httpd-2.4.58]# sudo vim /etc/systemd/system/httpd.service[root@localhost httpd-2.4.58]# sudo systemctl enable httpd[root@localhost httpd-2.4.58]# sudo systemctl enable --now httpd[root@localhost httpd-2.4.58]# sudo systemctl daemon-reload[root@localhost httpd-2.4.58]# sudo systemctl start httpd
成功:
http://192.168.204.141/
4.设置httpd开机自启报错
(1)报错
[root@localhost httpd-2.4.58]# sudo systemctl enable httpd
Failed to enable unit: File httpd.service: Bad message
![]()
(2)原因分析
配置文件格式错误
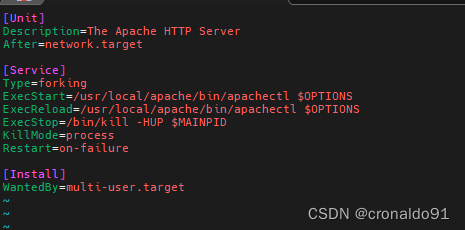
(3)解决方法
修改配置文件
[root@localhost httpd-2.4.58]# sudo vim /etc/systemd/system/httpd.service
![]()
修改前:
修改后:
成功: