目录
1. 效果展示和使用简介
2. CodeFormer原理浅析和代码实现分析
3. SDWebui中使用
4. 关键细节:保真度和质量之间的平衡
5. 参考资料
一、效果展示和使用简介
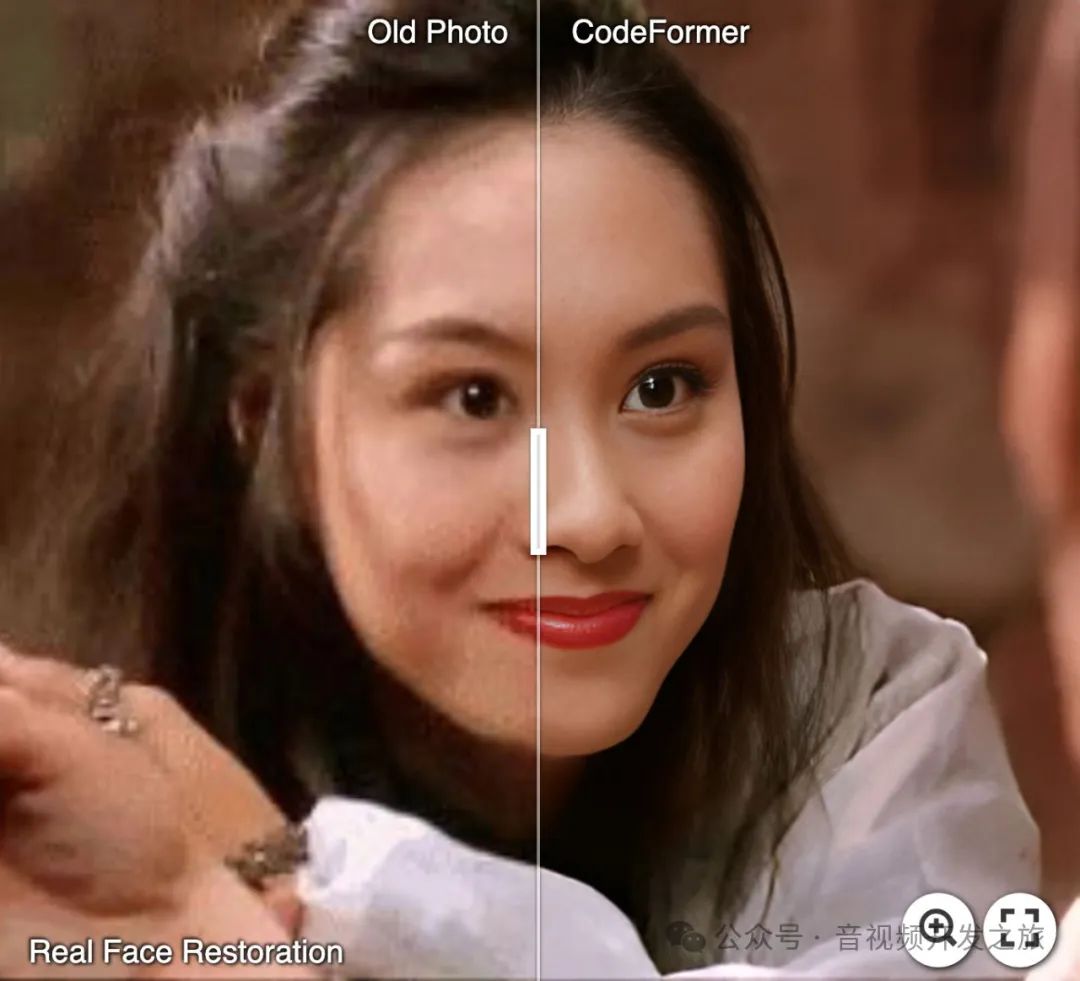
1.1 老旧照片修复
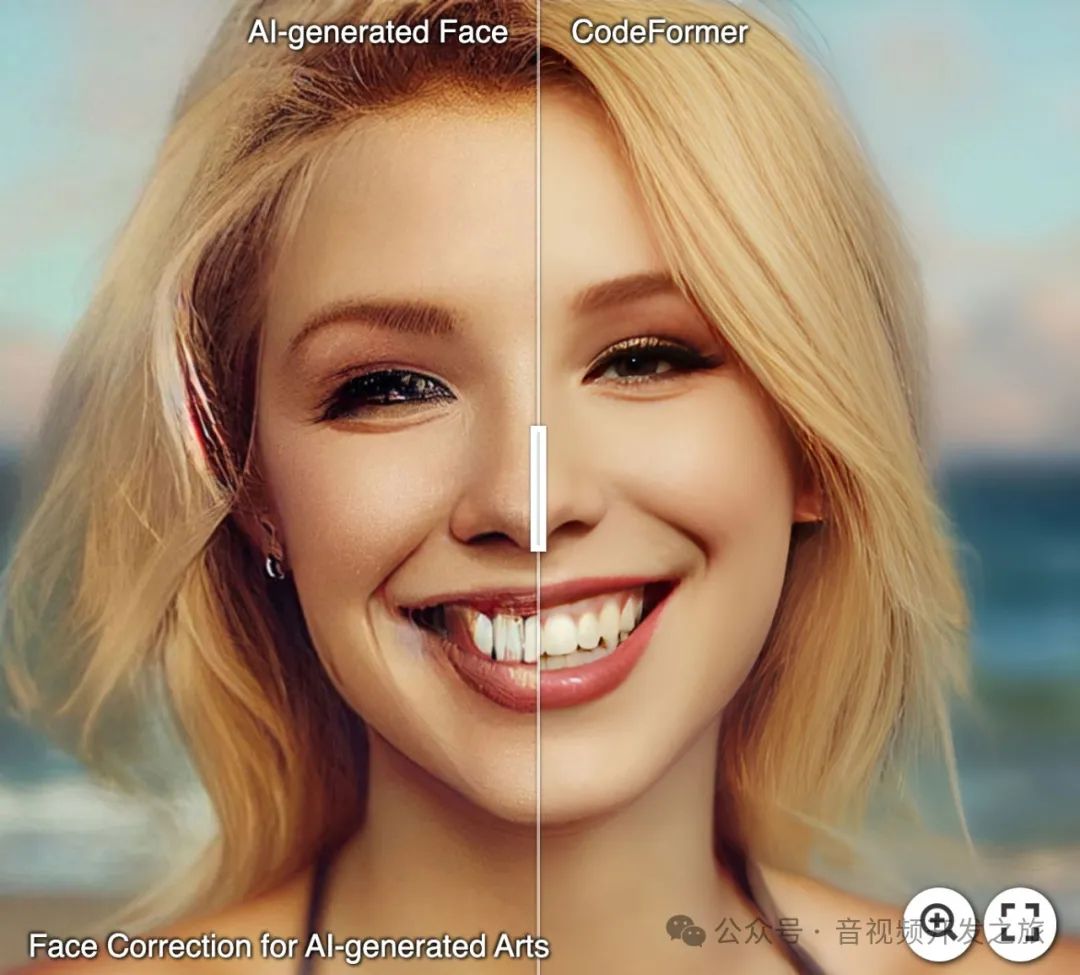
1.2 对AI生成照片修复
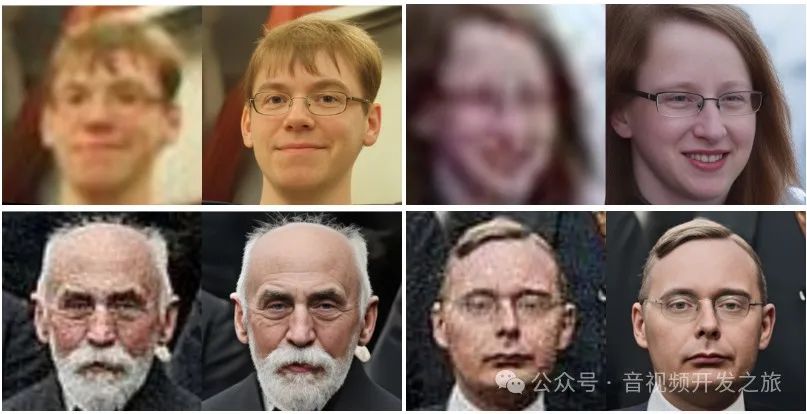
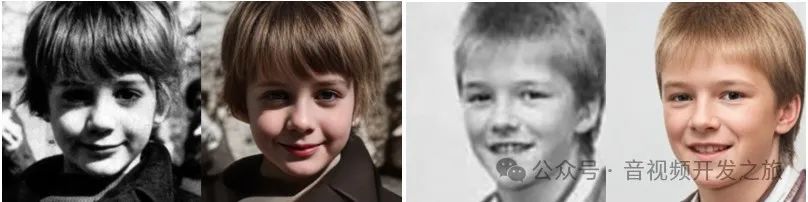
1.3 人脸修复
1.4 人脸色彩增强
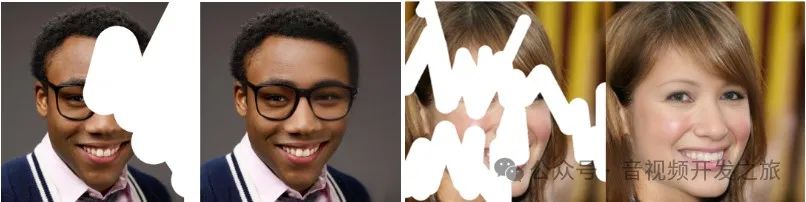
1.5 去除人脸打码
1.6 使用简介
(1)CodeFormer
见https://github.com/sczhou/CodeFormer Readme
(2)CodeFormer_GUI

CodeFormer_GUI下载链接:https://pan.baidu.com/s/1URjPk5FaJhHcC6nI3P2v0A?pwd=s2dp 提取码:s2dp
二、CodeFormer原理浅析和代码逻辑
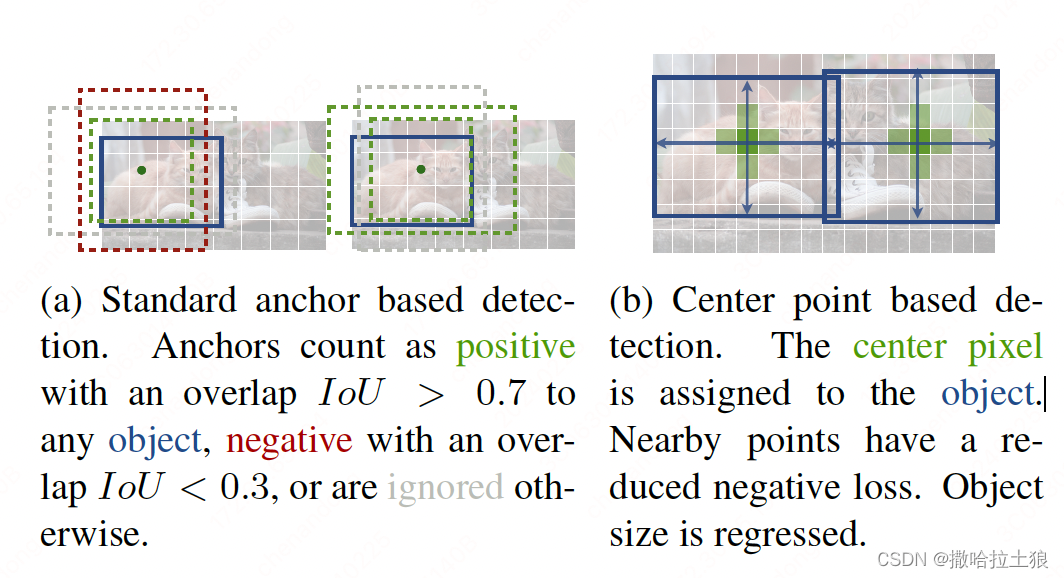
2.1 人脸修复的挑战
-
低清图片和高清图片存在多对多的映射关系(如下图所示),如何降低映射的不确定性

2. 低清图片纹理细节丢失(eg:噪声、jpg压缩伪影和模糊等),如恶化更好的补充真实的纹理细节
3.很难保证人脸一致性,在实际的人脸修复应用中对人脸身份的一致性要求很高,既要实现画质增强,又要保证人脸还原的一致性难度还是挺高。
2.2 CodeFormer 的框架
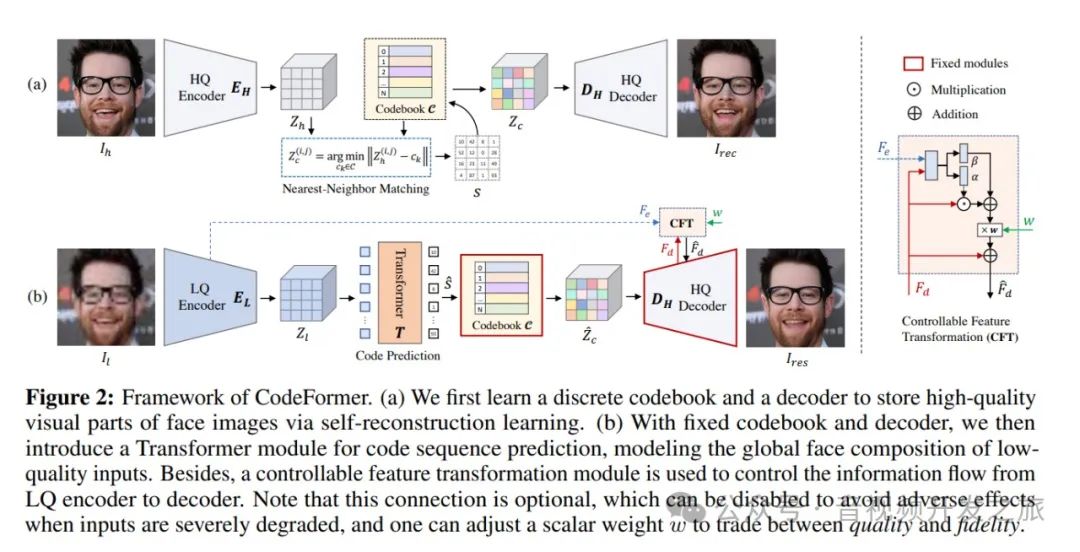
图片来自:https://arxiv.org/abs/2206.11253
(a) 首先学习一个离散码本(Codebook)和一个解码器(Decoder),通过自重建学习来存储人脸图像的高质量视觉部分。
通过引入离散编码空间缓解了映射的不确定性和纹理细节的真实性的问题。
(b) 使用固定的码本(Codebook)和解码器(Decoder),引入一个用于代码序列预测的 Transformer 模块,对低质量输入的全局人脸组成进行建模。此外,还使用可控特征变换模块来控制从LQ编码器到解码器的信息流。
另外 可以调整标量权重 w 以在质量和保真度之间进行权衡。
2.3 代码实现分析
2.3.1 模块加载
1. 加载背景/人脸超分网络模型
# 如果需要人脸或者背景超分,CodeFormer默认使用RealESRGAN进行上采样def set_realesrgan():from basicsr.archs.rrdbnet_arch import RRDBNetfrom basicsr.utils.realesrgan_utils import RealESRGANermodel = RRDBNet(num_in_ch=3,num_out_ch=3,num_feat=64,num_block=23,num_grow_ch=32,scale=2,)upsampler = RealESRGANer(scale=2,model_path="https://github.com/sczhou/CodeFormer/releases/download/v0.1.0/RealESRGAN_x2plus.pth",model=model,tile=args.bg_tile,tile_pad=40,pre_pad=0,half=use_half)return upsamplerbg_upsampler = set_realesrgan()face_upsampler = bg_upsampler
2. 加载CodeFormer模型
net = ARCH_REGISTRY.get('CodeFormer')(dim_embd=512, codebook_size=1024, n_head=8, n_layers=9,connect_list=['32', '64', '128', '256']).to(device)# ckpt_path = 'weights/CodeFormer/codeformer.pth'ckpt_path = load_file_from_url(url=pretrain_model_url['restoration'],model_dir='weights/CodeFormer', progress=True, file_name=None)checkpoint = torch.load(ckpt_path)['params_ema']net.load_state_dict(checkpoint)net.eval()
3. 加载人脸检测、人脸对齐等人脸处理模型
#detection_model default='retinaface_resnet50',用于人脸检测
face_helper = FaceRestoreHelper(args.upscale,face_size=512,crop_ratio=(1, 1),det_model = args.detection_model,save_ext='jpg',use_parse=True,device=device)
2.3.2 图片处理
处理的过程分为3个步骤:人脸识别、裁剪和摆正;人脸修复;贴回原图
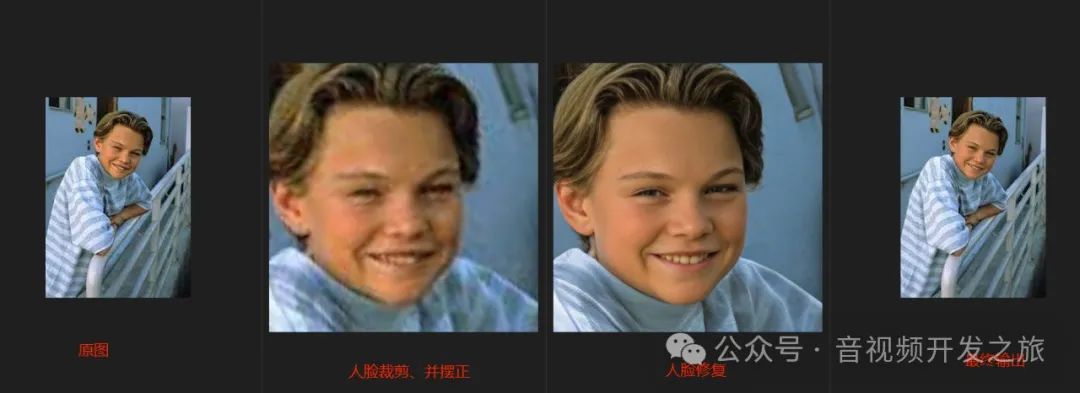
1. 使用人脸检测模型读取图片,获取人脸关键点,对图片进行人脸裁剪和摆正对齐
face_helper.read_image(img,args.upscale>1)# 获取每张人脸的marksnum_det_faces = face_helper.get_face_landmarks_5(only_center_face=args.only_center_face, resize=640, eye_dist_threshold=5)# 对齐摆正每张人脸face_helper.align_warp_face()
2. 对裁剪后的人脸,进行人脸修复,并把修复前后的人脸存起来
#对crop后的人脸进行修复for idx, cropped_face in enumerate(face_helper.cropped_faces):# prepare datacropped_face_t = img2tensor(cropped_face / 255., bgr2rgb=True, float32=True)normalize(cropped_face_t, (0.5, 0.5, 0.5), (0.5, 0.5, 0.5), inplace=True)cropped_face_t = cropped_face_t.unsqueeze(0).to(device)try:with torch.no_grad():#调用CodeFormer网络对裁剪的人脸进行修复output = net(cropped_face_t, w=w, adain=True)[0]restored_face = tensor2img(output, rgb2bgr=True, min_max=(-1, 1))del outputtorch.cuda.empty_cache()except Exception as error:print(f'\tFailed inference for CodeFormer: {error}')restored_face = tensor2img(cropped_face_t, rgb2bgr=True, min_max=(-1, 1))#修复后的人脸restored_face = restored_face.astype('uint8')#把裁剪的人脸以及修复后的人脸存起来face_helper.add_restored_face(restored_face, cropped_face)
3. 最后把修复后的人脸再贴回到原图上
#背景超分if bg_upsampler is not None:#使用RealESRGan进行背景上采样超分bg_img = bg_upsampler.enhance(img, outscale=args.upscale)[0]else:bg_img = Noneface_helper.get_inverse_affine(None)#把修复的人脸在粘贴回去if args.face_upsample and face_upsampler is not None:restored_img = face_helper.paste_faces_to_input_image(upsample_img=bg_img, draw_box=args.draw_box, face_upsampler=face_upsampler)else:restored_img = face_helper.paste_faces_to_input_image(upsample_img=bg_img, draw_box=args.draw_box)
2.4 face_helper进一步分析
通过上面的图片处理流程可以看到,人脸识别并裁剪、人脸5个关键点检测、人脸摆正对齐以及把人脸贴会原图都是再face_helper中进行,我们来进一步分析其实现。
1. FaceRestoreHelper 初始化
# facelib/utils/face_restoration_helper.py#__init__# Flickr-Faces-HQ Dataset (FFHQ)512x512人脸图像数据集 的人脸五个关键点的坐标:依次为:左眼中心、右眼中心、鼻尖、左嘴角、右嘴角self.face_template = np.array([[192.98138, 239.94708], [318.90277, 240.1936], [256.63416, 314.01935],[201.26117, 371.41043], [313.08905, 371.15118]])self.face_template = self.face_template * (face_size / 512.0)#初始化人脸检测模型 其中det_model默认为retinaface_resnet50self.face_detector = init_detection_model(det_model, half=False, device=self.device)#初始化face_parse模型self.face_parse = init_parsing_model(model_name='parsenet', device=self.device)
2. 人脸5个关键点检测 (左眼中心、右眼中心、鼻尖、左嘴角、右嘴角)
使用人脸检测模型进行人脸检测,获取人脸box、关键点和置信度
# facelib/utils/face_restoration_helper.py#get_face_landmarks_5with torch.no_grad():#使用人脸检测模型进行人脸检测bboxes = self.face_detector.detect_faces(input_img)#进一步调用到:facelib/detection/retinaface/retinaface.py#detect_facesdef detect_faces(self,image,conf_threshold=0.8,nms_threshold=0.4,use_origin_size=True,):image, self.resize = self.transform(image, use_origin_size)image = image.to(device)if self.half_inference:image = image.half()image = image - self.mean_tensor#调用人脸检测模型进行关键点检测以及获取置信度等信息loc, conf, landmarks, priors = self.__detect_faces(image)#人脸boxboxes = decode(loc.data.squeeze(0), priors.data, self.cfg['variance'])boxes = boxes * self.scale / self.resizeboxes = boxes.cpu().numpy()#人脸置信度scores = conf.squeeze(0).data.cpu().numpy()[:, 1]#人脸5个关键点landmarks = decode_landm(landmarks.squeeze(0), priors, self.cfg['variance'])landmarks = landmarks * self.scale1 / self.resizelandmarks = landmarks.cpu().numpy()# ignore low scoresinds = np.where(scores > conf_threshold)[0]boxes, landmarks, scores = boxes[inds], landmarks[inds], scores[inds]# sortorder = scores.argsort()[::-1]boxes, landmarks, scores = boxes[order], landmarks[order], scores[order]# bounding_boxes 非极大值抑制bounding_boxes = np.hstack((boxes, scores[:, np.newaxis])).astype(np.float32, copy=False)keep = py_cpu_nms(bounding_boxes, nms_threshold)bounding_boxes, landmarks = bounding_boxes[keep, :], landmarks[keep]return np.concatenate((bounding_boxes, landmarks), axis=1)
3. 剔除掉检测的眼距过小、侧脸以及太小人脸的关键点
# facelib/utils/face_restoration_helper.py#get_face_landmarks_5for bbox in bboxes:# remove faces with too small eye distance: side faces or too small faceseye_dist = np.linalg.norm([bbox[6] - bbox[8], bbox[7] - bbox[9]])if eye_dist_threshold is not None and (eye_dist < eye_dist_threshold):continueif self.template_3points:landmark = np.array([[bbox[i], bbox[i + 1]] for i in range(5, 11, 2)])else:landmark = np.array([[bbox[i], bbox[i + 1]] for i in range(5, 15, 2)])self.all_landmarks_5.append(landmark)self.det_faces.append(bbox[0:5])
4.根据人脸模型 对人脸进行摆正裁剪
使用 cv2.warpAffine 根据affine_matrix仿射变换矩阵等信息对图像旋转平移后裁剪
# facelib/utils/face_restoration_helper.py#align_warp_facedef align_warp_face(self, save_cropped_path=None, border_mode='constant'):for idx, landmark in enumerate(self.all_landmarks_5):# use 5 landmarks to get affine matrix# use cv2.LMEDS method for the equivalence to skimage transform# ref: https://blog.csdn.net/yichxi/article/details/115827338affine_matrix = cv2.estimateAffinePartial2D(landmark, self.face_template, method=cv2.LMEDS)[0]self.affine_matrices.append(affine_matrix)# warp and crop facesborder_mode = cv2.BORDER_CONSTANTinput_img = self.input_img#使用 cv2.warpAffine 根据affine_matrix等信息对图像旋转平移后裁剪cropped_face = cv2.warpAffine(input_img, affine_matrix, self.face_size, borderMode=border_mode, borderValue=(135, 133, 132)) # grayself.cropped_faces.append(cropped_face)#保存摆正裁剪后的人脸图片if save_cropped_path is not None:path = os.path.splitext(save_cropped_path)[0]save_path = f'{path}_{idx:02d}.{self.save_ext}'imwrite(cropped_face, save_path)
5. 贴回原图 局部重绘去除边界
使用cv2.warpAffine 通过逆仿射矩阵变换把修复的人脸放回原始的图片;通过cv2.erode腐蚀操作进行面部融合减少边缘;再边缘过度上使用cv2.GaussianBlur使得过度更加自然
# facelib/utils/face_restoration_helper.py#paste_faces_to_input_imagedef paste_faces_to_input_image(self, save_path=None, upsample_img=None, draw_box=False, face_upsampler=None):upsample_img = cv2.resize(self.input_img, (w_up, h_up), interpolation=cv2.INTER_LINEAR)for restored_face, inverse_affine in zip(self.restored_faces, self.inverse_affine_matrices):#将恢复的面部图像通过逆仿射变换对齐回放输入图像中inv_restored = cv2.warpAffine(restored_face, inverse_affine, (w_up, h_up))# always use square maskmask = np.ones(face_size, dtype=np.float32)inv_mask = cv2.warpAffine(mask, inverse_affine, (w_up, h_up))#面部融合,使用腐蚀操作cv2.erode减少掩码边缘的黑色边框,以便更自然地融合面部inv_mask_erosion = cv2.erode(inv_mask, np.ones((int(2 * self.upscale_factor), int(2 * self.upscale_factor)), np.uint8))pasted_face = inv_mask_erosion[:, :, None] * inv_restoredtotal_face_area = np.sum(inv_mask_erosion) # // 3# compute the fusion edge based on the area of facew_edge = int(total_face_area**0.5) // 20erosion_radius = w_edge * 2inv_mask_center = cv2.erode(inv_mask_erosion, np.ones((erosion_radius, erosion_radius), np.uint8))blur_size = w_edge * 2inv_soft_mask = cv2.GaussianBlur(inv_mask_center, (blur_size + 1, blur_size + 1), 0)#减少边缘效应if self.use_parse:...inv_soft_mask = inv_soft_parse_mask*fuse_mask + inv_soft_mask*(1-fuse_mask)#融合面部到原图upsample_img = inv_soft_mask * pasted_face + (1 - inv_soft_mask) * upsample_imgreturn upsample_img
三、SDWebui中使用
在sd生成图片的过程中,CodeFormer可用于后处理,即对于AI生成的图片进行画质增强或者超分处理,使图片增加更多细节。

代码实现在 modules/codeformer_model.py
可以看到sdWebui中的和我们上面分析的CodeFormer中的实现一致:创建模型、人脸检测、人脸修复和贴回原图
class FaceRestorerCodeFormer(stable_diffusion_webui_interface.modules.face_restoration.FaceRestoration):def create_models(self):passdef restore(self, np_image, w=None):self.face_helper.read_image(np_image)self.face_helper.get_face_landmarks_5(only_center_face=False, resize=640, eye_dist_threshold=5)self.face_helper.align_warp_face()for cropped_face in self.face_helper.cropped_faces:cropped_face_t = img2tensor(cropped_face / 255., bgr2rgb=True, float32=True)normalize(cropped_face_t, (0.5, 0.5, 0.5), (0.5, 0.5, 0.5), inplace=True)cropped_face_t = cropped_face_t.unsqueeze(0).to(devices.device_codeformer)try:with torch.no_grad():output = self.net(cropped_face_t, w=w if w is not None else shared.opts.code_former_weight, adain=True)[0]restored_face = tensor2img(output, rgb2bgr=True, min_max=(-1, 1))del outputdevices.torch_gc()except Exception:errors.report('Failed inference for CodeFormer', exc_info=True)restored_face = tensor2img(cropped_face_t, rgb2bgr=True, min_max=(-1, 1))restored_face = restored_face.astype('uint8')self.face_helper.add_restored_face(restored_face)self.face_helper.get_inverse_affine(None)restored_img = self.face_helper.paste_faces_to_input_image()restored_img = restored_img[:, :, ::-1]return restored_img
四、关键细节:保真度和质量之间的平衡
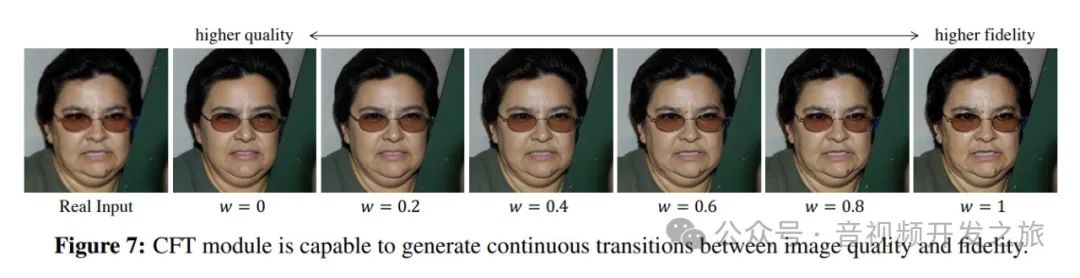
图片来自:https://arxiv.org/abs/2206.11253
之所以把这个单独来强调,是因为这个很重要。
根据不同场景可以设置不同的w权重来控制保真度和质量:
对于老旧照片修复的场景,因为有原图参考对比,所以要人脸的保真度优先,否则人脸五官或者表情都变了,无法使用;
对于AI生成的图片,可以使用质量优先,因为没有参考,所以不用考虑保真度的问题。
五、参考资料
1. CoderFormer https://github.com/sczhou/CodeFormer
2. 论文 https://arxiv.org/abs/2206.11253
3. codeFormer论文解读 https://www.bilibili.com/video/BV11M4y1U7z2/?spm_id_from=333.337.search-card.all.click&vd_source=03a763fa6cf49b01f658f32592f5a6f3
4. NeurIPS 2022 | 人脸复原新利器:CodeFormer https://mp.weixin.qq.com/s/WvrLugiJosB4NVvo1jrriQ
5. Stable Diffusion 硬核生存指南:WebUI 中的 CodeFormer https://mp.weixin.qq.com/s/nFonjSHvx0238z5_-CTIQA
6. 用opencv函数替代skimage函数生成相似矩阵 https://blog.csdn.net/yichxi/article/details/115827338
感谢你的阅读
接下来我们继续学习输出AIGC相关内容,欢迎关注公众号“音视频开发之旅”,一起学习成长。
欢迎交流