接上一篇文章:camunda源代码编译运行(二):构建并运行camunda源代码工程
4.1、发布流程模型
先通过camunda的流程设计器设计一个流程,命名为:UserTask Flow1,然后发布流程,发布流程的接口是我们通过源代码发布的rest服务接口,地址为:http://localhost:8080/engine-rest
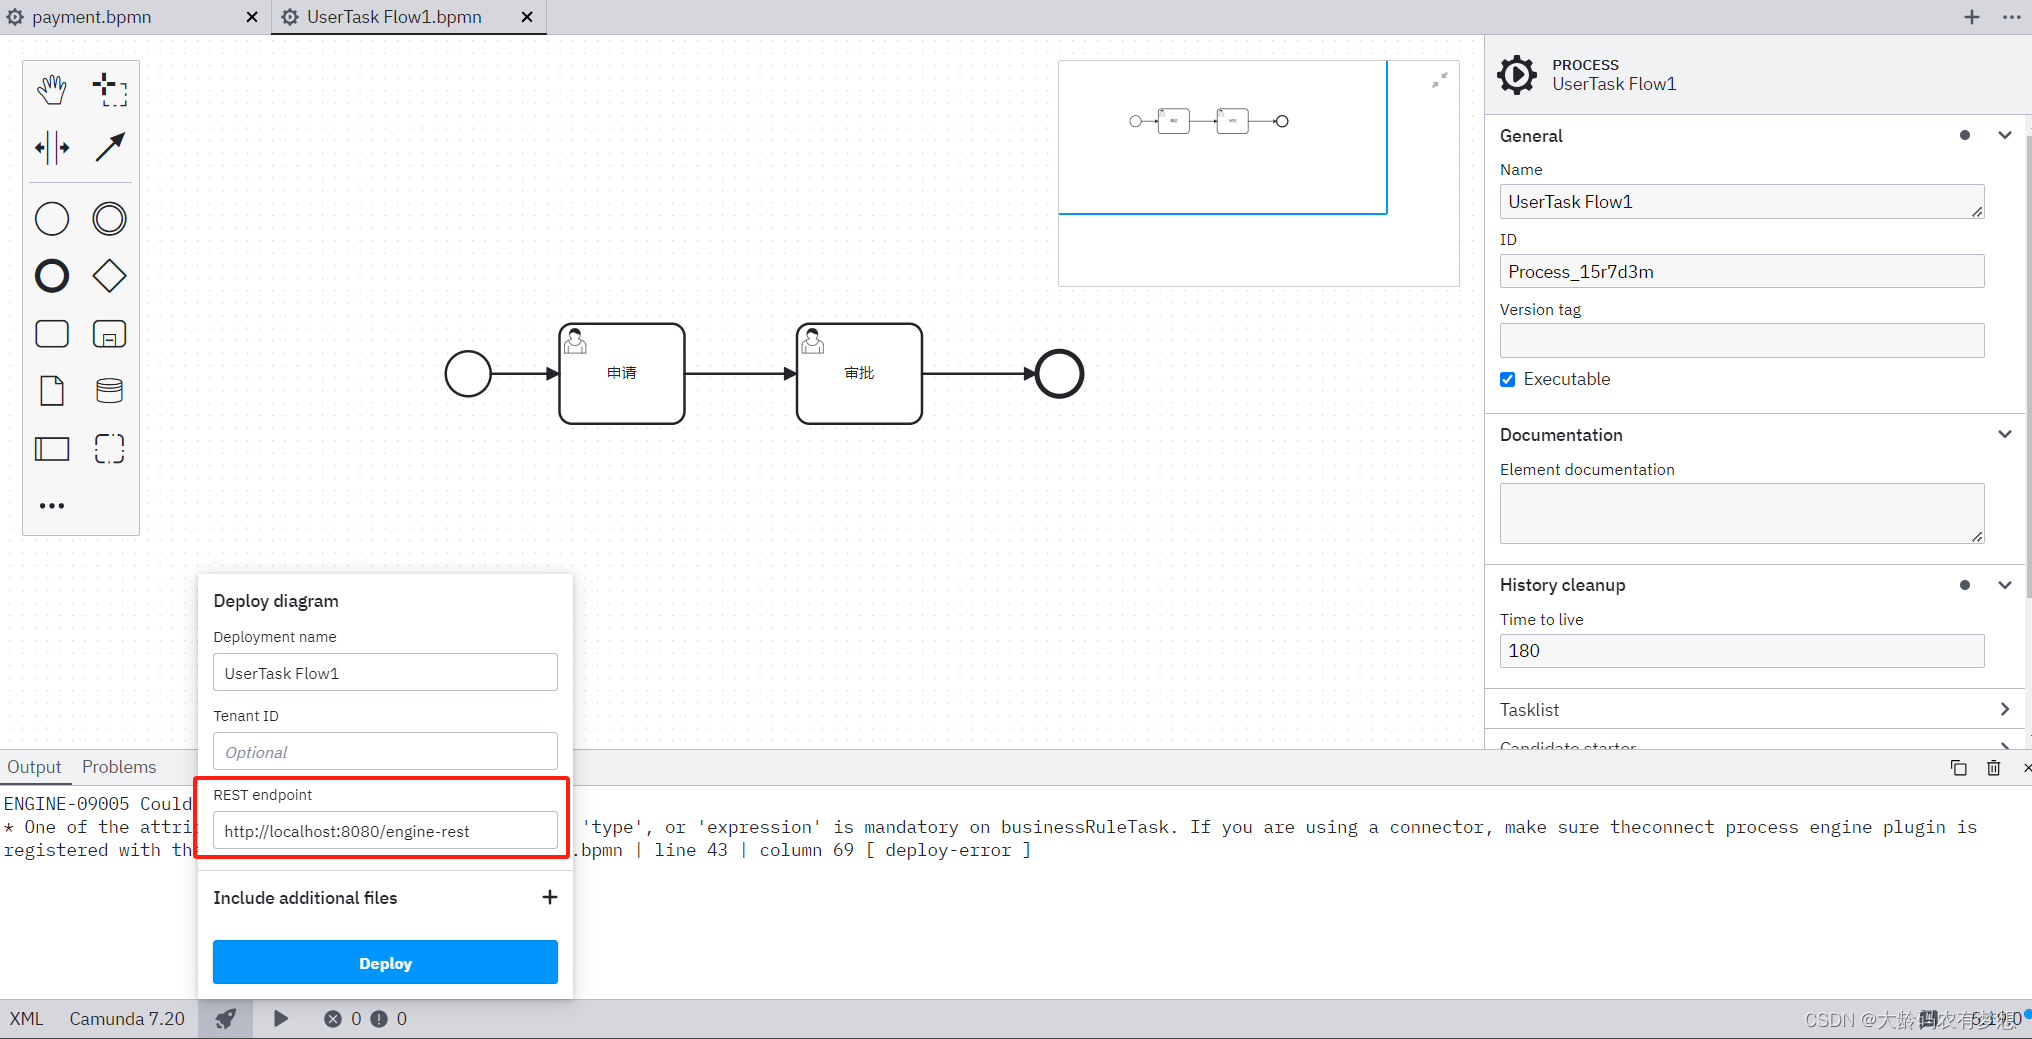
该bpmn流程设计比较简单,就是两个人工处理节点,处理人设置为demo,camunda系统初始化后默认的一个测试用户。UserTask Flow1.bpmn源文件如下:
<?xml version="1.0" encoding="UTF-8"?>
<bpmn:definitions xmlns:bpmn="http://www.omg.org/spec/BPMN/20100524/MODEL" xmlns:bpmndi="http://www.omg.org/spec/BPMN/20100524/DI" xmlns:dc="http://www.omg.org/spec/DD/20100524/DC" xmlns:camunda="http://camunda.org/schema/1.0/bpmn" xmlns:di="http://www.omg.org/spec/DD/20100524/DI" xmlns:modeler="http://camunda.org/schema/modeler/1.0" id="Definitions_0lwtj60" targetNamespace="http://bpmn.io/schema/bpmn" exporter="Camunda Modeler" exporterVersion="5.19.0" modeler:executionPlatform="Camunda Platform" modeler:executionPlatformVersion="7.20.0"><bpmn:process id="Process_15r7d3m" name="UserTask Flow1" isExecutable="true" camunda:historyTimeToLive="180"><bpmn:startEvent id="StartEvent_1"><bpmn:outgoing>Flow_11x673q</bpmn:outgoing></bpmn:startEvent><bpmn:sequenceFlow id="Flow_11x673q" sourceRef="StartEvent_1" targetRef="Activity_10ell5p" /><bpmn:sequenceFlow id="Flow_0foitiz" sourceRef="Activity_10ell5p" targetRef="Activity_09u1so2" /><bpmn:endEvent id="Event_0e68o48"><bpmn:incoming>Flow_01cgzte</bpmn:incoming></bpmn:endEvent><bpmn:sequenceFlow id="Flow_01cgzte" sourceRef="Activity_09u1so2" targetRef="Event_0e68o48" /><bpmn:userTask id="Activity_10ell5p" name="申请" camunda:assignee="demo"><bpmn:incoming>Flow_11x673q</bpmn:incoming><bpmn:outgoing>Flow_0foitiz</bpmn:outgoing></bpmn:userTask><bpmn:userTask id="Activity_09u1so2" name="审批" camunda:assignee="demo"><bpmn:incoming>Flow_0foitiz</bpmn:incoming><bpmn:outgoing>Flow_01cgzte</bpmn:outgoing></bpmn:userTask></bpmn:process><bpmndi:BPMNDiagram id="BPMNDiagram_1"><bpmndi:BPMNPlane id="BPMNPlane_1" bpmnElement="Process_15r7d3m"><bpmndi:BPMNShape id="_BPMNShape_StartEvent_2" bpmnElement="StartEvent_1"><dc:Bounds x="179" y="99" width="36" height="36" /></bpmndi:BPMNShape><bpmndi:BPMNShape id="Activity_1xzvv8s_di" bpmnElement="Activity_10ell5p"><dc:Bounds x="270" y="77" width="100" height="80" /></bpmndi:BPMNShape><bpmndi:BPMNShape id="Activity_1h27nqt_di" bpmnElement="Activity_09u1so2"><dc:Bounds x="460" y="77" width="100" height="80" /></bpmndi:BPMNShape><bpmndi:BPMNShape id="Event_0e68o48_di" bpmnElement="Event_0e68o48"><dc:Bounds x="652" y="99" width="36" height="36" /></bpmndi:BPMNShape><bpmndi:BPMNEdge id="Flow_11x673q_di" bpmnElement="Flow_11x673q"><di:waypoint x="215" y="117" /><di:waypoint x="270" y="117" /></bpmndi:BPMNEdge><bpmndi:BPMNEdge id="Flow_01cgzte_di" bpmnElement="Flow_01cgzte"><di:waypoint x="560" y="117" /><di:waypoint x="652" y="117" /></bpmndi:BPMNEdge><bpmndi:BPMNEdge id="Flow_0foitiz_di" bpmnElement="Flow_0foitiz"><di:waypoint x="370" y="117" /><di:waypoint x="460" y="117" /></bpmndi:BPMNEdge></bpmndi:BPMNPlane></bpmndi:BPMNDiagram>
</bpmn:definitions>
点击Deploy流程发布按钮
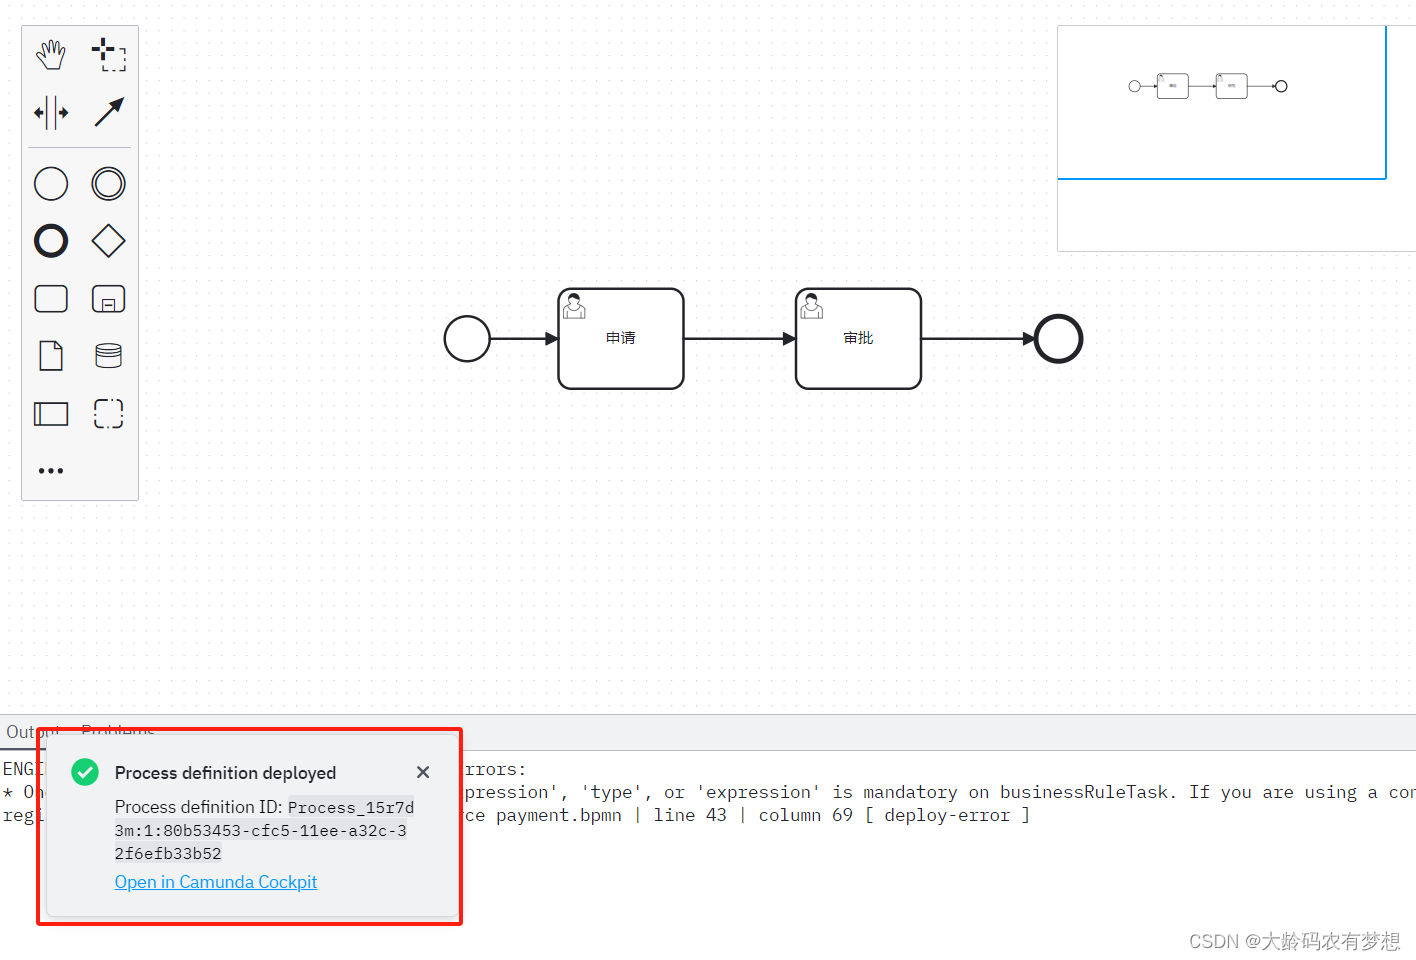
提示流程发布成功了,流程模型定义ID也显示了出来!
4.2、查询流程定义
接下来我们验证是否流程发布成功了,可以通过camunda流程引擎的服务接口查看。camunda平台提供了详细的rest服务接口,详细见文档:
Camunda Platform REST API

查看流程定义rest接口:http://{host}:{port}/{contextPath}/process-definition
用Postman测试验证:http://localhost:8080/engine-rest/process-definition
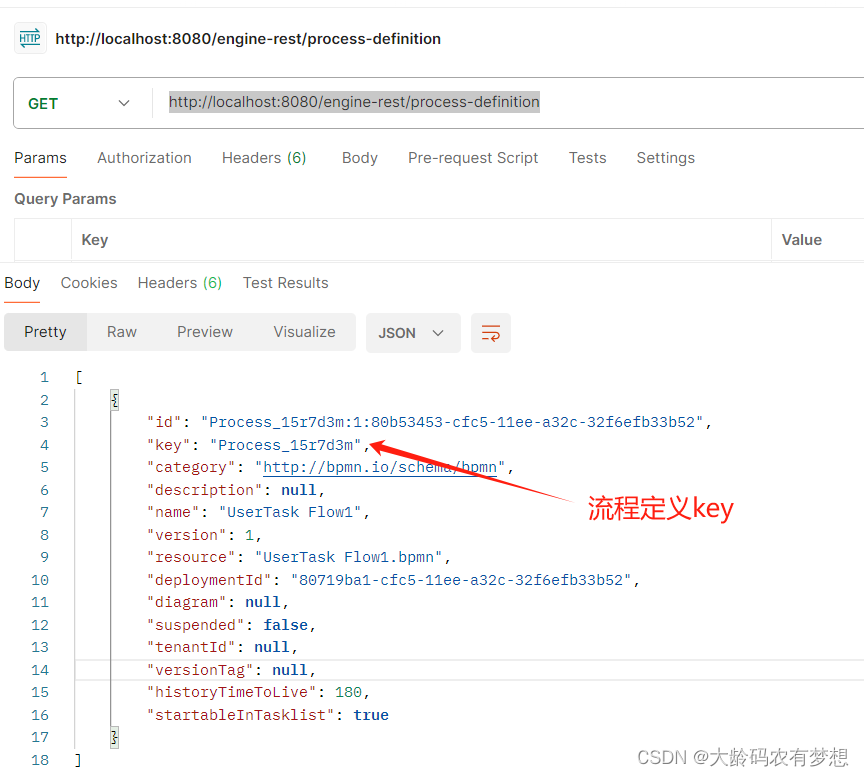
返回结果:
[{"id": "Process_15r7d3m:1:80b53453-cfc5-11ee-a32c-32f6efb33b52","key": "Process_15r7d3m","category": "http://bpmn.io/schema/bpmn","description": null,"name": "UserTask Flow1","version": 1,"resource": "UserTask Flow1.bpmn","deploymentId": "80719ba1-cfc5-11ee-a32c-32f6efb33b52","diagram": null,"suspended": false,"tenantId": null,"versionTag": null,"historyTimeToLive": 180,"startableInTasklist": true}]4.3、发起一个流程
通过服务接口发起流程,去官方网站查找发起流程的rest接口:
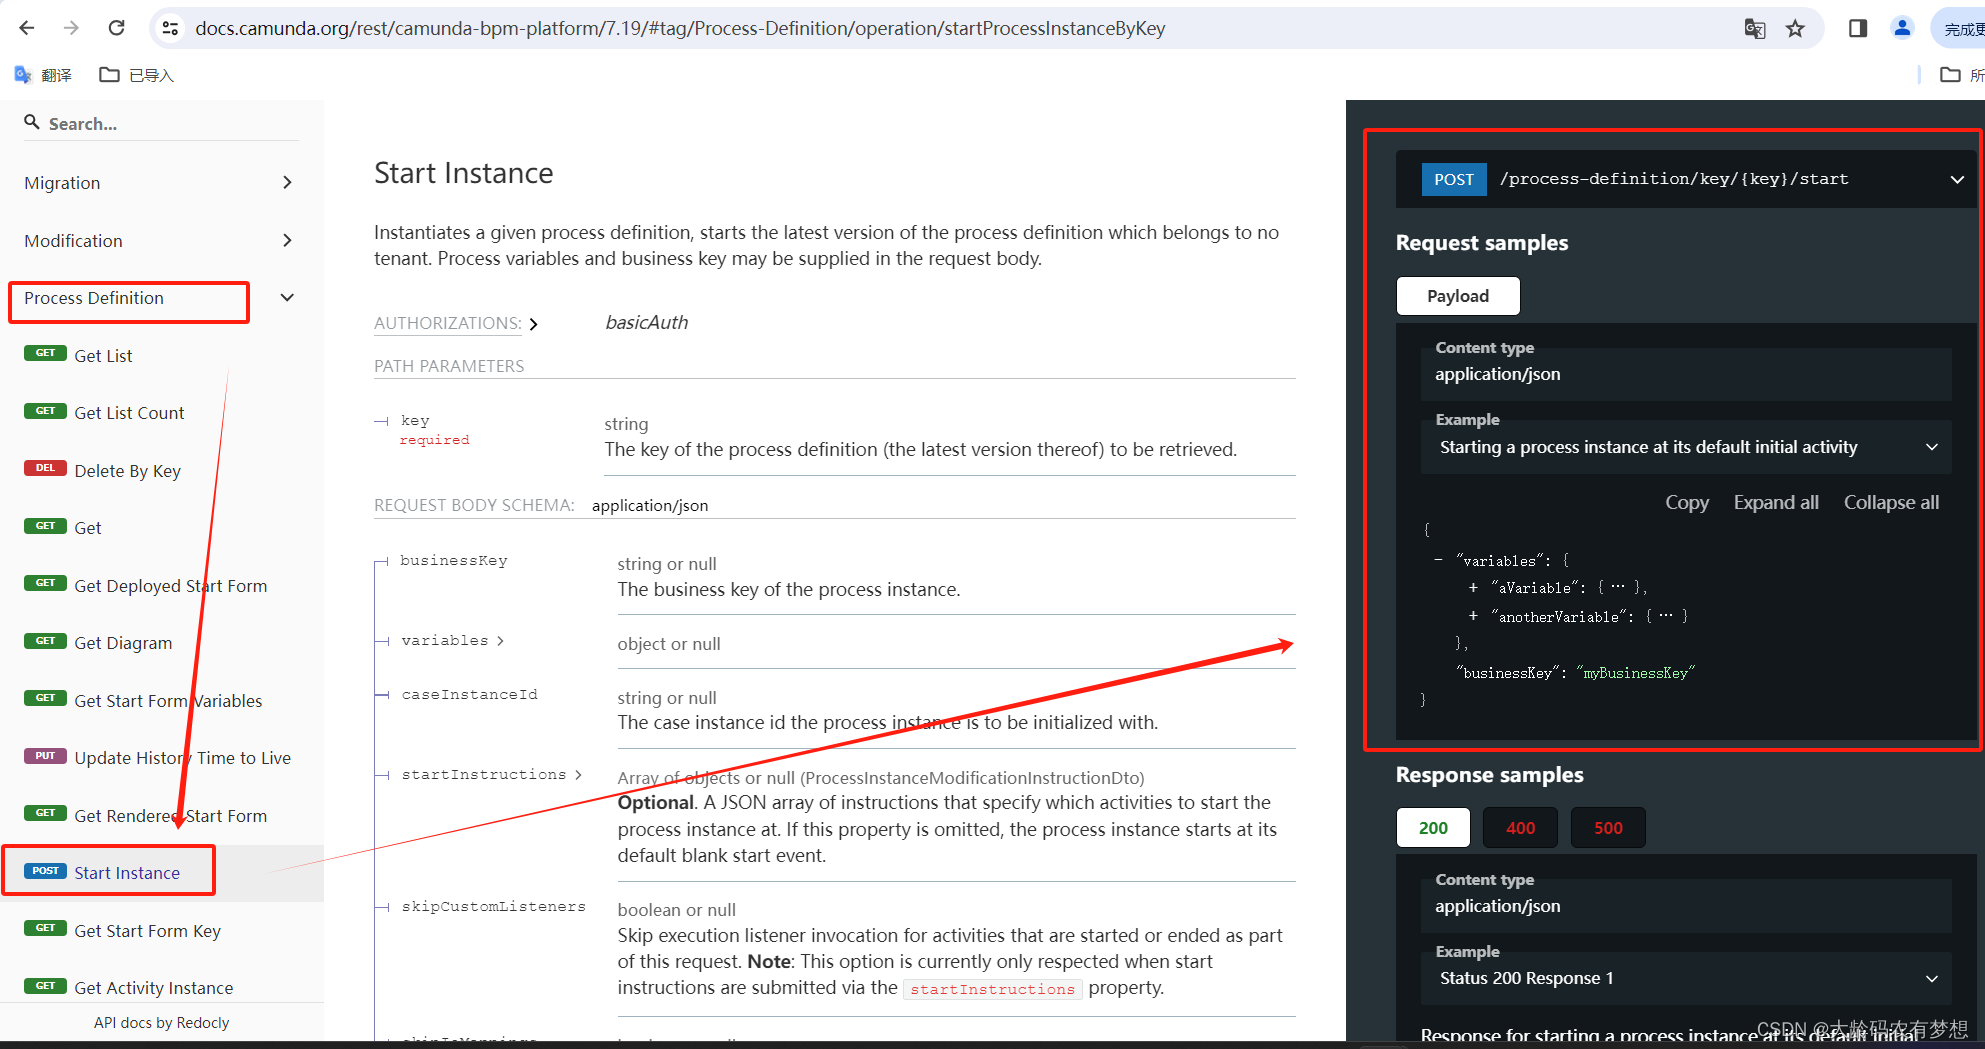
流程发起的rest接口为:http://{host}:{port}/{contextPath}/process-definition/key/{key}/start
详细接口描述见官方文档:Camunda Platform REST API
打开postman工具进行测试验证:http://localhost:8080/engine-rest/process-definition/key/Process_15r7d3m/start
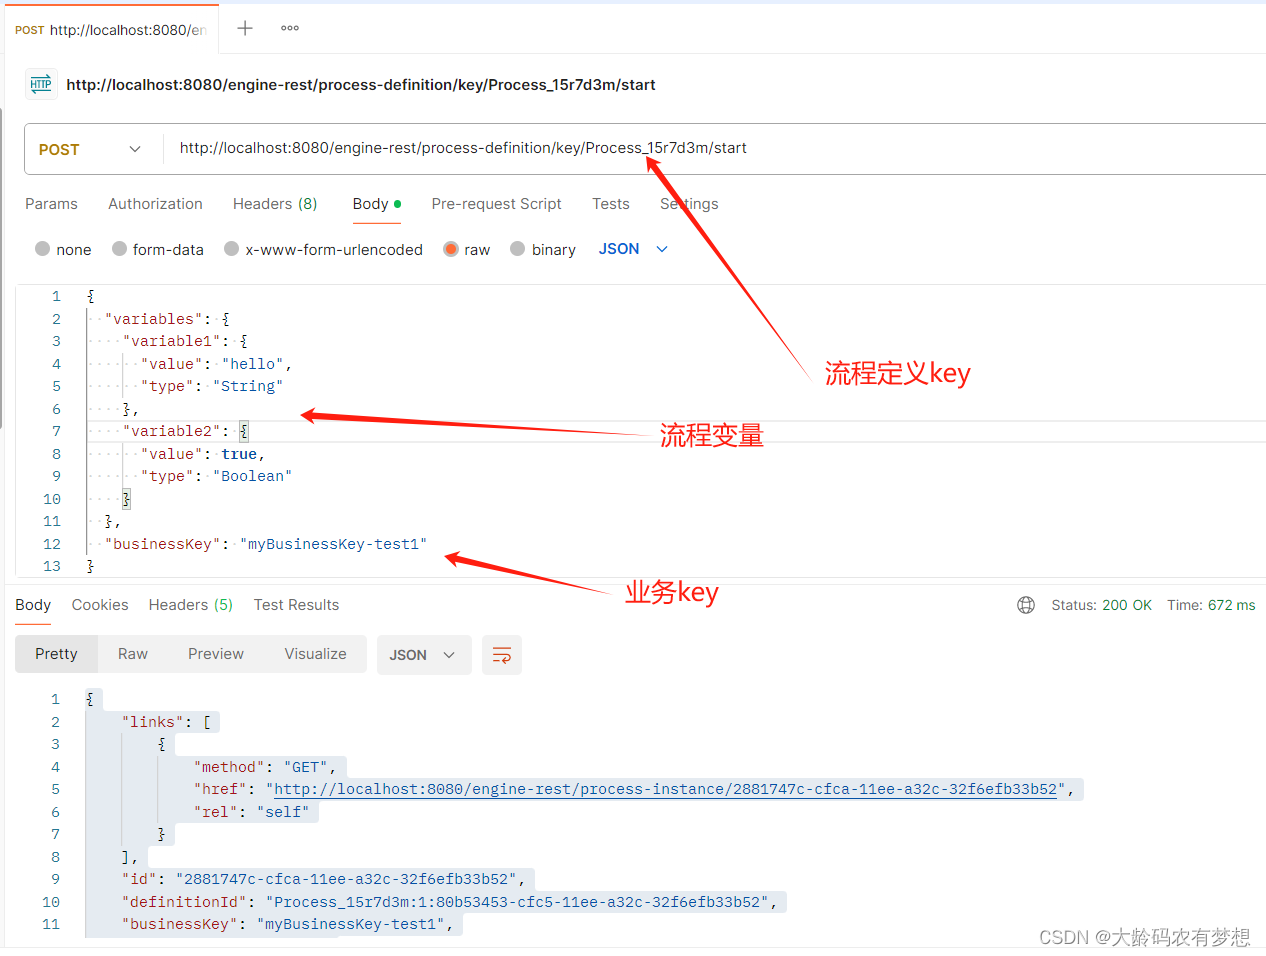
输入JSON
{"variables": {"variable1": {"value": "hello","type": "String"},"variable2": {"value": true,"type": "Boolean"}},"businessKey": "myBusinessKey-test1"}返回结果:
{"links": [{"method": "GET","href": "http://localhost:8080/engine-rest/process-instance/2881747c-cfca-11ee-a32c-32f6efb33b52","rel": "self"}],"id": "2881747c-cfca-11ee-a32c-32f6efb33b52","definitionId": "Process_15r7d3m:1:80b53453-cfc5-11ee-a32c-32f6efb33b52","businessKey": "myBusinessKey-test1","caseInstanceId": null,"ended": false,"suspended": false,"tenantId": null}4.4、查询流程状态
查看流程实例的rest接口为:http://{host}:{port}/{contextPath}/process-instance/{id}
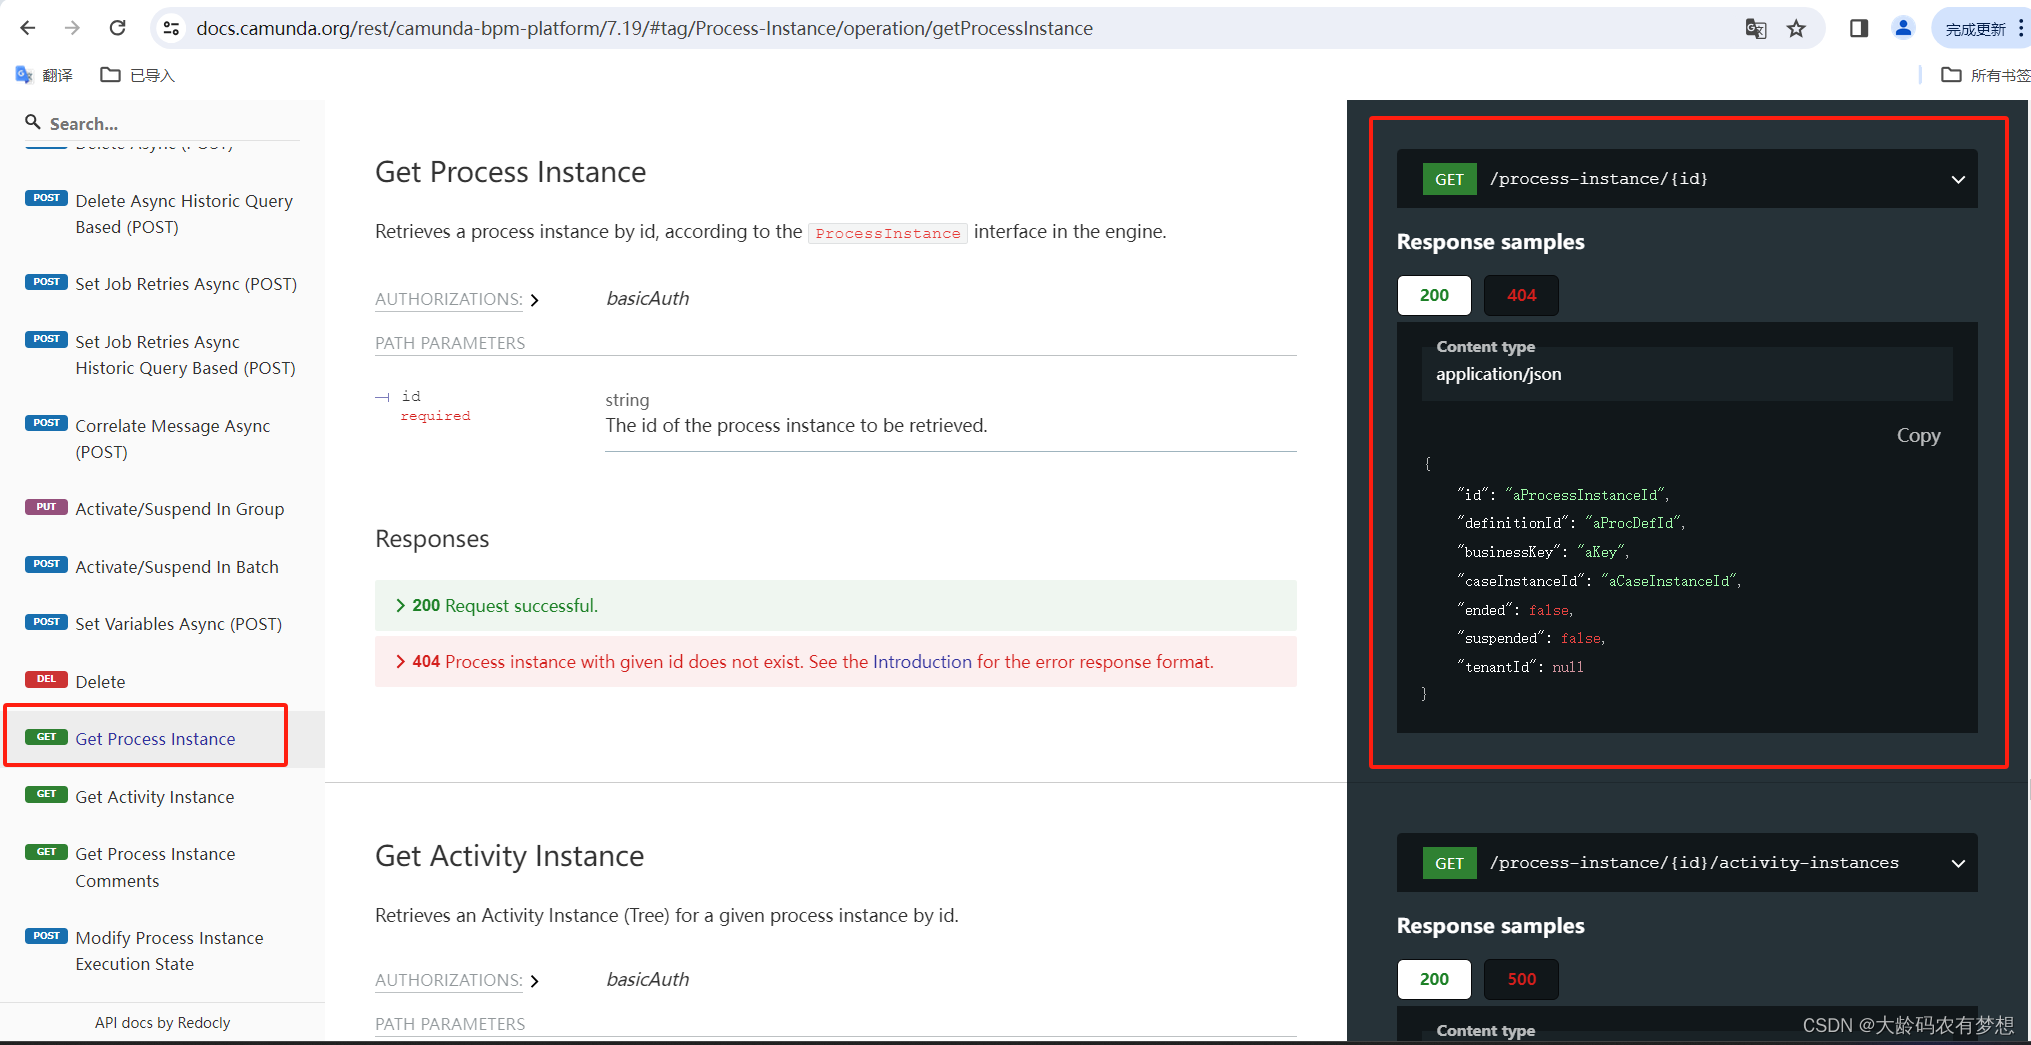
用postman发起请求:http://localhost:8080/engine-rest/process-instance/2881747c-cfca-11ee-a32c-32f6efb33b52

返回:
{"links": [],"id": "2881747c-cfca-11ee-a32c-32f6efb33b52","definitionId": "Process_15r7d3m:1:80b53453-cfc5-11ee-a32c-32f6efb33b52","businessKey": "myBusinessKey-test1","caseInstanceId": null,"ended": false,"suspended": false,"tenantId": null}这时需要知道流程流转到了哪个步骤上,查看流程活动实例的rest接口:http://{host}:{port}/{contextPath}/process-instance/{id}/activity-instances
用Postman测试:
http://localhost:8080/engine-rest/process-instance/2881747c-cfca-11ee-a32c-32f6efb33b52/activity-instances
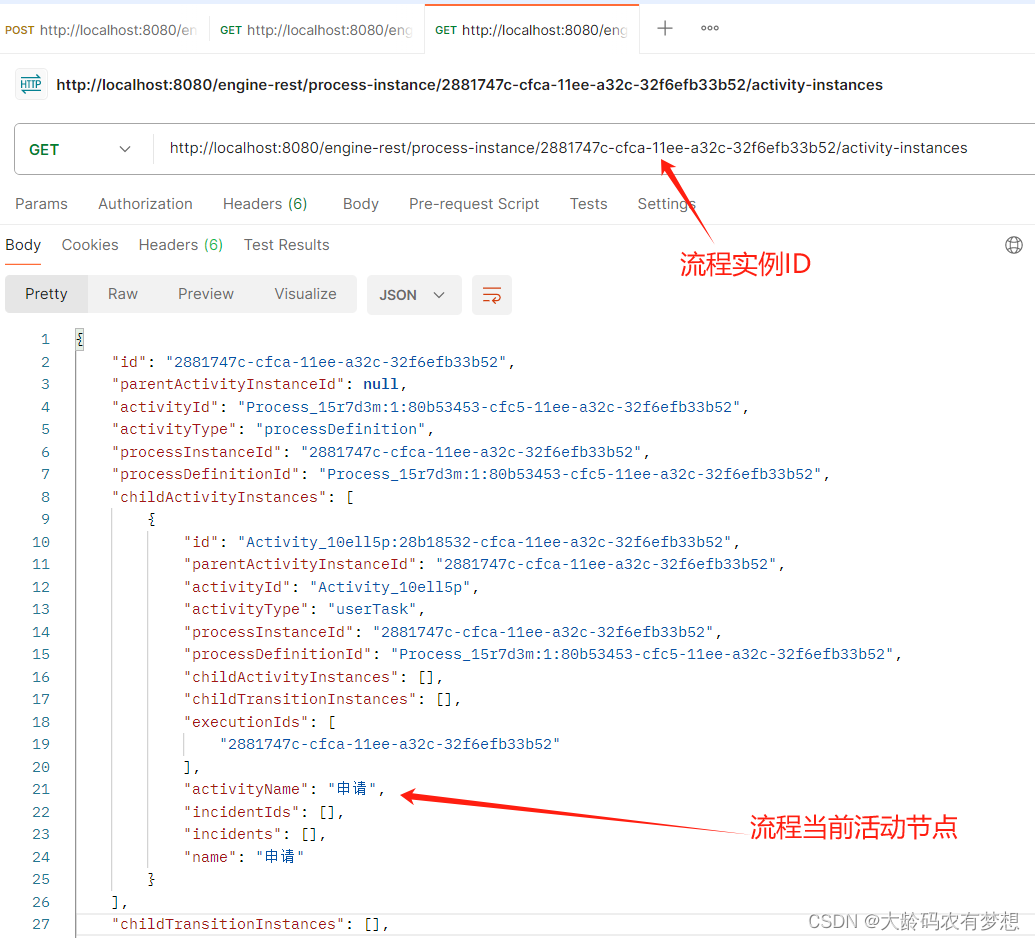
这个信息返回是比较全的,可以看出来流程当前流转到了“申请”节点,即流程刚刚启动的第一个节点。
{"id": "2881747c-cfca-11ee-a32c-32f6efb33b52","parentActivityInstanceId": null,"activityId": "Process_15r7d3m:1:80b53453-cfc5-11ee-a32c-32f6efb33b52","activityType": "processDefinition","processInstanceId": "2881747c-cfca-11ee-a32c-32f6efb33b52","processDefinitionId": "Process_15r7d3m:1:80b53453-cfc5-11ee-a32c-32f6efb33b52","childActivityInstances": [{"id": "Activity_10ell5p:28b18532-cfca-11ee-a32c-32f6efb33b52","parentActivityInstanceId": "2881747c-cfca-11ee-a32c-32f6efb33b52","activityId": "Activity_10ell5p","activityType": "userTask","processInstanceId": "2881747c-cfca-11ee-a32c-32f6efb33b52","processDefinitionId": "Process_15r7d3m:1:80b53453-cfc5-11ee-a32c-32f6efb33b52","childActivityInstances": [],"childTransitionInstances": [],"executionIds": ["2881747c-cfca-11ee-a32c-32f6efb33b52"],"activityName": "申请","incidentIds": [],"incidents": [],"name": "申请"}],"childTransitionInstances": [],"executionIds": ["2881747c-cfca-11ee-a32c-32f6efb33b52"],"activityName": "UserTask Flow1","incidentIds": [],"incidents": [],"name": "UserTask Flow1"}4.5、查询待办任务
通过上面接口得知,流程当前流转到了人工节点上,那么需要查询待办任务:
查询待办任务的rest接口:http://{host}:{port}/{contextPath}/task
用Postman测试:http://localhost:8080/engine-rest/task

返回所有的流程待办任务列表:
[{"id": "28b1d353-cfca-11ee-a32c-32f6efb33b52","name": "申请","assignee": "demo","created": "2024-02-20T16:29:26.815+0800","due": null,"followUp": null,"lastUpdated": null,"delegationState": null,"description": null,"executionId": "2881747c-cfca-11ee-a32c-32f6efb33b52","owner": null,"parentTaskId": null,"priority": 50,"processDefinitionId": "Process_15r7d3m:1:80b53453-cfc5-11ee-a32c-32f6efb33b52","processInstanceId": "2881747c-cfca-11ee-a32c-32f6efb33b52","taskDefinitionKey": "Activity_10ell5p","caseExecutionId": null,"caseInstanceId": null,"caseDefinitionId": null,"suspended": false,"formKey": null,"camundaFormRef": null,"tenantId": null}]4.6、完成待办提交流程
完成待办任务,提交流程往下走,提交流程的rest服务接口为:
http://{host}:{port}/{contextPath}/task/{id}/complete
用Postman测试:http://localhost:8080/engine-rest/task/28b1d353-cfca-11ee-a32c-32f6efb33b52/complete
参数:
{"variables": {"variable": {"value": "china"},"variable2": {"value": false}},"withVariablesInReturn": true}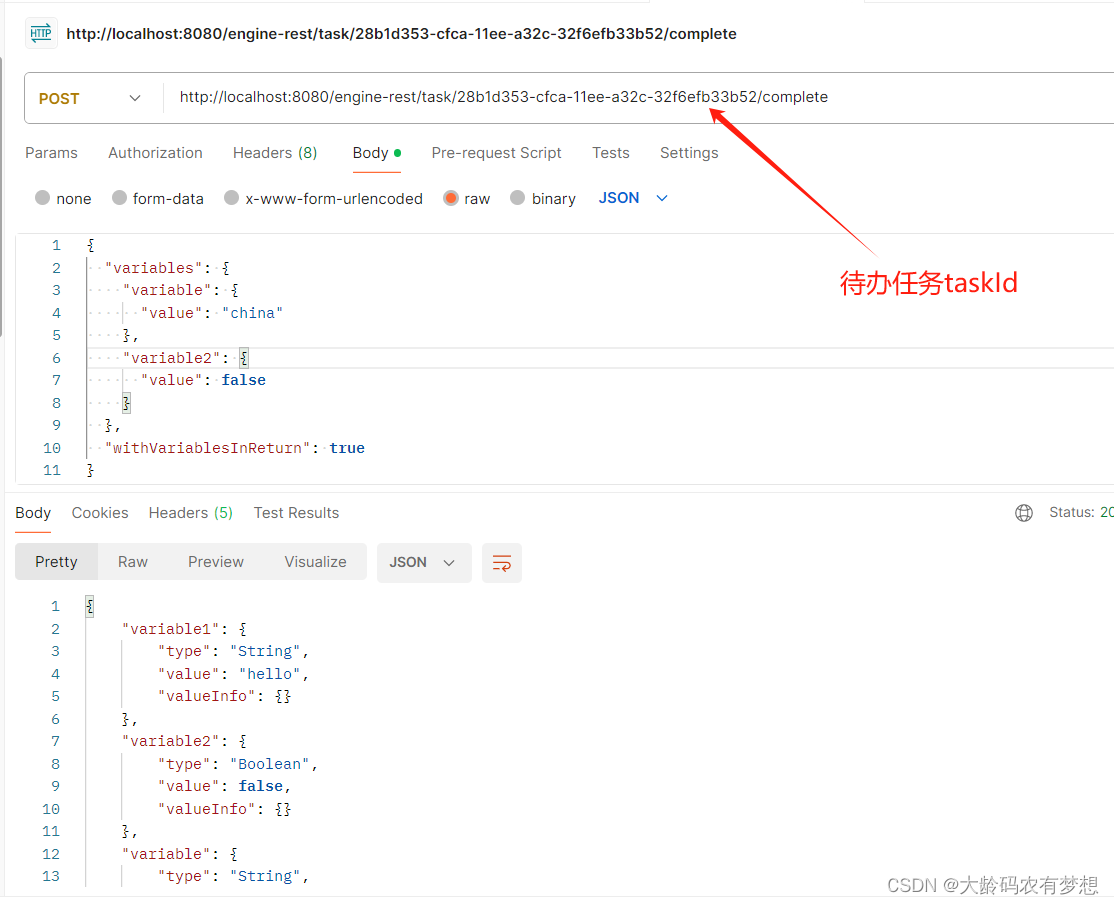
这时,我们再查询流程的的活动实例:
http://{host}:{port}/{contextPath}/process-instance/{id}/activity-instances
用Postman测试:http://localhost:8080/engine-rest/process-instance/2881747c-cfca-11ee-a32c-32f6efb33b52/activity-instances
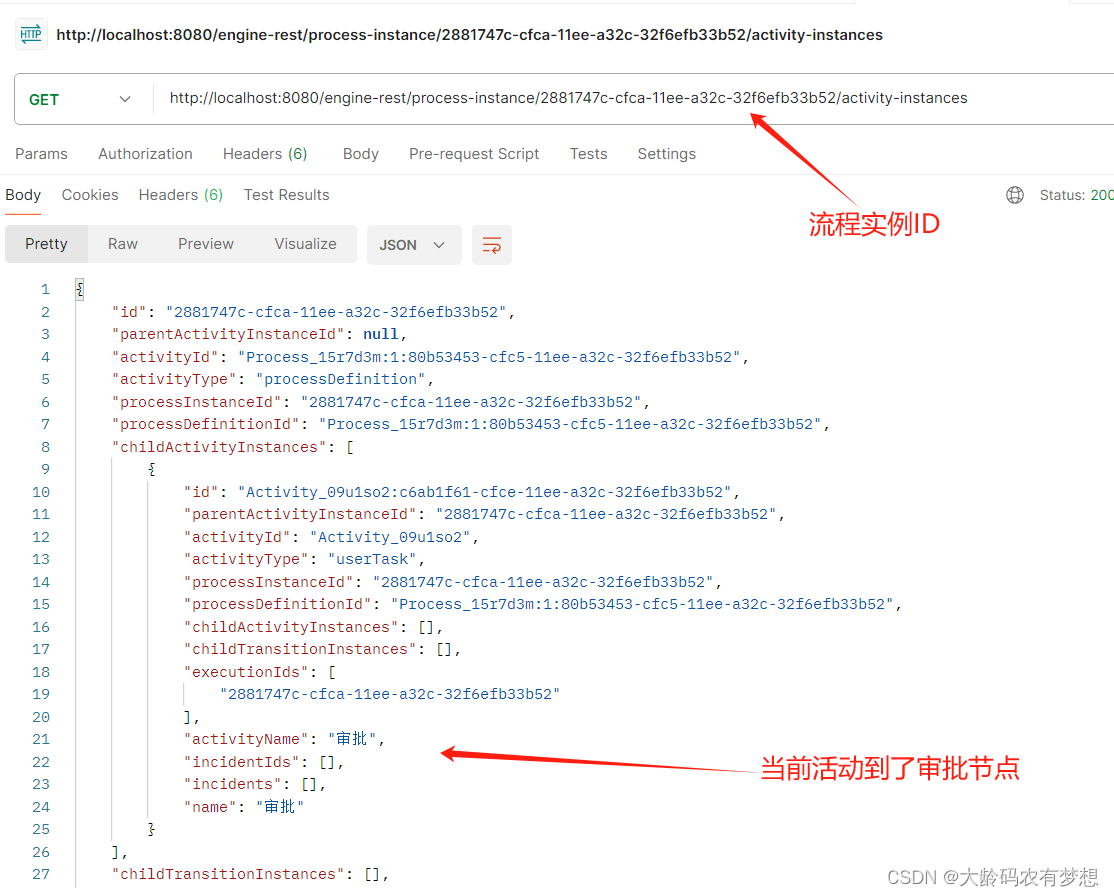
查询流程的待办任务:
http://{host}:{port}/{contextPath}/task
用Postman测试:http://localhost:8080/engine-rest/task
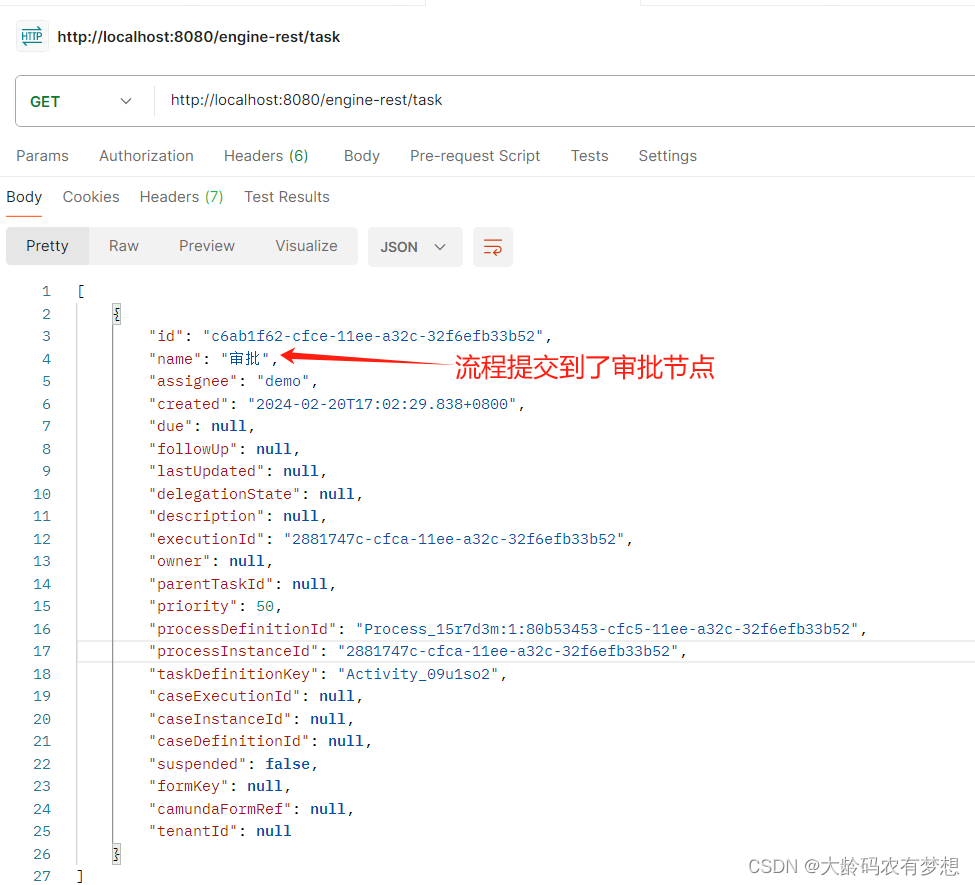
可以看到,流程提交到下一个”审批”节点,待办任务也流转到了下一步骤。
4.7、查询流程变量
可以通过接口查询该流程执行实例的流程变量,查询流程变量的rest接口为:
http://{host}:{port}/{contextPath}/execution/{id}/localVariables
用Postman测试:http://localhost:8080/engine-rest/execution/2881747c-cfca-11ee-a32c-32f6efb33b52/localVariables

5、小结
本文章介绍了通过camunda7.19的源代码编译运行方式,构建自己的springboot工程,并通过RESTful接口方式,验证camunda源代码编译和运行效果。
以上仅仅是验证了camunda流程引擎和rest接口是好用的,还没有人机交互界面,camunda开源版本也提供了基于angular语言开发的web界面,但该界面功能有限(好多高级有用的功能都在camunda企业版本里),而且不太适合中国人操作习惯,所以UI界面部分建议大家选择自己熟悉的语言vue\react\angular,进行定制化开发。
流程门户界面:以下是通过vue开发的流程门户界面,包括流程中心、我的待办、我的已办、我的流程、常用流程等重要的流程操作界面,用户也可以通过可视化拖拉拽方式配置自己的门户界面。
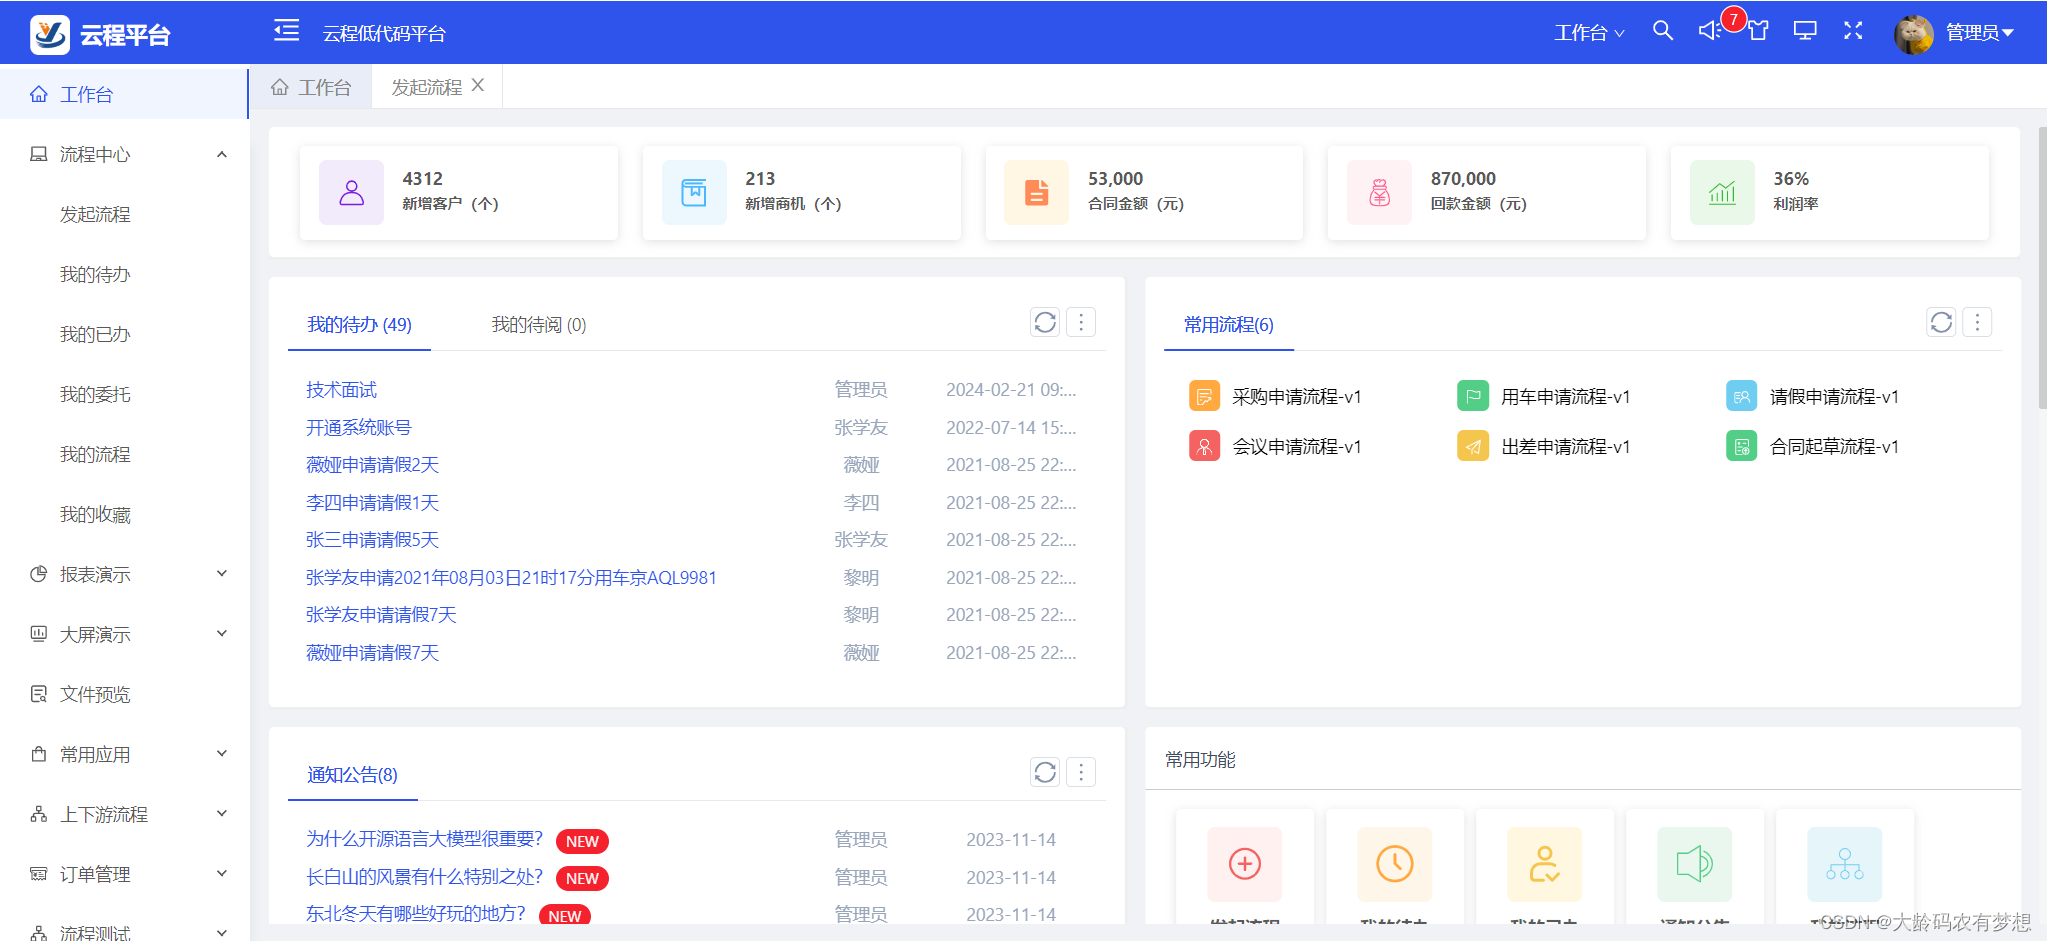
发起流程界面:把用户有权限发起的流程,按照业务分类聚合到一个界面上,方便用户快速发起流程和审批流程。

在线体验系统:http://www.yunchengxc.com
camunda源代码:GitHub - camunda/camunda-bpm-platform: Flexible framework for workflow and decision automation with BPMN and DMN. Integration with Quarkus, Spring, Spring Boot, CDI.
