今天我们将学习如何准备计算机视觉中最重要的网络之一:U-Net。如果你没有代码和数据集也没关系,可以分别通过下面两个链接进行访问:
代码:
https://www.kaggle.com/datasets/mateuszbuda/lgg-mri-segmentation?source=post_page-----e812e37e9cd0--------------------------------
Kaggle的MRI分割数据集:
https://www.kaggle.com/datasets/mateuszbuda/lgg-mri-segmentation?source=post_page-----e812e37e9cd0--------------------------------
主要步骤:
1. 数据集的探索
2. 数据集和Dataloader类的创建
3. 架构的创建
4. 检查损失(DICE和二元交叉熵)
5. 结果
数据集的探索
我们得到了一组(255 x 255)的MRI扫描的2D图像,以及它们相应的必须将每个像素分类为0(健康)或1(肿瘤)。
这里有一些例子:
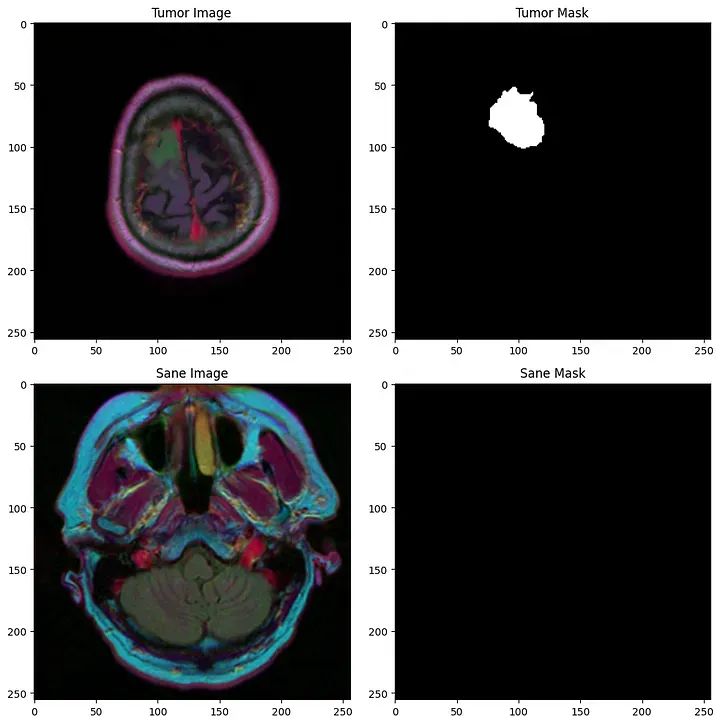
第一行:肿瘤,第二行:健康主题
数据集和Dataloader类
这是涉及神经网络的每个项目中都会找到的一步。
数据集类
import torch
import torch.nn as nn
import torch.nn.functional as F
from torch.utils.data import Dataset, DataLoaderclass BrainMriDataset(Dataset):def __init__(self, df, transforms):# df contains the paths to all filesself.df = df# transforms is the set of data augmentation operations we useself.transforms = transformsdef __len__(self):return len(self.df)def __getitem__(self, idx):image = cv2.imread(self.df.iloc[idx, 1])mask = cv2.imread(self.df.iloc[idx, 2], 0)augmented = self.transforms(image=image, mask=mask)image = augmented['image'] # Dimension (3, 255, 255)mask = augmented['mask']   # Dimension (255, 255)# We notice that the image has one more dimension (3 color channels), so we have to one one "artificial" dimension to the mask to match itmask = np.expand_dims(mask, axis=0) # Dimension (1, 255, 255)return image, mask
数据加载器
既然我们已经创建了Dataset类来重新整形张量,我们首先需要定义训练集(用于训练模型),验证集(用于监控训练并避免过拟合),以及测试集,最终评估模型在未见数据上的性能。
# Split df into train_df and val_df
train_df, val_df = train_test_split(df, stratify=df.diagnosis, test_size=0.1)
train_df = train_df.reset_index(drop=True)
val_df = val_df.reset_index(drop=True)# Split train_df into train_df and test_df
train_df, test_df = train_test_split(train_df, stratify=train_df.diagnosis, test_size=0.15)
train_df = train_df.reset_index(drop=True)train_dataset = BrainMriDataset(train_df, transforms=transforms)
train_dataloader = DataLoader(train_dataset, batch_size=32, shuffle=True)val_dataset = BrainMriDataset(val_df, transforms=transforms)
val_dataloader = DataLoader(val_dataset, batch_size=32, shuffle=False)test_dataset = BrainMriDataset(test_df, transforms=transforms)
test_dataloader = DataLoader(test_dataset, batch_size=32, shuffle=False)
U-Net架构
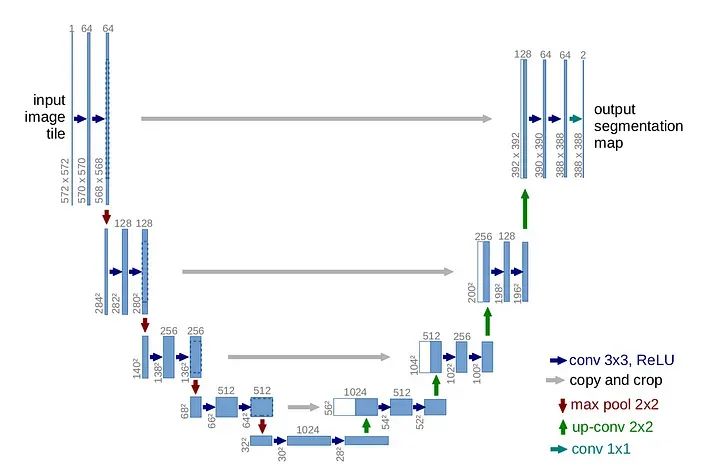
U-Net架构是用于图像分割任务的强大模型,是卷积神经网络(CNN)的一种类型,其名称来自其U形状的结构。U-Net最初由Olaf Ronneberger等人在2015年的论文中首次开发,标题为“U-Net:用于生物医学图像分割的卷积网络”。
其结构涉及编码(降采样)路径和解码(上采样)路径。U-Net至今仍然是一个非常成功的模型,其成功来自两个主要因素:
1. 对称结构(U形状)
2. 前向连接(图片上的灰色箭头)
前向连接的主要思想是,随着我们在层中越来越深入,我们会失去有关原始图像的一些信息。然而,我们的任务是对图像进行分割,我们需要精确的图像来对每个像素进行分类。这就是为什么我们在对称解码器层的每一层中重新注入图像的原因。以下是通过Pytorch实现的代码:
train_dataset = BrainMriDataset(train_df, transforms=transforms)
train_dataloader = DataLoader(train_dataset, batch_size=32, shuffle=True)val_dataset = BrainMriDataset(val_df, transforms=transforms)
val_dataloader = DataLoader(val_dataset, batch_size=32, shuffle=False)test_dataset = BrainMriDataset(test_df, transforms=transforms)
test_dataloader = DataLoader(test_dataset, batch_size=32, shuffle=False)class UNet(nn.Module):def __init__(self):super().__init__()# Define convolutional layers# These are used in the "down" path of the U-Net,# where the image is successively downsampledself.conv_down1 = double_conv(3, 64)self.conv_down2 = double_conv(64, 128)self.conv_down3 = double_conv(128, 256)self.conv_down4 = double_conv(256, 512)# Define max pooling layer for downsamplingself.maxpool = nn.MaxPool2d(2)# Define upsampling layerself.upsample = nn.Upsample(scale_factor=2, mode='bilinear', align_corners=True)# Define convolutional layers# These are used in the "up" path of the U-Net,# where the image is successively upsampledself.conv_up3 = double_conv(256 + 512, 256)self.conv_up2 = double_conv(128 + 256, 128)self.conv_up1 = double_conv(128 + 64, 64)# Define final convolution to output correct number of classes# 1 because there are only two classes (tumor or not tumor)self.last_conv = nn.Conv2d(64, 1, kernel_size=1)def forward(self, x):# Forward pass through the network# Down pathconv1 = self.conv_down1(x)x = self.maxpool(conv1)conv2 = self.conv_down2(x)x = self.maxpool(conv2)conv3 = self.conv_down3(x)x = self.maxpool(conv3)x = self.conv_down4(x)# Up pathx = self.upsample(x)x = torch.cat([x, conv3], dim=1)x = self.conv_up3(x)x = self.upsample(x)x = torch.cat([x, conv2], dim=1)x = self.conv_up2(x)x = self.upsample(x)x = torch.cat([x, conv1], dim=1)x = self.conv_up1(x)# Final outputout = self.last_conv(x)out = torch.sigmoid(out)return out
损失和评估标准
与每个神经网络一样,都有一个目标函数,一种损失,我们通过梯度下降最小化它。我们还引入了评估标准,它帮助我们训练模型(如果它在连续的3个时期中没有改善,那么我们停止训练,因为模型正在过拟合)。从这一段中有两个主要要点:
1. 损失函数是两个损失函数的组合(DICE损失,二元交叉熵)
2. 评估函数是DICE分数,不要与DICE损失混淆
DICE损失:
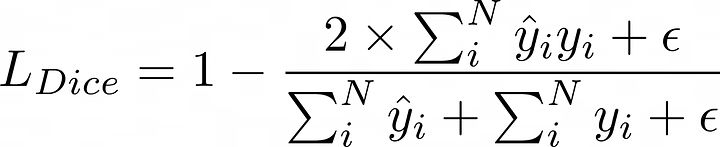
DICE损失
备注:我们添加了一个平滑参数(epsilon)以避免除以零。
二元交叉熵损失:

BCE
于是,我们的总损失是:

让我们一起实现它:
def dice_coef_loss(inputs, target):smooth = 1.0intersection = 2.0 * ((target * inputs).sum()) + smoothunion = target.sum() + inputs.sum() + smoothreturn 1 - (intersection / union)def bce_dice_loss(inputs, target):inputs = inputs.float()target = target.float()dicescore = dice_coef_loss(inputs, target)bcescore = nn.BCELoss()bceloss = bcescore(inputs, target)return bceloss + dicescore评估标准(Dice系数):
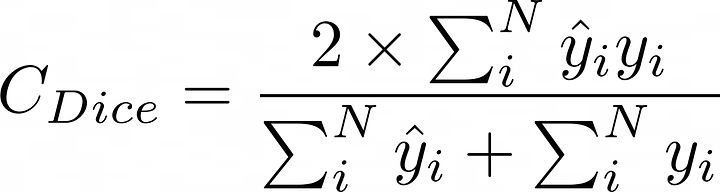
我们使用的评估函数是DICE分数。它在0到1之间,1是最好的。
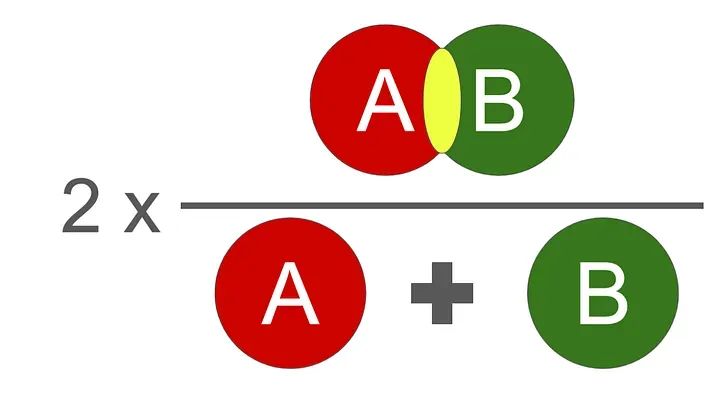
Dice分数的图示
其数学实现如下:
def dice_coef_metric(inputs, target):intersection = 2.0 * (target * inputs).sum()union = target.sum() + inputs.sum()if target.sum() == 0 and inputs.sum() == 0:return 1.0return intersection / union训练循环
def train_model(model_name, model, train_loader, val_loader, train_loss, optimizer, lr_scheduler, num_epochs): print(model_name)loss_history = []train_history = []val_history = []for epoch in range(num_epochs):model.train() # Enter train mode# We store the training loss and dice scoreslosses = []train_iou = []if lr_scheduler:warmup_factor = 1.0 / 100warmup_iters = min(100, len(train_loader) - 1)lr_scheduler = warmup_lr_scheduler(optimizer, warmup_iters, warmup_factor)# Add tqdm to the loop (to visualize progress)for i_step, (data, target) in enumerate(tqdm(train_loader, desc=f"Training epoch {epoch+1}/{num_epochs}")):data = data.to(device)target = target.to(device)outputs = model(data)out_cut = np.copy(outputs.data.cpu().numpy())# If the score is less than a threshold (0.5), the prediction is 0, otherwise its 1out_cut[np.nonzero(out_cut < 0.5)] = 0.0out_cut[np.nonzero(out_cut >= 0.5)] = 1.0train_dice = dice_coef_metric(out_cut, target.data.cpu().numpy())loss = train_loss(outputs, target)losses.append(loss.item())train_iou.append(train_dice)# Reset the gradientsoptimizer.zero_grad()# Perform backpropagation to compute gradientsloss.backward()# Update the parameters with the computed gradientsoptimizer.step()if lr_scheduler:lr_scheduler.step()val_mean_iou = compute_iou(model, val_loader)loss_history.append(np.array(losses).mean())train_history.append(np.array(train_iou).mean())val_history.append(val_mean_iou)print("Epoch [%d]" % (epoch))print("Mean loss on train:", np.array(losses).mean(), "\nMean DICE on train:", np.array(train_iou).mean(), "\nMean DICE on validation:", val_mean_iou)return loss_history, train_history, val_history结果
让我们在一个带有肿瘤的主题上评估我们的模型:
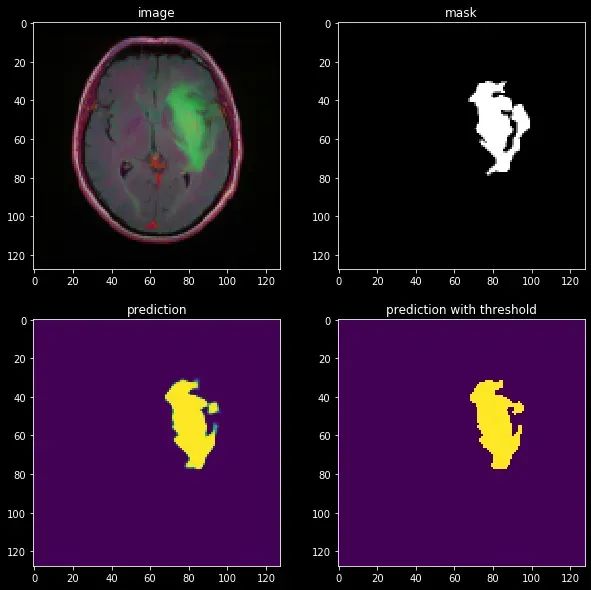
结果看起来相当不错!我们可以看到模型明显学到了关于图像结构的一些有用信息。然而,它可能可以更好地细化分割,这可以通过我们将很快讨论的更先进的技术来实现。U-Net至今仍然广泛使用,但有一个著名的模型达到了最先进的性能,称为nn-UNet。
· END ·
HAPPY LIFE

本文仅供学习交流使用,如有侵权请联系作者删除