ArkUI状态管理
分为以下四个:
- @State
- @Prop和@Link
- @Provide和@Consume
- @Observed和@ObjectLink
@State
相当于
vue中data()内定义的属性变量,相当于react中useState()的使用,即绑定在视图上的响应式变量,可动态更新~
Tip:
- 标记的变量必须初始化,不可为空值
- 支持Object、class、string、number、boolean、enum类型以及这些类型的数组
- 嵌套类型以及数组中的对象属性无法触发视图更新(类似于vue2中更改数组无法触发更新)
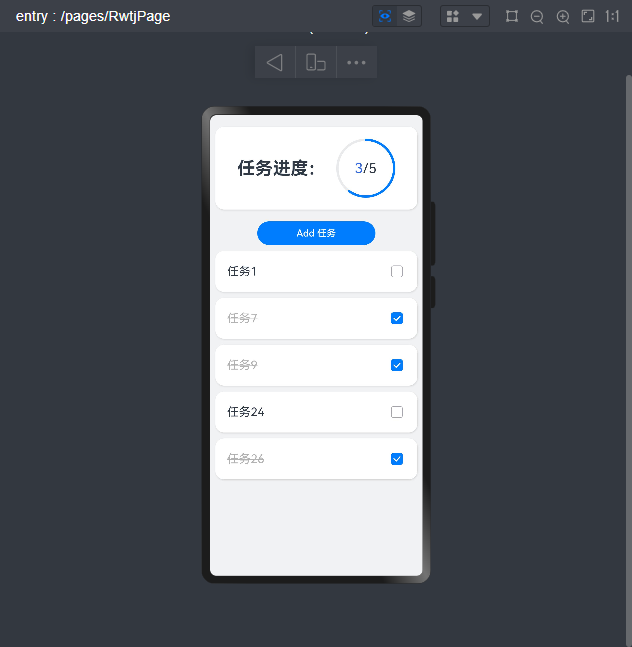
实操使用@State状态管理变量,实现一个任务进度案例(类似todo)
// 实现案例:任务统计
class Task{static id: number=1name: string='任务'+Task.id++isok: boolean =false
}
//卡片样式
@Styles function card(){.width('95%').padding(20).backgroundColor(Color.White).borderRadius(15).shadow({radius:6 , color: '#1F000000',offsetX:2,offsetY:4})
}
//完成样式(继承Text标签的样式属性)
@Extend(Text) function okTask(){.decoration({type:TextDecorationType.LineThrough}).fontColor('#B1B2B1')
}
@Entry
@Component
struct RwtjPage {@State totalTask: number = 0@State okTask:number = 0@State tasks: Task[]=[]handlerTaskChange(){this.tasks.push(new Task())this.tasks.pop()//更新进度this.totalTask=this.tasks.lengththis.okTask=this.tasks.filter(ok=>ok.isok).length//返回为true的数组列表的长度}build() {Column({space:10}) {//任务进度Row(){Text('任务进度:').fontSize(30).fontWeight(FontWeight.Bold)Stack(){//叠加容器Progress({value:this.okTask,total:this.totalTask,type:ProgressType.Ring}).width(100)Row() {Text(this.okTask.toString()).fontSize(24).fontColor("#36D")Text('/' + this.totalTask.toString()).fontSize(24)}}}.card().margin({top:20,bottom:10}).justifyContent(FlexAlign.SpaceEvenly)//新增任务Button('Add 任务').width(200).onClick(()=>{this.tasks.push(new Task())this.handlerTaskChange()})List({space:10}){//渲染任务列表ForEach(this.tasks,(item:Task,index)=>{ListItem(){Row(){if(item.isok===true){Text(item.name).fontSize(20).okTask()}else{Text(item.name).fontSize(20)}Checkbox().select(item.isok).onChange(val=>{item.isok=valthis.handlerTaskChange()})}.card().justifyContent(FlexAlign.SpaceBetween)}.swipeAction({end:this.DeleteBtn(index)}) //listitem自带的属性})}.width("100%").layoutWeight(1).alignListItem(ListItemAlign.Center)}.width('100%').height('100%').backgroundColor('#F1F2F3')}@Builder DeleteBtn(index: number){Button('Del').backgroundColor('red').fontColor('#fff').onClick(()=>{this.tasks.splice(index,1)this.handlerTaskChange()})}
}
@Prop和@Link
用于父子组件数据同步
- 可以将上方案例拆分为组件式便于代码解读维护
| @Prop | @Link | |
|---|---|---|
| 同步类型 | 单向 | 双向 |
| 允许装饰的变量类型 | @Prop只支持: string、number、boolean、enum类型 父组件对象类型,子组件是对象屈性 不可以是数组、any | 父子类型一致: string、number、boolean、enum、object、class,以及他们的数组数组中元素增、删、替换会引起刷新嵌套类型以及数组中的对象属性无法触发视图更新 |
| 初始化方式 | 不允许子组件初始化和 | 父组件传递,禁止子组件初始化 |
// 实现案例:任务统计
class Task{static id: number=1name: string='任务'+Task.id++isok: boolean =false
}
//卡片样式
@Styles function card(){.width('95%').padding(20).backgroundColor(Color.White).borderRadius(15).shadow({radius:6 , color: '#1F000000',offsetX:2,offsetY:4})
}
//完成样式(继承Text标签的样式属性)
@Extend(Text) function okTask(){.decoration({type:TextDecorationType.LineThrough}).fontColor('#B1B2B1')
}
@Entry
@Component
struct RwtjPage {@State totalTask: number = 0@State okTask:number = 0// @State tasks: Task[]=[]build() {Column({space:10}) {//任务进度TaskStatistics({okTask:this.okTask,totalTask:this.totalTask})//任务列表TaskList({okTask:$okTask,totalTask:$totalTask})}.width('100%').height('100%').backgroundColor('#F1F2F3')}
}@Component
struct TaskStatistics{@Prop okTask:number@Prop totalTask:numberbuild(){Row(){Text('任务进度:').fontSize(30).fontWeight(FontWeight.Bold)Stack(){//叠加容器Progress({value:this.okTask,total:this.totalTask,type:ProgressType.Ring}).width(100)Row() {Text(this.okTask.toString()).fontSize(24).fontColor("#36D")Text('/' + this.totalTask.toString()).fontSize(24)}}}.card().margin({top:20,bottom:10}).justifyContent(FlexAlign.SpaceEvenly)}
}@Component
struct TaskList{@Link okTask:number@Link totalTask:number@State tasks:Task[]=[]handlerTaskChange(){this.tasks.push(new Task())this.tasks.pop()//更新进度this.totalTask=this.tasks.lengththis.okTask=this.tasks.filter(ok=>ok.isok).length//返回为true的数组列表的长度}build(){Column(){//新增任务Button('Add 任务').width(200).onClick(()=>{this.tasks.push(new Task())this.handlerTaskChange()})List({space:10}){//渲染任务列表ForEach(this.tasks,(item:Task,index)=>{ListItem(){Row(){if(item.isok===true){Text(item.name).fontSize(20).okTask()}else{Text(item.name).fontSize(20)}Checkbox().select(item.isok).onChange(val=>{item.isok=valthis.handlerTaskChange()})}.card().justifyContent(FlexAlign.SpaceBetween)}.swipeAction({end:this.DeleteBtn(index)}) //listitem自带的属性})}.width("100%").layoutWeight(1).alignListItem(ListItemAlign.Center)}}@Builder DeleteBtn(index: number){Button('Del').backgroundColor('red').fontColor('#fff').onClick(()=>{this.tasks.splice(index,1)this.handlerTaskChange()})}
}
@Provide和@Consume
可以跨组件提供类似于
@State和@Link的双向同步
- 用了感觉更省事,同时也会更消耗资源
用@Link双向同步:
 @State totalTask: number = 0@State okTask:number = 0// @State tasks: Task[]=[]build() {Column({space:10}) {//任务列表TaskList({okTask:$okTask,totalTask:$totalTask})}.width('100%').height('100%').backgroundColor('#F1F2F3')}
@Component
struct TaskList{@Link okTask:number@Link totalTask:number@State tasks:Task[]=[]handlerTaskChange(){this.tasks.push(new Task())this.tasks.pop()//更新进度this.totalTask=this.tasks.lengththis.okTask=this.tasks.filter(ok=>ok.isok).length//返回为true的数组列表的长度}build(){Column(){......}
}
用@Provide和@Consume双向同步:
 @ProvidetotalTask: number = 0@ProvideokTask:number = 0// @State tasks: Task[]=[]build() {Column({space:10}) {//任务列表TaskList()}.width('100%').height('100%').backgroundColor('#F1F2F3')}
@Component
struct TaskList{@Consume okTask:number@Consume totalTask:number@State tasks:Task[]=[]handlerTaskChange(){this.tasks.push(new Task())this.tasks.pop()//更新进度this.totalTask=this.tasks.lengththis.okTask=this.tasks.filter(ok=>ok.isok).length//返回为true的数组列表的长度}build(){Column(){......}
}
区别: 不用手动传参了,自动化~
@Observed和@ObjectLink
用于涉及
嵌套对象和数组元素对象的场景中进行双向数据同步
- 上方案例的下划线功能就是因为修改了数组元素数组没渲染导致更新状态没有第一时间改变视图(然后我通过修改数组长度,push再删除,解决了这个问题,现在可以使用@Observed和@ObjectLink方式解决该问题)
可再次基于上次案例进行改进实现
// 实现案例:任务统计
@Observed
class Task{static id: number=1name: string='任务'+Task.id++isok: boolean =false
}
//卡片样式
@Styles function card(){.width('95%').padding(20).backgroundColor(Color.White).borderRadius(15).shadow({radius:6 , color: '#1F000000',offsetX:2,offsetY:4})
}
//完成样式(继承Text标签的样式属性)
@Extend(Text) function okTask(){.decoration({type:TextDecorationType.LineThrough}).fontColor('#B1B2B1')
}
@Entry
@Component
struct RwtjPage {@Provide totalTask: number = 0@Provide okTask:number = 0// @State tasks: Task[]=[]build() {Column({space:10}) {//任务进度TaskStatistics()//任务列表TaskList()}.width('100%').height('100%').backgroundColor('#F1F2F3')}
}@Component
struct TaskStatistics{@Consume okTask:number@Consume totalTask:numberbuild(){Row(){Text('任务进度:').fontSize(30).fontWeight(FontWeight.Bold)Stack(){//叠加容器Progress({value:this.okTask,total:this.totalTask,type:ProgressType.Ring}).width(100)Row() {Text(this.okTask.toString()).fontSize(24).fontColor("#36D")Text('/' + this.totalTask.toString()).fontSize(24)}}}.card().margin({top:20,bottom:10}).justifyContent(FlexAlign.SpaceEvenly)}
}@Component
struct TaskList{@Consume okTask:number@Consume totalTask:number@State tasks:Task[]=[]handlerTaskChange(){// this.tasks.push(new Task())// this.tasks.pop()//更新进度this.totalTask=this.tasks.lengththis.okTask=this.tasks.filter(ok=>ok.isok).length//返回为true的数组列表的长度}build(){Column(){//新增任务Button('Add 任务').width(200).onClick(()=>{this.tasks.push(new Task())this.handlerTaskChange()})List({space:10}){//渲染任务列表ForEach(this.tasks,(item:Task,index)=>{ListItem(){TaskItem({item:item,onTaskChange:this.handlerTaskChange.bind(this)})}.swipeAction({end:this.DeleteBtn(index)}) //listitem自带的属性})}.width("100%").layoutWeight(1).alignListItem(ListItemAlign.Center)}}@Builder DeleteBtn(index: number){Button('Del').backgroundColor('red').fontColor('#fff').onClick(()=>{this.tasks.splice(index,1)this.handlerTaskChange()})}
}@Component
struct TaskItem {@ObjectLink item: TaskonTaskChange: ()=>voidbuild() {Row(){if(this.item.isok===true){Text(this.item.name).fontSize(20).okTask()}else{Text(this.item.name).fontSize(20)}Checkbox().select(this.item.isok).onChange(val=>{this.item.isok=valthis.onTaskChange()// this.handlerTaskChange()})}.card().justifyContent(FlexAlign.SpaceBetween)}
}
上方主要是在
Task类加上@Observed,其次传递函数的时候需要加个.bind(this)表示函数指向本方法
- 再通过组件中使用
@ObjectLink实现接收传来的数组中对象,通过修改对象中的属性从而视图跟着刷新,替换了我的小聪明代码
// this.tasks.push(new Task()) // this.tasks.pop()
通过以上内容即可学会
ArkUI状态管理的基本使用了,在项目中会经常用到喔✌