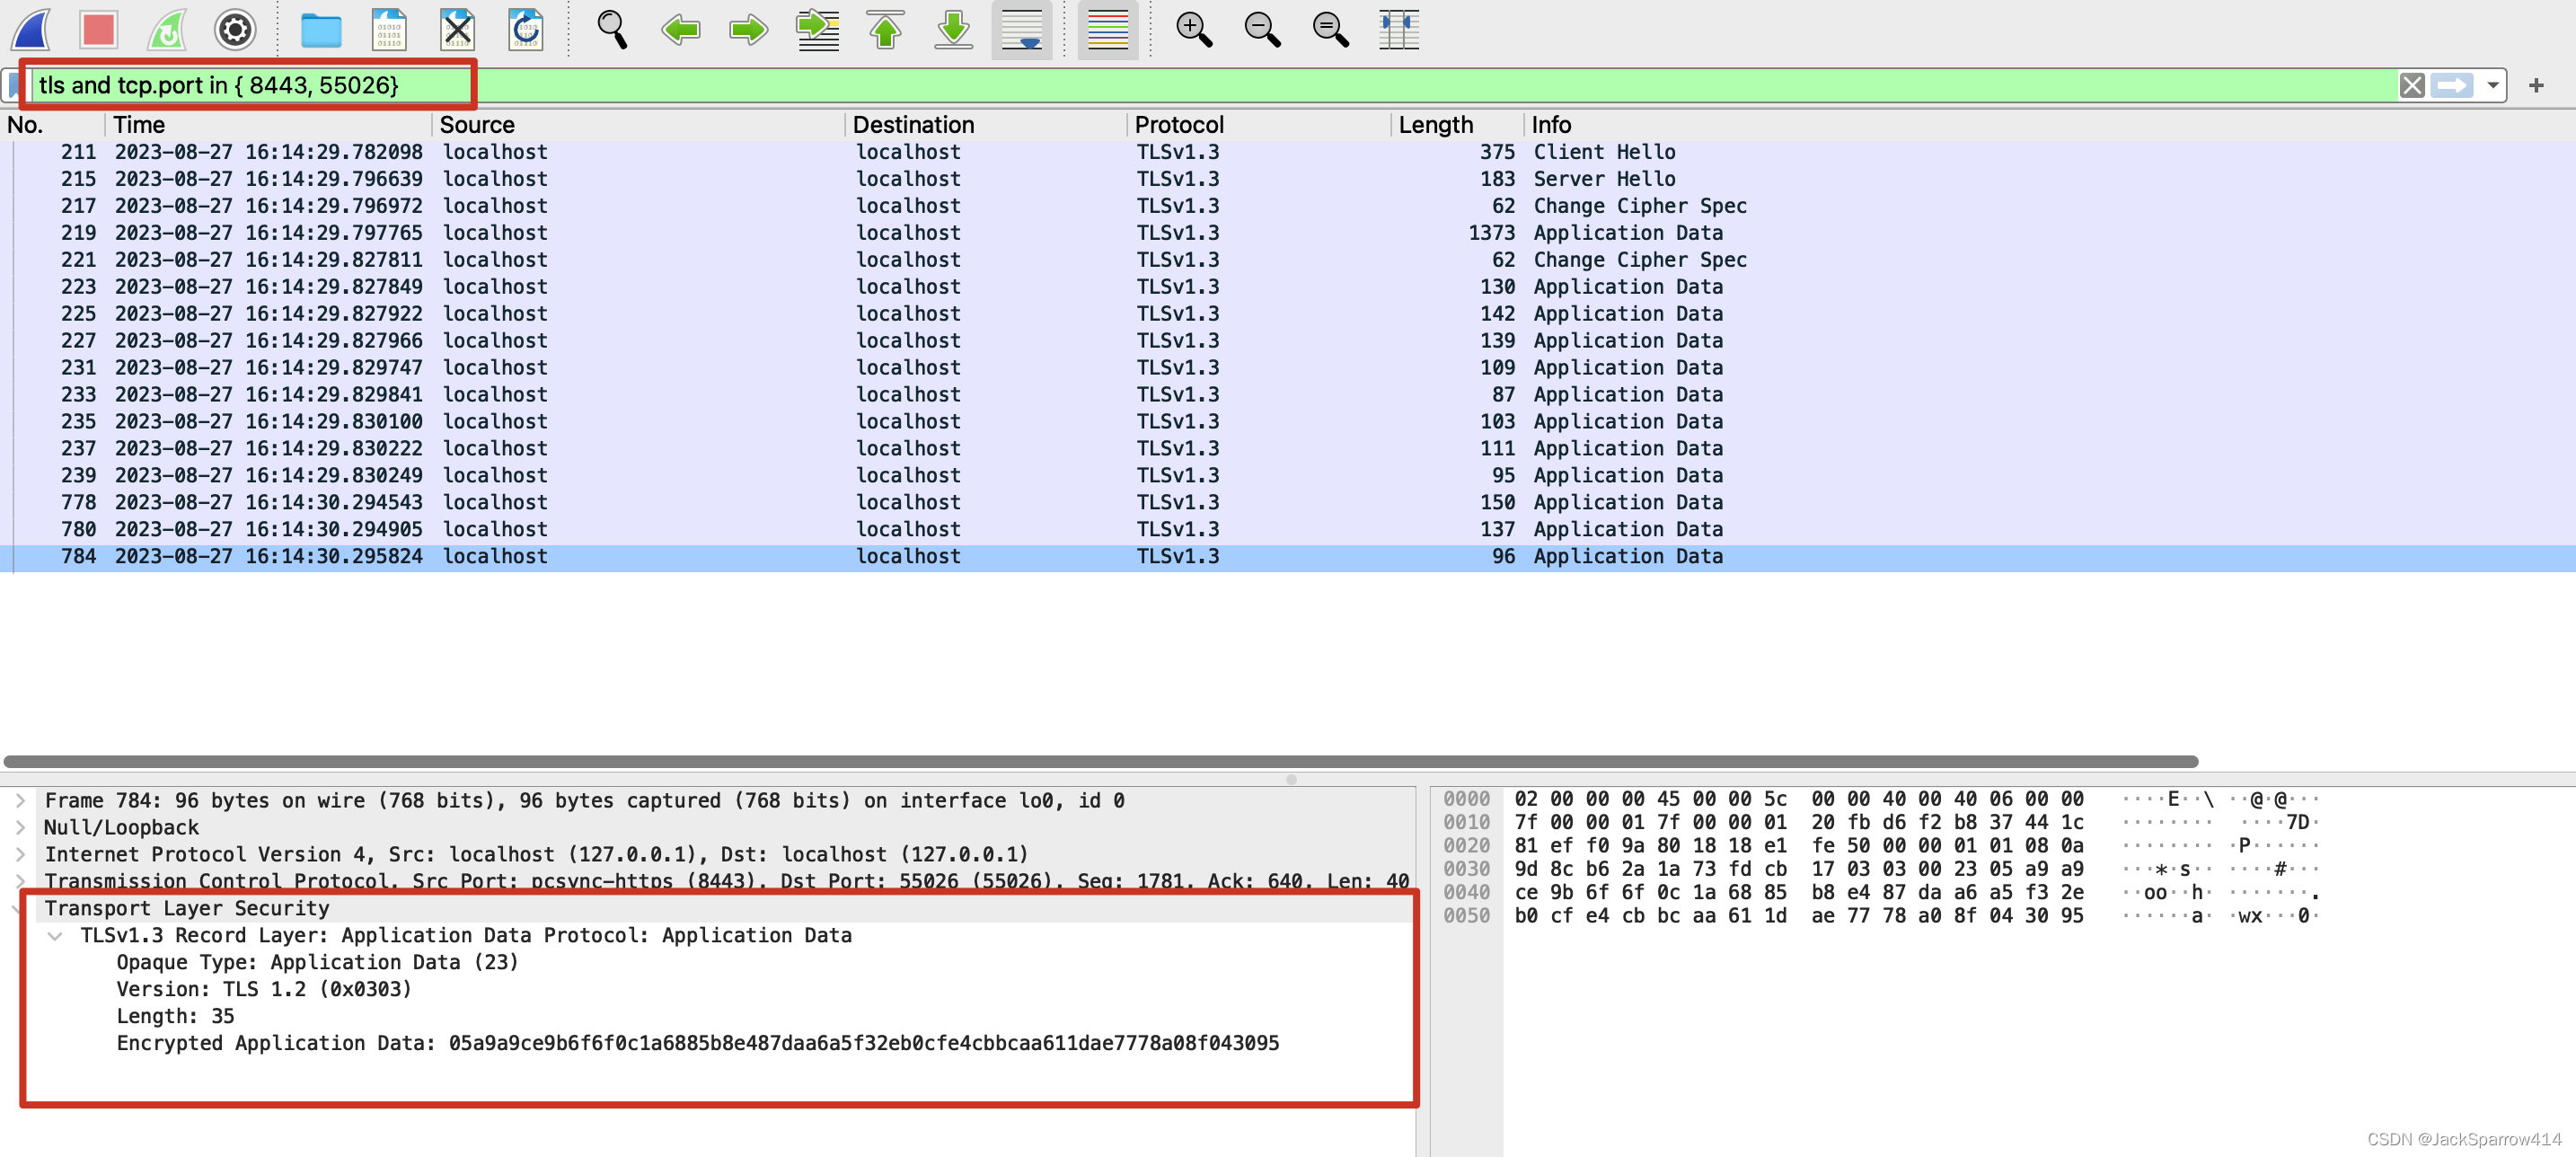
1. 导包
import cv2 as cv
import numpy as np
from matplotlib import pyplot as plt
import math
import glob
2. 相机标定
pattern_rows = 10
pattern_cols = 6
pattern_size = (pattern_rows, pattern_cols)
square_size = 10  # mm
object_points = np.zeros((pattern_rows * pattern_cols, 3), np.float32)
object_points[:, :2] = np.mgrid[0:pattern_rows, 0:pattern_cols].T.reshape(-1, 2) * square_size
criteria = (cv.TERM_CRITERIA_EPS + cv.TERM_CRITERIA_MAX_ITER, 30, 0.001)objpoints = []
imgpoints = []
images = glob.glob('./images/*.bmp')
for fname in images:gray = cv.imread(fname, cv.IMREAD_GRAYSCALE)height, width = gray.shapeflags = cv.CALIB_CB_ADAPTIVE_THRESH + cv.CALIB_CB_FILTER_QUADS + cv.CALIB_CB_FAST_CHECKret, corners = cv.findChessboardCorners(image=gray, patternSize=pattern_size, flags=flags)if ret == True:objpoints.append(object_points)corners = cv.cornerSubPix(gray,corners, (11,11), (-1,-1), criteria)imgpoints.append(corners)ret, mtx, dist, rvecs, tvecs = cv.calibrateCamera(objpoints, imgpoints, (width, height), None, None)
3. 参考图像
img_ref = cv.imread('./images./Image_20210907144725602.bmp', cv.IMREAD_GRAYSCALE)
plt.imshow(img_ref, cmap='gray')

4. 计算图像与参考平面的映射关系
trans, _ = cv.estimateAffine2D(corners, object_points[:,np.newaxis,:2])
5. 边缘点查找
def FindEdgePoint(src, roi, kernel_size = 2, edge_threshold = 30.0, edge_type = 1, edge_polarity = 0):# ROI 长宽取整且获取矩形顶点new_roi = (roi[0], (math.ceil(roi[1][0]), math.ceil(roi[1][1])), roi[2])roi_points = cv.boxPoints(new_roi)# ROI区域图像转正rect_point = np.array([[0, new_roi[1][1] - 1],[0, 0],[new_roi[1][0] - 1, 0],[new_roi[1][0] - 1, new_roi[1][1] - 1]], dtype=np.float32)trans_local = cv.getPerspectiveTransform(roi_points, rect_point)img_dst = cv.warpPerspective(src, trans_local, new_roi[1])# 垂直投影img_h2 = np.average(img_dst,axis=0)img_h = np.expand_dims(img_h2, 0)# 高斯滤波img_h = cv.GaussianBlur(img_h, (kernel_size * 2 + 1, 1), 0)# 索贝尔边缘提取img_s = cv.Sobel(src=img_h, ddepth=-1, dx=1, dy=0, ksize=1, scale = 1, delta = 0, borderType=cv.BORDER_DEFAULT)# 边缘提取img_s_abs = np.abs(img_s)indice = []values = []for index in range(img_s.shape[1]):if img_s_abs[0, index] > edge_threshold:if edge_type == 0:if edge_polarity == 0:values.append(img_s[0, index])indice.append(index)elif edge_polarity == 1 and img_s[0, index] > 0:values.append(img_s[0, index])indice.append(index)elif edge_polarity == 2 and img_s[0, index] < 0:values.append(img_s[0, index])indice.append(index)elif edge_type == 1:if edge_polarity == 0:indice.append(index)values.append(img_s[0, index])breakelif edge_polarity == 1 and img_s[0, index] > 0:indice.append(index)values.append(img_s[0, index])breakelif edge_polarity == 2 and img_s[0, index] < 0:values.append(img_s[0, index])indice.append(index)breakelif edge_threshold == 2:if edge_polarity == 0:if (len(indice) == 0):indice.append(index)values.append(img_s[0, index])else:indice[0] = indexvalues[1] = img_s[0, index]elif edge_polarity == 1 and img_s[0, index] > 0:if (len(indice) == 0):indice.append(index)values.append(img_s[0, index])else:indice[0] = indexvalues[1] = img_s[0, index]elif edge_polarity == 2 and img_s[0, index] < 0:if (len(indice) == 0):indice.append(index)values.append(img_s[0, index])else:indice[0] = indexvalues[1] = img_s[0, index]else:if edge_polarity == 0:if (len(indice) == 0):indice.append(index)values.append(img_s[0, index])else:if math.abs(values[1] < img_s_abs[0, index]):indice[0] = indexvalues[1] = img_s[0, index]elif edge_polarity == 1 and img_s[0, index] > 0:if (len(indice) == 0):indice.append(index)values.append(img_s[0, index])else:if math.abs(values[1] < img_s_abs[0, index]):indice[0] = indexvalues[1] = img_s[0, index]elif edge_polarity == 2 and img_s[0, index] < 0:if (len(indice) == 0):indice.append(index)values.append(img_s[0, index])else:if math.abs(values[1] < img_s_abs[0, index]):indice[0] = indexvalues[1] = img_s[0, index]# 反转坐标half_height = new_roi[1][1] * 0.5edge_point_h = []trans_inv = np.linalg.inv(trans_local)color_image = cv.cvtColor(src, cv.COLOR_GRAY2BGR)for i in range(len(values)):point_h = np.array([indice[0], half_height]).reshape(1,1,2)edge_point = cv.transform(point_h, trans_inv)cv.circle(color_image, (int(edge_point[0, 0, 0]), int(edge_point[0, 0, 1])), 20, (255, 0, 0), -1)plt.figure(figsize=(20,8))plt.imshow(color_image[...,::-1])return edge_point[0, 0, 0],edge_point[0, 0, 1]
x1,y1 = FindEdgePoint(img_ref, ((789.72, 1037.57),(150, 224.288), 0))

x2,y2 = FindEdgePoint(img_ref, ((3325.32, 1037.57),(150, 224.288), 0))

6. 将点映射到物理坐标
new_x1 = trans[0, 0] * x1 + trans[0, 1] * y1 + trans[0, 2]
new_y1 = trans[1, 0] * x1 + trans[1, 1] * y1 + trans[1, 2]
new_x2 = trans[0, 0] * x2 + trans[0, 1] * y2 + trans[0, 2]
new_y2 = trans[1, 0] * x2 + trans[1, 1] * y2 + trans[1, 2]dist = math.sqrt((new_x1 - new_x2) ** 2 + (new_y1 - new_y2) ** 2)
print(dist)
110.0605974101517