
先看界面布局文件
<?xml version="1.0" encoding="utf-8"?>
<LinearLayout xmlns:android="http://schemas.android.com/apk/res/android"android:layout_width="fill_parent"android:layout_height="fill_parent"android:orientation="vertical" ><EditTextandroid:id="@+id/edit"android:layout_width="fill_parent"android:layout_height="wrap_content" /><EditTextandroid:id="@+id/edit1"android:layout_width="fill_parent"android:layout_height="wrap_content"android:password="true" /><RelativeLayoutandroid:layout_width="fill_parent"android:layout_height="wrap_content" ><android.inputmethodservice.KeyboardViewandroid:id="@+id/keyboard_view"android:layout_width="fill_parent"android:layout_height="wrap_content"android:layout_alignParentBottom="true"android:focusable="true"android:focusableInTouchMode="true"android:background="@color/lightblack"android:keyBackground="@drawable/btn_keyboard_key"android:keyTextColor="@color/white"android:visibility="gone" /></RelativeLayout></LinearLayout>
通过布局文件可以看出界面上有两个输入框,其中一个是密码输入框,界面上还有一个隐藏的键盘控件。
在res下新建xml文件夹,在xml文件夹中新建qwerty.xml和symbols.xml文件. qwerty.xml 是字母键盘布局,symbols.xml 是数字键盘布局,内如如下
qwerty.xml内容
<?xml version="1.0" encoding="UTF-8"?>
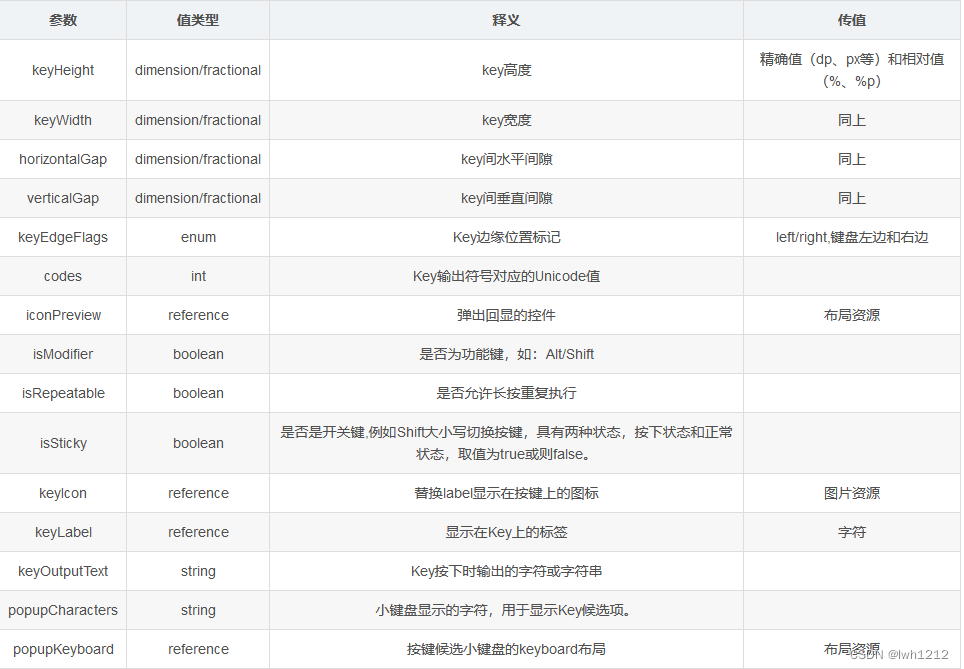
<Keyboard android:keyWidth="10.000002%p" android:keyHeight="@dimen/key_height"android:horizontalGap="0.0px" android:verticalGap="0.0px"xmlns:android="http://schemas.android.com/apk/res/android"><Row><Key android:codes="113" android:keyEdgeFlags="left"android:keyLabel="q" /><Key android:codes="119" android:keyLabel="w" /><Key android:codes="101" android:keyLabel="e" /><Key android:codes="114" android:keyLabel="r" /><Key android:codes="116" android:keyLabel="t" /><Key android:codes="121" android:keyLabel="y" /><Key android:codes="117" android:keyLabel="u" /><Key android:codes="105" android:keyLabel="i" /><Key android:codes="111" android:keyLabel="o" /><Key android:codes="112" android:keyEdgeFlags="right"android:keyLabel="p" /></Row><Row><Key android:horizontalGap="4.999995%p" android:codes="97"android:keyEdgeFlags="left" android:keyLabel="a" /><Key android:codes="115" android:keyLabel="s" /><Key android:codes="100" android:keyLabel="d" /><Key android:codes="102" android:keyLabel="f" /><Key android:codes="103" android:keyLabel="g" /><Key android:codes="104" android:keyLabel="h" /><Key android:codes="106" android:keyLabel="j" /><Key android:codes="107" android:keyLabel="k" /><Key android:codes="108" android:keyEdgeFlags="right"android:keyLabel="l" /></Row><Row><Key android:keyWidth="14.999998%p" android:codes="-1"android:keyEdgeFlags="left" android:isModifier="true"android:isSticky="true" android:keyIcon="@drawable/sym_keyboard_shift" /><Key android:codes="122" android:keyLabel="z" /><Key android:codes="120" android:keyLabel="x" /><Key android:codes="99" android:keyLabel="c" /><Key android:codes="118" android:keyLabel="v" /><Key android:codes="98" android:keyLabel="b" /><Key android:codes="110" android:keyLabel="n" /><Key android:codes="109" android:keyLabel="m" /><Key android:keyWidth="14.999998%p" android:codes="-5"android:keyEdgeFlags="right" android:isRepeatable="true"android:keyIcon="@drawable/sym_keyboard_delete" /></Row><Row android:rowEdgeFlags="bottom"><Key android:keyWidth="20.000004%p" android:codes="-2"android:keyLabel="12#" /><Key android:keyWidth="14.999998%p" android:codes="44"android:keyLabel="," /><Key android:keyWidth="29.999996%p" android:codes="32"android:isRepeatable="true" android:keyIcon="@drawable/sym_keyboard_space" /><Key android:keyWidth="14.999998%p" android:codes="46"android:keyLabel="." /><Key android:keyWidth="20.000004%p" android:codes="-3"android:keyEdgeFlags="right" android:keyLabel="完成" /></Row>
</Keyboard>
symbols.xml 内容
<?xml version="1.0" encoding="utf-8"?>
<Keyboard xmlns:android="http://schemas.android.com/apk/res/android"android:keyWidth="25%p" android:horizontalGap="0px"android:verticalGap="0px" android:keyHeight="@dimen/key_height"><Row><Key android:codes="49" android:keyLabel="1" /><Key android:codes="50" android:keyLabel="2" /><Key android:codes="51" android:keyLabel="3" /><Key android:codes="57419" android:keyEdgeFlags="right"android:keyIcon="@drawable/sym_keyboard_left" /></Row><Row><Key android:codes="52" android:keyLabel="4" /><Key android:codes="53" android:keyLabel="5" /><Key android:codes="54" android:keyLabel="6" /><Key android:codes="57421" android:keyEdgeFlags="right"android:keyIcon="@drawable/sym_keyboard_right" /></Row><Row><Key android:codes="55" android:keyLabel="7" /><Key android:codes="56" android:keyLabel="8" /><Key android:codes="57" android:keyLabel="9" /><Key android:codes="-3" android:keyHeight="100dip"android:keyEdgeFlags="right" android:isRepeatable="true"android:keyLabel="完成" /></Row><Row><Key android:codes="-2" android:keyLabel="ABC" /><Key android:codes="48" android:keyLabel="0" /><Key android:codes="-5" android:keyIcon="@drawable/sym_keyboard_delete" /></Row>
</Keyboard>
KeydemoActivity.java
package cn.key;import android.app.Activity;
import android.content.Context;
import android.os.Bundle;
import android.text.InputType;
import android.view.MotionEvent;
import android.view.View;
import android.view.View.OnTouchListener;
import android.widget.EditText;public class KeydemoActivity extends Activity {private Context ctx;private Activity act;private EditText edit;private EditText edit1;@Overridepublic void onCreate(Bundle savedInstanceState) {super.onCreate(savedInstanceState);setContentView(R.layout.main);ctx = this;act = this;edit = (EditText) this.findViewById(R.id.edit);edit.setInputType(InputType.TYPE_NULL);edit1 = (EditText) this.findViewById(R.id.edit1);edit.setOnTouchListener(new OnTouchListener() {@Overridepublic boolean onTouch(View v, MotionEvent event) {new KeyboardUtil(act, ctx, edit).showKeyboard();return false;}});edit1.setOnTouchListener(new OnTouchListener() {@Overridepublic boolean onTouch(View v, MotionEvent event) {int inputback = edit1.getInputType();edit1.setInputType(InputType.TYPE_NULL);new KeyboardUtil(act, ctx, edit1).showKeyboard();edit1.setInputType(inputback);return false;}});}
}
KeyboardUtil.java
package cn.key;import java.util.List;import android.app.Activity;
import android.content.Context;
import android.inputmethodservice.Keyboard;
import android.inputmethodservice.KeyboardView;
import android.inputmethodservice.Keyboard.Key;
import android.inputmethodservice.KeyboardView.OnKeyboardActionListener;
import android.text.Editable;
import android.view.View;
import android.widget.EditText;public class KeyboardUtil {private Context ctx;private Activity act;private KeyboardView keyboardView;private Keyboard k1;// 字母键盘private Keyboard k2;// 数字键盘public boolean isnun = false;// 是否数据键盘public boolean isupper = false;// 是否大写private EditText ed;public KeyboardUtil(Activity act, Context ctx, EditText edit) {this.act = act;this.ctx = ctx;this.ed = edit;k1 = new Keyboard(ctx, R.xml.qwerty);k2 = new Keyboard(ctx, R.xml.symbols);keyboardView = (KeyboardView) act.findViewById(R.id.keyboard_view);keyboardView.setKeyboard(k1);keyboardView.setEnabled(true);keyboardView.setPreviewEnabled(true);keyboardView.setOnKeyboardActionListener(listener);}private OnKeyboardActionListener listener = new OnKeyboardActionListener() {@Overridepublic void swipeUp() {}@Overridepublic void swipeRight() {}@Overridepublic void swipeLeft() {}@Overridepublic void swipeDown() {}@Overridepublic void onText(CharSequence text) {}@Overridepublic void onRelease(int primaryCode) {}@Overridepublic void onPress(int primaryCode) {}@Overridepublic void onKey(int primaryCode, int[] keyCodes) {Editable editable = ed.getText();int start = ed.getSelectionStart();if (primaryCode == Keyboard.KEYCODE_CANCEL) {// 完成hideKeyboard();} else if (primaryCode == Keyboard.KEYCODE_DELETE) {// 回退if (editable != null && editable.length() > 0) {if (start > 0) {editable.delete(start - 1, start);}}} else if (primaryCode == Keyboard.KEYCODE_SHIFT) {// 大小写切换changeKey();keyboardView.setKeyboard(k1);} else if (primaryCode == Keyboard.KEYCODE_MODE_CHANGE) {// 数字键盘切换if (isnun) {isnun = false;keyboardView.setKeyboard(k1);} else {isnun = true;keyboardView.setKeyboard(k2);}} else if (primaryCode == 57419) { // go leftif (start > 0) {ed.setSelection(start - 1);}} else if (primaryCode == 57421) { // go rightif (start < ed.length()) {ed.setSelection(start + 1);}} else {editable.insert(start, Character.toString((char) primaryCode));}}};/*** 键盘大小写切换*/private void changeKey() {List<Key> keylist = k1.getKeys();if (isupper) {//大写切换小写isupper = false;for(Key key:keylist){if (key.label!=null && isword(key.label.toString())) {key.label = key.label.toString().toLowerCase();key.codes[0] = key.codes[0]+32;}}} else {//小写切换大写isupper = true;for(Key key:keylist){if (key.label!=null && isword(key.label.toString())) {key.label = key.label.toString().toUpperCase();key.codes[0] = key.codes[0]-32;}}}}public void showKeyboard() {int visibility = keyboardView.getVisibility();if (visibility == View.GONE || visibility == View.INVISIBLE) {keyboardView.setVisibility(View.VISIBLE);}}public void hideKeyboard() {int visibility = keyboardView.getVisibility();if (visibility == View.VISIBLE) {keyboardView.setVisibility(View.INVISIBLE);}}private boolean isword(String str){String wordstr = "abcdefghijklmnopqrstuvwxyz";if (wordstr.indexOf(str.toLowerCase())>-1) {return true;}return false;}}
源码下载地址:http://download.csdn.net/detail/hfsu0419/4534209
